Column rendering in ASP.NET Core Grid component
1 Jul 202622 minutes to read
In ASP.NET Core DataGrid, column rendering provides you with the ability to finely control how data is presented. This allows you to manually define columns, automatically generate them, and dynamically customize data presentation. With column rendering, you can ensure that your data is displayed exactly as needed, offering a wide range of possibilities for organizing and showcasing information within the grid.
The column definitions are used as the DataSource schema in the grid. The grid operations such as sorting, filtering and grouping etc. are performed based on column definitions. The field property of grid column is necessary to map the datasource values in the grid columns.
- If the column
fieldis not specified in the dataSource, column values will be empty.- If the
fieldname contains dot operator, it is considered as complex binding.- It is must to define the
fieldproperty for a Template column, to perform CRUD or data Operations such as filtering, searching etc.
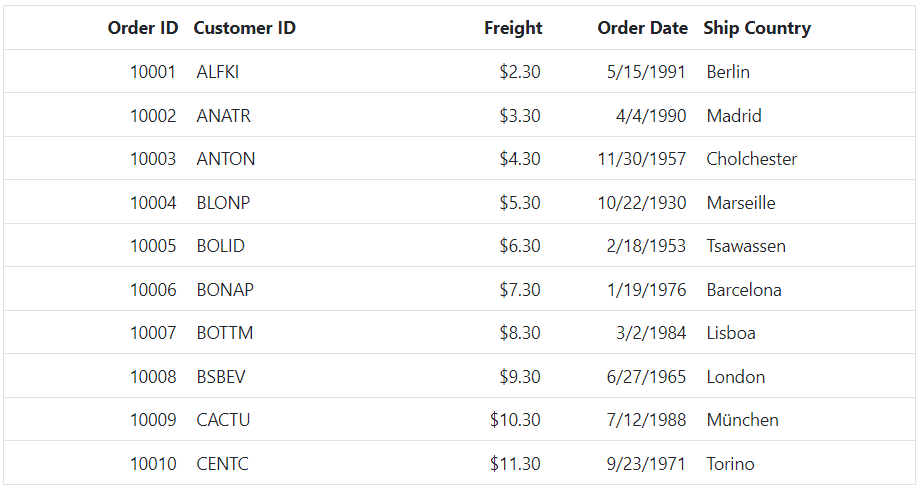
Define columns manually
To define columns manually in grid, you can use the e-grid-columns element to define the columns and represent each column with its respective properties such as field, headerText, type, and width set accordingly. This allows you to customize the column’s behavior and appearance based on the requirements.
Here’s an example code snippet that demonstrates how to define columns manually in the ASP.NET Core Grid:
<ejs-grid id="Grid" dataSource="@ViewBag.DataSource" height='315'>
    <e-grid-columns>
        <e-grid-column field='OrderID' headerText='Order ID' textAlign='Right' width="100"></e-grid-column>
        <e-grid-column field='CustomerID' headerText='Customer ID' width="120"></e-grid-column>
        <e-grid-column field='Freight' headerText='Freight' format='C2' textAlign='Right' width="80"></e-grid-column>
        <e-grid-column field='OrderDate' headerText='Order Date' format='yMd' textAlign='Right' width="80"></e-grid-column>
        <e-grid-column field='ShipCountry' headerText='Ship Country' width="80"></e-grid-column>
    </e-grid-columns>
</ejs-grid>
public IActionResult Index()
{
var Order = OrderDetails.GetAllRecords();
ViewBag.DataSource = Order;
return View();
}
Auto generated columns
The Grid automatically generates columns when the columns declaration is empty or undefined while initializing the grid. All the columns in the dataSource are bound as grid columns.
You can use the following code snippet to enable auto-generated columns in the Syncfusion® Grid:
<ejs-grid id="Grid" allowPaging=true dataSource="@ViewBag.DataSource">
</ejs-grid>
public IActionResult Index()
{
var Order = OrderDetails.GetAllRecords();
ViewBag.DataSource = Order;
return View();
}
- When the columns are auto-generated, the column
typeis determined from the first record of the dataSource.- If you have a large dataset, auto-generating columns can result in performance issues. In this case, it is recommended to specify the columns manually in the columns property during initialization or else use column virtualization feature by setting enableColumnVirtualization property value as true.
Set isPrimaryKey for auto generated columns when editing is enabled
When editing is enabled in the grid, you may need to set a primary key for auto-generated columns to uniquely identify each row for operations such as updating or deleting data. This can be achieved using the isPrimaryKey property of the column object by using the dataBound event.
By setting isPrimaryKey to true for an auto-generated column in the Syncfusion® Grid, you can specify it as the primary key column, which uniquely identifies each row when editing is enabled.
Here is an example code snippet that shows how to set a primary key for an auto-generated column when editing is enabled:
<ejs-grid id="Auto" dataSource="@ViewBag.dataSource" dataBound="dataBound">
    <e-grid-editSettings allowAdding="true" allowDeleting="true" allowEditing="true">
    </e-grid-editSettings>
</ejs-grid>
<script>
    function dataBound() {
        document.getElementById('Auto').ej2_instances[0].columns[0].isPrimaryKey = 'true';
    }
</script>
public IActionResult Index()
{
var Order = OrderDetails.GetAllRecords();
ViewBag.dataSource = Order;
return View();
}If the column field name is known, the getColumnByField method can be used to retrieve the column object. Then, the isPrimaryKey property can be set to true for that column, as demonstrated in the code snippet below:
onDataBound: function() {
    let grid = document.getElementById('Grid').ej2_instances[0];
    let column= grid.getColumnByField('OrderID');
    column.isPrimaryKey = true;
  }
Set column options to auto generated columns
To configure column options such as type, format and width for auto-generated columns in Syncfusion® Grid, you can use the dataBound event of the Grid component. This event is triggered after the data has been bound to the Grid. By handling this event, you can specify the desired column options for the auto-generated columns.
Here’s an example of how you can set column options for auto-generated columns using the dataBound event:
In the below example, width is set for OrderID column, date type is set for OrderDate column and format is set for Freight and OrderDate column.
<ejs-grid id="Grid" dataSource="@ViewBag.DataSource" dataBound="dataBound">
</ejs-grid>
<script>
    function dataBound() {
        const grid = document.getElementById('Auto').ej2_instances[0];
        for (const cols of grid.columns) {
            if (cols.field === 'OrderID') {
                cols.width = 120;
            }
            if (cols.field === 'OrderDate') {
                cols.type = 'date';
                cols.format = 'yMd';
            }
            if (cols.field === 'Freight') {
                cols.format = 'P2';
            }
        }
        grid.refreshColumns();
    }
</script>
public IActionResult Index()
{
var Order = OrderDetails.GetAllRecords();
ViewBag.DataSource = Order;
return View();
}Dynamic column generation
The Syncfusion® Grid component allows you to dynamically generate columns at runtime, based on the data provided. This feature is useful when you need to display data with varying columns based on user requirements or dynamic data sources.
Using valueAccessor property
Dynamic column generation using value accessor allows you to access and manipulate the display data values in a grid column. By using the valueAccessor property of a grid column, you can customize the display value of the column based on the data.
To use valueAccessor property, define the column with the property and provide a function that will return the formatted value. The function receives two arguments:
- field: represents the data field of the column.
- data: represents the data record for the corresponding row.
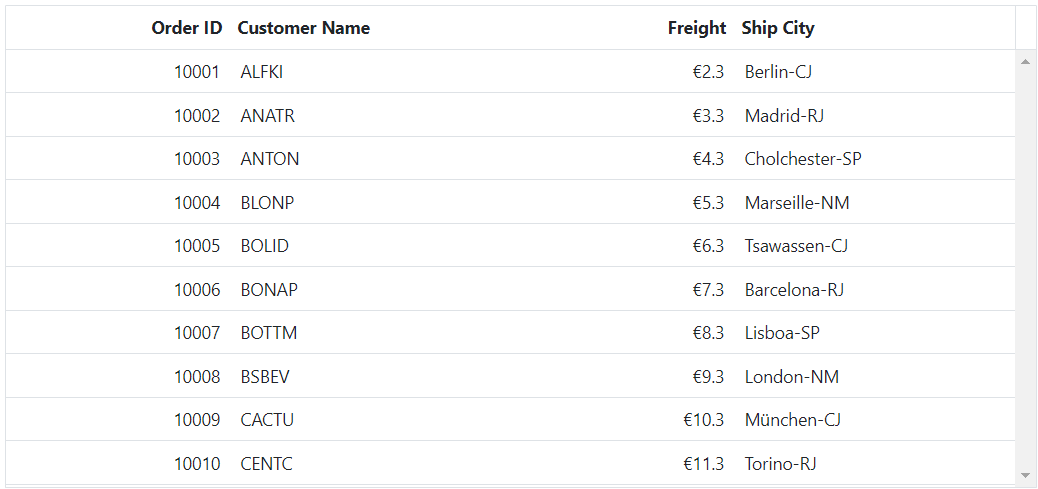
In the provided code, the currencyFormatter function takes the Freight value of the data object, appends the Euro symbol to it, and returns the formatted string. The concatenateFields function concatenates the ShipCity and ShipRegion values of the data object and returns the combined string.
@{
    var currencyFormatter = "currencyFormatterFn";
    var concatenateFields = "concatenateFieldsFn";
}
<ejs-grid id="grid" dataSource="@ViewBag.DataSource" height="350">
    <e-grid-columns>
        <e-grid-column field="OrderID" headerText="Order ID" width="100" textAlign="Right"></e-grid-column>
        <e-grid-column field="CustomerID" headerText="Customer Name" width="120"></e-grid-column>
        <e-grid-column field="Freight" headerText="Freight" textAlign="Right"  width="120"  valueAccessor="currencyFormatter" ></e-grid-column>
        <e-grid-column field="ShipCity" valueAccessor="concatenateFields" headerText="Ship City" width="150"></e-grid-column>
    </e-grid-columns>
</ejs-grid>

<script>
    function currencyFormatterFn(field, data) {
        return '€' + data['Freight']
    }

    function concatenateFieldsFn(field, data) {
        return data['ShipCity'] + '-' + data['ShipRegion']; // Assuming concatenation of ShipCity and ShipCountry
    }
</script>
public IActionResult Index()
{
var Order = OrdersDetails.GetAllRecords();
ViewBag.DataSource = Order;
return View();
}
The
valueAccessorfunction can have performance implications if it is used to access a large number of data records or to perform complex data manipulations. To avoid performance issues, you can enable the virtualization feature while using thevalueAccessorproperty. This ensures that only the visible rows are rendered, resulting in faster rendering times.
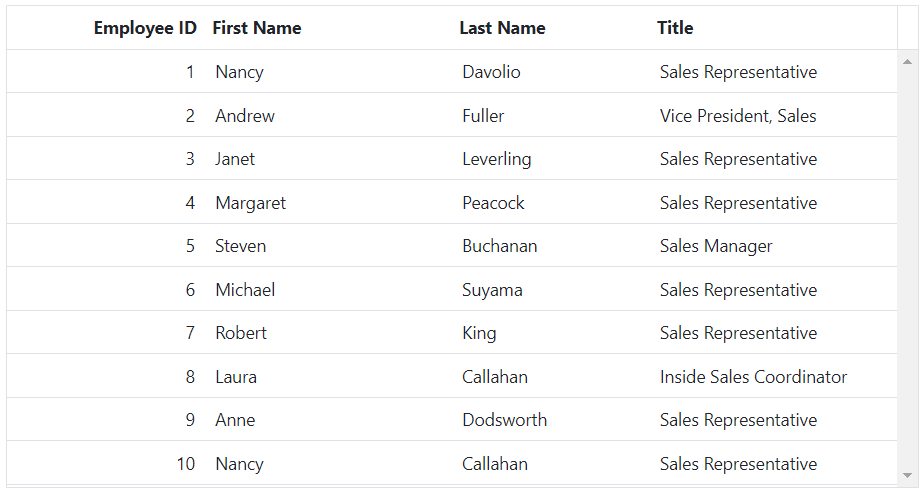
Display array type columns
The Grid component allows you to easily bind an array of objects to a column using the valueAccessor property. This property allows customization of how the data is displayed in the column.
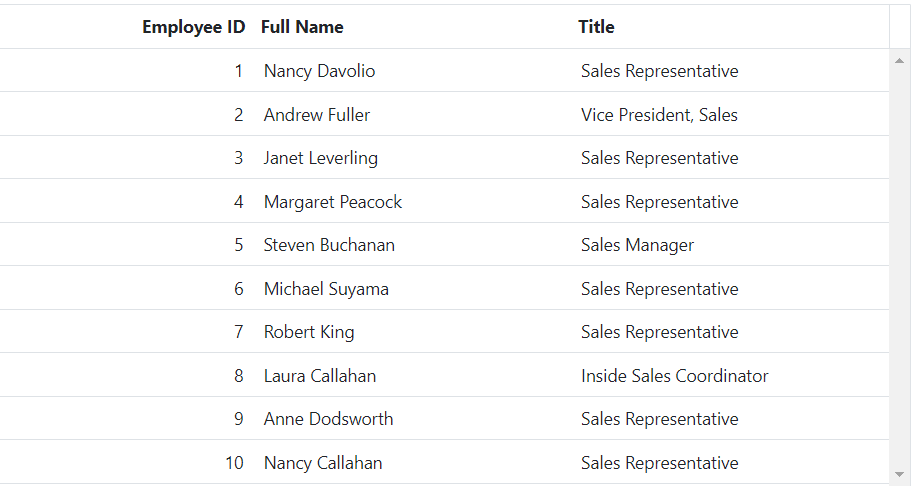
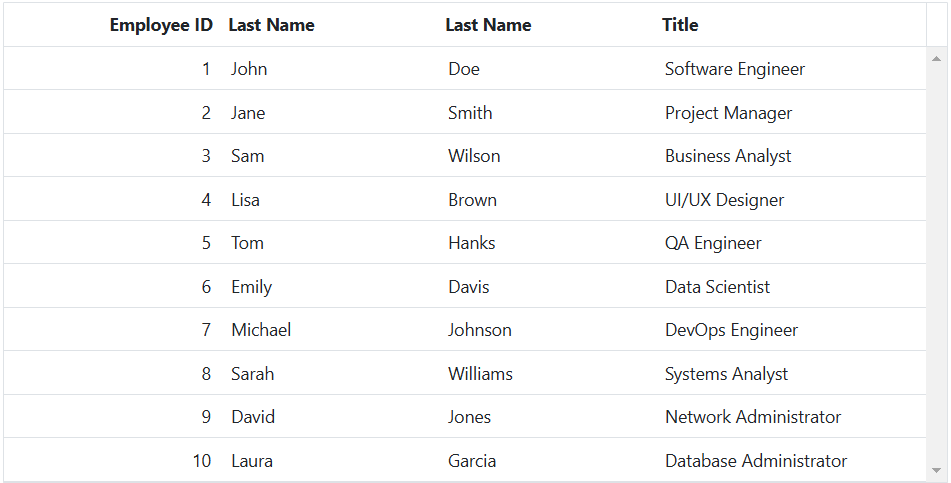
For example, consider a column named Name that contains an array of two objects, FirstName and LastName. The valueAccessor property can be used to join these two objects and bind them to the column.
This will display the concatenated value of FirstName and LastName in the Full Name column of the grid. Here’s an example of how this can be achieved:
@{
    var valueAccess = "valueAccessFn";
}
<ejs-grid id="Grid" dataSource="@ViewBag.DataSource" height="350" >
    <e-grid-columns>
        <e-grid-column field="EmployeeID" headerText="Employee ID" width="150" ></e-grid-column>
        <e-grid-column field="Name" headerText="Full Name" width="150"></e-grid-column>
        <e-grid-column field="Title" headerText="Title" width="150"></e-grid-column>
    </e-grid-columns>
</ejs-grid>
<script>
    function valueAccessFn(field, data) {
        return data[field].map((s) => { return s.LastName || s.FirstName; }).join(' ');
    }
</script>
public IActionResult Index()
{
var ComplexData = ComplexData.GetAllRecords();
ViewBag.DataSource = ComplexData;
return View();
}
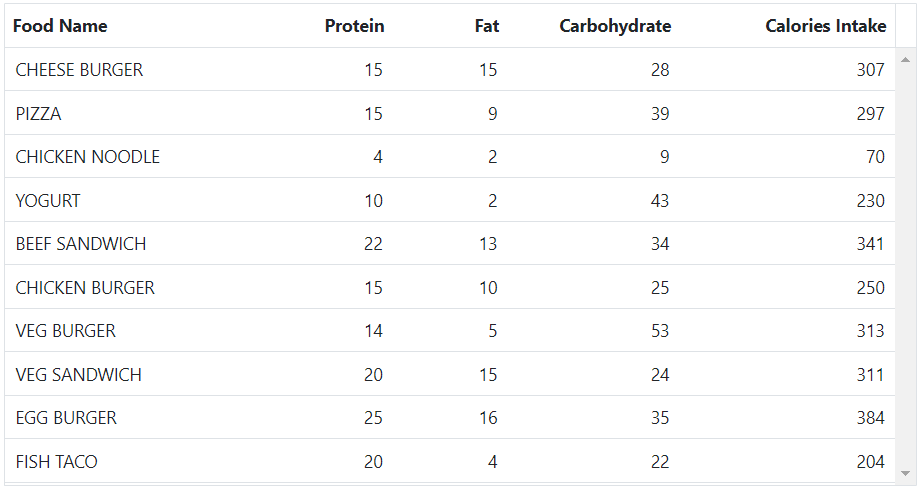
Expression column
You can achieve an expression column in the Grid by using the valueAccessor property. The valueAccessor property allows you to define a function that calculates the value for the expression column based on the values of other columns.
In this example, we have a grid with columns Food Name, Protein, Fat, and Carbohydrate. We want to add an expression column called Calories Intake that calculates the total calories for each row based on the values of Protein, Fat, and Carbohydrate columns.
@{
    var totalCalories = "totalCaloriesFn";
}

<ejs-grid id="ValueAccessor" dataSource="@ViewBag.DataSource" height="280">
    <e-grid-columns>
        <e-grid-column field='FoodName' headerText='Food Name' width=150></e-grid-column>
        <e-grid-column field='Protein' headerText='Protein' textAlign='Right' width=120></e-grid-column>
        <e-grid-column field='Fat' headerText='Fat' textAlign='Right' width=80></e-grid-column>
        <e-grid-column field='Carbohydrate' headerText='Carbohydrate' textAlign='Right' width=120></e-grid-column>
        <e-grid-column headerText='Calories Intake' textAlign='Right' valueAccessor='totalCalories' width=150></e-grid-column>
    </e-grid-columns>
</ejs-grid>

<script>
    function totalCaloriesFn(field, data) {
        return data.Protein * 4 + data.Fat * 9 + data.Carbohydrate * 4;
    }
</script>
public IActionResult Index()
{
var Order = FoodDetails.GetAllRecords();
ViewBag.DataSource = Order;
return View();
}
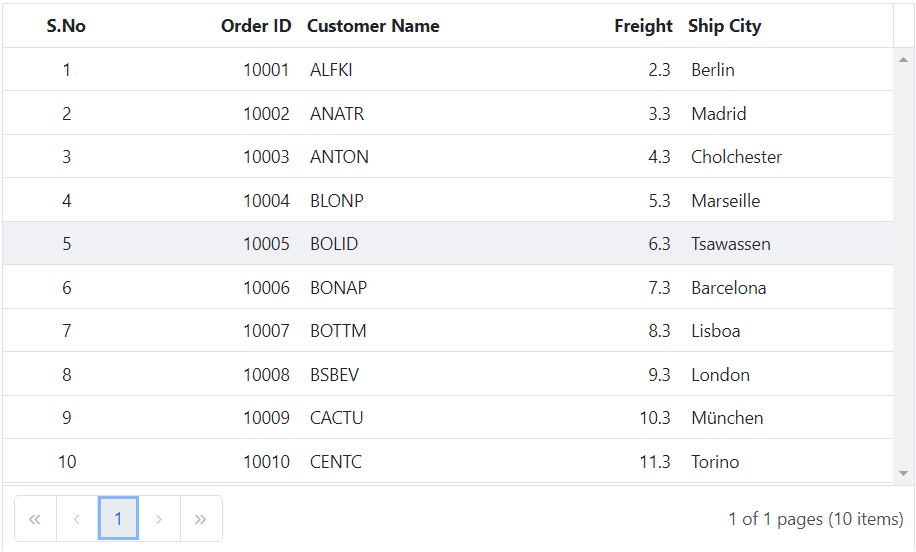
Display serial number
To display serial number in the grid for every rows, you can use the rowDataBound event. The rowDataBound event is triggered for each row in the grid when the data is bound to the grid.
Within the event handler, the pagesize and currentPage index can be obtained from the grid’s pageSettings property. Using these values, the serial number can be calculated based on the page size, current page, and row index. Finally, the calculated serial number can be set as the innerHTML of the corresponding row cell.
Here is an example code snippet that demonstrates how to display serial numbers in a Syncfusion® Grid using rowDataBound event:
<ejs-grid id="Grid" dataSource="@ViewBag.dataSource" height="350" rowDataBound='rowDataBound' allowPaging="true">
    <e-grid-columns>
        <e-grid-column headerText='S.No' width=90 textAlign='Center'></e-grid-column>
        <e-grid-column field="OrderID" headerText="Order ID" width="100" textAlign="Right"></e-grid-column>
        <e-grid-column field="CustomerID" headerText="Customer Name" width="120"></e-grid-column>
        <e-grid-column field="Freight" headerText="Freight" textAlign="Right" width="120" ></e-grid-column>
        <e-grid-column field="ShipCity" headerText="Ship City" width="150"></e-grid-column>
    </e-grid-columns>
</ejs-grid>
<script>
    function rowDataBound (args) {
        let grid = document.getElementById('Grid').ej2_instances[0];
        if (args.row) {
            var rowIndex = parseInt(args.row.getAttribute('aria-rowIndex'));
            var currentPageNumber = grid.pageSettings.currentPage;
            var pageSize = grid.pageSettings.pageSize;
            var startIndex = (currentPageNumber - 1) * pageSize;
            args.row.querySelector('.e-rowcell').innerHTML = (
                startIndex + rowIndex
            ).toString();
        }
    }
</script>
public IActionResult Index()
{
var Order = OrdersDetails.GetAllRecords();
ViewBag.dataSource = Order;
return View();
}
Complex data binding
The Syncfusion® Grid component allows you to achieve complex data binding by using the dot (.) operator in the column.field. This feature is particularly useful when dealing with nested or complex data structures.
Using local data
To enable complex data binding in the Grid component using local data, use the dot (.) operator in the field property of the column. Here is an example of how to achieve complex data binding using local data:
In the below example, we have bound the nested Employee object’s FirstName and LastName properties using the dot (.) operator.
<ejs-grid id="Grid" dataSource="@ViewBag.data" height="315" >
    <e-grid-columns>
        <e-grid-column field="EmployeeID" headerText="Employee ID" width="120" textAlign="Right"></e-grid-column>
        <e-grid-column field="Name.FirstName" headerText="Last Name" width="120"></e-grid-column>
        <e-grid-column field="Name.LastName"  headerText="Last Name" width="120"></e-grid-column>
        <e-grid-column field="Title" headerText="Title" width="150"></e-grid-column>
    </e-grid-columns>
</ejs-grid>
public IActionResult Index()
{
var ComplexData = ComplexData.GetAllRecords();
ViewBag.data = ComplexData;
return View();
}
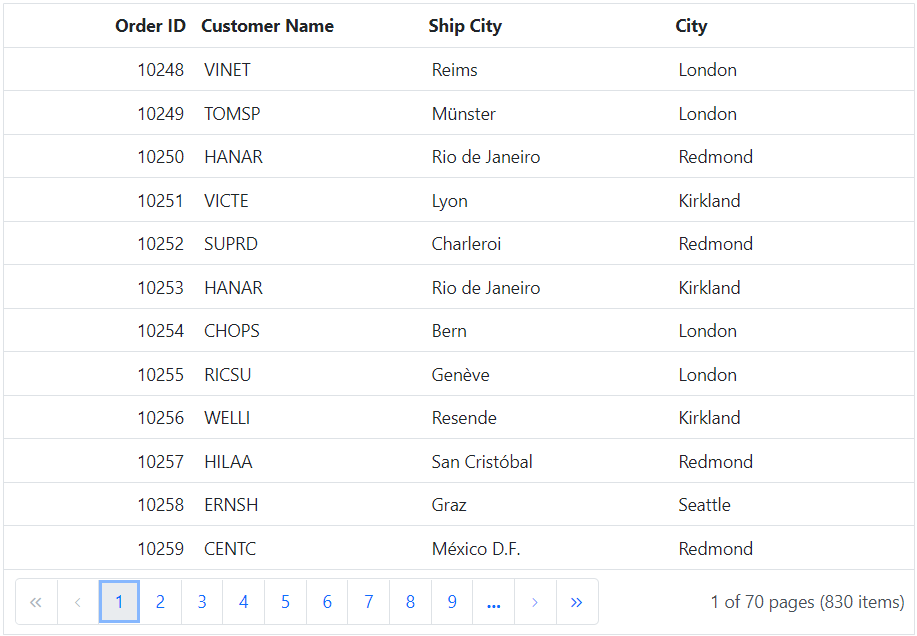
Using remote data
To enable complex data binding in the Grid component using remote data, add the expand query to the query property of the Grid, to eager load the complex data. Here is an example of how to achieve complex data binding using remote data:
In the below example, we have used the expand query to load the nested Employee object’s City property using the dot (.) operator.
<ejs-grid id="Grid" allowPaging='true' query="new ej.data.Query().expand('Employee')"  >
  <e-data-manager url="https://services.odata.org/V4/Northwind/Northwind.svc/Orders/" crossdomain="true" adaptor="ODataV4Adaptor"></e-data-manager>
    <e-grid-columns>
        <e-grid-column field="OrderID" headerText="Order ID" width="100"></e-grid-column>
        <e-grid-column field="CustomerID" headerText="Customer Name" width="120"></e-grid-column>
        <e-grid-column field="ShipCity" headerText="Ship City" width="130"></e-grid-column>
        <e-grid-column field="Employee.City" headerText="City" width="130"></e-grid-column>
    </e-grid-columns>
</ejs-grid>
public IActionResult Index()
{
var Order = OrderDetails.GetAllRecords();
ViewBag.DataSource = Order;
return View();
}
Complex data binding with list of array of objects
The Syncfusion® Grid supports complex data binding with lists of arrays of objects. This feature allows you to bind complex data with multiple levels of nested objects and arrays to the Grid.
The following example shows how to set complex field for datasource having array of objects.
<ejs-grid id="grid" dataSource="@ViewBag.DataSource" height="315px" >
    <e-grid-columns>
        <e-grid-column field="EmployeeID" headerText="Employee ID" width="120" textAlign="Right"></e-grid-column>
        <e-grid-column field="Names.0.FirstName" headerText="Last Name" width="120"></e-grid-column>
        <e-grid-column field="Names.0.LastName" headerText="Last Name" width="120"></e-grid-column>
        <e-grid-column field="Title" headerText="Title" width="150"></e-grid-column>
    </e-grid-columns>
</ejs-grid>
public IActionResult Index()
{
ViewBag.DataSource = ComplexData.GetAllRecords();
return View();
}
How to set complex column as foreign key column
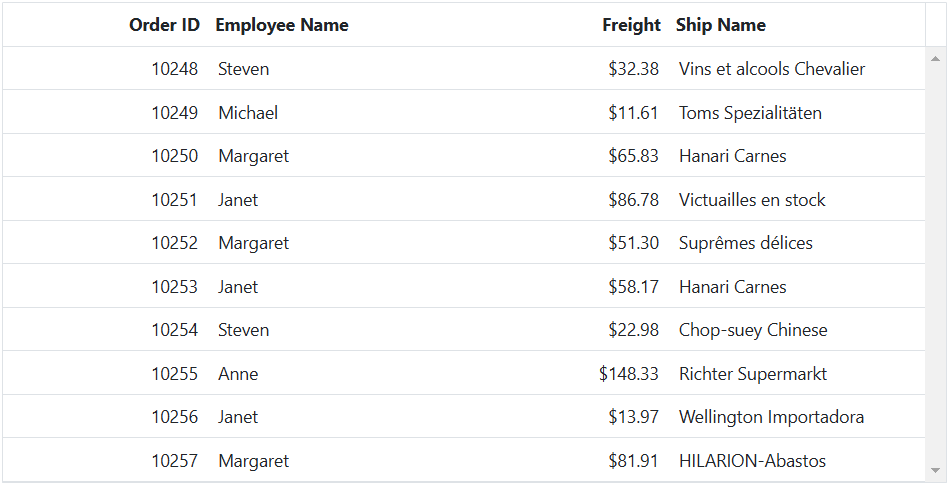
The Syncfusion® Grid control provides the ability to set complex columns as foreign key columns. This allows you to display related data from a foreign data source based on the complex column value.
The following example demonstrates how to set the Employee.EmployeeID column as a foreign key column, and display the FirstName column from the foreign data.
<ejs-grid id="grid" dataSource="@ViewBag.DataSource" height="348px">
    <e-grid-columns>
        <e-grid-column field="OrderID" headerText="Order ID" isPrimaryKey="true" textAlign="Right" width="120"></e-grid-column>
        <e-grid-column field="Employee.EmployeeID" foreignKeyField= "EmployeeID" headerText="Employee Name" foreignKeyValue="FirstName" dataSource="ViewBag.EmployeeData" width="150"></e-grid-column>
        <e-grid-column field="Freight" headerText="Freight" textAlign="Right" format="C2" width="120"></e-grid-column>
        <e-grid-column field="ShipName" headerText="Ship Name" width="150"></e-grid-column>
    </e-grid-columns>
 </ejs-grid>
public IActionResult DefaultExporting()
{
ViewBag.DataSource = OrdersDetails.GetAllRecords();
ViewBag.EmployeeData = EmployeeView.GetAllRecords();
return View();
}