Paging in ASP.NET Core Grid component
3 Feb 202524 minutes to read
Paging provides an option to display grid data in segmented pages, making it easier to navigate through large datasets. This feature is particularly useful when dealing with extensive data sets.
To enable paging, you need to set the allowPaging property to true. This property determines whether paging is enabled or disabled for the grid. When paging is enabled, a pager component rendered at the bottom of the grid, allowing you to navigate through different pages of data.
Paging options can be configured through the pageSettings property. The pageSettings object allows you to control various aspects of paging, such as the page size, current page, and total number of records.
You can achieve better performance by using grid paging to fetch only a pre-defined number of records from the data source.
Customize the pager options
Customizing the pager options in the Syncfusion® Grid allows you to tailor the pagination control according to your specific requirements. You can customize the pager to display the number of pages using the pageCount property, change the current page using currentPage property, display the number of records in the grid using the pageSize property, and even adjust the page sizes in a dropdown using the pageSizes property. Additionally, you can include the current page as a query string in the URL for convenient navigation.
Change the page size
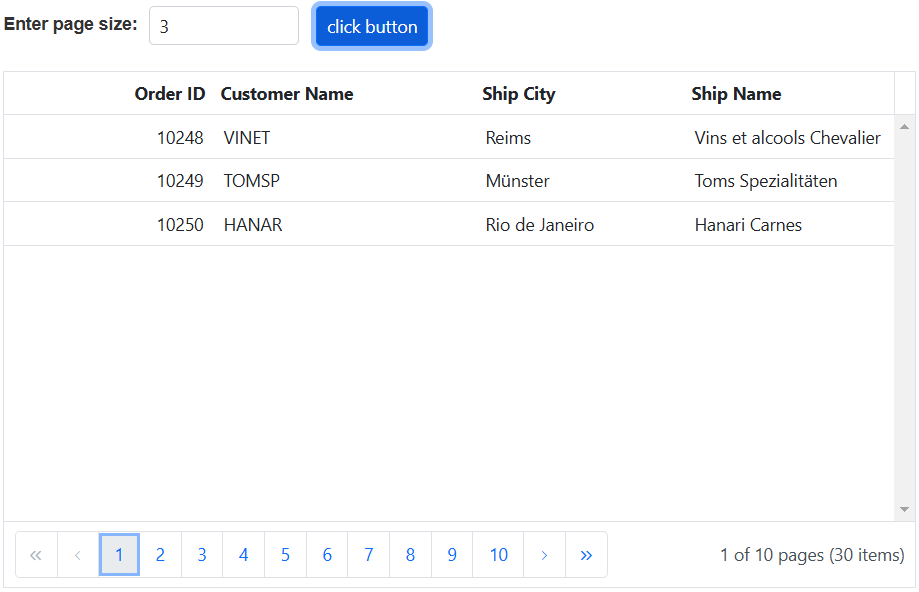
The Syncfusion® Grid allows you to control the number of records displayed per page, providing you with flexibility in managing your data. This feature is particularly useful when you want to adjust the amount of data visible to you at any given time. To achieve this, you can utilize the pageSettings.pageSize property. This property is used to specify the initial number of records to display on each page. The default value of pageSize property is 12.
The following example demonstrates how to change the page size of a Grid using an external button click based on TextBoxinput.
<div style="padding-bottom: 20px">
    <label style="padding: 30px 5px 0 0;font-weight: bold">Enter page size:</label>
    <ejs-textbox id="inputTextBox" width="120px"></ejs-textbox>
    <ejs-button id="buttons" cssClass="e-primary custom" content="click button"></ejs-button>
</div>
<ejs-grid id="grid" dataSource="@ViewBag.dataSource" allowPaging="true" height="325">
    <e-grid-columns>
        <e-grid-column field="OrderID" headerText="Order ID" textAlign="Right" width="120"></e-grid-column>
        <e-grid-column field="CustomerID" headerText="Customer Name" width="150"></e-grid-column>
        <e-grid-column field="ShipCity" headerText="Ship City" width="150"></e-grid-column>
        <e-grid-column field="ShipName" headerText="Ship Name" width="150"></e-grid-column>
    </e-grid-columns>
</ejs-grid>
<script>
    document.getElementById('buttons').onclick = function () {
        var grid = document.getElementById("grid").ej2_instances[0];
        var textBoxdocument.getElementById("inputTextBox").ej2_instances[0];
        if(textBox.value){
           grid.pageSettings.pageSize = parseInt(textBox.value, 10);
        }
    }
</script>
<style>
    .custom{
        margin-left: 10px;
    }
</style>
public IActionResult Index()
{
ViewBag.dataSource = OrderDetails.GetAllRecords();
return View();
}
Change the page count
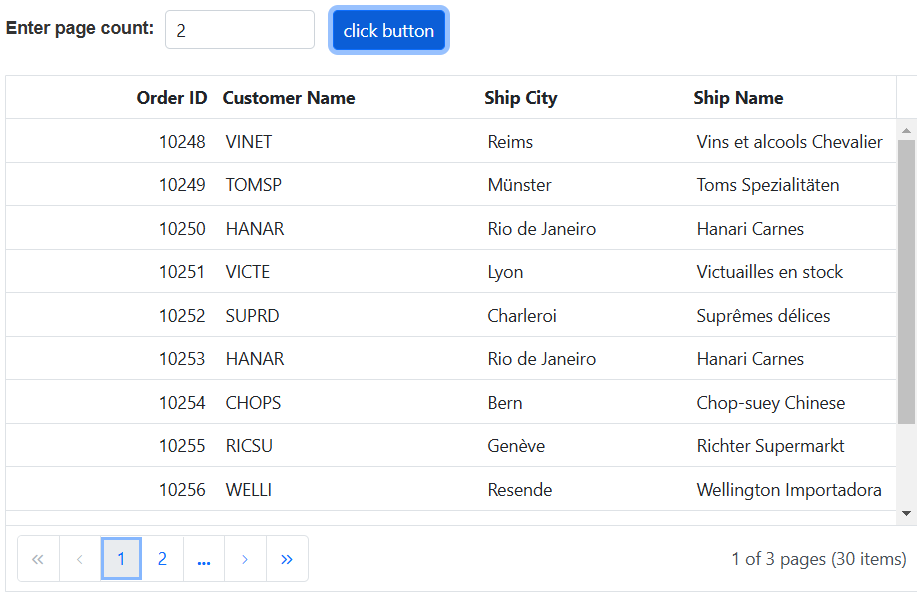
The Syncfusion® Grid allows you to adjust the number of pages displayed in the pager container. This is useful when you want to manage the number of pages you see while navigating through extensive datasets. The default value of pageCount property is 8.
To change the page count in the Syncfusion® Grid, you can utilize the pageSettings.pageCount property, which defines the number of pages displayed in the pager container.
The following example demonstrates how to change the page count of a Grid using an external button click based on TextBox input.
<div style="padding-bottom: 20px">
    <label style="padding: 30px 5px 0 0;font-weight: bold">Enter page count:</label>
    <ejs-textbox id="inputTextBox" width="120px"></ejs-textbox>
    <ejs-button id="buttons" cssClass="e-primary custom" content="click button"></ejs-button>
</div>
<ejs-grid id="grid" dataSource="@ViewBag.dataSource" allowPaging="true" height="325">
    <e-grid-columns>
        <e-grid-column field="OrderID" headerText="Order ID" textAlign="Right" width="120"></e-grid-column>
        <e-grid-column field="CustomerID" headerText="Customer Name" width="150"></e-grid-column>
        <e-grid-column field="ShipCity" headerText="Ship City" width="150"></e-grid-column>
        <e-grid-column field="ShipName" headerText="Ship Name" width="150"></e-grid-column>
    </e-grid-columns>
</ejs-grid>
<script>
    document.getElementById('buttons').onclick = function () {
        var grid = document.getElementById("grid").ej2_instances[0];
        var textBox=document.getElementById("inputTextBox").ej2_instances[0];
        if(textBox.value){
            grid.pageSettings.pageCount = parseInt(textBox.value, 10);
        }
    }
</script>
<style>
    .custom{
        margin-left: 10px;
    }
</style>
public IActionResult Index()
{
ViewBag.dataSource = OrderDetails.GetAllRecords();
return View();
}
Change the current page
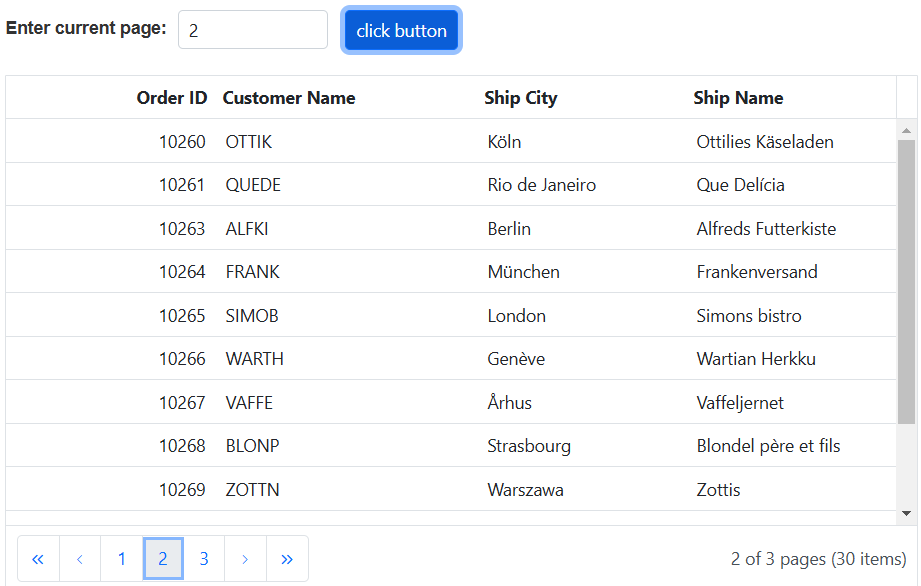
The Syncfusion® Grid allows you to change the currently displayed page, which can be particularly useful when you need to navigate through different pages of data either upon the initial rendering of the grid or update the displayed page based on interactions or specific conditions. The default value of currentPage property is 1.
To change the current page in the Syncfusion® Grid, you can utilize the pageSettings.currentPage property, which defines the current page number of the pager.
The following example demonstrates how to dynamically change the current page using an external button click based on TextBox input:
<div style="padding-bottom: 20px">
    <label style="padding: 30px 5px 0 0;font-weight: bold">Enter current page:</label>
    <ejs-textbox id="inputTextBox" width="120px"></ejs-textbox>
    <ejs-button id="buttons" cssClass="e-primary custom" content="click button"></ejs-button>
</div>
<ejs-grid id="grid" dataSource="@ViewBag.dataSource" allowPaging="true" height="325px">
    <e-grid-columns>
        <e-grid-column field="OrderID" headerText="Order ID" textAlign="Right" width="120"></e-grid-column>
        <e-grid-column field="CustomerID" headerText="Customer Name" width="150"></e-grid-column>
        <e-grid-column field="ShipCity" headerText="Ship City" width="150"></e-grid-column>
        <e-grid-column field="ShipName" headerText="Ship Name" width="150"></e-grid-column>
    </e-grid-columns>
</ejs-grid>
<script>
    document.getElementById('buttons').onclick = function () {
        var grid = document.getElementById("grid").ej2_instances[0];
        var textBox=document.getElementById("inputTextBox").ej2_instances[0];
        if(textBox.value){
            grid.pageSettings.currentPage = parseInt(textBox.value, 10);
        }
    }
</script>
<style>
    .custom{
        margin-left: 10px;
    }
</style>
public IActionResult Index()
{
ViewBag.dataSource = OrderDetails.GetAllRecords();
return View();
}
Add current page in URL as a query string
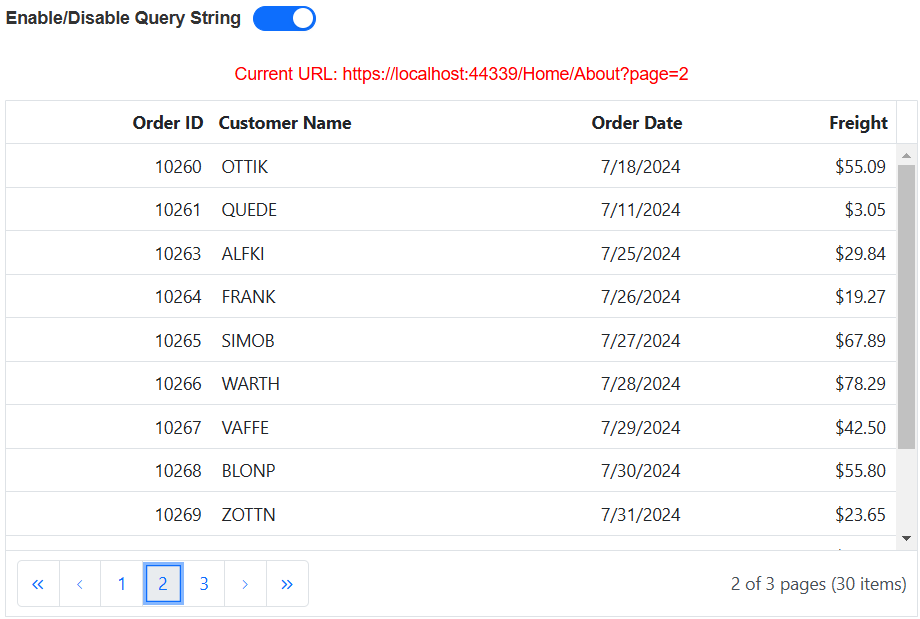
The Syncfusion® Grid allows you to include the current page information as a query string in the URL. This feature is particularly useful for scenarios where you need to maintain and share the state of the grid’s pagination.
To add the current page detail to the URL as a query string in the Syncfusion® Grid, you can enable the enableQueryString property. When this property is set to true, it will automatically pass the current page information as a query string parameter along with the URL when navigating to other pages within the grid.
By enabling the
enableQueryStringproperty, you can easily copy the URL of the current page and share it with others. When the shared URL is opened, it will load the grid with the exact page that was originally shared.
In the following example, the EJ2 Toggle Switch Button component is added to enable or disable the addition of the current page to the URL as a query string. When the switch is toggled, the change event is triggered and the enableQueryString property of the grid is updated accordingly.
<div style="padding: 0px 0px 20px 0px; display:flex">
    <label style="margin-top: -3px;padding: 0px 10px 0px 0px;font-weight: bold">Enable/Disable Query String</label>
    <ejs-switch id="switch" change="toggleQueryString"></ejs-switch>
</div>
<p id="message"></p>
<ejs-grid id="grid" dataSource="@ViewBag.dataSource" allowPaging="true" height="325" actionBegin="onActionBegin">
    <e-grid-columns>
        <e-grid-column field="OrderID" headerText="Order ID" textAlign="Right" width="120"></e-grid-column>
        <e-grid-column field="CustomerID" headerText="Customer Name" width="150"></e-grid-column>
        <e-grid-column field="OrderDate" headerText="Order Date" format="yMd" width="150"></e-grid-column>
        <e-grid-column field="Freight" headerText="Freight" format="C2" width="150"></e-grid-column>
    </e-grid-columns>
</ejs-grid>
<script>
    function onActionBegin(args) {
        var grid = document.getElementById("grid").ej2_instances[0];
        if (args.requestType === "paging" && grid.pageSettings.enableQueryString) {
         document.getElementById("message").innerText = "Current URL: " + window.location.href;
        }
    }
   function toggleQueryString(args) {
        var grid = document.getElementById("grid").ej2_instances[0];
        grid.pageSettings.enableQueryString = args.checked;
   }
</script>
<style>
    #message {
        color: red;
        text-align: center;
    }
</style>
public IActionResult Index()
{
ViewBag.dataSource = OrderDetails.GetAllRecords();
return View();
}
Pager template
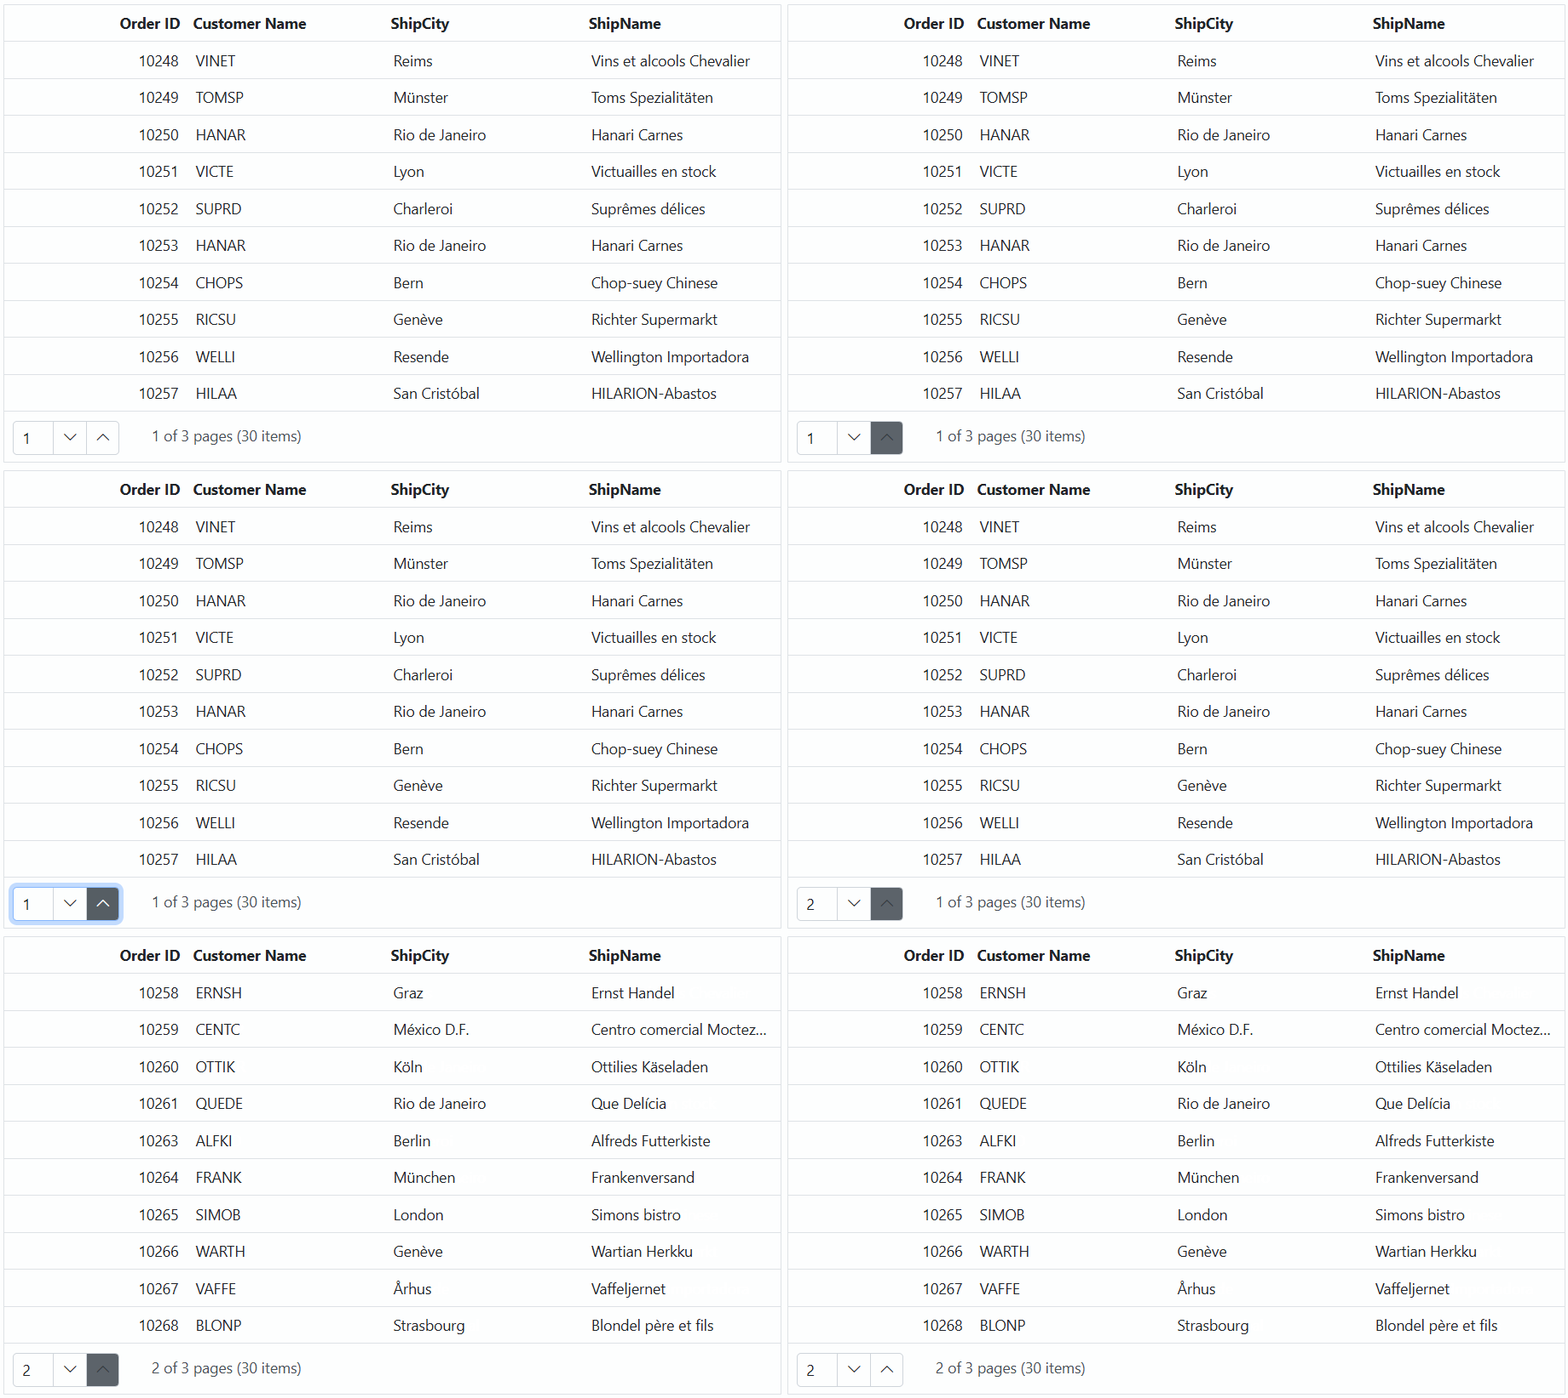
The pager template in Syncfusion® Grid allows you to customize the appearance and behavior of the pager element, which is used for navigation through different pages of grid data. This feature is particularly useful when you want to use custom elements inside the pager instead of the default elements.
To use the pager template, you need to specify the pagerTemplate property in your Syncfusion® Grid configuration. The pagerTemplate property allows you to define a custom template for the pager. Within the template, you can access the currentPage, pageSize, pageCount, totalPage and totalRecordCount values.
The following example demonstrates how to render a NumericTextBox component in the pager using the pagerTemplate property:
<ejs-grid id="Grid" dataSource="@ViewBag.dataSource" dataBound="dataBound" pagerTemplate="#pagerTemplate" actionComplete="actionComplete" allowPaging="true">
    <e-grid-pagesettings pageSize=10>
    </e-grid-pagesettings>
    <e-grid-columns>
        <e-grid-column field="OrderID" headerText="Order ID" textAlign="Right" width="120"></e-grid-column>
        <e-grid-column field="CustomerID" headerText="Customer Name" width="150"></e-grid-column>
        <e-grid-column field="ShipCity" headerText="Ship City" width="150"></e-grid-column>
        <e-grid-column field="ShipName" headerText="Ship Name" width="150"></e-grid-column>
    </e-grid-columns>
</ejs-grid>
<script>
    function updateTemplate() {
        var numeric;
        var grid = document.getElementById("Grid").ej2_instances[0];
        numeric = new ej.inputs.NumericTextBox({
            min: 1,
            max: 3,
            step: 1,
            width: 100,
            format: '###.##',
            change: function (args) {
                grid.pageSettings = { currentPage: args.value };
            }
        });
        numeric.appendTo('#currentPage');
    };
    var flag = true;
    function dataBound() {
        if (flag) {
            flag = false;
            updateTemplate();
        }
    }
    function actionComplete(args) {
        if (args.requestType === 'paging') {
            updateTemplate();
        }
    }
</script>
<script id="pagerTemplate" type="text/x-template">
    <div class="e-pagertemplate">
        <div>
            <div class="content-wrapper">
                <input id="currentPage" type="text" value=${currentPage}>
            </div>
        </div>
        <div id="totalPages" class="e-pagertemplatemessage" style="margin-top:5px;margin-left:30px;border: none; display: inline-block ">
            <span class="e-pagenomsg">${currentPage} of ${totalPages} pages (${totalRecordsCount} items)</span>
        </div>
    </div>
</script>
public IActionResult Index()
{
ViewBag.dataSource = OrderDetails.GetAllRecords();
return View();
}
Pager with page size dropdown
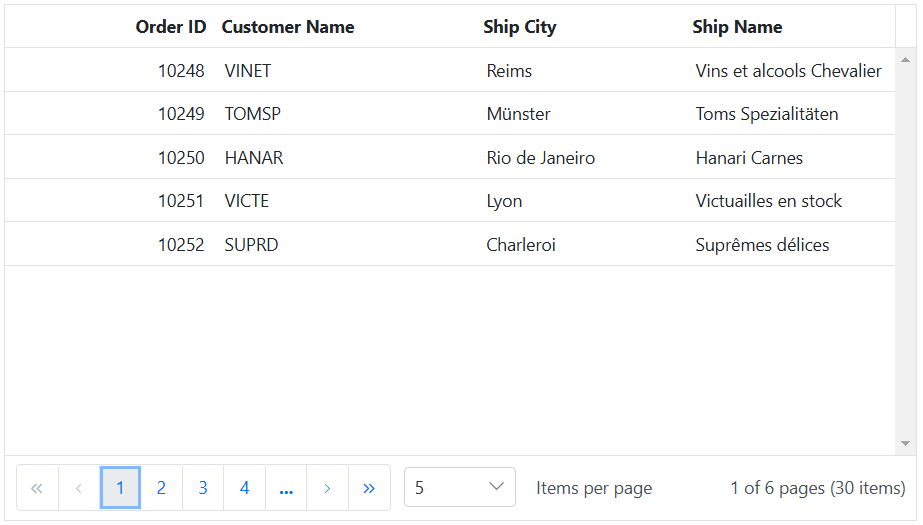
The pager with a page size dropdown in Syncfusion® Grid allows you to dynamically change the number of records displayed in the grid. This feature is useful when you want to easily customize the number of records to be shown per page.
To enable the page size dropdown feature in the Syncfusion® Grid, you need to set the pageSettings.pageSizes property to true in the grid configuration. This property configuration triggers the rendering of a dropdown list within the pager, allowing you to select the desired page size. The selected page size determines the number of records displayed on each page of the grid.
The following example that demonstrates how to integrate the page size dropdown feature by configuring the pageSizes property:
<ejs-grid id="grid" dataSource="@ViewBag.dataSource" allowPaging="true" height="325px">
    <e-grid-pagesettings pageSizes="true" pageSize=10>
    </e-grid-pagesettings>
    <e-grid-columns>
        <e-grid-column field="OrderID" headerText="Order ID" textAlign="Right" width="120"></e-grid-column>
        <e-grid-column field="CustomerID" headerText="Customer Name" width="150"></e-grid-column>
        <e-grid-column field="ShipCity" headerText="Ship City" width="150"></e-grid-column>
        <e-grid-column field="ShipName" headerText="Ship Name" width="150"></e-grid-column>
    </e-grid-columns>
</ejs-grid>
public IActionResult Index()
{
ViewBag.dataSource = OrderDetails.GetAllRecords();
return View();
}
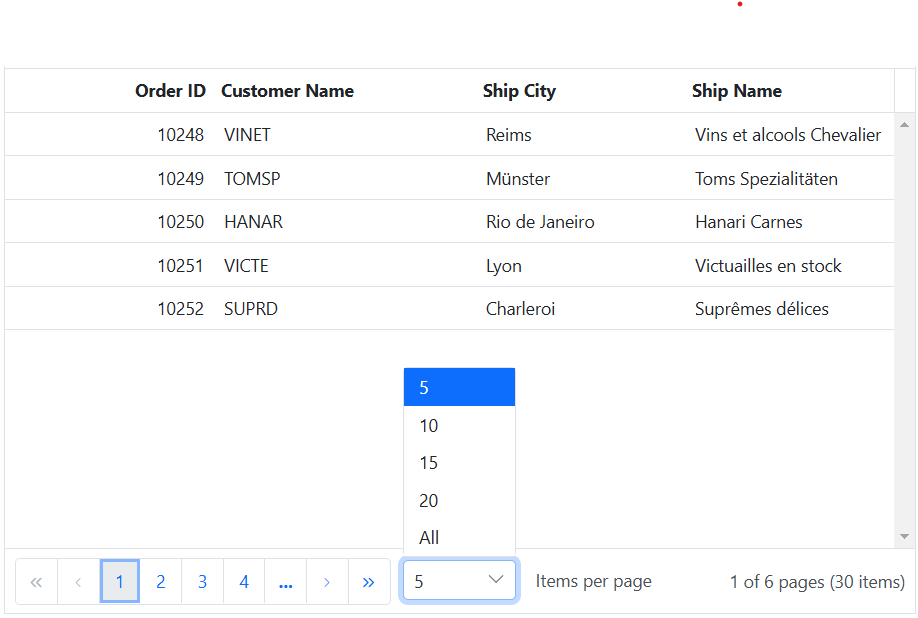
If the
pageSizesproperty is set to a boolean value like ‘true’ or ‘false,’ the page size dropdown defaults to an array of strings containing options such as [‘All’, ‘5’, ‘10’, ‘15’, ‘20’].
Customize page size dropdown
The Syncfusion® Grid allows you to customize the default values of the page size dropdown in the pager, allowing you to change the number of records displayed per page. To achieve this, you can define the pageSizes property as an array of string instead of boolean value.
The following example demonstrate how to customize the default values of the pager dropdown using the pageSizes property:
<ejs-grid id="grid" dataSource="@ViewBag.dataSource" allowPaging="true" height="348">
    <e-grid-pagesettings pageSizes="@(new string[] { "5", "10", "15", "20", "All"  })" pageSize=10>
    </e-grid-pagesettings>
    <e-grid-columns>
        <e-grid-column field="OrderID" headerText="Order ID" textAlign="Right" width="120"></e-grid-column>
        <e-grid-column field="CustomerID" headerText="Customer Name" width="150"></e-grid-column>
        <e-grid-column field="ShipCity" headerText="Ship City" width="150"></e-grid-column>
        <e-grid-column field="ShipName" headerText="Ship Name" width="150"></e-grid-column>
    </e-grid-columns>
</ejs-grid>
public IActionResult Index()
{
ViewBag.dataSource = OrderDetails.GetAllRecords();
return View();
}
The
pageSizesproperty can be configured with either an array of strings or a boolean value.
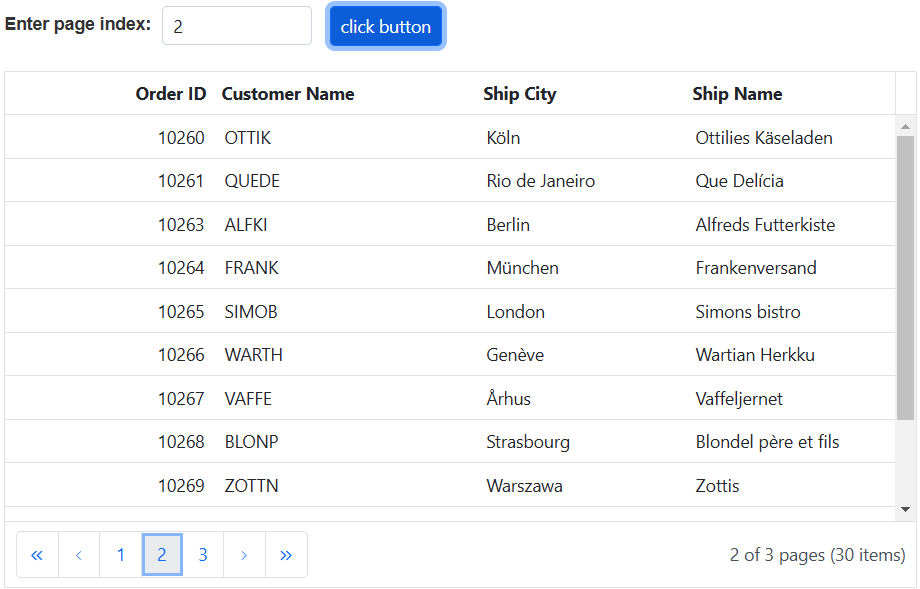
How to navigate to particular page
Navigating to a particular page in the Syncfusion® Grid is particularly useful when dealing with large datasets. It provides a quick and efficient way to jump to a specific page within the grid.
To achieve page navigation, you can use the goToPage method provided by Syncfusion® Grid. This method allows you to programmatically navigate to a specific page within the grid.
The following example demonstrates how to dynamically navigate to a particular page using the goToPage method triggered by an external button click based on TextBox input:
<div style="padding-bottom: 20px">
    <label style="padding: 30px 5px 0 0;font-weight: bold">Enter page index:</label>
    <ejs-textbox id="inputTextBox" width="120px"></ejs-textbox>
    <ejs-button id="buttons" cssClass="e-primary custom" content="click button"></ejs-button>
</div>
<ejs-grid id="grid" dataSource="@ViewBag.dataSource" allowPaging="true" height="325px">
    <e-grid-columns>
        <e-grid-column field="OrderID" headerText="Order ID" textAlign="Right" width="120"></e-grid-column>
        <e-grid-column field="CustomerID" headerText="Customer Name" width="150"></e-grid-column>
        <e-grid-column field="ShipCity" headerText="Ship City" width="150"></e-grid-column>
        <e-grid-column field="ShipName" headerText="Ship Name" width="150"></e-grid-column>
    </e-grid-columns>
</ejs-grid>
<script>
    document.getElementById('buttons').onclick = function () {
        var grid = document.getElementById("grid").ej2_instances[0];
        var textBox=document.getElementById("inputTextBox").ej2_instances[0];
        if(textBox.value){
           grid.pagerModule.goToPage(parseInt(textBox.value, 10))
        }
    }
</script>
<style>
    .custom{
        margin-left: 10px;
    }
</style>
public IActionResult Index()
{
ViewBag.dataSource = OrderDetails.GetAllRecords();
return View();
}
How to get the pager element
You can get pager element in the Syncfusion® Grid. This allows you to customize the pager’s appearance or behavior to meet the requirements of your application.
getPager- This method allows you to obtain a reference to the pager element within the Syncfusion® Grid. It returns an HTML element representing the pager.
    var grid = document.getElementById("grid").ej2_instances[0];
    grid.getPager()
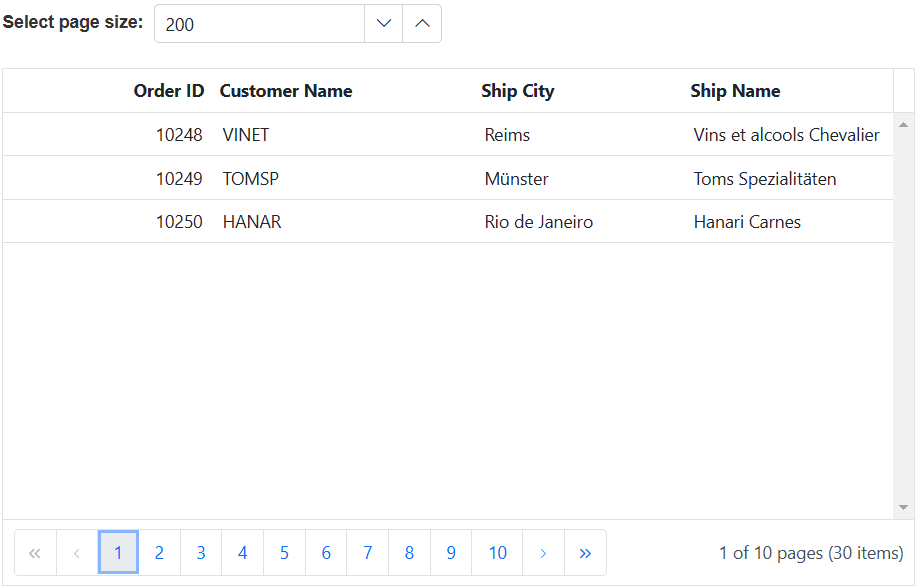
Dynamically calculate page size based on element height
You have an option to dynamically calculate the page size of a grid by considering the height of its parent element. This functionality proves invaluable in ensuring that the grid’s content remains within the available space, preventing the need for excessive scrolling. It primarily serves the purpose of automatically adjusting the pageSize when the height of the grid’s parent element changes dynamically. Upon each alteration in the parent element’s height, invoking this method will compute the grid’s pageSize and present the current page records accordingly. This feature effectively addresses situations where a static pageSize value does not cater to the varying heights of different parent elements, preventing any unwanted empty spaces within the grid.
To achieve page size calculation based on an element’s height in the Grid, you can utilize the calculatePageSizeByParentHeight method. This method calculates the page size based on the height of the parent element.
The following example demonstrates how to calculate the page size based on element height using the calculatePageSizeByParentHeight method triggered by a change event based on the NumericTextBox input:
<div style="padding-bottom: 20px">
    <label style="padding: 30px 5px 0 0;font-weight: bold">Select page size:</label>
    <ejs-numerictextbox id="numeric" width="230px" format="####.##" min=150 step=50 placeholder="select container height" change="calculatePageSize"></ejs-numerictextbox>
</div>
<ejs-grid id="grid" dataSource="@ViewBag.dataSource" allowPaging="true" height="325">
    <e-grid-columns>
        <e-grid-column field="OrderID" headerText="Order ID" textAlign="Right" width="120"></e-grid-column>
        <e-grid-column field="CustomerID" headerText="Customer Name" width="150"></e-grid-column>
        <e-grid-column field="ShipCity" headerText="Ship City" width="150"></e-grid-column>
        <e-grid-column field="ShipName" headerText="Ship Name" width="150"></e-grid-column>
    </e-grid-columns>
</ejs-grid>
<script>
    function calculatePageSize(args) {
        var grid = document.getElementById("grid").ej2_instances[0];
        grid.pageSettings.pageSize =  grid.calculatePageSizeByParentHeight(args.value.toString());
    }
</script>
public IActionResult Index()
{
ViewBag.dataSource = OrderDetails.GetAllRecords();
return View();
}
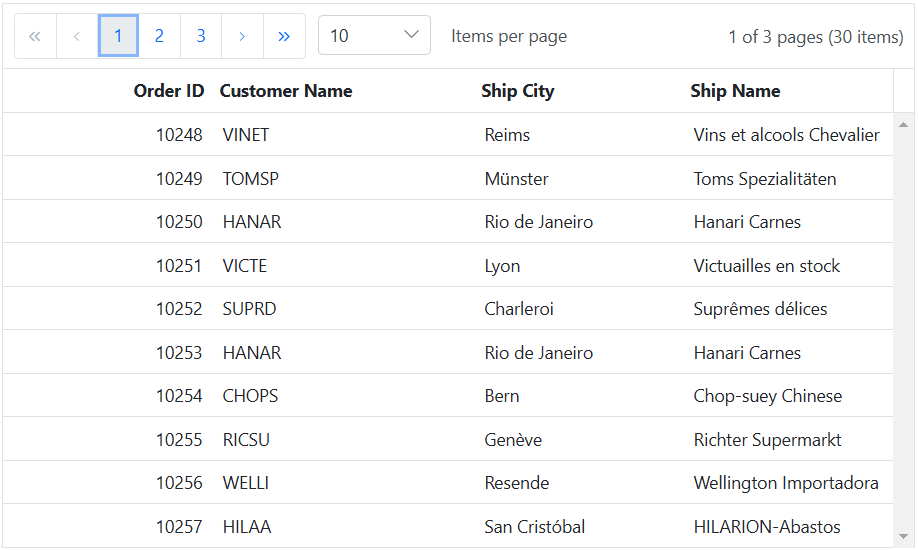
Render pager at the top of the grid
The Grid component provides built-in support for rendering a pager at the bottom of the grid by default. However, in certain scenarios, you might want to display the pager at the top of the grid. This can be achieved by utilizing the dataBound event. This event is triggered when the Grid completes rendering its data. By handling this event, you can customize the rendering of the pager and move it to the top of the Grid.
Here’s an example that demonstrates how to render the pager at the top of the grid using the dataBound event:
<ejs-grid id="grid" dataSource="@ViewBag.dataSource" allowPaging="true" height="348px" dataBound="dataBound">
    <e-grid-pagesettings pageSizes="true" pageSize=10>
    </e-grid-pagesettings>
    <e-grid-columns>
        <e-grid-column field="OrderID" headerText="Order ID" textAlign="Right" width="120"></e-grid-column>
        <e-grid-column field="CustomerID" headerText="Customer Name" width="150"></e-grid-column>
        <e-grid-column field="ShipCity" headerText="Ship City" width="150"></e-grid-column>
        <e-grid-column field="ShipName" headerText="Ship Name" width="150"></e-grid-column>
    </e-grid-columns>
</ejs-grid>
<script>
    let initialGridLoad = true;
    function dataBound()
    {
        if (initialGridLoad) {
            initialGridLoad = false;
            var grid = document.getElementById("grid").ej2_instances[0];
            let pager = document.getElementsByClassName('e-gridpager');
            let topElement;
            if (grid.allowGrouping || grid.toolbar) {
                topElement = grid.allowGrouping ? document.getElementsByClassName('e-groupdroparea') :
                    document.getElementsByClassName('e-toolbar');
            } else {
                topElement = document.getElementsByClassName('e-gridheader');
            }
            grid.element.insertBefore(pager[0], topElement[0]);
        }
    }
</script>
public IActionResult Index()
{
ViewBag.dataSource = OrderDetails.GetAllRecords();
return View();
}
During the paging action, the pager component triggers the below three events.
- The created event triggers when Pager is created.
- The
clickevent triggers when the numeric items in the pager is clicked.- The
dropDownChangedevent triggers when pageSize DropDownList value is selected.
Pager events
The Syncfusion® Grid component triggers two pager events during paging actions:
actionBegin- This event triggered before any paging action (such as changing the page, changing the page size and etc) is initiated. You can use this event to customize or control the behavior of paging actions.
actionComplete- This event triggered after a pager action is completed. It provides information about the action, such as the new page number, page size, and the total number of records. You can use this event to perform actions or update the UI after the operation has been executed.
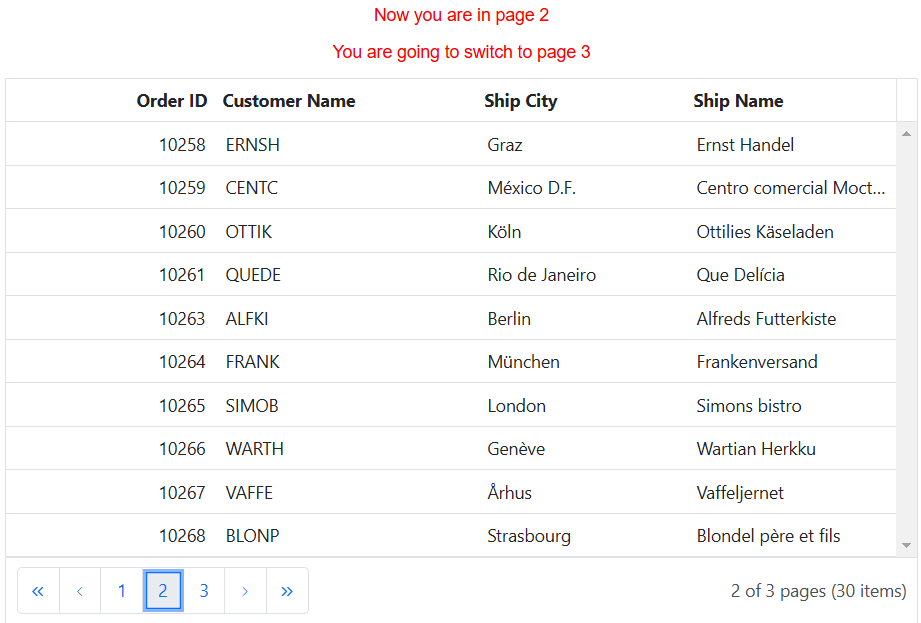
The following example that example demonstrates how to use these events to display notification messages to indicate the current and next page during paging actions in the Syncfusion® ASP.NET Core Grid:
<p id="alertMessage"></p>
<p id="message"></p>
<ejs-grid id="grid" dataSource="@ViewBag.dataSource" allowPaging="true" height="348px"  actionComplete="onActionComplete" actionBegin="onActionBegin">
    <e-grid-columns>
        <e-grid-column field="OrderID" headerText="Order ID" textAlign="Right" width="120"></e-grid-column>
        <e-grid-column field="CustomerID" headerText="Customer Name" width="150"></e-grid-column>
        <e-grid-column field="ShipCity" headerText="Ship City" width="150"></e-grid-column>
        <e-grid-column field="ShipName" headerText="Ship Name" width="150"></e-grid-column>
    </e-grid-columns>
</ejs-grid>
<script>
    function onActionBegin(args){
        if (args.requestType === 'paging') {
            document.getElementById("message").innerText = args.currentPage > args.previousPage
            ? `You are going to switch to page ${parseInt(args.currentPage, 10) + 1}`
            : `You are going to switch to page ${args.previousPage}`;
        }
    };
    function onActionComplete(args){
        if (args.requestType === 'paging') {
            document.getElementById("alertMessage").innerText = `Now you are in page ${args.currentPage}`;
        }
    };
</script>
<style>
    #message, #alertMessage {
     color: red;
     text-align: center;
    }
</style>
public IActionResult Index()
{
ViewBag.dataSource = OrderDetails.GetAllRecords();
return View();
}