How can I help you?
Validation in ASP.NET Core Syncfusion Grid component
7 May 202524 minutes to read
Validation is a crucial aspect of data integrity in any application. The ASP.NET Core Grid component in Syncfusion® provides built-in support for easy and effective data validation. This feature ensures that the data entered or modified adheres to predefined rules, preventing errors and guaranteeing the accuracy of the displayed information.
Column validation
Column validation allows you to validate the edited or added row data before saving it. This feature is particularly useful when you need to enforce specific rules or constraints on individual columns to ensure data integrity. By applying validation rules to columns, you can display error messages for invalid fields and prevent the saving of erroneous data. This feature leverages the Form Validator component to perform the validation. You can define validation rules using the columns.validationRules property to specify the criteria for validating column values.
The following code example demonstrates how to define a validation rule for grid column:
<ejs-grid id="grid" dataSource="@ViewBag.DataSource" height="273px" toolbar="@(new List<string>() { "Add", "Edit", "Delete","Update", "Cancel" })">
    <e-grid-editSettings allowAdding="true" allowDeleting="true" allowEditing="true" mode="Normal"></e-grid-editSettings>
    <e-grid-columns>
        <e-grid-column field="OrderID"  headerText="Order ID" isPrimaryKey="true" textAlign="Right" width="100"  validationRules="@(new { required= true })"></e-grid-column>
        <e-grid-column field="CustomerID" headerText="Customer Name" width="120" validationRules="@(new { required= true, minLength= 5 })"></e-grid-column>
        <e-grid-column field="Freight" headerText="Freight" textAlign="Right" format="C2" editType="numericedit" width="120" validationRules="@(new { required= true, min= 1,max=1000 })"></e-grid-column>
        <e-grid-column field="ShipCountry" headerText="Ship Country" width="150" editType="dropdownedit" validationRules="@(new { required= true })"></e-grid-column>
    </e-grid-columns>
 </ejs-grid>
public IActionResult Index()
{
ViewBag.DataSource = OrderDetails.GetAllRecords();
return View();
}
Custom validation
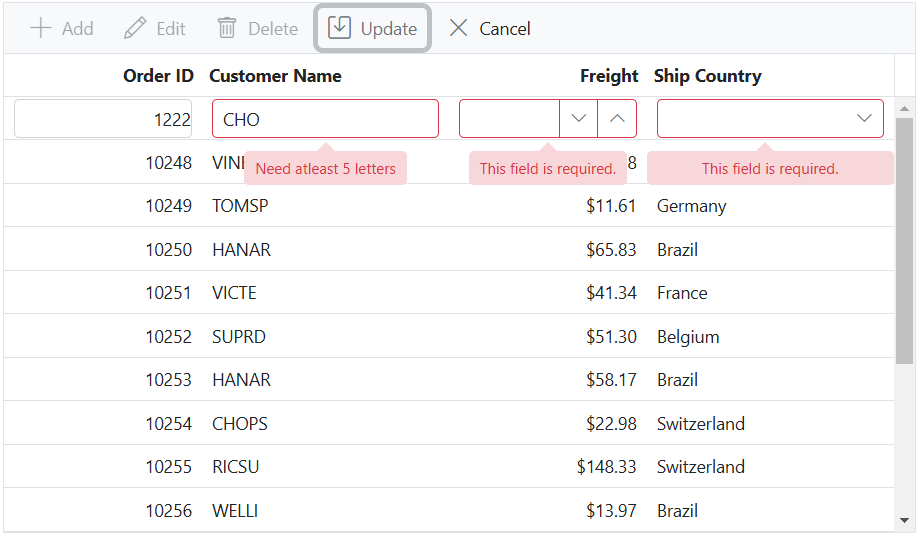
The Custom validation feature is used to define and enforce your own validation rules for specific columns in the Grid. This is achieved by leveraging the utilizing the Form Validator custom rules, you can enforce your desired validation logic and display error messages for invalid fields.
In the below demo, custom validation applied for CustomerID column.
<ejs-grid id="grid" dataSource="@ViewBag.DataSource" height="273px" toolbar="@(new List<string>() { "Add", "Edit", "Delete", "Cancel", "Update" })" load="load">
    <e-grid-editSettings allowAdding="true" allowDeleting="true" allowEditing="true" mode="Normal"></e-grid-editSettings>
    <e-grid-columns>
        <e-grid-column field="OrderID"  headerText="Order ID" isPrimaryKey="true" textAlign="Right" width="100"  validationRules="@(new { required= true })"></e-grid-column>
        <e-grid-column field="CustomerID" headerText="Customer Name" type="string" width="120"></e-grid-column>
        <e-grid-column field="Freight" headerText="Freight" textAlign="Right" format="C2" editType="numericedit" width="120" validationRules="@(new { required= true, min= 1,max=1000 })"></e-grid-column>
        <e-grid-column field="ShipCountry" headerText="Ship Country" width="150" editType="dropdownedit" validationRules="@(new { required= true })"></e-grid-column>
    </e-grid-columns>
 </ejs-grid>
<script>
    function load(args) {
        var grid = document.getElementById("grid").ej2_instances[0];
        grid.getColumnByField("CustomerID").validationRules = { required: true, minLength: [customFunction, 'Need atleast 5 letters'] };
    }
    function customFunction(args) {
        return args['value'].length >= 5;
    };
</script>
public IActionResult Index()
{
ViewBag.DataSource = OrdersDetails.GetAllRecords();
return View();
}
Custom validation based on dropdown change
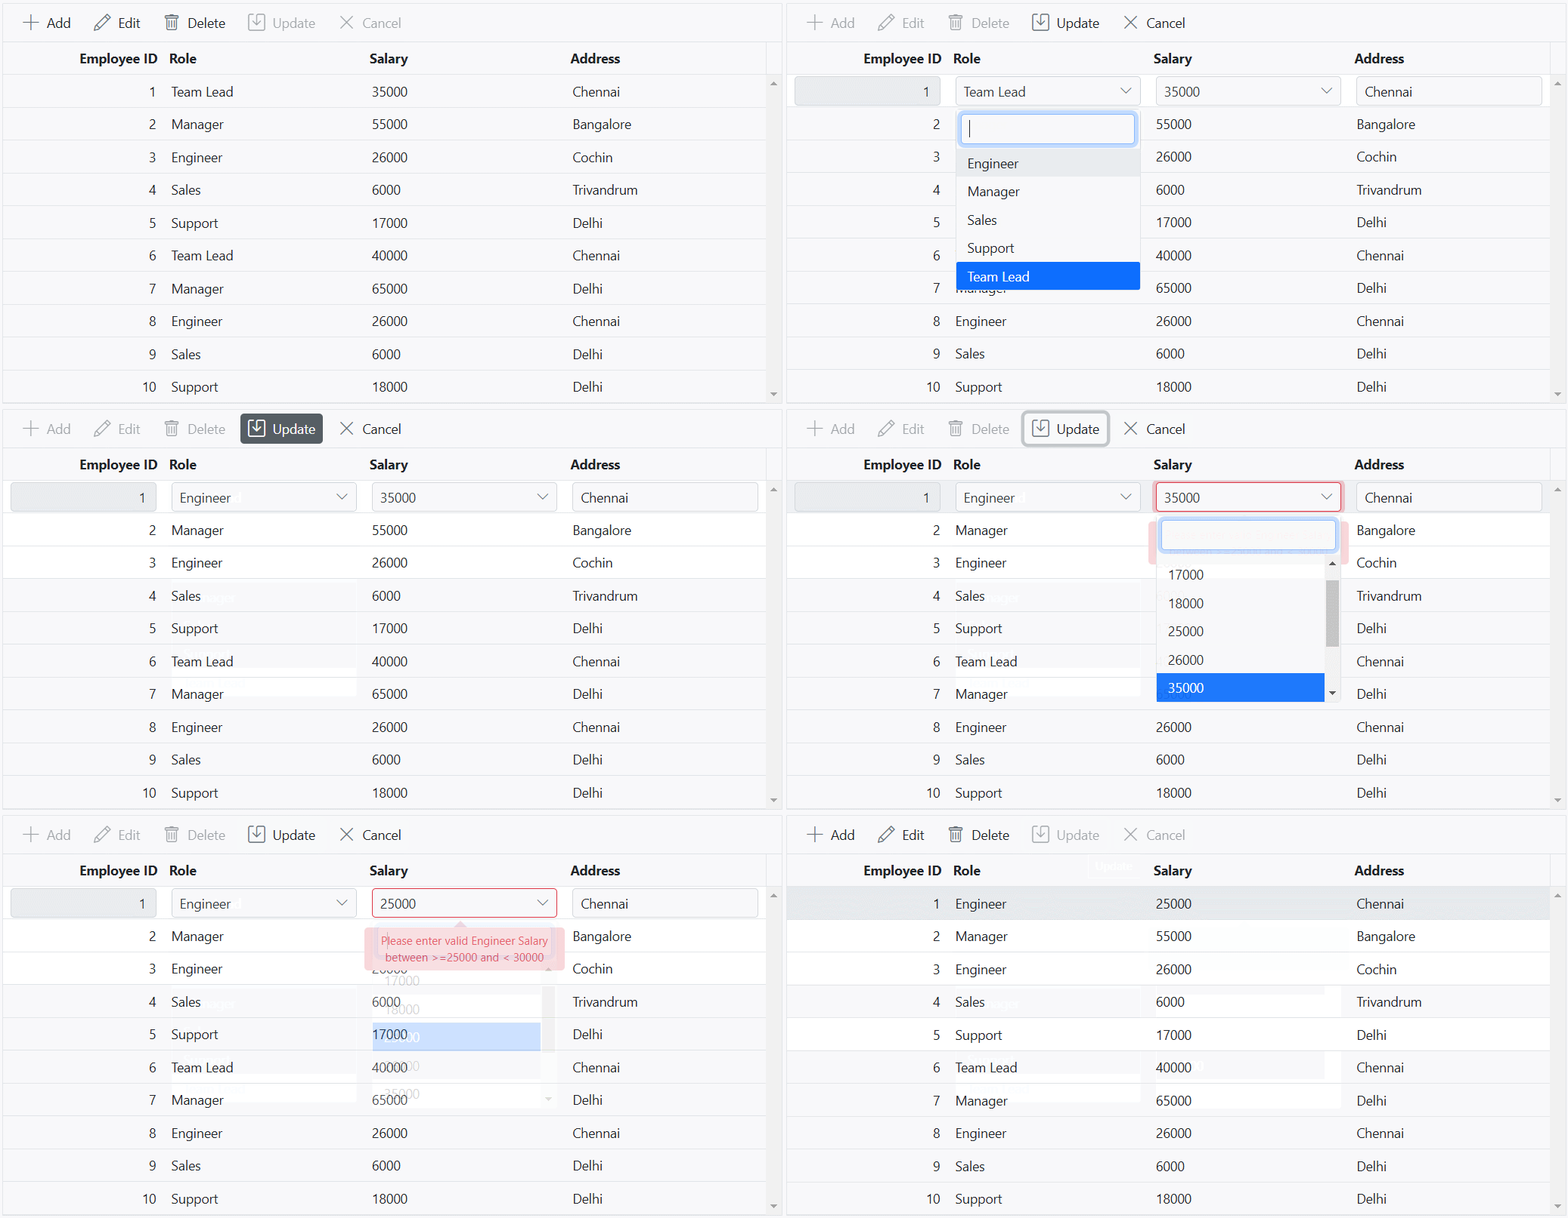
The Custom validation feature in the Grid allows you to apply validation rules and messages to a column based on the value of another column in edit mode. This feature is particularly useful when you need to enforce specific validation criteria that depend on the selection made in a dropdown column.
In the following sample, dropdownlist edit type is used for the Role and Salary columns. Here, you can apply the custom validation in the Salary column based on the value selected in the Role column.
@{
    var jobRole = new List<object>
    {
        new { role = "Team Lead" },
        new { role = "Manager" },
        new { role = "Engineer" },
        new { role = "Sales" },
        new { role = "Support" }
    };
    var salaryDetails = new List<object>
    {
        new { Salary = 6000 },
        new { Salary = 17000 },
        new { Salary = 18000 },
        new { Salary = 26000 },
        new { Salary = 25000 },
        new { Salary = 40000 },
        new { Salary = 35000 },
        new { Salary = 55000 },
        new { Salary = 65000 }
    };
    var roleDropDownList = new Syncfusion.EJ2.DropDowns.DropDownList() { DataSource = jobRole, Query = "new ej.data.Query()", Fields = new Syncfusion.EJ2.DropDowns.DropDownListFieldSettings() { Value = "role", Text = "role" }, AllowFiltering = true,Change="valueChange" };
    var salaryDropDownList = new Syncfusion.EJ2.DropDowns.DropDownList() { DataSource = salaryDetails, Query = "new ej.data.Query()", Fields = new Syncfusion.EJ2.DropDowns.DropDownListFieldSettings() { Value = "Salary", Text = "Salary" }, AllowFiltering = true,Change="customFunction" };
}
<ejs-grid id="grid" dataSource="@ViewBag.DataSource" height="273px" load="load" actionBegin="actionBegin" toolbar="@(new List<string>() { "Add", "Edit", "Delete", "Cancel", "Update" })">
    <e-grid-editSettings allowAdding="true" allowDeleting="true" allowEditing="true" mode="Normal"></e-grid-editSettings>
    <e-grid-columns>
        <e-grid-column field="EmployeeID"  headerText="Employee ID" isPrimaryKey="true" textAlign="Right" width="100"  validationRules="@(new { required= true })"></e-grid-column>
        <e-grid-column field="Role" headerText="Role" width="120"  editType="dropdownedit" edit="new {@params = roleDropDownList }" validationRules="@(new { required= true })"></e-grid-column>
        <e-grid-column field="Salary" headerText="Salary" textAlign="Right" editType="dropdownedit" edit="new {@params = salaryDropDownList }" width="120" validationRules="@(new { required= true })"></e-grid-column>
        <e-grid-column field="Address" headerText="Address" width="150"  validationRules="@(new { required= true })"></e-grid-column>
    </e-grid-columns>
</ejs-grid>
<script>
    window.role = '';
    function customFunction(args) {
        var grid = document.getElementById("grid").ej2_instances[0];
        var formObjectect = grid.editModule.formObj.element['ej2_instances'][0];
        let salary = parseInt(args.value)
        switch (window['role']) {
            case 'Sales':
                if ((salary >= 5000) && (salary < 15000))
                    return true;
                else
                    formObject.rules['Salary']['required'][1] = 'Please enter valid Sales Salary >=5000 and< 15000';
                break;
            case 'Support':
                if ((salary >= 15000 && salary < 19000))
                    return true;
                else
                    formObject.rules['Salary']['required'][1] = 'Please enter valid Support Salary >=15000 and < 19000';
                break;
            case 'Engineer':
                if ((salary >= 25000 && salary < 30000))
                    return true;
                else
                    formObject.rules['Salary']['required'][1] = 'Please enter valid Engineer Salary between >=25000 and < 30000';
                break;
            case 'Team Lead':
                if ((salary >= 30000) && (salary < 50000))
                    return true;
                else
                    formObject.rules['Salary']['required'][1] = 'Please enter valid TeamLead Salary >= 30000 and < 50000';
                break;
            case 'Manager':
                if ((salary >= 50000) && (salary < 70000))
                    return true;
                else
                    formObject.rules['Salary']['required'][1] = 'Please enter valid Manager Salary >=50000 and < 70000';
                break;
        }
        return false;
    }
    function valueChange(args) {
      var grid = document.getElementById("grid").ej2_instances[0];
      window.role = args.value.toString();
      var formObject = grid.editModule.formObj.element['ej2_instances'][0];
        switch ( window.role) {
            case 'Sales':
                formObject.rules['Salary']['required'][1] = 'Please enter valid Sales Salary >=5000 and< 15000';
                break;
            case 'Support':
                formObject.rules['Salary']['required'][1] = 'Please enter valid Support Salary >=15000 and < 19000';
                break;
            case 'Engineer':
                formObject.rules['Salary']['required'][1] = 'Please enter valid Engineer Salary between >=25000 and < 30000';
                break;
            case 'Team Lead':
                formObject.rules['Salary']['required'][1] = 'Please enter valid TeamLead Salary >= 30000 and < 50000';
                break;
            case 'Manager':
                formObject.rules['Salary']['required'][1] = 'Please enter valid Manager Salary >=50000 and < 70000';
                break;
        }
    }
   function load() {
        var grid = document.getElementById("grid").ej2_instances[0];
        var column = grid.getColumnByField('Salary');
        column.validationRules = {
            required: [customFunction,'Please enter valid salary'],
        };
    }
   function actionBegin(args){
        window.role = args.rowData.Role;
    }
</script>
public IActionResult Index()
{
ViewBag.DataSource = OrderDetails.GetAllRecords();
return View();
}
Custom validation for numeric column
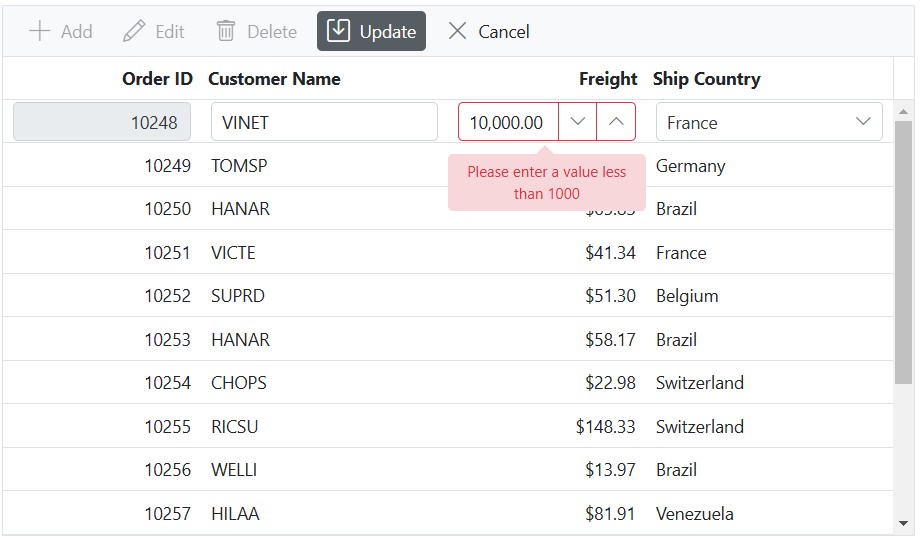
Custom validation for a numeric column Grid is useful when you want to enforce specific validation rules on numeric values in a column. This allows you to define your own validation logic and display custom error messages when the you enters invalid data.
In the following example, custom validation functions, namely customFunction and customFunctionOne, are defined to check the entered numeric value against your validation criteria. Then, the grid column is configured with the appropriate validation settings using the freightRules object, specifying the custom validation functions along with corresponding error messages. Additionally, the change event of the numeric column is bound to the validate method of the form element through the edit params. This enables you to trigger validation and display error messages whenever the you modifies the value in the NumericTextBox.
<ejs-grid id="grid" dataSource="@ViewBag.DataSource" height="273px" toolbar="@(new List<string>() { "Add", "Edit", "Delete", "Cancel", "Update" })" load="load">
    <e-grid-editSettings allowAdding="true" allowDeleting="true" allowEditing="true" mode="Normal"></e-grid-editSettings>
    <e-grid-columns>
        <e-grid-column field="OrderID"  headerText="Order ID" isPrimaryKey="true" textAlign="Right" width="100"  validationRules="@(new { required= true })"></e-grid-column>
        <e-grid-column field="CustomerID" headerText="Customer Name" type="string" edit="@(new { @params = new Syncfusion.EJ2.Inputs.NumericTextBox() { Change= "onChange"}})" width="120"></e-grid-column>
        <e-grid-column field="Freight" headerText="Freight" textAlign="Right" format="C2" editType="numericedit" width="120"></e-grid-column>
        <e-grid-column field="ShipCountry" headerText="Ship Country" width="150" editType="dropdownedit" validationRules="@(new { required= true })"></e-grid-column>
    </e-grid-columns>
 </ejs-grid>
<script>
    function load(args) {
        var grid = document.getElementById("grid").ej2_instances[0];
        grid.getColumnByField("Freight").validationRules = { required: true, min: [customFunctionOne, 'Please enter a value greater than 1'], max: [customFunction, 'Please enter a value less than 1000'] };
    }
    function customFunction(args) {
        return args['value'].length >= 5;
    };
    function customFunction (args) {
      return (args['value'] <= 1000);
    }
    function customFunctionOne (args) {
       return (args['value'] >= 1);
    }
    function onActionComplete(args) {
     if (args.requestType === "beginEdit" || args.requestType === "add") {
        formElement = args.form;
     }
    }
   function onChange() {
      formElement['ej2_instances'][0].validate();
    }
</script>
public IActionResult Index()
{
ViewBag.DataSource = OrderDetails.GetAllRecords();
return View();
}
Dynamically add or remove validation rules from the form
You can dynamically add or remove validation rules from input elements within a form. This feature is particularly useful when you need to adjust the validation rules based on different scenarios or dynamically changing data.
To add validation rules dynamically to an input element, you can use the addRules method. This method enables you to add validation rules to the corresponding input element based on the name attribute.
The following example to demonstrates how to dynamically add or remove a required validation rule for an input field based on a CheckBox selection:
<div style='padding-bottom:20px'>
    <ejs-checkbox id="checkbox" checked="true" label="Enable/Disable validation rule for customerID coulumn"></ejs-checkbox>
</div>
<ejs-grid id="grid" dataSource="@ViewBag.DataSource" height="273px" toolbar="@(new List<string>() { "Add", "Edit", "Delete","Update", "Cancel" })" actionComplete="actionComplete">
    <e-grid-editSettings allowAdding="true" allowDeleting="true" allowEditing="true" mode="Normal"></e-grid-editSettings>
    <e-grid-columns>
        <e-grid-column field="OrderID"  headerText="Order ID" isPrimaryKey="true" textAlign="Right" width="100"  validationRules="@(new { required= true })"></e-grid-column>
        <e-grid-column field="CustomerID" headerText="Customer Name" type="string" width="120"></e-grid-column>
        <e-grid-column field="Freight" headerText="Freight" textAlign="Right" format="C2" editType="numericedit" width="120" validationRules="@(new { required= true, min= 1,max=1000 })"></e-grid-column>
        <e-grid-column field="ShipCountry" headerText="Ship Country" width="150" editType="dropdownedit" validationRules="@(new { required= true })"></e-grid-column>
    </e-grid-columns>
 </ejs-grid>
 <script>
    function actionComplete(args) {
        var grid = document.getElementById("grid").ej2_instances[0];
        var formObject = grid.editModule.formObj;
        var customerIDRules = {
            required: true,
            minLength: [5, 'Customer ID should have a minimum length of 5 characters'],
        };
        if (args.requestType === 'beginEdit' || args.requestType === 'add') {
            var checkbox = document.getElementById("checkbox").ej2_instances[0];
            if (checkbox.checked) {
                formObject.addRules('CustomerID', customerIDRules);
            }
        }
    }
</script>
public IActionResult Index()
{
ViewBag.DataSource = OrderDetails.GetAllRecords();
return View();
}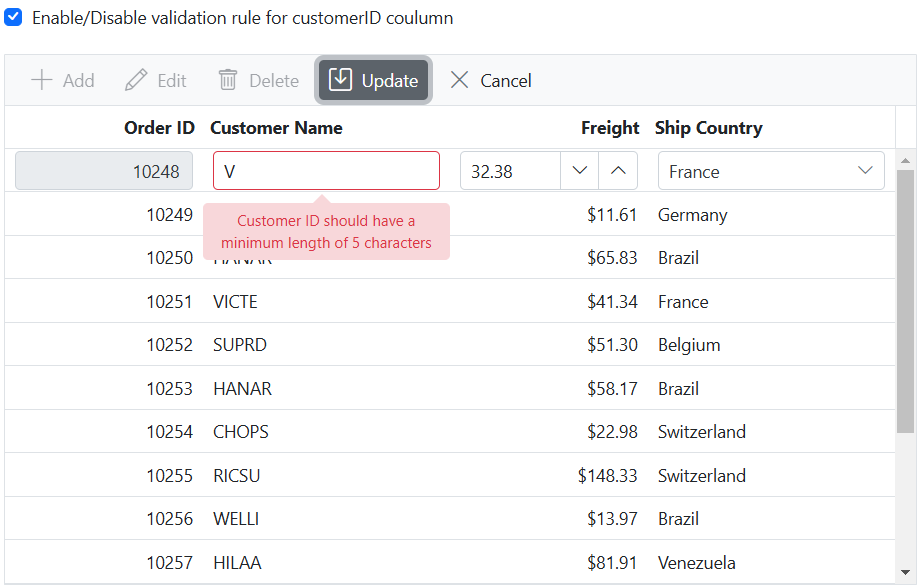
- To remove an existing validation rule from an input element, you can use the
removeRulesmethod.
Change the position of validation error message
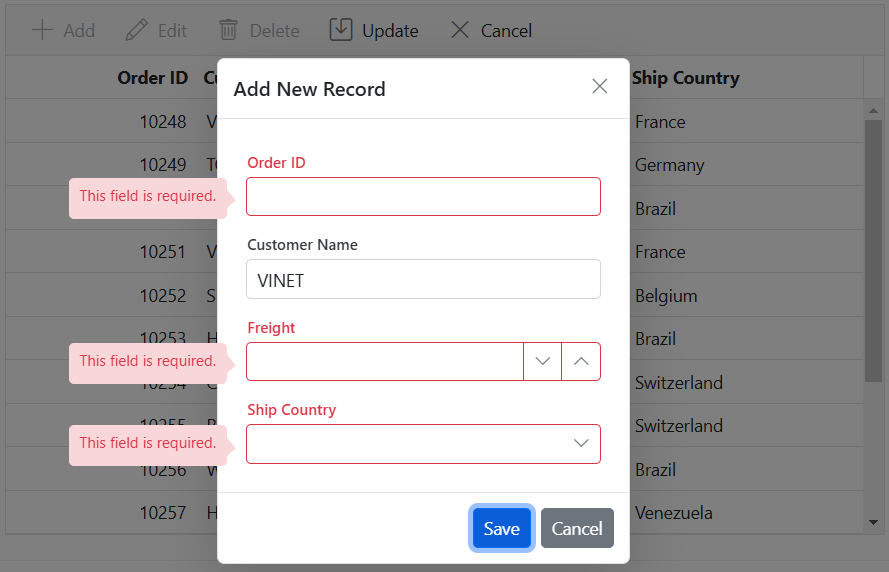
By default, the validation error message in Grid is displayed below the input field. However, you have an option to customize its position and display it in a different location. This feature is particularly useful when you want to align the error message according to your application’s design and layout.
To change the position of the validation error message in Grid, you can utilize the customPlacement event. This event allows you to define a custom logic to position the error message at the desired location.
Here’s an example that demonstrates how to change the position of the validation error message to the top of the input field:
<ejs-grid id="grid" dataSource="@ViewBag.DataSource" height="273px" toolbar="@(new List<string>() { "Add", "Edit", "Delete", "Cancel", "Update" })" actionComplete="onActionComplete">
    <e-grid-editSettings allowAdding="true" allowDeleting="true" allowEditing="true" mode="Dialog"></e-grid-editSettings>
    <e-grid-columns>
        <e-grid-column field="OrderID"  headerText="Order ID" isPrimaryKey="true" textAlign="Right" width="100" validationRules="@(new { required= true })"></e-grid-column>
        <e-grid-column field="CustomerID" headerText="Customer Name" type="string" width="120" validationRules="@(new { required= true })"></e-grid-column>
        <e-grid-column field="Freight" headerText="Freight" textAlign="Right" format="C2" editType="numericedit" width="120" validationRules="@(new { required= true, min= 1,max=1000 })"></e-grid-column>
        <e-grid-column field="ShipCountry" headerText="Ship Country" width="150" editType="dropdownedit" validationRules="@(new { required= true })"></e-grid-column>
    </e-grid-columns>
 </ejs-grid>
 <script>
  function onActionComplete(args) {
    if (args.requestType == "beginEdit" || args.requestType == "add") {
      var grid = document.getElementById("grid").ej2_instances[0];
      var valueError = ej.grids.getObject('valErrorPlacement', grid.editModule).bind(grid.editModule);
      grid.editModule.formObj.customPlacement = (input, error) => {
        valueError(input, error);
        var element = document.getElementById(input.name + '_Error');
        var tooltipWidth = element.offsetWidth;
        var  inputElement = null;
        if (document.querySelector('#' + grid.element.id + input.name)) {
          inputElement = document.querySelector('#' +grid.element.id + input.name);
        } else if (document.querySelector('#' + input.name)) {
          inputElement = document.querySelector('#' + input.name);
        }
        var inputPosition =  inputElement.getBoundingClientRect();
        var leftPosition =  (inputPosition.left - tooltipWidth - 16).toString() + 'px'; //for right side
        var topPosition = inputPosition.top.toString() + 'px';
        element.style.left = leftPosition;
        element.style.top =  topPosition;
        element.style.position = 'fixed';
      }
    }
  }
</script>
<style>
    .e-gridform .e-arrow-tip.e-tip-top {
        transform: rotate(90deg);
        left: 121px;
        top: 10px;
    }
</style>
public IActionResult Index()
{
ViewBag.DataSource =OrderDetails.GetAllRecords();
return View();
}
Show custom error message while performing CRUD actions
While performing CRUD actions in the Syncfusion ASP.NET Core Grid, errors may occur due to various reasons such as validation failures, network issues, or server-side exceptions. Handling these errors effectively is essential for providing meaningful error messages when an operation fails.
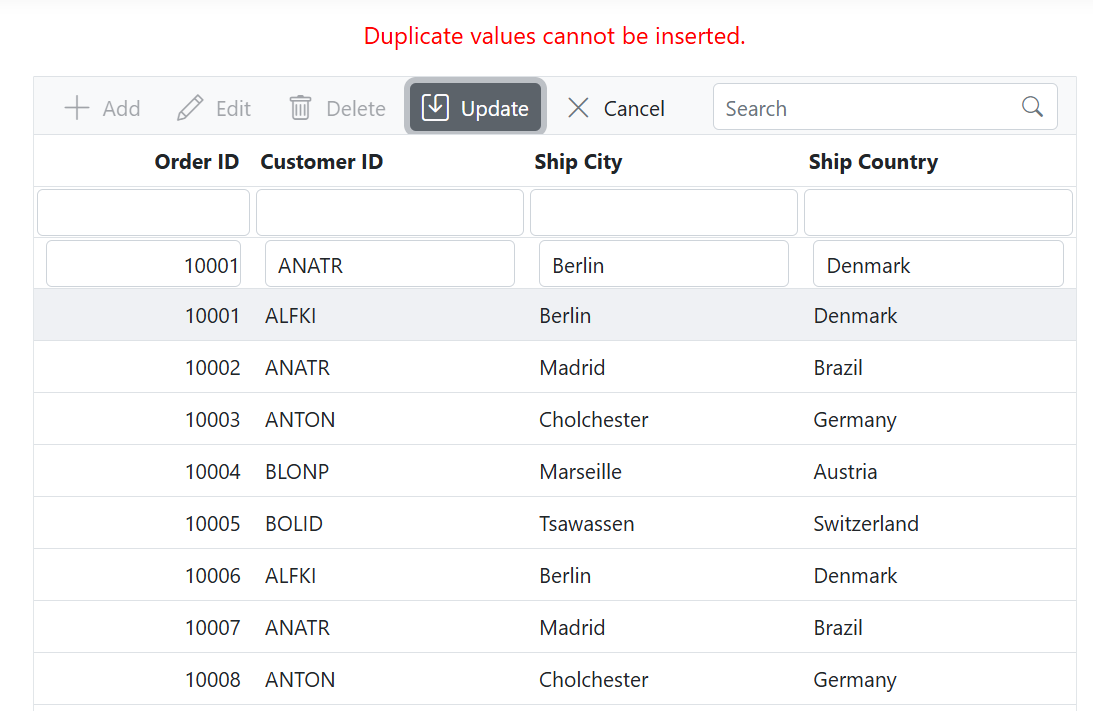
To achieve this, you can use the ActionFailure event, which is triggered when an action (such as update, delete, or insert) fails. This event allows you to retrieve the error message from the server response and display it in the UI.
The following sample demonstrates how to retrieve and display error messages in the Syncfusion ASP.NET Core Grid:
@page
@model IndexModel

<div><p style="color: red; text-align: center" id="errorMessage"></p></div>
<ejs-grid id="Grid" allowFiltering="true" actionFailure="actionFailure" allowSorting="true" allowPaging="true" toolbar="@(new List<string>() { "Add", "Edit", "Delete", "Update", "Cancel","Search" })">
   //Replace xxxx with your actual port number
    <e-data-manager url='https://localhost:xxxx/api/Grid' insertUrl='https://localhost:xxxx/api/Grid/Insert' updateUrl='https://localhost:xxxx/api/Grid/Update' removeUrl='https://localhost:xxxx/api/Grid/Remove' adaptor="UrlAdaptor">
    </e-data-manager>
    <e-grid-editSettings allowAdding="true" allowDeleting="true" allowEditing="true" mode="Normal"></e-grid-editSettings>
    <e-grid-columns>
        <e-grid-column field="OrderID" headerText="Order ID" width="120" textAlign="Right" isPrimaryKey="true" type="number"></e-grid-column>
        <e-grid-column field="CustomerID" headerText="Customer ID" width="150" type="string"></e-grid-column>
        <e-grid-column field="ShipCity" headerText="Ship City" width="150"></e-grid-column>
        <e-grid-column field="ShipCountry" headerText="Ship Country" width="150"></e-grid-column>
    </e-grid-columns>
</ejs-grid>

<script>
let errorMessage = document.getElementById("errorMessage");
function actionFailure(args) {
    if (args.error && Array.isArray(args.error) && args.error.length > 0 && args.error[0].error){
        args.error[0].error.json().then(function (data) {
            errorMessage.innerHTML = data.message || "An unknown error occurred.";
        }).catch(function () {
            errorMessage.innerHTML = "Error occurred, but message could not be retrieved.";
        });
    }
    else{
        errorMessage.innerHTML = "An unexpected error occurred.";
    }
}
</script>
using Microsoft.AspNetCore.Http;
using Microsoft.AspNetCore.Mvc;
using Syncfusion.EJ2.Base;
using UrlAdaptor.Models;
namespace UrlAdaptor.Controllers
{
[ApiController]
public class GridController : Controller
{
[HttpPost]
[Route("api/[controller]")]
public object Post([FromBody] DataManagerRequest DataManagerRequest)
{
// Retrieve data from the data source (e.g., database).
IQueryable<OrdersDetails> DataSource = GetOrderData().AsQueryable();
// Initialize DataOperations instance.
QueryableOperation queryableOperation = new QueryableOperation();
// Handling searching operation.
if (DataManagerRequest.Search != null && DataManagerRequest.Search.Count > 0)
{
DataSource = queryableOperation.PerformSearching(DataSource, DataManagerRequest.Search);
}
// Handling filtering operation.
if (DataManagerRequest.Where != null && DataManagerRequest.Where.Count > 0)
{
foreach (var condition in DataManagerRequest.Where)
{
foreach (var predicate in condition.predicates)
{
DataSource = queryableOperation.PerformFiltering(DataSource, DataManagerRequest.Where, predicate.Operator);
}
}
}
// Handling sorting operation.
if (DataManagerRequest.Sorted != null && DataManagerRequest.Sorted.Count > 0)
{
DataSource = queryableOperation.PerformSorting(DataSource, DataManagerRequest.Sorted);
}
// Get the total count of records.
int totalRecordsCount = DataSource.Count();
// Handling paging operation.
if (DataManagerRequest.Skip != 0)
{
DataSource = queryableOperation.PerformSkip(DataSource, DataManagerRequest.Skip);
}
if (DataManagerRequest.Take != 0)
{
DataSource = queryableOperation.PerformTake(DataSource, DataManagerRequest.Take);
}
// Return data based on the request.
return new { result = DataSource, count = totalRecordsCount };
}
[HttpGet]
[Route("api/[controller]")]
public List<OrdersDetails> GetOrderData()
{
var data = OrdersDetails.GetAllRecords().ToList();
return data;
}
/// <summary>
/// Inserts a new data item into the data collection.
/// </summary>
/// <param name="addRecord">The order to be inserted.</param>
/// <returns>It returns the newly inserted record detail.</returns>
[HttpPost]
[Route("api/[controller]/Insert")]
public IActionResult Insert([FromBody] CRUDModel<OrdersDetails> value)
{
if (value == null)
{
return BadRequest(new { message = "Invalid data received." });
}
var existingOrder = OrdersDetails.order.FirstOrDefault(or => or.OrderID == value.value.OrderID);
if (existingOrder == null)
{
OrdersDetails.order.Insert(0, value.value);
return Ok(new { success = true, message = "Order added successfully.", data = value });
}
else
{
return BadRequest(new { success = false, message = "Duplicate values cannot be inserted." });
}
}
/// <summary>
/// Updates an existing order.
/// </summary>
/// <param name="updateRecord">The updated order details.</param>
/// <returns>It returns the updated order details.</returns>
[HttpPost]
[Route("api/[controller]/Update")]
public IActionResult Update([FromBody] CRUDModel<OrdersDetails> Order)
{
var updatedOrder = Order.value;
if (updatedOrder.OrderID < 10010 || updatedOrder.OrderID > 10030)
{
return BadRequest(new { message = "OrderID must be between 10010 and 10030 to update." });
}
var data = OrdersDetails.GetAllRecords().FirstOrDefault(or => or.OrderID == updatedOrder.OrderID);
if (data == null)
{
return NotFound(new { message = "Order not found." });
}
// Update the existing record.
data.CustomerID = updatedOrder.CustomerID;
data.ShipCity = updatedOrder.ShipCity;
data.ShipCountry = updatedOrder.ShipCountry;
return Ok(new { success = true, message = "Order updated successfully." });
}
/// <summary>
/// Deletes an order.
/// </summary>
/// <param name="deletedRecord">It contains the specific record detail which is need to be removed.</param>
/// <returns>It returns the deleted record detail.</returns>
[HttpPost]
[Route("api/[controller]/Remove")]
public IActionResult Remove([FromBody] CRUDModel<OrdersDetails> value)
{
int orderId;
if (!int.TryParse(value.key.ToString(), out orderId))
{
return BadRequest(new { message = "Invalid OrderID format." });
}
if (orderId < 10031 || orderId > 10045)
{
return BadRequest(new { message = "OrderID must be between 10031 and 10045 to delete." });
}
var data = OrdersDetails.GetAllRecords().FirstOrDefault(orderData => orderData.OrderID == orderId);
if (data == null)
{
return NotFound(new { message = "Order not found." });
}
OrdersDetails.GetAllRecords().Remove(data);
return Ok(new { success = true, message = "Order deleted successfully." });
}
public class CRUDModel<T> where T : class
{
public string? action { get; set; }
public string? keyColumn { get; set; }
public object? key { get; set; }
public T? value { get; set; }
public List<T>? added { get; set; }
public List<T>? changed { get; set; }
public List<T>? deleted { get; set; }
public IDictionary<string, object>? @params { get; set; }
}
}
}
Prevent adding duplicate rows with custom validation
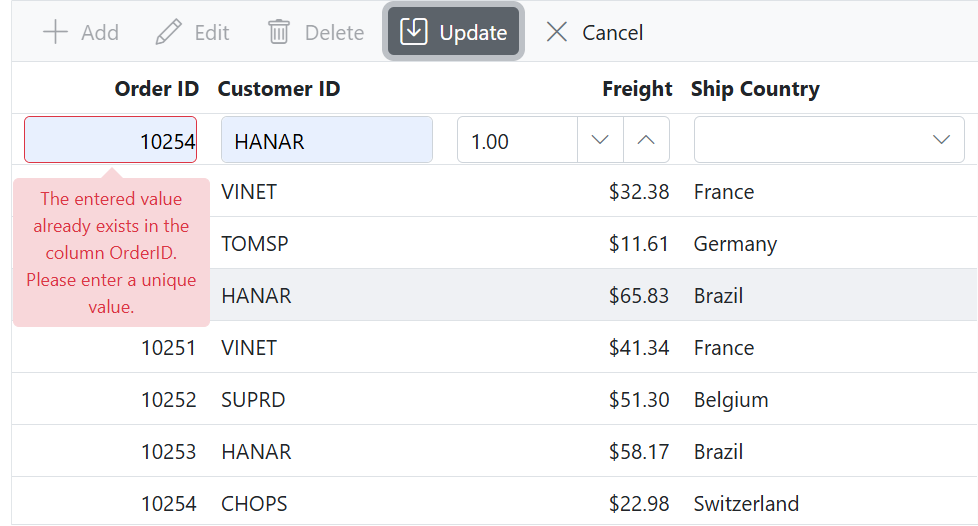
The Syncfusion ASP.NET Core Grid allows you to enforce constraints to prevent duplicate rows by customizing the validation logic within the Grid setup. This ensures data integrity by restricting duplicate entries in the OrderID column.
To prevent adding duplicate rows in the Grid, follow these steps:
-
Implement Custom Validation: Define the
orderIdCustomValidationfunction to check whether the entered OrderID already exists in the dataSource. This allows editing an existing row without triggering a duplicate error. -
Add Dynamic Validation Rules: Create the
orderIDRulesobject to enforce unique OrderID values. Dynamically add this rule to the form during the save action. -
Handle Validation in the actionBegin event: In the
actionBeginevent, check if the requestType is save. Apply the validation rule before saving and cancel the actionargs.cancel = trueif the validation fails.
For server-side validation to prevent adding duplicate rows, you can refer to the detailed guidance provided in our knowledge base. If you want to display the Grid’s validation tooltip instead of the alert used in our knowledge base, you can call the grid.editModule.formObj.validate() method in the Ajax/Fetch success function to display the Grid’s tooltip validation for the server side.
<ejs-grid id="Grid" dataSource="@ViewBag.DataSource" height="273" toolbar="@(new List<string>() { "Add", "Edit", "Delete", "Cancel", "Update" })" actionBegin="actionBegin" created="created">
    <e-grid-editSettings allowAdding="true" allowDeleting="true" allowEditing="true" mode="Normal"></e-grid-editSettings>
    <e-grid-columns>
        <e-grid-column field="OrderID" headerText="Order ID" isPrimaryKey="true" textAlign="Right" width="120"></e-grid-column>
        <e-grid-column field="CustomerID" headerText="Customer ID" type="string" width="120" validationRules="@(new { required= true })"></e-grid-column>
        <e-grid-column field="Freight" headerText="Freight" textAlign="Right" format="C2" editType="numericedit" width="120"></e-grid-column>
        <e-grid-column field="ShipName" headerText="Ship Name" width="150"></e-grid-column>
        <e-grid-column field="ShipCountry" headerText="Ship Country" width="150"></e-grid-column>
    </e-grid-columns>
</ejs-grid>

<script>
    var grid;
    var orderIDRules = {
        required: true,
        min: [orderIdCustomValidation, 'The entered value already exists in the column OrderID. Please enter a unique value.']
    };

    function created() {
        grid = this;
    }

    function orderIdCustomValidation(args) {
        return (grid.dataSource).every((data) => {
            return data['OrderID'] + '' !== args['value'] || data['OrderID'] === grid.editModule.editModule.args.rowData['OrderID']
        });
    };

    function actionBegin(args) {
        if (args.requestType === 'save') {
            grid.editModule.formObj.addRules('OrderID', orderIDRules); // Add form validation rules dynamically.
            if (!grid.editModule.formObj.validate()) { // Check dynamically added validation rules.
                args.cancel = true; // Prevent adding duplicate data action.
            }
            grid.editModule.formObj.removeRules('OrderID'); // Remove form validation rules dynamically.
        }
    }
</script>
public IActionResult Index()
{
ViewBag.DataSource = OrdersDetails.GetAllRecords();
return View();
}