Edit Types in ASP.NET Core Grid Component
23 Jul 202524 minutes to read
The ASP.NET Core Grid component in Syncfusion® provides various edit types that allow you to customize the editing behavior for different types of columns. These edit types enhance the editing experience and provide flexibility in handling different data types.
The Syncfusion® Grid provides pre-built default editors that enhance data editing and input handling within the grid. These default editors are designed to simplify the process of defining the editor component for specific columns based on the data type of the column within the grid. To configure default editors for grid columns, leverage the editType property.
The available default edit types are as follows:
| Component | Edit Type value | Description |
|---|---|---|
| TextBox | stringedit | The stringedit type renders a TextBox component for string data type columns. |
| NumericTextBox | numericedit | The numericedit type renders a NumericTextBox component for integers,double,float ,short ,byte ,long ,long double and decimal data types columns. |
| DropDownList | dropdownedit | The dropdownedit type renders a DropdownList component for string data type columns. |
| Checkbox | booleanedit | The booleanedit type renders a CheckBox component for boolean data type columns. |
| DatePicker | datepickeredit | The datepickeredit type renders a DatePicker component for date data type columns. |
| DateTimePicker | datetimepickeredit | The datetimepickeredit type renders a DateTimePicker component for date time data type columns. |
The following example demonstrates how to define the editType for grid columns:
    <e-grid-column field="CustomerName" headerText="Customer Name" editType="stringedit"></e-grid-column>
    <e-grid-column field="Frieght" headerText="Frieght" editType="numericedit'"></e-grid-column>
    <e-grid-column field="ShipCountry" headerText="Ship Country" editType="dropdownedit"></e-grid-column>
    <e-grid-column field="OrderDate" headerText="Order Date" editType="datepickeredit"></e-grid-column>
    <e-grid-column field="OrderTime" headerText="Order Time" editType="datetimepickeredit"></e-grid-column>
    <e-grid-column field="Verified" headerText="Verified" editType="booleanedit"></e-grid-column>
If edit type is not defined in the column, then it will be considered as the stringedit type (TextBox component).
Customize TextBox component of stringedit type
You can customize the default TextBox component in Grid edit form using its property. This customization allows you to configure various properties of the TexBox, tailoring its behavior and appearance to match your specific requirements within the Grid. The behavior of the editor component can be fine-tuned through the columns->edit->params property.
| Component | Edit Type | Description | Example Customized edit params |
|---|---|---|---|
| TextBox | stringedit | The stringedit type renders a TextBox component for string data type columns. To customize the TextBox component, refer to the TextBox API documentation for detailed information on available properties |
params: { showClearButton : true} |
The following sample code demonstrates the customization applied to TextBox component of CustomerID Grid column:
<ejs-grid id="Grid" dataSource="@ViewBag.DataSource" toolbar="@(new List<string>() { "Add", "Edit", "Delete", "Cancel", "Update" })">
    <e-grid-editSettings allowAdding="true" allowDeleting="true" allowEditing="true"></e-grid-editSettings>
    <e-grid-columns>
        <e-grid-column field="OrderID" headerText="Order ID" isPrimaryKey="true" validationRules="@(new { required=true, number=true})" textAlign="Right" width="100"></e-grid-column>
        <e-grid-column field="CustomerID" headerText="Customer ID" edit="new { @params = new { showClearButton= true }}" width="120"></e-grid-column>
        <e-grid-column field="Freight" headerText="Freight" textAlign="Right" format="C2" editType="numericedit" width="120"></e-grid-column>
        <e-grid-column field="ShipCity" headerText="Ship City" width="150" editType="dropdownedit"></e-grid-column>
   </e-grid-columns>
</ejs-grid>
public IActionResult Index()
{
ViewBag.DataSource = OrdersDetails.GetAllRecords();
return View();
}
Customize NumericTextBox component of numericedit type
You can customize the NumericTextBox component in Grid edit form using its property. This customization allows you to configure various properties of the NumericTextBox, tailoring its behavior and appearance to match your specific requirements within the Grid. The behavior of the editor component can be fine-tuned through the columns->edit->params property.
| Component | Edit Type | Description | Example Customized edit params |
|---|---|---|---|
| NumericTextBox | numericedit | TThe numericedit type renders a NumericTextBox component for integers, double, float, short, byte, long, long double and decimal data types columns. To customize the NumericTextBox component, refer to the NumericTextBox API documentation for detailed information on available properties. |
params: { decimals: 2, value: 5 } |
The following sample code demonstrates the customization applied to NumericTextBox component of Frieght Grid column:
<ejs-grid id="Grid" dataSource="@ViewBag.DataSource" toolbar="@(new List<string>() { "Add", "Edit", "Delete", "Cancel", "Update" })">
    <e-grid-editSettings allowAdding="true" allowDeleting="true" allowEditing="true"></e-grid-editSettings>
    <e-grid-columns>
        <e-grid-column field="OrderID" headerText="Order ID" isPrimaryKey="true" validationRules="@(new { required=true, number=true})" textAlign="Right" width="100"></e-grid-column>
        <e-grid-column field="CustomerID" headerText="Customer ID" validationRules="@(new { required=true})" width="120"></e-grid-column>
        <e-grid-column field="Freight" headerText="Freight" edit="@(new { @params = new Syncfusion.EJ2.Inputs.NumericTextBox() {
            Decimals = 0,
            Format = "N",
            ShowClearButton= true,
            ShowSpinButton= false
           }})" editType="numericedit" validationRules="@(new { required= true, min=1, max=1000 })" textAlign="Right" width="120"></e-grid-column>
        <e-grid-column field="ShipCity" headerText="Ship City" validationRules="@(new { required=true})" editType="dropdownedit" width="150" ></e-grid-column>
   </e-grid-columns>
</ejs-grid>
public IActionResult Index()
{
ViewBag.DataSource = OrdersDetails.GetAllRecords();
return View();
}
Restrict to type decimal points in a NumericTextBox while editing the numeric column
By default, the NumericTextBox component allows entering decimal values with up to two decimal places when editing a numeric column. However, there might be cases where you want to restrict input to whole numbers only, without any decimal points. In such scenarios, you can make use of the validateDecimalOnType and decimals properties provided by Syncfusion’s NumericTextBox component.
The validateDecimalOnType property is used to component whether decimal points are allowed during input in the NumericTextBox. By default, it is set to false, allowing decimal points to be entered. However, when set to true, decimal points will be restricted, and only whole numbers can be entered.
The decimals property specifies the number of decimal places to be displayed in the NumericTextBox. By default, it is set to 2, meaning that two decimal places will be displayed. However, you can modify this value to customize the decimal places according to your requirements.
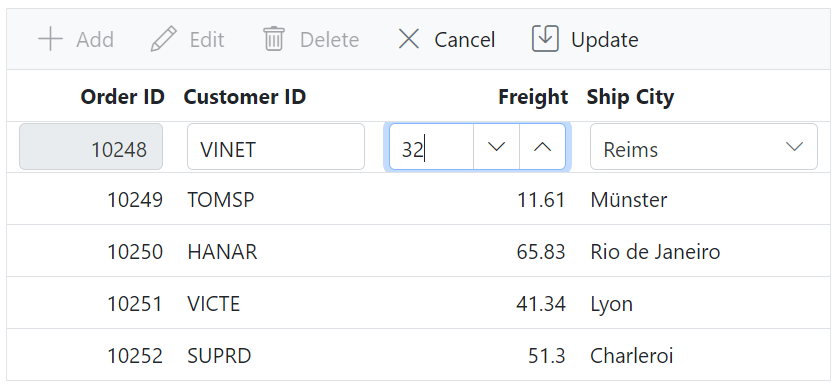
In the below demo, while editing the row the decimal point value is restricted to type in the NumericTextBox of Freight column.
<ejs-grid id="Grid" dataSource="@ViewBag.DataSource" toolbar="@(new List<string>() { "Add", "Edit", "Delete", "Cancel", "Update" })">
    <e-grid-editSettings allowAdding="true" allowDeleting="true" allowEditing="true"></e-grid-editSettings>
    <e-grid-columns>
        <e-grid-column field="OrderID" headerText="Order ID" isPrimaryKey="true" validationRules="@(new { required=true, number=true})" textAlign="Right" width="100"></e-grid-column>
        <e-grid-column field="CustomerID" headerText="Customer ID" width="120"></e-grid-column>
        <e-grid-column field="Freight" headerText="Freight" editType="numericedit"
            edit="@(new { @params = new Syncfusion.EJ2.Inputs.NumericTextBox() {
            ValidateDecimalOnType = true,
            Decimals = 0,
            Format = "N"
           }})" textAlign="Right" width="150"></e-grid-column>
        <e-grid-column field="ShipCity" headerText="Ship City" editType="dropdownedit" width="150"></e-grid-column>
    </e-grid-columns>
</ejs-grid>
public IActionResult Index()
{
ViewBag.DataSource = OrderDetails.GetAllRecords();
return View();
}
Customize DropDownList component of DropDownEdit type
You can customize the DropDownList component in Grid edit form using its property. This customization allows you to configure various properties of the DropDownList, tailoring its behavior and appearance to match your specific requirements within the Grid. The behavior of the editor component can be fine-tuned through the columns->edit->params property.
| Component | Edit Type | Description | Example Customized edit params |
|---|---|---|---|
| DropDownList | DropDownEdit | The dropdownedit type renders a DropDownList component for string data type columns. To customize the DropDownList component, refer to the DropDownList API documentation for detailed information on available properties. |
params: { value: ‘Germany’ } |
The following sample code demonstrates the customization applied to DropDownList component of ShipCity Grid column:
<ejs-grid id="Grid" dataSource="@ViewBag.DataSource" toolbar="@(new List<string>() { "Add", "Edit", "Delete", "Cancel", "Update" })">
    <e-grid-editSettings allowAdding="true" allowDeleting="true" allowEditing="true"></e-grid-editSettings>
    <e-grid-columns>
        <e-grid-column field="OrderID" headerText="Order ID" isPrimaryKey="true" validationRules="@(new { required=true, number=true})" textAlign="Right" width="100"></e-grid-column>
        <e-grid-column field="CustomerID" headerText="Customer ID" validationRules="@(new { required=true})" width="120"></e-grid-column>
        <e-grid-column field="Freight" headerText="Freight" editType="numericedit" validationRules="@(new { required= true, min=1, max=1000 })" textAlign="Right" width="120"></e-grid-column>
        <e-grid-column field="ShipCity" headerText="Ship City" edit="@(new { @params = new Syncfusion.EJ2.DropDowns.DropDownList(){
        ShowClearButton= true,
        PopupHeight="120",
        } })" validationRules="@(new { required=true})" editType="dropdownedit" width="150"></e-grid-column>
   </e-grid-columns>
</ejs-grid>
public IActionResult Index()
{
ViewBag.DataSource = OrdersDetails.GetAllRecords();
return View();
}
Provide custom data source for DropDownList component
In Syncfusion® Grid component, you have an option to provide a custom data source for the DropDownList component in the edit form. This feature allows you to define a specific set of values for the DropDownList.
To achieve this, you can utilize the columns->edit->params property. This property allows you to define the edit params for the column within the grid.
When setting a new data source using the edit params, you need to specify a new query property for the DropDownList. The query property allows you to define custom queries for data retrieval and filtering.
In the below demo, DropDownList is rendered with custom data source for the ShipCountry column :
@{
    ViewBag.DropDownData = new List<object>
    {
        new { Country = "United States"},
        new { Country = "Australia" },
        new { Country = "India" },
        new { Country = "Germany" },
        new { Country = "France" },
        new { Country = "Brazil" }
    };
    var DropDownList = new Syncfusion.EJ2.DropDowns.DropDownList() { DataSource = ViewBag.DropDownData, Query = "new ej.data.Query()", AllowFiltering = true, Fields = new Syncfusion.EJ2.DropDowns.DropDownListFieldSettings() { Value = "Country", Text = "Country" } };
}

<ejs-grid id="grid" dataSource="@ViewBag.DataSource" height="348px" toolbar="@(new List<string>() { "Add", "Edit", "Delete", "Cancel", "Update" })">
    <e-grid-editSettings allowAdding="true" allowDeleting="true" allowEditing="true" mode="Normal"></e-grid-editSettings>
    <e-grid-columns>
        <e-grid-column field="OrderID" headerText="Order ID" isPrimaryKey="true" textAlign="Right" width="100"></e-grid-column>
        <e-grid-column field="CustomerID" headerText="Customer ID" type="string" width="120"></e-grid-column>
        <e-grid-column field="Freight" headerText="Freight" textAlign="Right" format="C2" editType="numericedit" width="120"></e-grid-column>
        <e-grid-column field="ShipCountry" headerText="Ship Country" width="150" editType="dropdownedit" edit="new {@params = DropDownList }"></e-grid-column>
    </e-grid-columns>
</ejs-grid>
public IActionResult Index()
{
ViewBag.DataSource = OrdersDetails.GetAllRecords();
return View();
}
Apply filtering for DropDownList component
The Syncfusion® Grid component provides filtering for the DropDownList within the edit form. This feature allows to select options from a predefined list and easily search for specific items using the built-in filtering feature.
To enable filtering, set the allowFiltering property to true within the edit params. This will enable the filtering feature in the DropDownList.
In the following demo, filtering is enabled for the ShipCountry column:
<ejs-grid id="Grid" dataSource="@ViewBag.DataSource" toolbar="@(new List<string>() { "Add", "Edit", "Delete", "Cancel", "Update" })">
    <e-grid-editSettings allowAdding="true" allowDeleting="true" allowEditing="true" mode="Normal"></e-grid-editSettings>
    <e-grid-columns>
        <e-grid-column field="OrderID" headerText="Order ID" isPrimaryKey="true" validationRules="@(new { required=true, number=true})" textAlign="Right" width="100"></e-grid-column>
        <e-grid-column field="CustomerID" headerText="Customer ID" validationRules="@(new { required=true})" width="120"></e-grid-column>
        <e-grid-column field="ShipCountry" headerText="Ship Country" edit="@(new { @params = new Syncfusion.EJ2.DropDowns.DropDownList(){
        AllowFiltering= true,
        } })" validationRules="@(new { required=true})" width="150" editType="dropdownedit" ></e-grid-column>
    </e-grid-columns>
</ejs-grid>
public IActionResult Index()
{
ViewBag.DataSource = OrderDetails.GetAllRecords();
return View();
}
Open popup while focusing in the edit cell
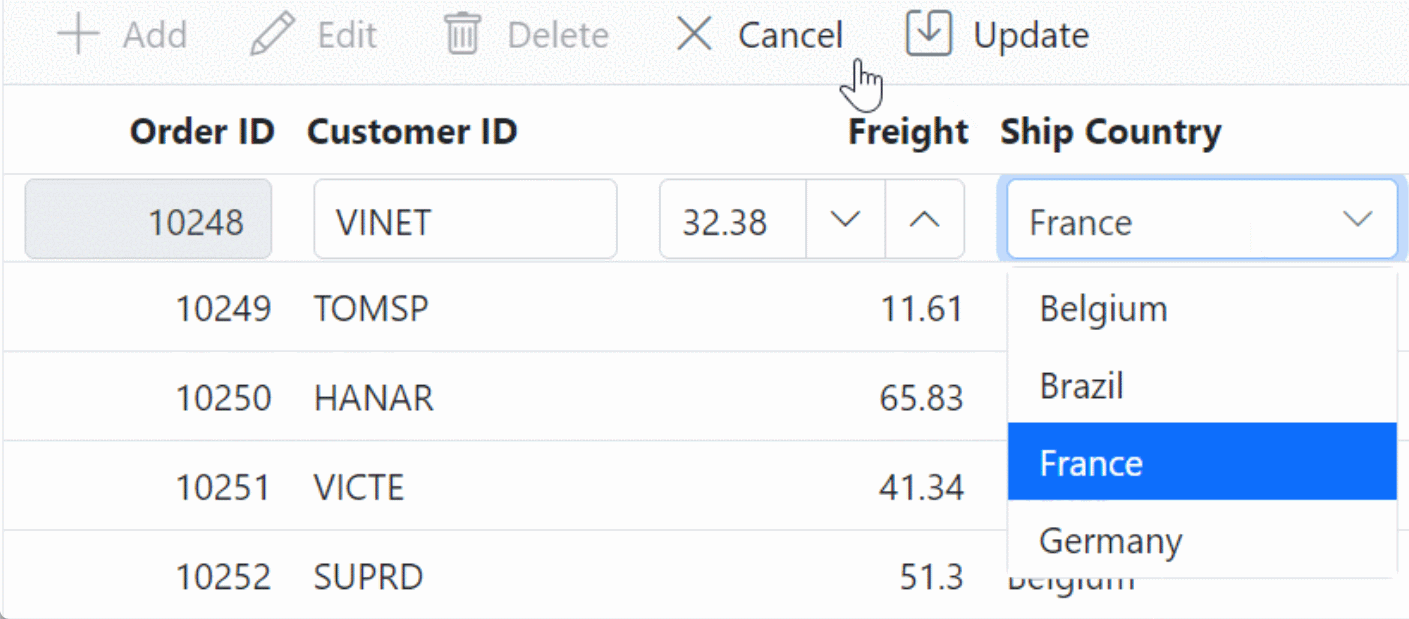
You can open the dropdown edit popup with a single click by focusing the dropdown element. This feature allows you to quickly access and interact with the dropdown options without the need for an additional click.
To achieve this, you can utilize the showPopup method provided by the EJ2 DropDownList component. This method can be invoked within the actionComplete event of the Grid, which triggers when an action, such as editing, is completed. By calling the showPopup method in this event, you can open the popup for the dropdown edit.
To ensure that the dropdown column is the clicked edit target, you need to set a global flag variable in the mouseup event along with load event. This flag variable will be used to determine if the clicked element corresponds to the dropdown column.
The following sample demonstrates how to open the popup when focusing on the edit cell using the actionComplete and load events:
<ejs-grid id="Grid" dataSource="@ViewBag.DataSource" actionComplete="actionComplete" load="load" toolbar="@(new List<string>() { "Add", "Edit", "Delete", "Cancel", "Update" })">
    <e-grid-editSettings allowAdding="true" allowDeleting="true" allowEditing="true"></e-grid-editSettings>
    <e-grid-columns>
        <e-grid-column field="OrderID" headerText="Order ID" isPrimaryKey="true" validationRules="@(new { required=true, number=true})" textAlign="Right" width="100"></e-grid-column>
        <e-grid-column field="CustomerID" headerText="Customer ID" width="120"></e-grid-column>
        <e-grid-column field="Freight" headerText="Freight" textAlign="Right" width="120"></e-grid-column>
        <e-grid-column field="ShipCountry" headerText="Ship Country" editType="dropdownedit" width="150"></e-grid-column>
   </e-grid-columns>
</ejs-grid>

<script>
    var isDropdown = false;
    function load() {
        var grid = document.getElementById("Grid").ej2_instances[0];
        grid.element.addEventListener('mouseup', (e) => {
            if (e.target.classList.contains('e-rowcell')) {
                if (grid.isEdit) {
                    grid.endEdit();
                }
                var rowInfo = grid.getRowInfo(e.target);
                if (rowInfo && rowInfo.column && (rowInfo.column).field === 'ShipCountry') {
                    isDropdown = true;
                    grid.selectRow(rowInfo.rowIndex);
                    grid.startEdit();
                }
            }
        });
    }

    function actionComplete(args) {
        if (args.requestType === 'beginEdit' && isDropdown) {
            isDropdown = false;
            var dropdownObj = (args.form.querySelector('.e-dropdownlist'))['ej2_instances'][0];
            dropdownObj.element.focus();
            dropdownObj.showPopup();
        }
    }
</script>
public IActionResult Index()
{
ViewBag.DataSource = OrdersDetails.GetAllRecords();
return View();
}
Customize CheckBox component of booleanedit type
You can customize the CheckBox component in Grid edit form using its property. This customization allows you to configure various properties of the CheckBox, tailoring its behavior and appearance to match your specific requirements within the Grid. The behavior of the editor component can be fine-tuned through the columns->edit->params property.
| Component | Edit Type | Description | Example Customized edit params |
|---|---|---|---|
| CheckBox | booleanedit | The booleanedit type renders a CheckBox component for boolean data type. To customize the CheckBox component, refer to the CheckBox API documentation for detailed information on available properties. |
params: { checked: true} |
The following sample code demonstrates the customization applied to CheckBox component of Verified Grid column:
<ejs-grid id="Grid" dataSource="@ViewBag.DataSource" toolbar="@(new List<string>() { "Add", "Edit", "Delete", "Cancel", "Update" })">
    <e-grid-editSettings allowAdding="true" allowDeleting="true" allowEditing="true"></e-grid-editSettings>
    <e-grid-columns>
        <e-grid-column field="OrderID" headerText="Order ID" isPrimaryKey="true" validationRules="@(new { required=true, number=true})" textAlign="Right" width="100"></e-grid-column>
        <e-grid-column field="CustomerID" headerText="Customer ID" validationRules="@(new { required=true})" width="120"></e-grid-column>
         <e-grid-column field="Freight" headerText="Freight" editType="numericedit" validationRules="@(new { required= true,min=1, max=1000 })" textAlign="Right" width="120"></e-grid-column>
        <e-grid-column field="ShipCity" headerText="Ship City" validationRules="@(new { required=true})" editType="dropdownedit" width="110"></e-grid-column>
        <e-grid-column field="OrderDate" headerText="Order Date" format="yyyy-MM-dd" editType="datetimepickeredit" width="120"></e-grid-column>
        <e-grid-column field="Verified" headerText="Verified" edit= "@(new { @params = new Syncfusion.EJ2.Buttons.CheckBox() { Disabled = true } })" editType= 'booleanedit' displayAsCheckBox="true" width="100"></e-grid-column>
   </e-grid-columns>
</ejs-grid>
public IActionResult Index()
{
ViewBag.DataSource = OrdersDetails.GetAllRecords();
return View();
}
Customize DatePicker component of datepickeredit type
You can customize the DatePicker component in Grid edit form using its property. This customization allows you to configure various properties of the DatePicker, tailoring its behavior and appearance to match your specific requirements within the Grid. The behavior of the editor component can be fine-tuned through the columns->edit->params property.
| Component | Edit Type | Description | Example Customized edit params |
|---|---|---|---|
| DatePicker | datepickeredit | The datepickeredit type renders a DatePicker component for date data type columns. To customize the DatePicker component, refer to the DatePicker API documentation for detailed information on available properties. |
params: { format:’dd.MM.yyyy’ } |
The following sample code demonstrates the customization applied to DatePicker component of OrderDate Grid column:
<ejs-grid id="Grid" dataSource="@ViewBag.DataSource" toolbar="@(new List<string>() { "Add", "Edit", "Delete", "Cancel", "Update" })">
    <e-grid-editSettings allowAdding="true" allowDeleting="true" allowEditing="true"></e-grid-editSettings>
    <e-grid-columns>
        <e-grid-column field="OrderID" headerText="Order ID" isPrimaryKey="true" validationRules="@(new { required=true, number=true})" textAlign="Right" width="100"></e-grid-column>
        <e-grid-column field="CustomerID" headerText="Customer ID" validationRules="@(new { required=true})" width="120"></e-grid-column>
        <e-grid-column field="Freight" headerText="Freight" editType="numericedit" validationRules="@(new { required= true,min=1, max=1000 })" textAlign="Right" width="120"></e-grid-column>
        <e-grid-column field="ShipCity" headerText="Ship City" validationRules="@(new { required=true})" editType="dropdownedit" width="150"></e-grid-column>
        <e-grid-column field="OrderDate" headerText="Order Date" edit="@(new { @params = new Syncfusion.EJ2.Calendars.DatePicker() { ShowClearButton = false, ShowTodayButton=false } })" validationRules="@(new { required= true })" format="MM-dd-yyyy" editType="datepickeredit" width="150"></e-grid-column>
   </e-grid-columns>
</ejs-grid>
public IActionResult Index()
{
ViewBag.DataSource = OrdersDetails.GetAllRecords();
return View();
}
Disable the date value prior to the selected date value in DatePicker
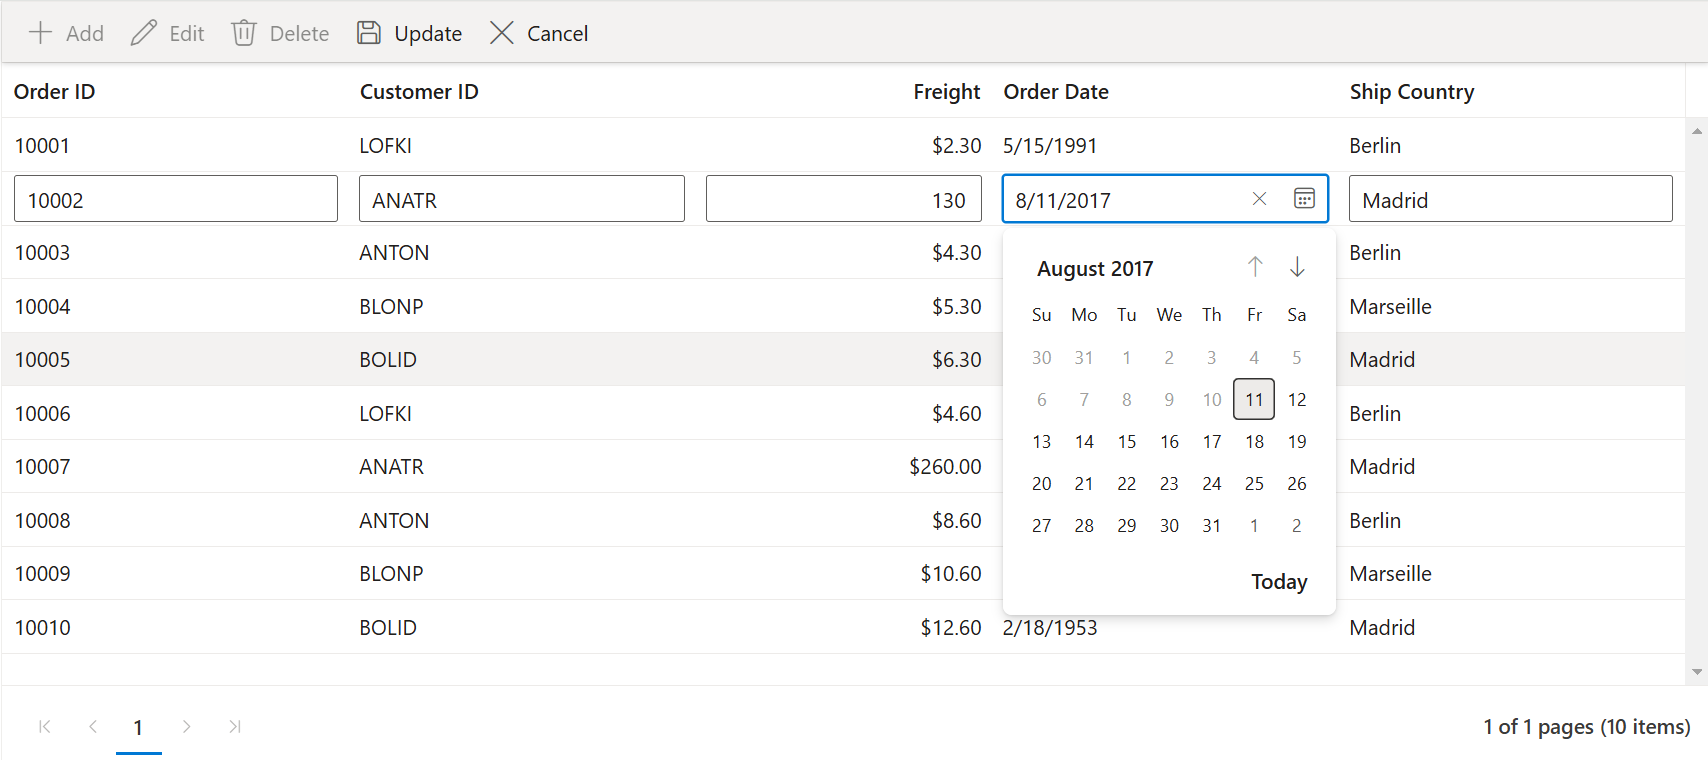
The Syncfusion ASP.NET Core Grid allows configuring the DatePicker to dynamically set a minimum selectable date. This ensures that users can only select dates that fall after a specified minimum date, based on the data in each row. This feature is particularly useful for maintaining data consistency and preventing users from selecting inappropriate or illogical dates.
The following example demonstrates how to configure the DatePicker within the Grid using the edit parameters of a column. This setup dynamically restricts the selection of dates in the DatePicker’s calendar based on the data in the current row.
<ejs-grid id="Grid" dataSource="@ViewBag.DataSource" toolbar="@(new List<string>() { "Add", "Edit", "Delete", "Cancel", "Update" })" actionBegin="actionBegin">
    <e-grid-editSettings allowAdding="true" allowDeleting="true" allowEditing="true"></e-grid-editSettings>
    <e-grid-columns>
        <e-grid-column field="OrderID" headerText="Order ID" isPrimaryKey="true" validationRules="@(new { required=true, number=true})" textAlign="Right" width="100"></e-grid-column>
        <e-grid-column field="CustomerID" headerText="Customer ID" validationRules="@(new { required=true})" width="120"></e-grid-column>
        <e-grid-column field="Freight" headerText="Freight" editType="numericedit" validationRules="@(new { required= true,min=1, max=1000 })" textAlign="Right" width="120"></e-grid-column>
        <e-grid-column field="ShipCity" headerText="Ship City" validationRules="@(new { required=true})" editType="dropdownedit" width="150"></e-grid-column>
        <e-grid-column field="OrderDate" headerText="Order Date" format="MM-dd-yyyy" editType="datepickeredit" width="150"></e-grid-column>
   </e-grid-columns>
</ejs-grid>
<script>
function actionBegin(args) {
    if (args.requestType === 'beginEdit') {
        let minDate = args.rowData['OrderDate'];
        this.columns.forEach((column) => {
            if (column.field === 'OrderDate') {
                column.edit.params = { min: minDate };
            }
        });
    }
}
</script>
public IActionResult Index()
{
ViewBag.DataSource = OrdersDetails.GetAllRecords();
return View();
}
Customize DateTimePicker component of datetimepickeredit type
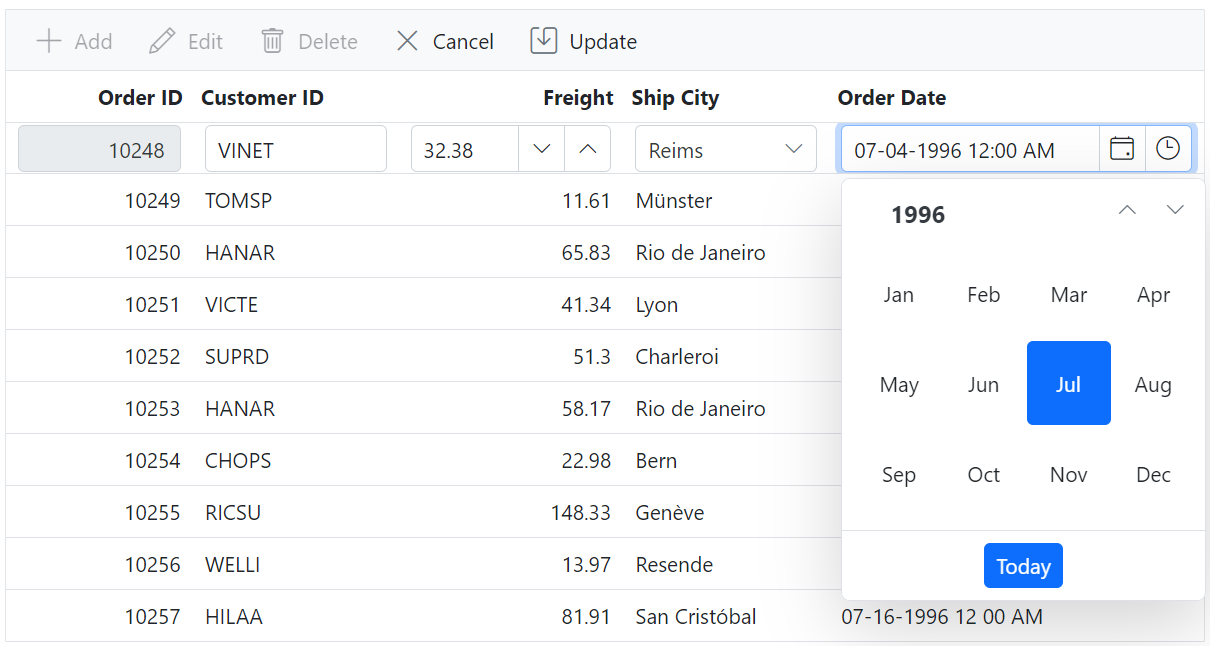
You can customize the DateTimePicker component in Grid edit form using its property. This customization allows you to configure various properties of the DateTimePicker, tailoring its behavior and appearance to match your specific requirements within the Grid. The behavior of the editor component can be fine-tuned through the columns->edit->params property.
| Component | Edit Type | Description | Example Customized edit params |
|---|---|---|---|
| DateTimePicker | datetimepickeredit | The datetimepickeredit type renders a DateTimePicker component for date time data type columns. You can customize the DateTimePicker component, refer to the DateTimePicker API documentation for detailed information on available properties. |
params: { value: new Date() } |
The following sample code demonstrates the customization applied to DatePicker component of OrderDate Grid column:
<ejs-grid id="Grid" dataSource="@ViewBag.DataSource" toolbar="@(new List<string>() { "Add", "Edit", "Delete", "Cancel", "Update" })">
    <e-grid-editSettings allowAdding="true" allowDeleting="true" allowEditing="true"></e-grid-editSettings>
    <e-grid-columns>
        <e-grid-column field="OrderID" headerText="Order ID" isPrimaryKey="true" validationRules="@(new { required=true, number=true})" textAlign="Right" width="100"></e-grid-column>
        <e-grid-column field="CustomerID" headerText="Customer ID" validationRules="@(new { required=true})" width="120"></e-grid-column>
        <e-grid-column field="Freight" headerText="Freight" editType="numericedit" validationRules="@(new { required= true,min=1, max=1000 })" textAlign="Right" width="120"></e-grid-column>
        <e-grid-column field="ShipCity" headerText="Ship City" validationRules="@(new { required=true})" editType="dropdownedit" width="150"></e-grid-column>
        <e-grid-column field="OrderDate" headerText="Order Date" edit="@(new { @params = new Syncfusion.EJ2.Calendars.DateTimePicker() {  Start = Syncfusion.EJ2.Calendars.CalendarView.Year, ShowClearButton = false, Format="MM-dd-yyyy hh:mm aa", } })" validationRules="@(new { required= true })" format="MM-dd-yyyy hh mm aa" editType="datetimepickeredit" width="150"></e-grid-column>
   </e-grid-columns>
</ejs-grid>
public IActionResult Index()
{
ViewBag.DataSource = OrdersDetails.GetAllRecords();
return View();
}
Access editor components using instance
Accessing editor components in the Syncfusion® Grid allows you to interact with the editor instances associated with cells during editing or adding actions. This feature is especially useful when you need to perform custom actions, retrieve data from the Editor, or manipulate its properties during editing or adding operations in the Grid.
To access the component instance from the component element, you can use the ej2_instances property. This property provides access to the instance of the editor component associated with a cell.
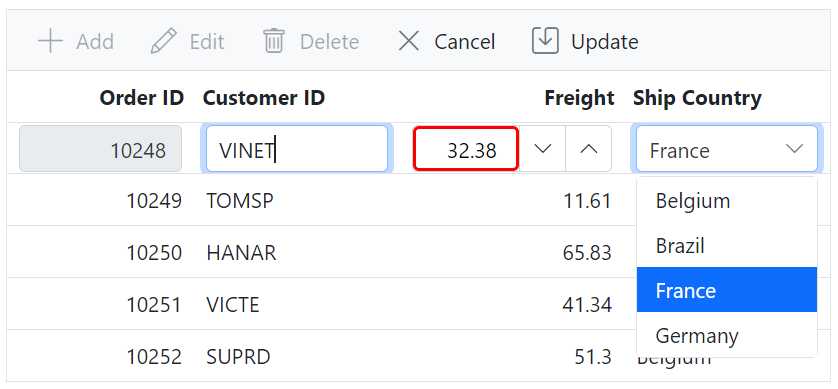
In the below demo, you can access the editor component instance while adding or editing actions in the actionComplete event.
<ejs-grid id="Grid" dataSource="@ViewBag.DataSource" actionComplete="actionComplete" toolbar="@(new List<string>() { "Add", "Edit", "Delete", "Cancel", "Update" })">
    <e-grid-editSettings allowAdding="true" allowDeleting="true" allowEditing="true"></e-grid-editSettings>
    <e-grid-columns>
        <e-grid-column field="OrderID" headerText="Order ID" isPrimaryKey="true" validationRules="@(new { required=true, number=true})" textAlign="Right" width="100"></e-grid-column>
        <e-grid-column field="CustomerID" headerText="Customer ID" validationRules="@(new { required=true})" width="120"></e-grid-column>
        <e-grid-column field="Freight" headerText="Freight" validationRules="@(new { required=true})" textAlign="Right" width="120"></e-grid-column>
        <e-grid-column field="ShipCountry" headerText="Ship Country" editType="dropdownedit" width="150"></e-grid-column>
   </e-grid-columns>
</ejs-grid>

<script>
    function actionComplete(args) {
        if (args.requestType === 'beginEdit' || args.requestType === 'add') {
            var rowElement = args.row;
            var numericTextBox = rowElement.querySelector('.e-numerictextbox'); // numeric TextBox control element
            if (numericTextBox) {
                var numericTextBoxInstance = (numericTextBox).ej2_instances[0];
                numericTextBoxInstance.element.style.backgroundColor = 'light pink';
                numericTextBoxInstance.element.style.color = 'black';
                numericTextBoxInstance.element.style.border = '2px solid red';
                numericTextBoxInstance.element.style.textAlign = 'center';
                numericTextBoxInstance.max = 1000;
                numericTextBoxInstance.min = 1;
            }
            var dropDownList = rowElement.querySelector('.e-dropdownlist'); // dropDownList control element
            if (dropDownList) {
                var dropDownListInstance = (dropDownList).ej2_instances[0]
                dropDownListInstance.showPopup(); // Open the dropdown list
            }
        }
    }
</script>
public IActionResult Index()
{
ViewBag.DataSource = OrdersDetails.GetAllRecords();
return View();
}
Render custom cell editors using external function
The Syncfusion® Grid provides the ability to render custom cell editors, allowing you to add custom components to specific columns in your grid using the cell edit template feature. This feature is useful when you need to edit cell values using custom input elements or components.
To utilize the custom cell editor template feature, you need to implement the following functions:
-
create - It is used to create the element at the time of initialization.
-
write - It is used to create custom component or assign default value at the time of editing.
-
read - It is used to read the value from the component at the time of save.
-
destroy - It is used to destroy the component.
Render textArea in edit form
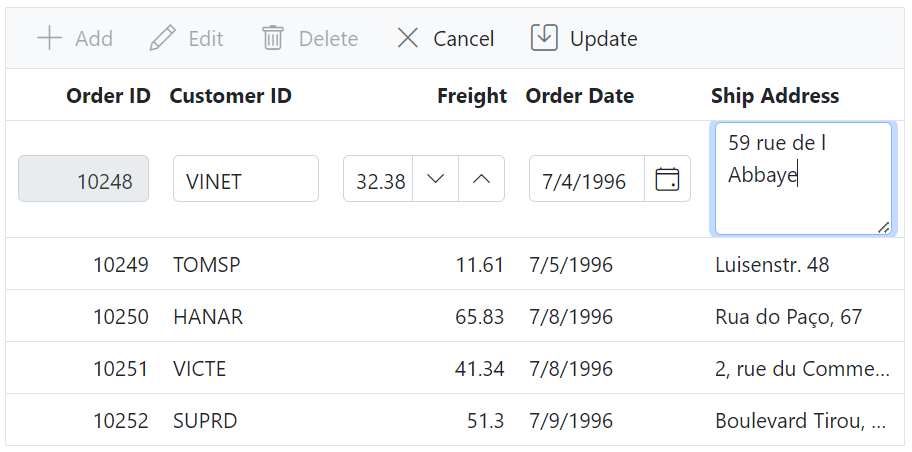
The Syncfusion® Grid allows you to render a textArea within the Grid’s edit form for a specific column. This feature is especially valuable when you need to edit and display multi-line text content, providing an efficient way to manage extensive text data within the Grid’s columns.
To render a textArea in the edit form, you need to define a cell edit template for the column using edit property. The edit property specifies the cell edit template that used as an editor for a particular column.
When using a text area, please use Shift+Enter to move to the next line. By default, pressing Enter will trigger a record update while you are in edit mode.
The following example demonstrates how to render a textArea component in the ShipAddress column of the Syncfusion® Grid. The valueAccessor property is utilized to split the text into multiple lines within the grid column:
@{
    var valueAccessor = "valueAccessor";
}

<ejs-grid id="Grid" dataSource="@ViewBag.DataSource" toolbar="@(new List<string>() { "Add", "Edit", "Delete", "Cancel", "Update" })">
    <e-grid-editSettings allowAdding="true" allowDeleting="true" allowEditing="true"></e-grid-editSettings>
    <e-grid-columns>
        <e-grid-column field="OrderID" headerText="Order ID" isPrimaryKey="true" validationRules="@(new { required=true, number=true})" textAlign="Right" width="100"></e-grid-column>
        <e-grid-column field="CustomerID" headerText="Customer ID" validationRules="@(new { required=true})" width="120"></e-grid-column>
        <e-grid-column field="Freight" headerText="Freight" editType="numericedit" validationRules="@(new { required= true,min=1, max=1000 })" textAlign="Right" width="120"></e-grid-column>
        <e-grid-column field="OrderDate" headerText="Order Date" format="yMd" editType="datepickeredit" width="120"></e-grid-column>
        <e-grid-column field="ShipAddress" headerText="Ship Address" disableHtmlEncode="false" edit="@(new {create = "createShipAddressHandler", read = "readShipAddressHandler", destroy = "destroyShipAddressHandler", write = "writeShipAddressHandler"})" valueAccessor="valueAccessor" editType="dropdownedit" width="150"></e-grid-column>
   </e-grid-columns>
</ejs-grid>

<script>
    function createShipAddressHandler() {
        textBoxElement = document.createElement('textarea');
        return textBoxElement;
    }
    function destroyShipAddressHandler() {
        textBoxObject.destroy();
    }
    function readShipAddressHandler() {
        return textBoxObject.value;
    }

    function writeShipAddressHandler(args) {
        var rowData = args.rowData;
        textBoxObject = new ej.inputs.TextBox({
            multiline: true,
            value: rowData.ShipAddress,
        });
        textBoxObject.appendTo(textBoxElement);
    }

    function valueAccessor(field, data) {
        var value = data.ShipAddress;
        return (value !== undefined) ? value.split('\n').join('<br>') : '';
    }
</script>
public IActionResult Index()
{
ViewBag.DataSource = OrdersDetails.GetAllRecords();
return View();
}
Prevent the enter key functionality in multiline textbox while editing
While editing a particular row in normal or dialog edit mode, pressing the ENTER key will save the changes made in the specific cell or edit form. Similarly, pressing the ENTER key while performing editing with the multiline textbox will save the changes. However, in a multiline textbox, it is often desired that pressing the ENTER key adds a new line break in the text content, rather than triggering the save action.
To achieve this behavior, you can utilize the stopPropagation method along with the focus event of the textBox component. This prevents the default behavior of the ENTER key, allowing you to manually handle the newline behavior.
The following example demonstrates how to prevent the enter key functionality in multiline textbox during editing by utilizing the focus event:
@{
    var valueAccessor = "valueAccessor";
}

<ejs-grid id="Grid" dataSource="@ViewBag.DataSource" toolbar="@(new List<string>() { "Add", "Edit", "Delete", "Cancel", "Update" })">
    <e-grid-editSettings allowAdding="true" allowDeleting="true" allowEditing="true"></e-grid-editSettings>
    <e-grid-columns>
        <e-grid-column field="OrderID" headerText="Order ID" isPrimaryKey="true" validationRules="@(new { required=true, number=true})" textAlign="Right" width="100"></e-grid-column>
        <e-grid-column field="CustomerID" headerText="Customer ID" validationRules="@(new { required=true})" width="120"></e-grid-column>
        <e-grid-column field="Freight" headerText="Freight" editType="numericedit" validationRules="@(new { required= true,min=1, max=1000 })" textAlign="Right" width="120"></e-grid-column>
        <e-grid-column field="OrderDate" headerText="Order Date" format="yMd" editType="datepickeredit" width="120"></e-grid-column>
        <e-grid-column field="ShipAddress" headerText="Ship Address" disableHtmlEncode="false" edit="@(new {create = "createShipAddressHandler", read = "readShipAddressHandler", destroy = "destroyShipAddressHandler", write = "writeShipAddressHandler"})" valueAccessor="valueAccessor" editType="dropdownedit" width="150"></e-grid-column>
   </e-grid-columns>
</ejs-grid>

<script>
    function createShipAddressHandler() {
        textBoxElementent = document.createElement('textarea');
        return textBoxElement;
    }
    function destroyShipAddressHandler() {
        textBoxObject.destroy();
    }
    function readShipAddressHandler() {
        return textBoxObject.value;
    }

    function writeShipAddressHandler(args) {
        var rowData = args.rowData;
        textBoxObject = new ej.inputs.TextBox({
            multiline: true,
            value: rowData.ShipAddress,
            focus:  function onFocus(args) {
                ((args.event).target).addEventListener('keydown', (e) => {
                    if ((e).key === 'Enter') {
                        e.stopPropagation();
                    }
                });
            }
        });
        textBoxObject.appendTo(textBoxElement);
    }

    function valueAccessor(field, data) {
        var value = data.ShipAddress;
        return (value !== undefined) ? value.split('\n').join('<br>') : '';
    }
</script>
public IActionResult Index()
{
ViewBag.DataSource = OrdersDetails.GetAllRecords();
return View();
}
Render MaskedTextBox component in edit form
The Syncfusion® Grid allows you to render a MaskedTextBox component within the Grid’s edit form for a specific column. This feature is especially useful when you need to provide masked input fields that require a specific format, such as phone numbers or postal codes.
To render a MaskedTextBox component in the edit form, you need to define a cell edit template for the column using edit property. The edit property specifies the cell edit template that used as an editor for a particular column.
Here’s an example of how to render a MaskedTextBox component in the CustomerNumber column of the Syncfusion® Grid.
<ejs-grid id="Grid" dataSource="@ViewBag.DataSource" toolbar="@(new List<string>() { "Add", "Edit", "Delete", "Cancel", "Update" })">
    <e-grid-editSettings allowAdding="true" allowDeleting="true" allowEditing="true"></e-grid-editSettings>
    <e-grid-columns>
        <e-grid-column field="OrderID" headerText="Order ID" isPrimaryKey="true" validationRules="@(new { required=true, number=true})" textAlign="Right" width="100"></e-grid-column>
        <e-grid-column field="CustomerID" headerText="Customer ID" validationRules="@(new { required=true})" width="120"></e-grid-column>
        <e-grid-column field="Freight" headerText="Freight" editType="numericedit" validationRules="@(new { required= true,min=1, max=1000 })" textAlign="Right" width="120"></e-grid-column>
        <e-grid-column field="OrderDate" headerText="Order Date" format="yMd" editType="datepickeredit" width="120"></e-grid-column>
        <e-grid-column field="CustomerNumber" headerText="Customer Number" edit="@(new {create = "createCustomerNumberHandler", read = "readCustomerNumberHandler", destroy = "destroyCustomerNumberHandler", write = "writeCustomerNumberHandler"})"  width="150"></e-grid-column>
   </e-grid-columns>
</ejs-grid>

<script>
    function createCustomerNumberHandler() {
        maskElement = document.createElement('input');
        return maskElement;
    }
    function destroyCustomerNumberHandler() {
        maskObject.destroy();
    }
    function readCustomerNumberHandler() {
        return maskObject.value;
    }
    function writeCustomerNumberHandler(args) {
        var rowData = args.rowData;
        maskObject = new ej.inputs.MaskedTextBox({
            mask: "000-000-0000",
            value: rowData.CustomerNumber
        });
        maskObject.appendTo(maskElement);
    }
</script>
public IActionResult Index()
{
ViewBag.DataSource = OrdersDetails.GetAllRecords();
return View();
}
Render DropDownList component in edit form
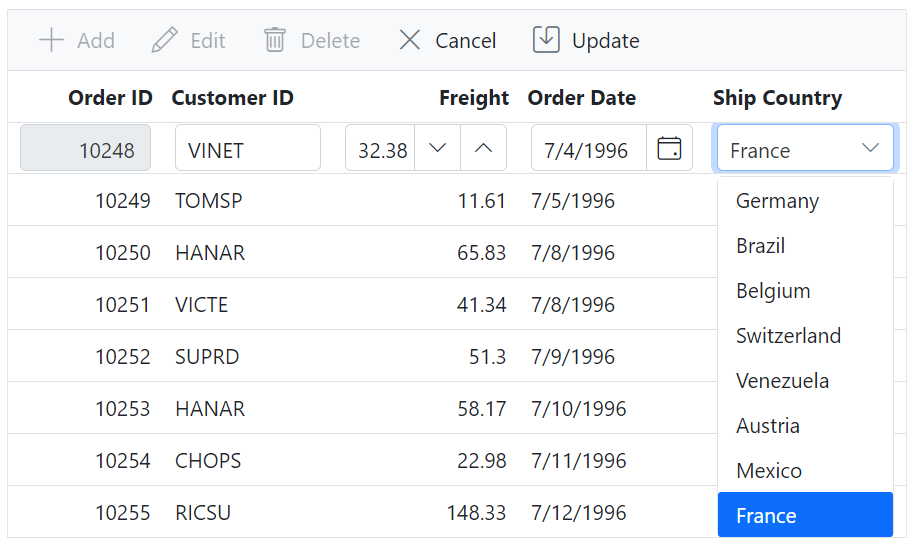
The Syncfusion® Grid allows you to render a DropDownList component within the Grid’s edit form for a specific column. This feature is valuable when you need to provide a convenient way to select options from a predefined list while editing data in the Grid’s edit form.
To render a DropDownList component in the edit form, you need to define a cell edit template for the column using edit property. The edit property specifies the cell edit template that used as an editor for a particular column.
The following example demonstrates how to render a DropDownList component in the ShipCountry column of the Syncfusion® Grid.
<ejs-grid id="Grid" dataSource="@ViewBag.DataSource" toolbar="@(new List<string>() { "Add", "Edit", "Delete", "Update", "Cancel" })">
    <e-grid-editsettings allowEditing="true" allowAdding="true" allowDeleting="true"></e-grid-editsettings>
    <e-grid-columns>
        <e-grid-column field="OrderID" headerText="Order ID" isPrimaryKey="true" width="120" textAlign="Right"></e-grid-column>
        <e-grid-column field="CustomerID" headerText="Customer Name" width="120"></e-grid-column>
        <e-grid-column field="Freight" headerText="Freight" editType="numericedit" validationRules="@(new { required= true,min=1, max=1000 })" format="C2" textAlign="Right" width="120"></e-grid-column>
        <e-grid-column field="OrderDate" headerText="Order Date" format="yMd" editType="datepickeredit" width="120"></e-grid-column>
        <e-grid-column field="ShipCountry" headerText="Ship Country" edit="@(new {create = "createShipCountryHandler", read = "readShipCountryHandler", destroy = "destroyShipCountryHandler", write = "writeShipCountryHandler"})" width="130"></e-grid-column>
    </e-grid-columns>
</ejs-grid>

<script>
    var dropDownElement;
    var dropDownListObj;
    var selectDataSource = [
        { text: 'Germany', value: 'Germany' },
        { text: 'Brazil', value: 'Brazil' },
        { text: 'Belgium', value: 'Belgium' },
        { text: 'Switzerland', value: 'Switzerland' },
        { text: 'Venezuela', value: 'Venezuela' },
        { text: 'Austria', value: 'Austria' },
        { text: 'Mexico', value: 'Mexico' },
        { text: 'France', value: 'France' }
    ];
    function createShipCountryHandler() {
        dropDownElement = document.createElement('input');
        return dropDownElement;
    }
    function destroyShipCountryHandler() {
        dropDownListObj.destroy();
    }
    function readShipCountryHandler() {
        return dropDownListObj.value;
    }
    function writeShipCountryHandler(args) {
        var rowData = args.rowData;
        dropDownListObj = new ej.dropdowns.DropDownList({
            dataSource: selectDataSource,
            value: rowData.ShipCountry
        });
        dropDownListObj.appendTo(dropDownElement);
    }
</script>
public IActionResult Index()
{
ViewBag.DataSource = OrderDetails.GetAllRecords();
return View();
}
Render images in the DropDownList editor component using the item template
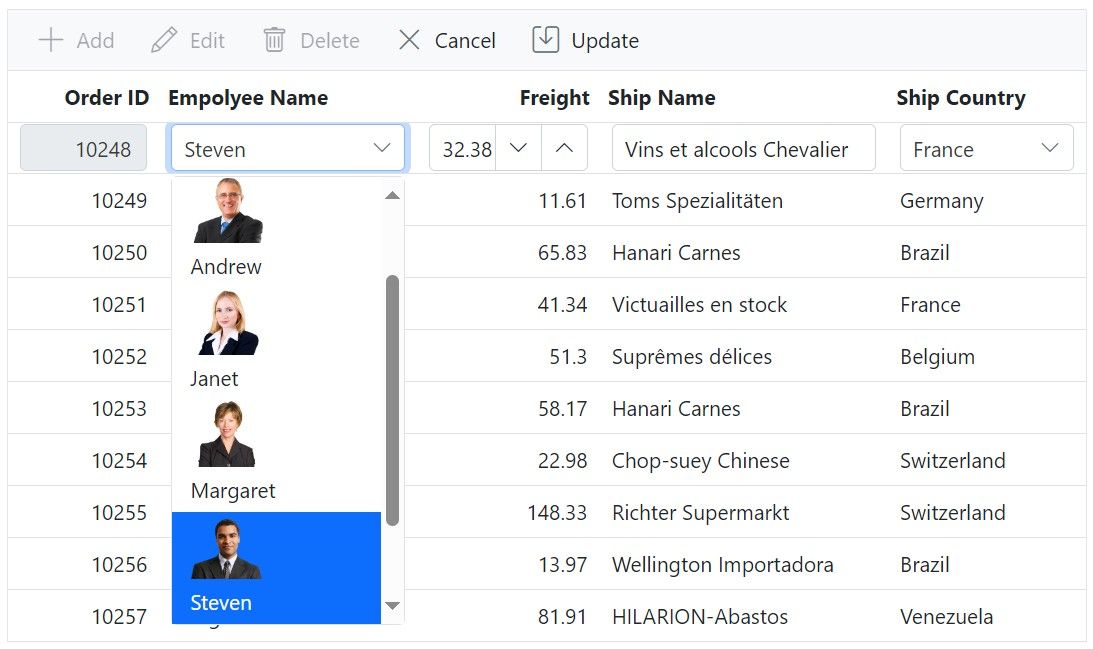
The Syncfusion® Grid allows you to render images in the DropDownList editor conttol. This feature is valuable when you want to display images for each item in the dropdown list of a particular column, enhancing the visual representation of your data.
To render a DropDownList in the edit form, you need to define a cell edit template for the column using edit property. The edit property specifies the cell edit template that used as an editor for a particular column.
To display an image in the DropDownList editor component, you can utilize the itemTemplate property. This property allows you to customize the content of each item in the dropdown list.
The following example demonstrates how to render images in the DropDownList editor component using the itemTemplate within the EmployeeName column of the Syncfusion® Grid.
@using Newtonsoft.Json;

<ejs-grid id="Grid" dataSource="@ViewBag.DataSource" toolbar="@(new List<string>() { "Add", "Edit", "Delete", "Update", "Cancel" })">
    <e-grid-editsettings allowEditing="true" allowAdding="true" allowDeleting="true"></e-grid-editsettings>
    <e-grid-columns>
    <e-grid-column field="OrderID" headerText="Order ID" isPrimaryKey="true" validationRules="@(new { required=true, number=true})" textAlign="Right" width="120"></e-grid-column>
    <e-grid-column field="EmployeeID" headerText="Empolyee Name" foreignKeyField="EmployeeID" foreignKeyValue="FirstName" dataSource="ViewBag.EmployeeDataSource" edit="@(new {create = "createEmployeeNameHandler", read = "readEmployeeNameHandler", destroy = "destroyEmployeeNameHandler", write = "writeEmployeeNameHandler"})" width="220"></e-grid-column>
    <e-grid-column field="Freight" headerText="Freight" editType="numericedit" format="C2" textAlign="Right" width="100"></e-grid-column>
    <e-grid-column field="ShipName" headerText="Ship Name" width="170"></e-grid-column>
    <e-grid-column field="ShipCountry" headerText="Ship Country" editType="dropdownedit" width="150"></e-grid-column>
    </e-grid-columns>
</ejs-grid>

<script>
    var dropDownElement;
    var dropDownListObj;
    var dropDownDataSource = @Html.Raw(JsonConvert.SerializeObject(ViewBag.EmployeeDataSource));

    function createEmployeeNameHandler() {
        dropDownElement = document.createElement('input');
        return dropDownElement;
    }
    function destroyEmployeeNameHandler() {
        dropDownListObj.destroy();
    }
    function readEmployeeNameHandler() {
        return dropDownListObj.value;
    }
    function writeEmployeeNameHandler(args) {
        var rowData = args.rowData;
        dropDownListObj = new ej.dropdowns.DropDownList({
            dataSource: dropDownDataSource,
            fields: { text: 'FirstName', value: 'EmployeeID' },
            value: rowData.EmployeeID,
            change: function (args) {
                // Update the EmployeeID value in the rowData object
                rowData.EmployeeID = args.value;
            },
            itemTemplate: function (props) {
                return '<div><img class="employeeImage" width="50px" src="https://ej2.syncfusion.com/demos/src/grid/images/' + props.EmployeeID + '.png" alt="${EmployeeID}"/><div class="employeeName">' + props.FirstName + '</div></div>';
            }
        });
        dropDownListObj.appendTo(dropDownElement);
    }
</script>
public IActionResult Index()
{
ViewBag.DataSource = OrderDetails.GetAllRecords();
ViewBag.EmployeeDataSource = EmployeeDetails.GetAllRecords();
return View();
}
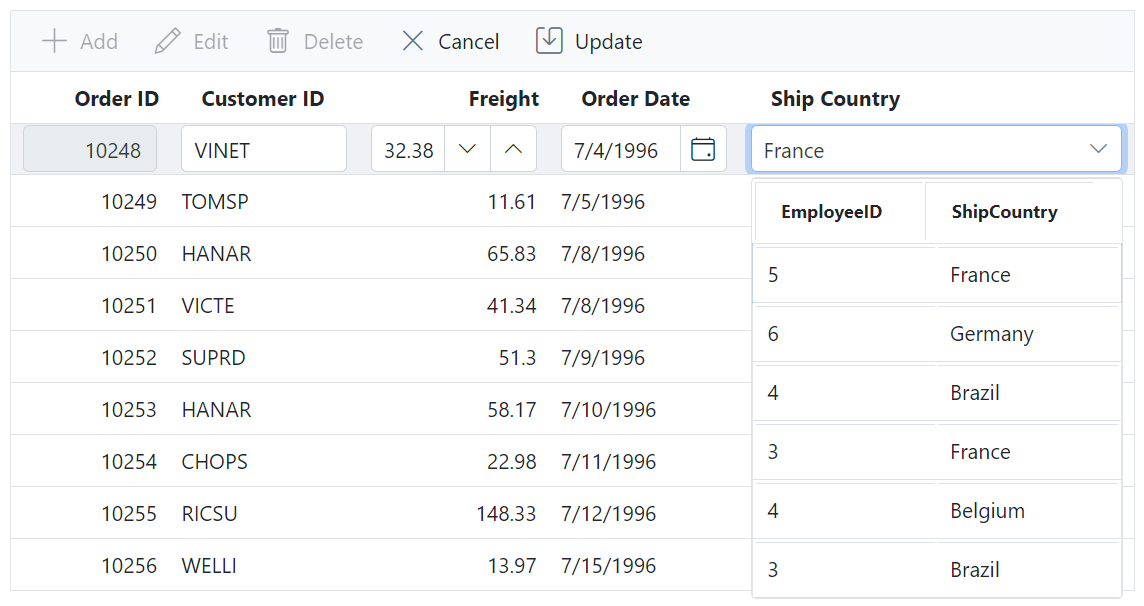
Render Multiple columns in DropDownList component
The Syncfusion® Grid allows you to render a DropDownList component within the Grid’s edit form for a specific column. This feature is particularly useful when you want to display more detailed information for each item in the dropdown list during editing a specific column.
To render a DropDownList in the edit form, you need to define a cell edit template for the column using edit property. The edit property specifies the cell edit template that used as an editor for a particular column.
The DropDownList has been provided with several options to customize each list item, group title, selected value, header, and footer element. By default, list items can be rendered as a single column in the DropDownList component. Instead of this, multiple columns can be rendered. This can be achieved by using the headerTemplate and itemTemplate properties of the DropDownList component.
The following example demonstrates how to render a DropDownList component with multiple columns within in the ShipCountry column.
@using Newtonsoft.Json;

<ejs-grid id="Grid" dataSource="@ViewBag.DataSource" toolbar="@(new List<string>() { "Add", "Edit", "Delete", "Update", "Cancel" })">
    <e-grid-editsettings allowEditing="true" allowAdding="true" allowDeleting="true"></e-grid-editsettings>
    <e-grid-columns>
        <e-grid-column field="OrderID" headerText="Order ID" isPrimaryKey="true" width="120" textAlign="Right"></e-grid-column>
        <e-grid-column field="CustomerID" headerText="Customer Name" width="120"></e-grid-column>
        <e-grid-column field="Freight" headerText="Freight" editType="numericedit" validationRules="@(new { required= true,min=1, max=1000 })" format="C2" textAlign="Right" width="120"></e-grid-column>
        <e-grid-column field="OrderDate" headerText="Order Date" format="yMd" editType="datepickeredit" width="130"></e-grid-column>
        <e-grid-column field="ShipCountry" headerText="Ship Country" edit="@(new {create = "createShipCountryHandler", read = "readShipCountryHandler", destroy = "destroyShipCountryHandler", write = "writeShipCountryHandler"})" width="300"></e-grid-column>
    </e-grid-columns>
</ejs-grid>

<script>
    var dropDownElement;
    var dropDownListObj;
    var dropDownDataSource = @Html.Raw(JsonConvert.SerializeObject(ViewBag.DataSource));

    function createShipCountryHandler() {
        dropDownElement = document.createElement('input');
        return dropDownElement;
    }
    function destroyShipCountryHandler() {
        dropDownListObj.destroy();
    }
    function readShipCountryHandler() {
        return dropDownListObj.value;
    }
    function writeShipCountryHandler(args) {
        var rowData = args.rowData;
        dropDownListObj = new ej.dropdowns.DropDownList({
            dataSource: dropDownDataSource,
            query: new ej.data.Query().from('data').select(['EmployeeID', 'ShipCountry', 'OrderID']).take(6),
            fields: { text: 'ShipCountry' },
            value: rowData.ShipCountry,
            change: function (args) {
                // Update the EmployeeID value in the rowData
                rowData.ShipCountry = args.value;
            },
            headerTemplate: '<table><tr><th>EmployeeID</th><th>ShipCountry</th></tr></table>',
            itemTemplate: '<div class="e-grid"><table class="e-table"><tbody><tr><td class="e-rowcell">${EmployeeID}</td><td class="e-rowcell">${ShipCountry}</td></tr></tbody></table></div>'
        });
        dropDownListObj.appendTo(dropDownElement);
    }
</script>
<style>
    .content {
        margin: 0 auto;
        width: 550px;
    }
     table{
        width:100%;
        border-collapse: separate;
        table-layout: fixed;
    }
    th,td{
        border-width: 1px 0 0 1px;
        border-color: #e0e0e0;
        text-align: left;
        border-style: solid;
        display: table-cell;
    }
    th{
        line-height: 36px;
        text-indent: 16px;
    }
    .e-ddl-header{
        padding-right: 17px;
        border-width: 1px 0px 1px 0px;
        border-color: #e0e0e0;
        border-style: solid;
    }
    .e-dropdownbase .e-list-item{
        padding-right:0px;
    }
</style>
public IActionResult Index()
{
ViewBag.DataSource = OrderDetails.GetAllRecords();
return View();
}
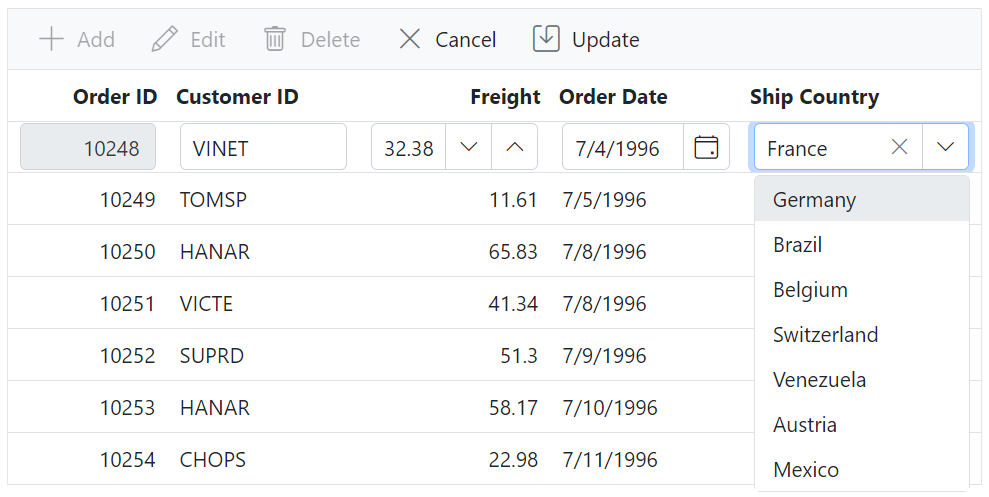
Render ComboBox component in edit form
The Syncfusion® Grid allows you to render a ComboBox component within the Grid’s edit form for a specific column. This feature is especially valuable when you need to provide a drop-down selection with auto-suggestions for data entry.
To render a comboBox component in the edit form, you need to define a cell edit template for the column using edit property. The edit property specifies the cell edit template that used as an editor for a particular column.
The following example demonstrates how to render a ComboBox component in the ShipCountry column of the Syncfusion® Grid.
<ejs-grid id="Grid" dataSource="@ViewBag.DataSource" toolbar="@(new List<string>() { "Add", "Edit", "Delete", "Update", "Cancel" })">
    <e-grid-editsettings allowEditing="true" allowAdding="true" allowDeleting="true"></e-grid-editsettings>
    <e-grid-columns>
        <e-grid-column field="OrderID" headerText="Order ID" isPrimaryKey="true" width="120" textAlign="Right"></e-grid-column>
        <e-grid-column field="CustomerID" headerText="Customer Name" width="120"></e-grid-column>
        <e-grid-column field="Freight" headerText="Freight" editType="numericedit" validationRules="@(new { required= true,min=1, max=1000 })" textAlign="Right" width="120"></e-grid-column>
        <e-grid-column field="OrderDate" headerText="Order Date" format="yMd" editType="datepickeredit" width="130"></e-grid-column>
        <e-grid-column field="ShipCountry" headerText="Ship Country" edit="@(new {create = "createShipCountryHandler", read = "readShipCountryHandler", destroy = "destroyShipCountryHandler", write = "writeShipCountryHandler"})" width="150"></e-grid-column>
    </e-grid-columns>
</ejs-grid>

<script>
    var comboBoxObj;
    var comboBoxElement;
    var selectDataSource = [
        { text: 'Germany', value: 'Germany' },
        { text: 'Brazil', value: 'Brazil' },
        { text: 'Belgium', value: 'Belgium' },
        { text: 'Switzerland', value: 'Switzerland' },
        { text: 'Venezuela', value: 'Venezuela' },
        { text: 'Austria', value: 'Austria' },
        { text: 'Mexico', value: 'Mexico' },
    ];

    function createShipCountryHandler() {
        comboBoxElement = document.createElement('input');
        return comboBoxElement;
    }
    function readShipCountryHandler() {
        return comboBoxObj.value;
    }
    function destroyShipCountryHandler() {
        comboBoxObj.destroy();
    }
    function writeShipCountryHandler(args) {
        var rowData = args.rowData;
        comboBoxObj = new ej.dropdowns.ComboBox({
            dataSource: selectDataSource,
            value: rowData.ShipCountry,
            change: function (e) {
                rowData.ShipCountry = e.value;
            }
        })
        comboBoxObj.appendTo(comboBoxElement);
    }
</script>
public IActionResult Index()
{
ViewBag.DataSource = OrderDetails.GetAllRecords();
return View();
}
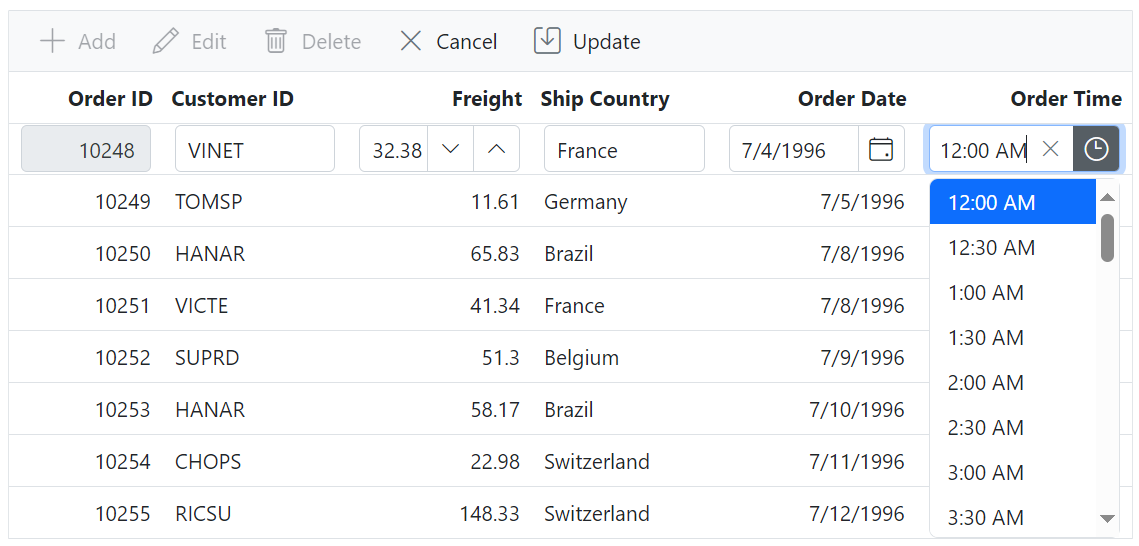
Render TimePicker component in edit form
The Syncfusion® Grid allows you to render a TimePicker component within the Grid’s edit form for a specific column. This feature is especially valuable when you need to provide a time input, such as appointment times, event schedules, or any other time-related data for editing in the Grid.
To render a TimePicker component in the edit form, you need to define a cell edit template for the column using edit property. The edit property specifies the cell edit template that used as an editor for a particular column.
The following example demonstrates how to render a TimePicker component in the OrderDate column of the Syncfusion® Grid.
<ejs-grid id="Grid" dataSource="@ViewBag.DataSource" allowPaging="true" toolbar="@( new List<object>() {"Add","Edit","Delete","Update","Cancel"})">
    <e-grid-editsettings allowAdding="true" allowDeleting="true" allowEditing="true"></e-grid-editsettings>
    <e-grid-columns>
        <e-grid-column field="OrderID" headerText="Order ID" validationRules="@(new { required= true })" isPrimaryKey="true" textAlign="Right" width="120"></e-grid-column>
        <e-grid-column field="CustomerID" headerText="Customer Name" width="150"></e-grid-column>
        <e-grid-column field="Freight" headerText="Freight" editType="numericedit" textAlign="Right" format="C2" width="120"></e-grid-column>
        <e-grid-column field="ShipCountry" headerText="Ship Country"  width="150"></e-grid-column>
        <e-grid-column field="OrderDate" headerText="Order Date" editType="datepickeredit" format="yMd" textAlign="Right" width="140"></e-grid-column>
        <e-grid-column field="OrderDate" headerText="Order Time" edit="@(new {create = "createOrderDateHandler", read = "readOrderDateHandler", destroy = "destroyOrderDateHandler", write = "writeOrderDateHandler"})" format="hh :mm a" textAlign="Right" width="140"></e-grid-column>
    </e-grid-columns>
</ejs-grid>

<script>
    var timePickerObj;
    var timePickerElement

    function createOrderDateHandler() {
        timePickerElement = document.createElement('input');
        return timePickerElement;
    }
    function readOrderDateHandler() {
        return timePickerObj.value;
    }
    function destroyOrderDateHandler() {
        timePickerObj.destroy();
    }
    function writeOrderDateHandler(args) {
        var rowData = args.rowData;
        timePickerObj = new ej.calendars.TimePicker({
            value: rowData.OrderDate,
            change: function (e) {
                rowData.OrderDate = e.value;
            }
        });
        timePickerObj.appendTo(timePickerElement);
    }
</script>
public IActionResult Index()
{
ViewBag.DataSource = OrderDetails.GetAllRecords();
return View();
}
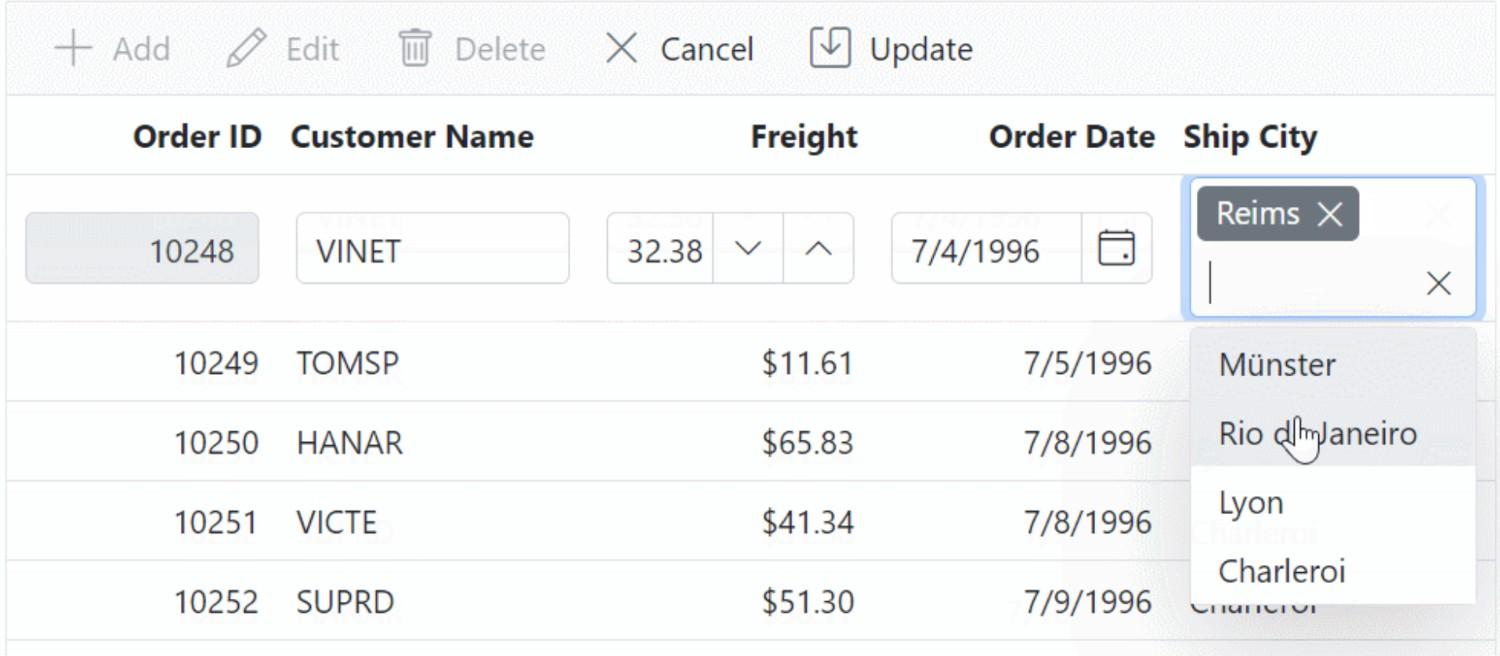
Render MultiSelect component in edit form
The Syncfusion® Grid allows you to render a MultiSelect component within the Grid’s edit form, enabling you to select multiple values from a dropdown list when editing a specific column. This feature is particularly useful when you need to handle situations where multiple selections are required for a column.
To render a MultiSelect component in the edit form, you need to define a cell edit template for the column using edit property. The edit property specifies the cell edit template that used as an editor for a particular column.
The following example demonstrates how to render a MultiSelect component in the ShipCity column of the Syncfusion® Grid. The actionBegin event is handled to update the edited value in the grid when the save button is clicked:
<ejs-grid id="Grid" dataSource="@ViewBag.DataSource" actionBegin="actionBegin" toolbar="@( new List<object>() {"Add","Edit","Delete","Update","Cancel"})">
    <e-grid-editsettings allowAdding="true" allowDeleting="true" allowEditing="true"></e-grid-editsettings>
    <e-grid-columns>
        <e-grid-column field="OrderID" headerText="Order ID" isPrimaryKey="true" validationRules="@(new { required=true, number=true})" textAlign="Right" width="120"></e-grid-column>
        <e-grid-column field="CustomerID" headerText="Customer Name" width="120"></e-grid-column>
        <e-grid-column field="Freight" headerText="Freight" editType="numericedit" validationRules="@(new { required= true,min=1, max=1000 })" format="C2" textAlign="Right" width="120"></e-grid-column>
        <e-grid-column field="OrderDate" headerText="Order Date" editType="datepickeredit" format="yMd" textAlign="Right" width="130"></e-grid-column>
        <e-grid-column field="ShipCity" headerText="Ship City" edit="@(new {create = "createShipCityHandler", read = "readShipCityHandler", destroy = "destroyShipCityHandler", write = "writeShipCityHandler"})" width="150"></e-grid-column>
    </e-grid-columns>
</ejs-grid>

<script>
    function actionBegin(args){
        if (args.requestType === 'beginEdit' || args.requestType === 'add') {
            orderData = Object.assign({}, args.rowData);
            orderData['ShipCity'] = orderData['ShipCity'] ? orderData['ShipCity'].split(',') : [];
        }
        if (args.requestType === 'save') {
            args.data['ShipCity'] = orderData['ShipCity'].join(',');
        }
    }
</script>

<script>
    var orderData;
    var multiSelectElement;
    var multiSelectObj;
    var multiSelectDatasource = [
        { value: 'Reims', text: 'Reims' },
        { value: 'Münster', text: 'Münster' },
        { value: 'Rio de Janeiro', text: 'Rio de Janeiro' },
        { value: 'Lyon', text: 'Lyon' },
        { value: 'Charleroi', text: 'Charleroi' }
    ];

    function createShipCityHandler() {
        multiSelectElement = document.createElement('input');
        return multiSelectElement;
    }
    function readShipCityHandler() {
        return multiSelectObj.value;
    }
    function destroyShipCityHandler() {
        multiSelectObj.destroy();
    }
    function writeShipCityHandler() {
        multiSelectObj = new ej.dropdowns.MultiSelect({
            dataSource: multiSelectDatasource,
            value: orderData.ShipCity,
            fields: { value: 'value', text: 'text' },
            change: function (e) {
                orderData.ShipCity = e.value; // Update orderData.ShipCity on change
            }
        });
        multiSelectObj.appendTo(multiSelectElement);
    }
</script>
public IActionResult Index()
{
ViewBag.DataSource = OrdersDetails.GetAllRecords();
return View();
}
Render RichTextEditor component in edit form
The Syncfusion® Grid allows you to render the RichTextEditor component within the edit form. This feature is valuable when you need to format and style text content using various formatting options such as bold, italic, underline, bullet lists, numbered lists, and more during editing a specific column.
To render RichTextEditor component in edit form,you need to define a cell edit template for the column using edit property. The edit property specifies the cell edit template that used as an editor for a particular column.
Additionally, you need set the allowTextWrap property of the corresponding grid column to true. By enabling this property, the rich text editor component will automatically adjust its width and wrap the text content to fit within the boundaries of the column.
The following example demonstrates how to render a RichTextEditor component in the ShipAddress column of the Syncfusion® Grid.
<ejs-grid id="Grid" dataSource="@ViewBag.DataSource"  allowTextWrap="true" toolbar="@(new List<string>() { "Add", "Edit", "Delete", "Update", "Cancel" })" created="created">
    <e-grid-editsettings allowEditing="true" allowAdding="true" allowDeleting="true"></e-grid-editsettings>
    <e-grid-columns>
        <e-grid-column field="OrderID" headerText="Order ID" isPrimaryKey="true" validationRules="@(new { required=true})" textAlign="Right" width="100"></e-grid-column>
        <e-grid-column field="CustomerID" headerText="Customer Name" validationRules="@(new { required=true})" width="100"></e-grid-column>
        <e-grid-column field="Freight" headerText="Freight" editType="numericedit" validationRules="@(new { required= true })" format="C2" textAlign="Right" width="100"></e-grid-column>
        <e-grid-column field="OrderDate" headerText="Order Date" editType="datepickeredit" format="yMd" textAlign="Right" width="100"></e-grid-column>
        <e-grid-column field="ShipAddress" headerText="Ship Address" edit="@(new {create = "createShipAddressHandler", read = "readShipAddressHandler", destroy = "destroyShipAddressHandler", write = "writeShipAddressHandler"})" disableHtmlEncode=false editType="textarea" width="150"></e-grid-column>
    </e-grid-columns>
</ejs-grid>

<script>
    function created() {
        this.keyConfigs.enter = '';
    }
    function onFocus(args) {
        ((args.event).target).addEventListener('keydown', (e) => {
            if (e.key === 'Enter') {
                e.stopPropagation();
            }
        });
    }
</script>

<script>
    var richTextEditorElement;
    var richTextEditorObj;

    function createShipAddressHandler(args) {
        richTextEditorElement = document.createElement('textarea');
        return richTextEditorElement;
    }
    function readShipAddressHandler() {
        return richTextEditorObj.value;
    }
    function destroyShipAddressHandler() {
        richTextEditorObj.destroy();
    }
    function writeShipAddressHandler(args) {
        var rowData = args.rowData;
        richTextEditorObj = new ej.richtexteditor.RichTextEditor({
            value: rowData.ShipAddress,
            focus: onFocus,
            change: function (e) {
                rowData.ShipAddress = e.value;
            }
        });
        richTextEditorObj.appendTo(richTextEditorElement);
    }
</script>
public IActionResult Index()
{
ViewBag.DataSource = OrdersDetails.GetAllRecords();
return View();
}
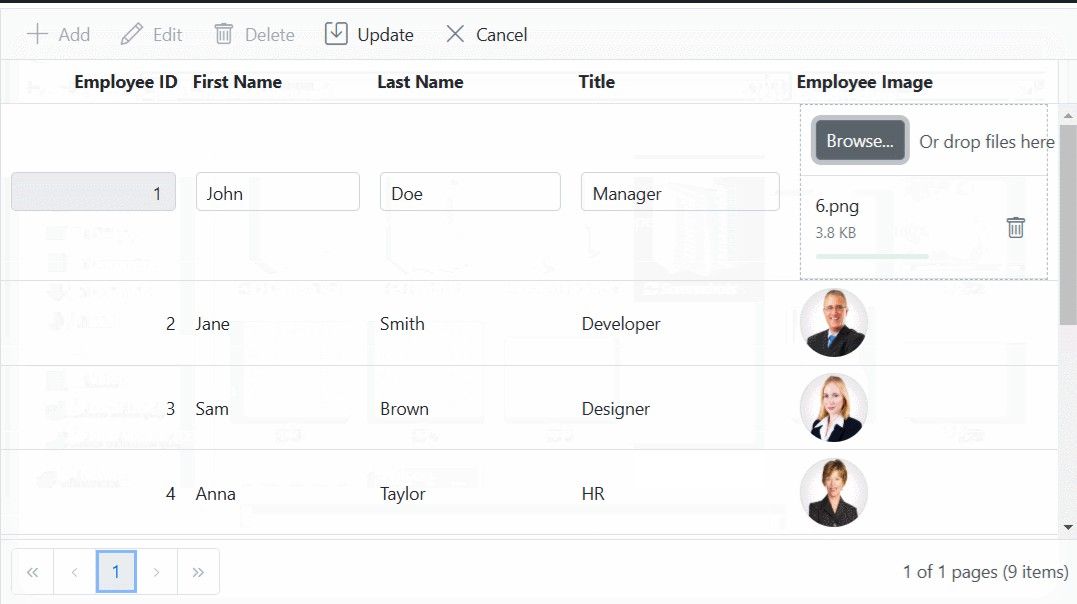
Render Upload component in edit form
The Syncfusion Grid allows you to render an Upload control within the Grid’s edit form. This feature is especially valuable when you need to upload and manage files or images in a specific column during data editing.
To render Upload control in edit form, you need to define a cell edit template for the column using edit property. The edit property specifies the cell edit template that used as an editor for a particular column.
The following example demonstrates how to render a Upload control in the Employee Image column of the Syncfusion Grid. The actionBegin event is handled to update the edited value in the grid when the save button is clicked:
<ejs-grid id="grid" dataSource="@ViewBag.DataSource" height="348px" allowPaging="true" actionBegin="actionBegin" toolbar="@( new List<object>() {"Add","Edit","Delete","Update","Cancel"})">
    <e-grid-editsettings allowAdding="true" allowDeleting="true" allowEditing="true" mode="Normal"></e-grid-editsettings>
    <e-grid-columns>
        <e-grid-column field="EmployeeID" headerText="Employee ID" isPrimaryKey="true" validationRules="@(new { required= true })" textAlign="Right" width="120"></e-grid-column>
        <e-grid-column field="FirstName" headerText="First Name" width="120" validationRules="@(new { required= true })"></e-grid-column>
        <e-grid-column field="LastName" headerText="Last Name" width="120" validationRules="@(new { required= true })"></e-grid-column>
        <e-grid-column field="Title" headerText="Title" width="130" validationRules="@(new { required= true })"></e-grid-column>
        <e-grid-column headerText="Employee Image" template="#template"  edit="@(new {create = "create", read = "read", destroy = "destroy", write = "write"})" width="150"></e-grid-column>
    </e-grid-columns>
</ejs-grid>
<script id="template" type="text/x-template">
    ${employeeImageTemplate(data)}
</script>
<script>
    var uploaderElement;
    var uploaderObject;
    var uploadedImageBase64 = "";
    function employeeImageTemplate(props) {
        var src = props.Image ? props.Image: 'https://ej2.syncfusion.com/angular/demos/assets/grid/images/' + props.EmployeeID + '.png';
        return '<div class="image"><img src="' + src + '" alt="' + props.EmployeeID + '" /></div>';
    }
    function create() {
        uploaderElement = document.createElement('input');
        return uploaderElement;
    }
    function destroy() {
        if (uploaderObject) uploaderObject.destroy();
    }
    function read() {
        return  uploaderObject.value;
    }
    function write(event) {
        uploaderObject = new ej.inputs.Uploader({
        asyncSettings: {
            saveUrl: 'https://services.syncfusion.com/aspnet/production/api/FileUploader/Save',
            removeUrl: 'https://services.syncfusion.com/aspnet/production/api/FileUploader/Remove'             },
            multiple: false,
            success: onUploadSuccess
        });
        uploaderObject.appendTo(uploaderElement);
    }
    function actionBegin(args) {
       if (args.requestType === 'save') {
            if (uploadedImageBase64) {
                args.data['Image'] = uploadedImageBase64;
                uploadedImageBase64 = ""; // Reset after saving
            }
        }
    }
    function onUploadSuccess(args) {
        if (args.operation === 'upload') {
            var file = args.file.rawFile;
            getBase64(file);
        }
    }
    function getBase64(file) {
        var reader = new FileReader();
        reader.readAsDataURL(file);
        reader.onload = function () {
            uploadedImageBase64 = reader.result;
        };
    }
</script>
<style>
    .image img {
        height: 55px;
        width: 55px;
        border-radius: 50px;
        box-shadow: inset 0 0 1px #e0e0e0, inset 0 0 14px rgba(0, 0, 0, 0.2);
    }
</style>
public IActionResult Index()
{
ViewBag.DataSource = OrdersDetails.GetAllRecords();
return View();
}
Render AutoComplete in edit form
The Syncfusion ASP.NET Core Grid allows you to render the AutoComplete within the edit form by using the cell edit template feature.This feature enables you to select values from a predefined list during the editing of a specific column. It is especially valuable when you need to provide a dropdown-like auto-suggestion and input assistance for data entry in the Grid’s columns.
To achieve this, you need to define the cell edit template for the column using the edit property. This property specifies the necessary functions for creating, reading, and writing the AutoComplete into the specific column.
The following example demonstrates how to render a Autocomplete in the CustomerID column:
<ejs-grid id="Grid" dataSource="@ViewBag.DataSource" toolbar="@( new List<object>() {"Add","Edit","Delete","Update","Cancel"})">
    <e-grid-editsettings allowAdding="true" allowDeleting="true" allowEditing="true"></e-grid-editsettings>
    <e-grid-columns>
        <e-grid-column field="OrderID" headerText="Order ID" isPrimaryKey="true" validationRules="@(new { required= true })" textAlign="Right" width="120"></e-grid-column>
        <e-grid-column field="CustomerID" headerText="Customer ID" width="120" edit="@(new {create = "createCustomerIDHandler", read = "readCustomerIDHandler", destroy = "destroyCustomerIDHandler", write = "writeCustomerIDHandler"})"></e-grid-column>
        <e-grid-column field="Freight" headerText="Freight" editType="numericedit" textAlign="Right" format="C2" width="120"></e-grid-column>
        <e-grid-column field="OrderDate" headerText="Order Date" format="yMd" editType="datepickeredit" width="130"></e-grid-column>
        <e-grid-column field="ShipCountry" headerText="Ship Country" width="150"></e-grid-column>
    </e-grid-columns>
</ejs-grid>

<script>
    var autoCompleteData = [
        { CustomerID: 'VINET', Id: '1' },
        { CustomerID: 'TOMSP', Id: '2' },
        { CustomerID: 'HANAR', Id: '3' },
        { CustomerID: 'VICTE', Id: '4' },
        { CustomerID: 'SUPRD', Id: '5' },
    ];
    var autoCompleteObj;
    var autoCompleteElement;

    function createCustomerIDHandler() {
        autoCompleteElement = document.createElement('input');
        return autoCompleteElement;
    }
    function readCustomerIDHandler() {
        return autoCompleteObj.value;
    }
    function destroyCustomerIDHandler() {
        autoCompleteObj.destroy();
    }
    function writeCustomerIDHandler(args) {
        var rowData = args.rowData;
        autoCompleteObj = new ej.dropdowns.AutoComplete({
            allowCustom: true,
            dataSource: autoCompleteData,
            fields: { value: "CustomerID", text: "CustomerID" },
            value: rowData.CustomerID,
        });
        autoCompleteObj.appendTo(autoCompleteElement);
    }
</script>
public IActionResult Index()
{
ViewBag.DataSource = OrdersDetails.GetAllRecords();
return View();
}
Render cascading DropDownList in edit form
The Syncfusion ASP.NET Core Grid allows you to render the cascading DropDownList within the edit form by using the cell edit template feature.This feature is especially useful when you need to establish a hierarchy of options, such as choosing a country and then selecting a state based on the chosen country.
To achieve this, you need to define the cell edit template for the column using the edit property. This property specifies the necessary functions for creating, reading, and writing the cascading DropDownList.
In the below demo, cascading DropDownList rendered for ShipCountry and ShipState column.
<ejs-grid id="Grid" dataSource="@ViewBag.DataSource" toolbar="@( new List<object>() {"Add","Edit","Delete","Update","Cancel"})">
    <e-grid-editsettings allowAdding="true" allowDeleting="true" allowEditing="true"></e-grid-editsettings>
    <e-grid-columns>
        <e-grid-column field="OrderID" headerText="Order ID" isPrimaryKey="true" validationRules="@(new { required= true })" textAlign="Right" width="120"></e-grid-column>
        <e-grid-column field="CustomerID" headerText="Customer ID" width="120" ></e-grid-column>
        <e-grid-column field="ShipCountry" headerText="Ship Country" edit="@(new {create = "createShipCountryHandler", read = "readShipCountryHandler", destroy = "destroyShipCountryHandler", write = "writeShipCountryHandler"})" width="150"></e-grid-column>
        <e-grid-column field="ShipState" headerText="Ship Country" edit="@(new {create = "createShipStateHandler", read = "readShipStateHandler", destroy = "destroyShipStateHandler", write = "writeShipStateHandler"})" width="150"></e-grid-column>
        <e-grid-column field="OrderDate" headerText="Order Date" format="yMd" editType="datepickeredit" width="150"></e-grid-column>
    </e-grid-columns>
</ejs-grid>

<script>
    var country = [
        { countryName: 'United States', countryId: '1' },
        { countryName: 'Australia', countryId: '2' }
    ];
    var state = [
        { stateName: 'New York', countryId: '1', stateId: '101' },
        { stateName: 'Virginia ', countryId: '1', stateId: '102' },
        { stateName: 'Washington', countryId: '1', stateId: '103' },
        { stateName: 'Queensland', countryId: '2', stateId: '104' },
        { stateName: 'Tasmania ', countryId: '2', stateId: '105' },
        { stateName: 'Victoria', countryId: '2', stateId: '106' }
    ];
    var shipCountryObj;
    var shipCountryElement;
    var shipStateElement;
    var shipStateObj;

    function createShipCountryHandler() {
        shipCountryElement = document.createElement('input');
        return shipCountryElement;
    }
    function readShipCountryHandler() {
        return shipCountryObj.text;
    }
    function destroyShipCountryHandler() {
        shipCountryObj.destroy();
    }
    function writeShipCountryHandler() {
        shipCountryObj = new ej.dropdowns.DropDownList({
            dataSource: new ej.data.DataManager(country),
            fields: { value: 'countryId', text: 'countryName' },
            change: () => {
                shipStateObj.enabled = true;
                var filteredQuery = new ej.data.Query().where('countryId', 'equal', shipCountryObj.value);
                shipStateObj.query = filteredQuery;
                shipStateObj.text = '';
                shipStateObj.dataBind();
            },
            placeholder: 'Select a country',
            floatLabelType: 'Never'
        });
        shipCountryObj.appendTo(shipCountryElement);
    }

    function createShipStateHandler() {
        shipStateElement = document.createElement('input');
        return shipStateElement;
    }
    function readShipStateHandler() {
        return shipStateObj.text;
    }
    function destroyShipStateHandler() {
        shipStateObj.destroy();
    }
    function writeShipStateHandler() {
        shipStateObj = new ej.dropdowns.DropDownList({
            dataSource: new ej.data.DataManager(state),
            fields: { value: 'stateId', text: 'stateName' },
            enabled: false,
            placeholder: 'Select a state',
            floatLabelType: 'Never'
        });
        shipStateObj.appendTo(shipStateElement);
    }
</script>
public IActionResult Index()
{
ViewBag.DataSource = OrdersDetails.GetAllRecords();
return View();
}