Excel export options in ASP.NET Core Grid component
28 Mar 202524 minutes to read
The Syncfusion ASP.NET Core Grid component allows you to customize the Excel or CSV export options functionality. This flexibility enables you to have greater control over the exported content and layout to meet your specific requirements.
The Excel or CSV export action can be customized based on your requirements using the excelExportProperties property. By using the excelExportProperties property, you can export specific columns, exclude or include hidden column, export with custom data source, enable filter in the exported excel or CSV file, change the file name, add header and footer, multiple grid exporting, customize the data based on query, define delimiter for CSV exporting and set the theme.
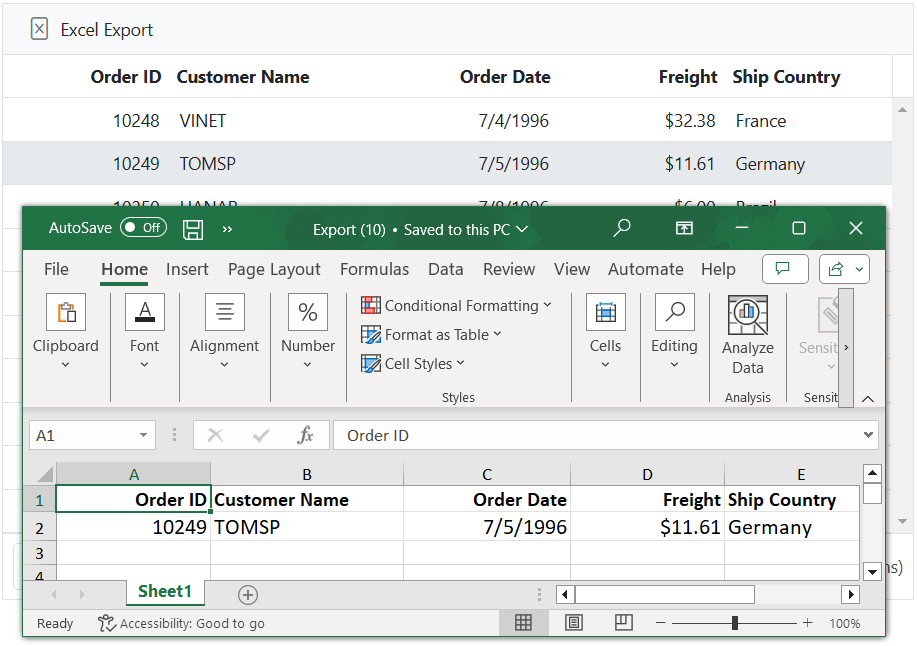
Export current page records
Exporting the current page in Syncfusion ASP.NET Core Grid to a Excel or CSV document provides the ability to export the currently displayed page records. This feature allows for generating Excel or CSV documents that specifically include the content from the current page of the grid.
To export the current page of the grid to an Excel or CSV document, you need to specify the exportType property. This property allows you to define which records you want to export. You can choose between two options:
- CurrentPage: Exports only the records on the current grid page.
- AllPages: Exports all the records from the grid.
The following example demonstrates how to export current page to a Excel document when a toolbar item is clicked.
@{
    var dropDownData = new[] {
        new { value = "CurrentPage", text = "CurrentPage" },
        new { value = "AllPages", text = "AllPages" },
    };
}
<div style="padding-bottom: 20px; display: flex">
    <label style="padding: 5px 46px 0 0;font-weight: bold"> Change export type:</label>
    <span style="height:fit-content">
        <ejs-dropdownlist id="dropDown" index="0" width="120px" dataSource=dropDownData>
        </ejs-dropdownlist>
    </span>
</div>
<ejs-grid id="grid" dataSource="@ViewBag.dataSource" height="348px" allowExcelExport="true" toolbarClick="toolbarClick" toolbar="@(new List<string>() {"ExcelExport"})" allowPaging="true">
    <e-grid-pagesettings pageSize=10></e-grid-pagesettings>
    <e-grid-columns>
        <e-grid-column field="OrderID" headerText="Order ID" isPrimaryKey="true" textAlign="Right" width="120"></e-grid-column>
        <e-grid-column field="CustomerID" headerText="Customer Name" width="140"></e-grid-column>
        <e-grid-column field="OrderDate" headerText="Order Date" format="yMd" width="140" ></e-grid-column>
        <e-grid-column field="Freight" headerText="Freight" format="C2" textAlign="Right" width="120"></e-grid-column>
        <e-grid-column field="ShipCountry" headerText="Ship Country" width="140"></e-grid-column>
    </e-grid-columns>
</ejs-grid>
<script>
    function toolbarClick(args) {
        var grid = document.getElementById("grid").ej2_instances[0];
        if (args.item.id === 'grid_excelexport') {
            var excelExportProperties = {
                exportType: document.getElementById("dropDown").ej2_instances[0].value
            };
            grid.excelExport(excelExportProperties);
        }
    }
</script>
public IActionResult Index()
{
ViewBag.dataSource = OrderDetails.GetAllRecords();
return View();
}Export the selected records
Exporting only the selected records from the Grid allows generating Excel or CSV document that include only the desired data from the Grid. This feature provides the flexibility to export specific records that are relevant to the needs, enabling more focused and targeted Excel or CSV exports.
To export only the selected records by utilizing the exportProperties.dataSource property in the toolbarClick event.
To export the selected records from the grid to a Excel or CSV file, you can follow these steps:
-
Handle the toolbarClick event of the Grid.
-
Retrieve the selected records using the
getSelectedRecordsmethod. -
Assign the selected data to the
exportProperties.dataSourceproperty. -
Trigger the export operation using the
excelExportorcsvExportmethod.
The following example demonstrates how to export the selected records to a Excel document when a toolbar item is clicked.
<ejs-grid id="grid" dataSource="@ViewBag.dataSource" height="348px" allowExcelExport="true" toolbarClick="toolbarClick" toolbar="@(new List<string>() {"ExcelExport"})" allowPaging="true">
    <e-grid-pagesettings pageSize="10"></e-grid-pagesettings>
    <e-grid-selectionSettings enableSimpleMultiRowSelection= "true" type="Multiple"></e-grid-selectionSettings>
    <e-grid-columns>
        <e-grid-column field="OrderID" headerText="Order ID" textAlign="Right" width="120"></e-grid-column>
        <e-grid-column field="CustomerID" headerText="Customer Name" width="150"></e-grid-column>
        <e-grid-column field="OrderDate" headerText="Order Date" format="yMd" width="150"></e-grid-column>
        <e-grid-column field="Freight" headerText="Freight" format="C2" width="150"></e-grid-column>
        <e-grid-column field="ShipCountry" headerText="Ship Country" width="150"></e-grid-column>
    </e-grid-columns>
</ejs-grid>
<script>
    function toolbarClick(args) {
        var grid = document.getElementById("grid").ej2_instances[0];
        if (args.item.id === 'grid_excelexport') {
            var exceldata = grid.getSelectedRecords();
            var exportProperties = {
                dataSource: exceldata
            };
            grid.excelExport(exportProperties);
        }
    }
</script>
public IActionResult Index()
{
ViewBag.dataSource = OrderDetails.GetAllRecords();
return View();
}
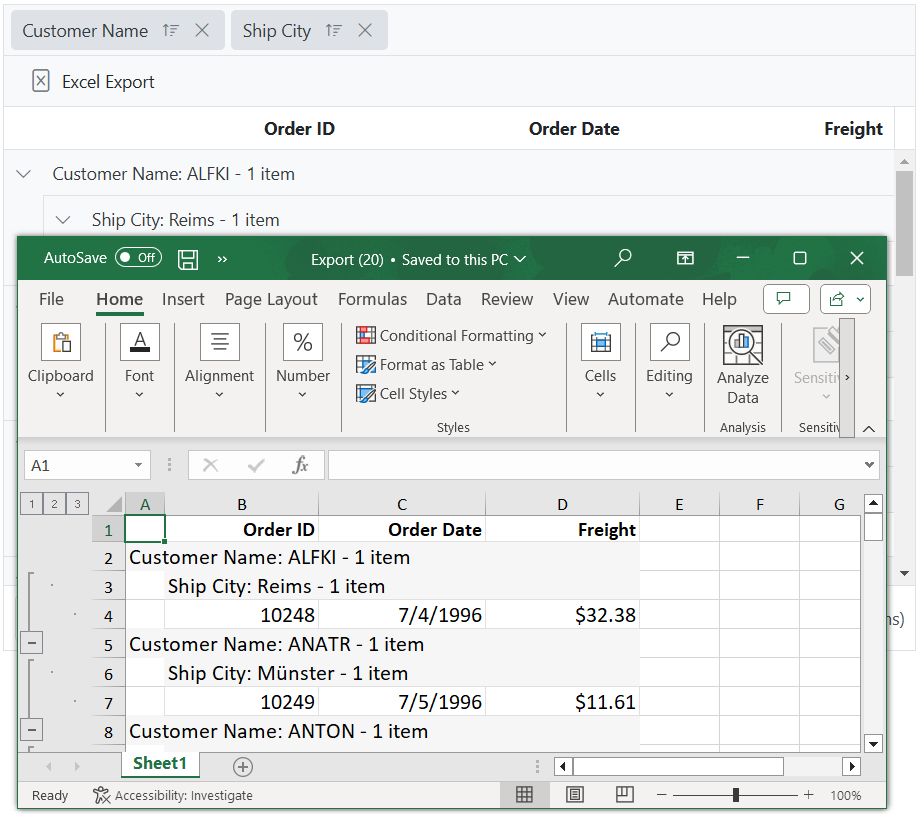
Exporting grouped records
The Grid component provides an outline option for grouped records, allowing you to hide detailed data for better viewing in the exported document. This feature is particularly useful when you need to share data that is grouped based on specific columns and maintain the grouping structure in the exported file.
To achieve this functionality, you need to enable grouping in the Grid by setting the allowGrouping property to true . Additionally, you need define the groupSettings.columns property to specify the columns by which you want to group the data.
The following example demonstrates how to export grouped records to an Excel document when a toolbar item is clicked.:
<ejs-grid id="grid" dataSource="@ViewBag.dataSource" allowExcelExport="true" toolbarClick="toolbarClick" toolbar="@(new List<string>() {"ExcelExport"})" allowPaging="true" allowGrouping="true">
    <e-grid-groupsettings columns="@(new string[] {"CustomerID","ShipCity"})"></e-grid-groupsettings>
    <e-grid-columns>
        <e-grid-column field="OrderID" headerText="Order ID" isPrimaryKey="true" textAlign="Right" width="120"></e-grid-column>
        <e-grid-column field="CustomerID" headerText="Customer Name" width="140"></e-grid-column>
        <e-grid-column field="OrderDate" headerText="Order Date" format="yMd" width="140"></e-grid-column>
        <e-grid-column field="Freight" headerText="Freight" format="C2" textAlign="Right" width="120"></e-grid-column>
        <e-grid-column field="ShipCity" headerText="Ship City" width="140"></e-grid-column>
    </e-grid-columns>
</ejs-grid>
<script>
    function toolbarClick(args) {
        var grid = document.getElementById("grid").ej2_instances[0];
        if (args.item.id === 'grid_excelexport') {
            grid.excelExport();
        }
    }
</script>
public IActionResult Index()
{
ViewBag.dataSource = OrderDetails.GetAllRecords();
return View();
}
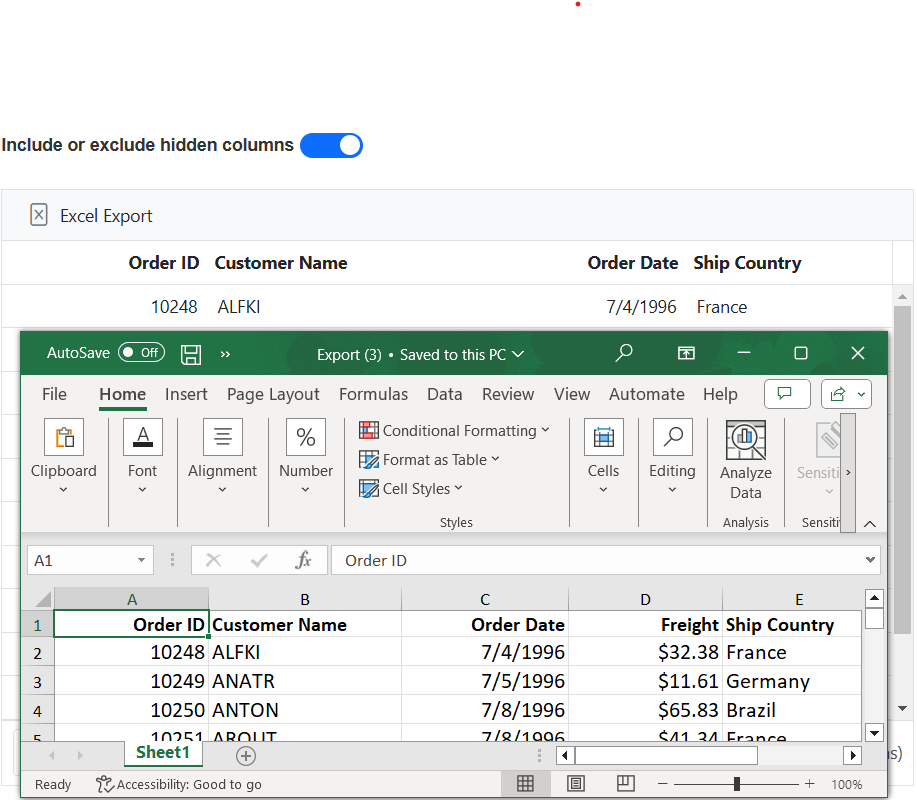
Export with hidden columns
Exporting hidden columns in the Syncfusion ASP.NET Core Grid allows you to include hidden columns in the exported Excel document. This feature is useful when you have columns that are hidden in the UI but still need to be included in the exported document.
To export hidden columns of the grid to a Excel or CSV file, you need to set the includeHiddenColumn property as true in the excelExportProperties property.
The following example demonstrates how to export hidden columns to a Excel file. In this example, the ShipCity column, which is not visible in the UI, is exported to the Excel document. You can also export the grid by changing the excelExportProperties.includeHiddenColumn property based on the switch toggle using the checked property of the EJ2 Toggle Switch Button component.
<div style="padding-bottom: 20px; display: flex">
    <label style="margin: -3px 5px 0 0;font-weight: bold;">Include or exclude hidden columns </label>
    <ejs-switch id="switch"></ejs-switch>
 </div>
<ejs-grid id="grid" dataSource="@ViewBag.dataSource" height="348px" allowExcelExport="true" toolbarClick="toolbarClick" toolbar="@(new List<string>() {"ExcelExport"})" allowPaging="true">
    <e-grid-columns>
        <e-grid-column field="OrderID" headerText="Order ID" isPrimaryKey="true" textAlign="Right" width="120"></e-grid-column>
        <e-grid-column field="CustomerID" headerText="Customer Name" width="140"></e-grid-column>
        <e-grid-column field="OrderDate" headerText="Order Date" format="yMd" width="140"></e-grid-column>
        <e-grid-column field="Freight" headerText="Freight" format="C2" textAlign="Right" visible="false" width="120"></e-grid-column>
        <e-grid-column field="ShipCountry" headerText="Ship Country" width="140"></e-grid-column>
    </e-grid-columns>
</ejs-grid>
<script>
    function toolbarClick(args) {
        var grid = document.getElementById("grid").ej2_instances[0];
        if (args.item.id === 'grid_excelexport') {
            var excelExportProperties = {
                includeHiddenColumn: document.getElementById("switch").ej2_instances[0].checked
            };
            grid.excelExport(excelExportProperties);
        }
    }
</script>
public IActionResult Index()
{
ViewBag.dataSource = OrderDetails.GetAllRecords();
return View();
}
Show or hide columns while exporting
The Grid component provides the functionality to show or hide columns dynamically during the export process. This feature allows you to selectively display or hide specific columns based on your requirements.
To show or hide columns based on user interaction during the export process, you can follow these steps:
-
Handle the toolbarClick event of the Grid component.
-
Update the visibility of the desired columns by setting the
visibleproperty of the column to true or false. -
Export the grid to Excel.
-
Handle the excelExportComplete event to restore the column visibility to its original state.
In the following example, the CustomerID is initially a hidden column in the grid. However, during the export process, the CustomerID column is made visible, while the Freight column is hidden.
<ejs-grid id="grid" dataSource="@ViewBag.dataSource" allowExcelExport="true" height="348px" toolbarClick="toolbarClick" excelExportComplete="excelExportComplete" toolbar="@(new List<string>() { "ExcelExport" })" allowPaging="true">
    <e-grid-columns>
        <e-grid-column field="OrderID" headerText="Order ID" isPrimaryKey="true" textAlign="Right" width="120"></e-grid-column>
        <e-grid-column field="CustomerID" headerText="Customer Name" visible="false" width="150"></e-grid-column>
        <e-grid-column field="OrderDate" headerText="Order Date" format="yMd" textAlign="Right" width="130"></e-grid-column>
        <e-grid-column field="Freight" headerText="Freight" format="C2" textAlign="Right" width="150"></e-grid-column>
        <e-grid-column field="ShipCountry" headerText="Ship Country" width="150"></e-grid-column>
    </e-grid-columns>
</ejs-grid>
<script>
    function toolbarClick(args) {
        var grid = document.getElementById("grid").ej2_instances[0];
        if (args.item.id === 'grid_excelexport') {
            grid.columns[1].visible = true;
            grid.columns[3].visible = false;
            grid.excelExport();
        }
    }
    function excelExportComplete(args) {
        var grid = document.getElementById("grid").ej2_instances[0];
        grid.columns[1].visible = false;
        grid.columns[3].visible = true;
    }
</script>
public IActionResult Index()
{
ViewBag.dataSource = OrderDetails.GetAllRecords();
return View();
}
Show or hide columns while exporting with stacked header
The Syncfusion ASP.NET Core Grid allows you to control the visibility of columns during export operations. This feature is particularly useful when customizing the data presented in exported files while using stacked headers.
To implement the show or hide columns feature during Excel export in the Syncfusion ASP.NET Core Grid, follow these steps:
-
Handle the toolbarClick event of the Syncfusion ASP.NET Core Grid.
-
Update the visibility of the desired columns by setting the visible property of the column to true or false.
-
Export the Syncfusion ASP.NET Core Grid to Excel document using the
ExcelExportorCsvExportmethod. -
Handle the excelExportComplete event to restore the column visibility to its original state.
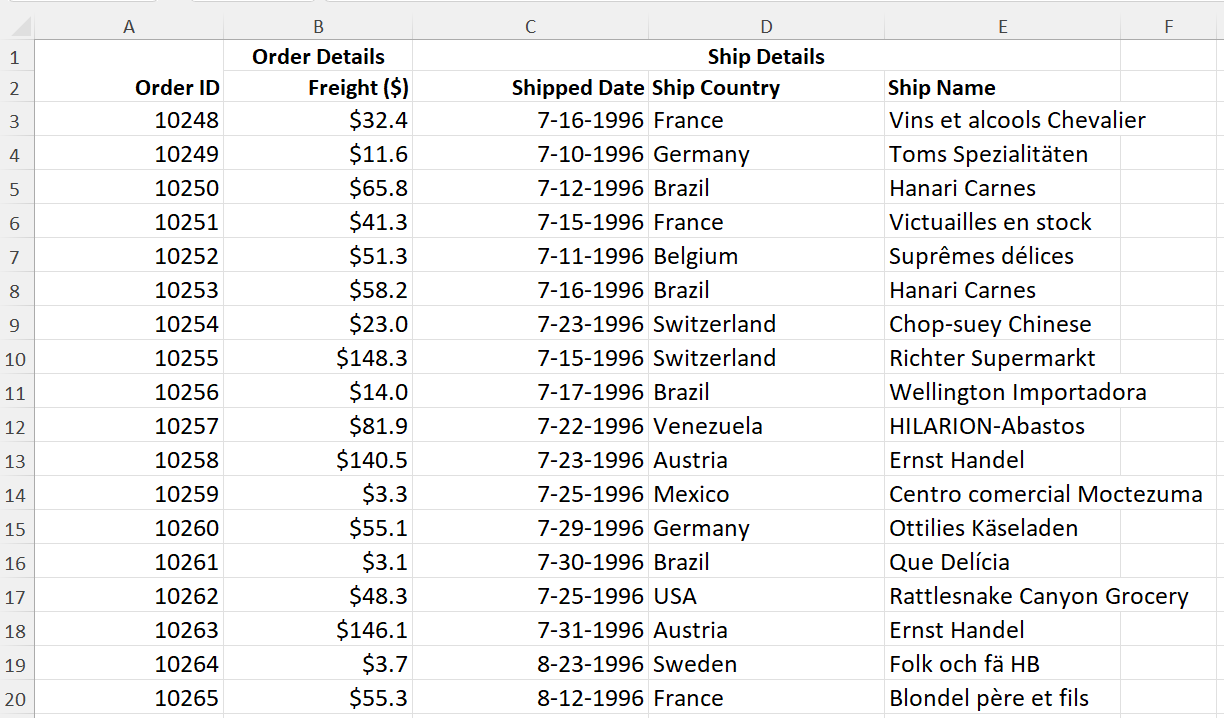
In the following example, the ShipName is initially a hidden column in the Syncfusion ASP.NET Core Grid. However, during the Excel export process, the ShipName column is made visible, while the OrderDate column is hidden:
@page
@model IndexModel
@{
    ViewData["Title"] = "Home page";
}

<ejs-grid id="grid" dataSource="@ViewBag.dataSource" allowExcelExport="true" height="348px" toolbarClick="toolbarClick" excelExportComplete="excelExportComplete" toolbar="@(new List<string>() { "ExcelExport" })">
    <e-grid-columns>
        <e-grid-column field="OrderID" headerText="Order ID" isPrimaryKey="true" textAlign="Right" width="120"></e-grid-column>
        <e-grid-column field="CustomerID" headerText="Customer ID" width="150" visible="false"></e-grid-column>
        <e-grid-column headerText="Order Details" textAlign="Center" columns="@( new List<Syncfusion.EJ2.Grids.GridColumn>() {
                new Syncfusion.EJ2.Grids.GridColumn { Field = "OrderDate", Width = "130", HeaderText = "Order Date", Format="yMd", TextAlign= Syncfusion.EJ2.Grids.TextAlign.Right },
                new Syncfusion.EJ2.Grids.GridColumn { Field = "Freight", Width = "120", HeaderText = "Freight", Format="C2", TextAlign= Syncfusion.EJ2.Grids.TextAlign.Right }
                })">
        </e-grid-column>
        <e-grid-column headerText="Ship Details" textAlign="Center" columns="@( new List<Syncfusion.EJ2.Grids.GridColumn>() {
                new Syncfusion.EJ2.Grids.GridColumn { Field = "ShippedDate", Width = "120", HeaderText = "Shipped Date", TextAlign=Syncfusion.EJ2.Grids.TextAlign.Right, Format="yMd" },
                new Syncfusion.EJ2.Grids.GridColumn { Field = "ShipCountry", Width = "120", HeaderText = "Ship Country" },
                new Syncfusion.EJ2.Grids.GridColumn { Field = "ShipName", Width = "150", HeaderText = "Ship Name", Visible = false }
                })">
        </e-grid-column>
    </e-grid-columns>
</ejs-grid>
<script>
	function toolbarClick(args) {
		var grid = document.getElementById("grid").ej2_instances[0];
		if (args.item.id === 'grid_excelexport') {
			grid.columns[2].columns[0].visible = false;
			grid.columns[3].columns[2].visible = true;
			grid.excelExport();
		}
	}

	function excelExportComplete() {
		var grid = document.getElementById("grid").ej2_instances[0];
		grid.columns[2].columns[0].visible = true;
		grid.columns[3].columns[2].visible = false;
	}
</script>
public ActionResult Index()
{
ViewBag.dataSource = OrdersDetails.GetAllRecords();
return View();
}
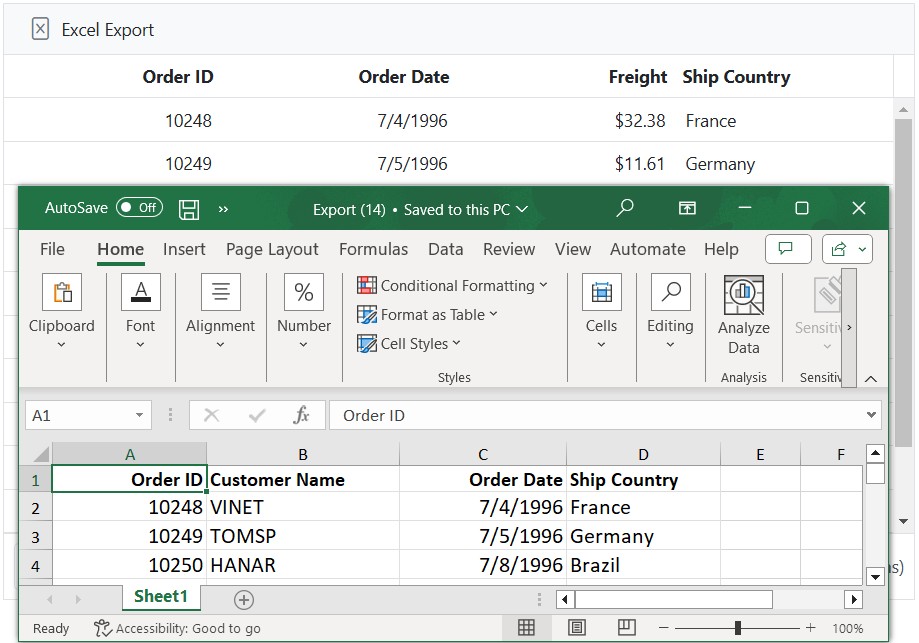
Enable filtering in the exported excel file
The Grid allows you to export data to Excel or CSV with filter options and also export only filtered records. This feature is especially beneficial when you need to share data with others while preserving the ability for them to filter and analyze the data in Excel or CSV.
To enable this feature, you should set the enableFilter property to true in the excelExportProperties object. Additionally, you need to set allowFiltering to true in the grid configuration. This property enables filtering in the grid.
The following example demonstrates how to export data with filter options to an Excel document when a toolbar item is clicked:
<ejs-grid id="grid" dataSource="@ViewBag.dataSource" allowFiltering="true" allowExcelExport="true" height="348px" toolbarClick="toolbarClick" toolbar="@(new List<string>() {"ExcelExport"})">
    <e-grid-columns>
        <e-grid-column field="OrderID" headerText="Order ID" isPrimaryKey="true" width="120"></e-grid-column>
        <e-grid-column field="CustomerID" headerText="Customer Name" width="140"></e-grid-column>
        <e-grid-column field="OrderDate" headerText="Order Date" format="yMd" width="140" ></e-grid-column>
        <e-grid-column field="Freight" headerText="Freight" textAlign="Right" format="C2" width="120"></e-grid-column>
        <e-grid-column field="ShipCountry" headerText="ShipCountry" width="140"></e-grid-column>
    </e-grid-columns>
</ejs-grid>
<script>
    function toolbarClick(args) {
        var grid = document.getElementById("grid").ej2_instances[0];
        let excelExportProperties= {
            enableFilter: true
        };
        grid.excelExport(excelExportProperties);
    }
</script>
public IActionResult Index()
{
ViewBag.dataSource = OrderDetails.GetAllRecords();
return View();
}
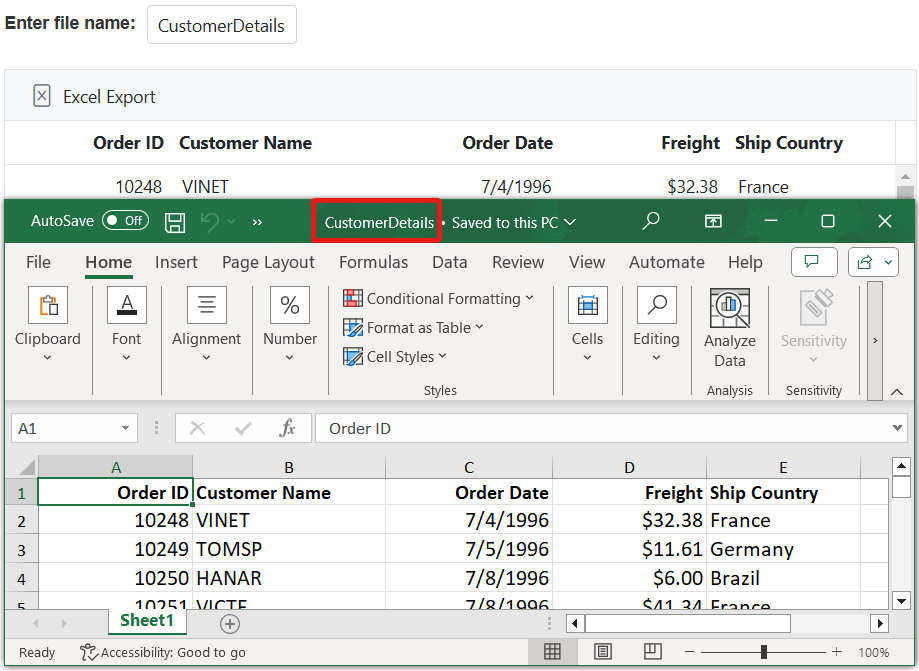
Define file name
The Syncfusion ASP.NET Core Grid component allows you to specify a custom file name for the exported Excel or CSV document. This feature enables you to provide a meaningful and descriptive name for the exported file, making it easier to identify and manage the exported data.
To assign a custom file name for the exported document, you can set the fileName property of the excelExportProperties property to the desired file name.
The following example demonstrates how to define a file name using excelExportProperties.fileName property when exporting to Excel, based on the entered value as the file name.
<div style="padding-bottom: 20px">
    <label style="padding: 30px 5px 0 0;font-weight: bold">Enter file name:</label>
    <ejs-textbox id="inputTextBox" width="120px" placeholder="Enter file name"></ejs-textbox>
</div>
<ejs-grid id="grid" dataSource="@ViewBag.dataSource" allowExcelExport="true" height="348px" toolbarClick="toolbarClick" toolbar="@(new List<string>() {"ExcelExport"})" allowPaging="true">
    <e-grid-columns>
        <e-grid-column field="OrderID" headerText="Order ID" isPrimaryKey="true" textAlign="Right" width="120"></e-grid-column>
        <e-grid-column field="CustomerID" headerText="Customer Name" width="140"></e-grid-column>
        <e-grid-column field="OrderDate" headerText="Order Date" format="yMd" width="140" ></e-grid-column>
        <e-grid-column field="Freight" headerText="Freight" textAlign="Right" format="C2" width="120"></e-grid-column>
        <e-grid-column field="ShipCountry" headerText="ShipCountry" width="140"></e-grid-column>
    </e-grid-columns>
</ejs-grid>
<script>
    function toolbarClick(args) {
        var grid = document.getElementById("grid").ej2_instances[0];
        var textBox = document.getElementById("inputTextBox").ej2_instances[0];
        if (args.item.id === 'grid_excelexport') {
            var excelExportProperties = {
                fileName: textBox.value !== "" ? textBox.value + '.xlsx' : 'new.xlsx'
            };
            grid.excelExport(excelExportProperties);
        }
    }
</script>
public IActionResult Index()
{
ViewBag.dataSource = OrderDetails.GetAllRecords();
return View();
}
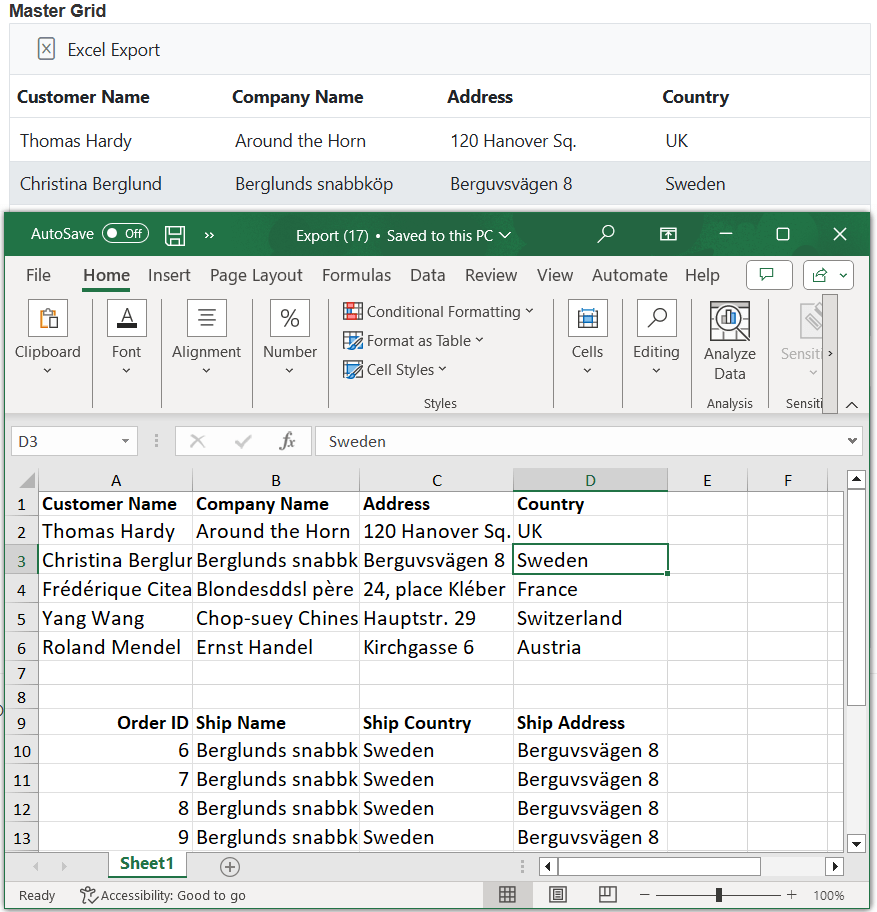
Export the master detail grid
The export functionality within the master-detail grid feature of the Grid enables you to export not only the master grid but also the associated detail grid onto a single Excel sheet. This feature proves to be particularly valuable when dealing with hierarchical data represented by two grids in the exported Excel file, allowing for comprehensive analysis and management.
To export the master-detail grid on the same sheet, you need to set the multipleExport.type property of the excelExportProperties object to AppendToSheet. It also has an option to provide blank space between the grids. This blank space can be defined by using multipleExport.blankRows property.
The following example demonstrates how to export master detail grid to the same page in a Excel file when a toolbar item is clicked. The rowSelected event dynamically updates the detail grid based on the selected master record:
@using System.Text.Json;

<div>
   <B>Master Grid</B>
    <ejs-grid id="masterGrid" dataSource="@ViewBag.customerDataSource" height="273px" allowExcelExport="true" selectedRowIndex="0" toolbar="@(new List<string>() {"ExcelExport"})" rowSelected="selected" toolbarClick="toolbarClick">
        <e-grid-columns>
            <e-grid-column field="CustomerName" headerText="Customer Name" width="120"></e-grid-column>
            <e-grid-column field="CompanyName" headerText="Company Name" width="120"></e-grid-column>
            <e-grid-column field="Address" headerText="Address" width="150"></e-grid-column>
            <e-grid-column field="Country" headerText="Country" width="150"></e-grid-column>
        </e-grid-columns>
    </ejs-grid>
</div>
<p><div class='e-statustext'> Showing orders of Customer:  <b id="key"></b></div></p>
<div>
    <ejs-grid id="detailGrid" allowExcelExport="true">
        <e-grid-columns>
            <e-grid-column field="OrderID" headerText="Order ID" textAlign="Right" width="120"></e-grid-column>
            <e-grid-column field="ShipName" headerText="Ship Name" width="150"></e-grid-column>
            <e-grid-column field="ShipCountry" headerText="Ship Country"></e-grid-column>
            <e-grid-column field="ShipAddress" headerText="Ship Address" width="150"></e-grid-column>
        </e-grid-columns>
    </ejs-grid>
</div>
<script>
    function rowSelected(args) {
        let selectedRecord = args.data;
        var data = @Html.Raw(JsonSerializer.Serialize(ViewBag.dataSource));
        var employeeID = args.data.EmployeeID;
        var detaildata = new ej.data.DataManager(data).executeLocal(new ej.data.Query().where("EmployeeID", "equal", employeeID, false));
        var detailGrid = document.getElementById("detailGrid").ej2_instances[0];
        detailGrid.dataSource = new ej.data.DataManager(detaildata).dataSource.json;
        document.getElementById("key").innerHTML = selectedRecord.CustomerName;
    };
    function toolbarClick(args) {
        var mastergrid = document.getElementById("masterGrid").ej2_instances[0];
        var grid = document.getElementById("detailGrid").ej2_instances[0];
        if (args.item.id === 'masterGrid_excelexport') {
            const appendExcelExportProperties = {
                multipleExport: { type: 'AppendToSheet', blankRows: 2 },
            };
            const firstGridExport = mastergrid.excelExport(appendExcelExportProperties, true);
            firstGridExport.then((masterGridData) => {
                grid.excelExport(appendExcelExportProperties, false, masterGridData);
            });
        }
    }
</script>
public IActionResult Index()
{
ViewBag.dataSource = OrdersDetails.GetAllRecords();
ViewBag.customerDataSource = Customer.GetAllRecords();
return View();
}
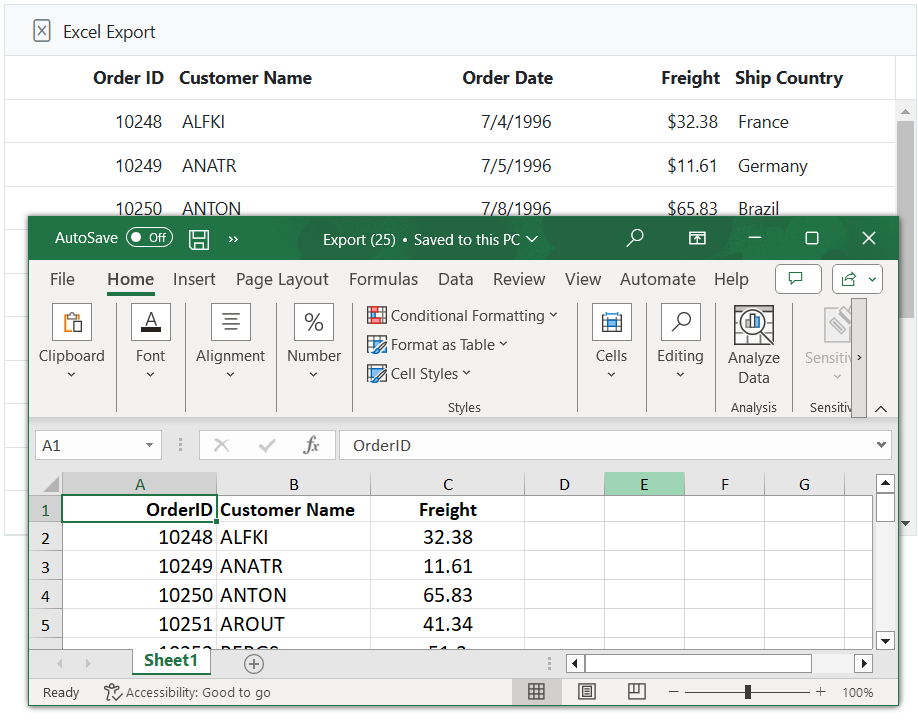
Customizing columns on export
The Grid component allows you to customize the appearance of grid columns in your exported Excel or CSV documents. This feature empowers you to tailor specific column attributes such as field, header text, and text alignment, ensuring that your exported Excels align perfectly with your design and reporting requirements.
To customize the grid columns, you can follow these steps:
-
Access the
excelExportProperties.columnof the Grid component. -
Set the
columnobject with attributes such asfield,headerText, andtextAlignto define the desired format. -
Trigger the Excel or CSV export operation to apply the customized column settings.
The following example demonstrates how to customize the grid columns when exporting a document. In this scenario, the attributes for different columns have been customized: OrderID with textAlign set to Right, CustomerID with headerText as Customer Name, and Freight with a center-aligned textAlign property, which is not rendered in the grid columns:
<ejs-grid id="grid" dataSource="@ViewBag.dataSource" allowExcelExport="true" height="348px" toolbarClick="toolbarClick" toolbar="@(new List<string>() {"ExcelExport"})">
    <e-grid-columns>
        <e-grid-column field="OrderID" headerText="Order ID" isPrimaryKey="true" textAlign="Right" width="120"></e-grid-column>
        <e-grid-column field="CustomerID" headerText="Customer Name" width="140"></e-grid-column>
        <e-grid-column field="OrderDate" headerText="Order Date" format="yMd" width="140" ></e-grid-column>
        <e-grid-column field="Freight" headerText="Freight" textAlign="Right" format="C2" width="120"></e-grid-column>
        <e-grid-column field="ShipCountry" headerText="ShipCountry" width="140"></e-grid-column>
    </e-grid-columns>
</ejs-grid>
<script>
    function toolbarClick(args) {
        var grid = document.getElementById("grid").ej2_instances[0];
        let excelExportColumns = [
            { field: 'OrderID', textAlign: 'Right', width: 120 },
            { field: 'CustomerID', headerText: 'Customer Name', width: 120 },
            { field: 'Freight', textAlign: 'Center', width: 120 }
        ];
        let excelExportProperties= {
            columns: excelExportColumns
        };
        grid.excelExport(excelExportProperties);
    }
</script>
public IActionResult Index()
{
ViewBag.dataSource = OrderDetails.GetAllRecords();
return View();
}
Font and color customization
The Excel export feature in Grid provides an option to include themes for the exported Excel document. This feature is particularly useful when you want to maintain a consistent and visually appealing style for the exported data in Excel.
To apply a theme to the exported Excel document, you can define the theme property within the excelExportProperties. This property allows you to specify the theme to be used in the exported Excel file, including styles for the caption, header, and record content.
caption: This property defines the theme style for the caption content in the exported Excel document. The caption is the title or description that appears at the top of the exported Excel sheet.
header: This property is used to defines the style for the header content in the exported Excel document. The header corresponds to the column headers in the Grid.
record: This property defines the theme style for the record content in the exported Excel document. The record represents the data rows in the Grid that are exported to Excel.
In the following example, apply font styling to the caption, header, and record in the Excel file using the theme property:
<ejs-grid id="grid" dataSource="@ViewBag.dataSource" allowExcelExport="true" toolbarClick="toolbarClick" toolbar="@(new List<string>() {"ExcelExport"})" height="348px">
    <e-grid-columns>
        <e-grid-column field="OrderID" headerText="Order ID" isPrimaryKey="true" textAlign="Right" width="120"></e-grid-column>
        <e-grid-column field="CustomerID" headerText="Customer Name" width="140"></e-grid-column>
        <e-grid-column field="OrderDate" headerText="Order Date" format="yMd" width="140"></e-grid-column>
        <e-grid-column field="Freight" headerText="Freight" textAlign="Right" format="C2" width="120"></e-grid-column>
        <e-grid-column field="ShipCountry" headerText="Ship Country" width="140"></e-grid-column>
    </e-grid-columns>
</ejs-grid>
<script>
    function toolbarClick(args) {
        var grid = document.getElementById("grid").ej2_instances[0];
        if (args.item.id === 'grid_excelexport') {
            let excelExportProperties = {
                theme:
                {
                    header: { fontName: 'Segoe UI', fontColor: '#666666' },
                    record: { fontName: 'Segoe UI', fontColor: '#666666' },
                    caption: { fontName: 'Segoe UI', fontColor: '#666666' }
                }
            };
            grid.excelExport(excelExportProperties);
        }
    }
</script>
public IActionResult Index()
{
ViewBag.dataSource = OrderDetails.GetAllRecords();
return View();
}
By default, material theme is applied to exported excel document.
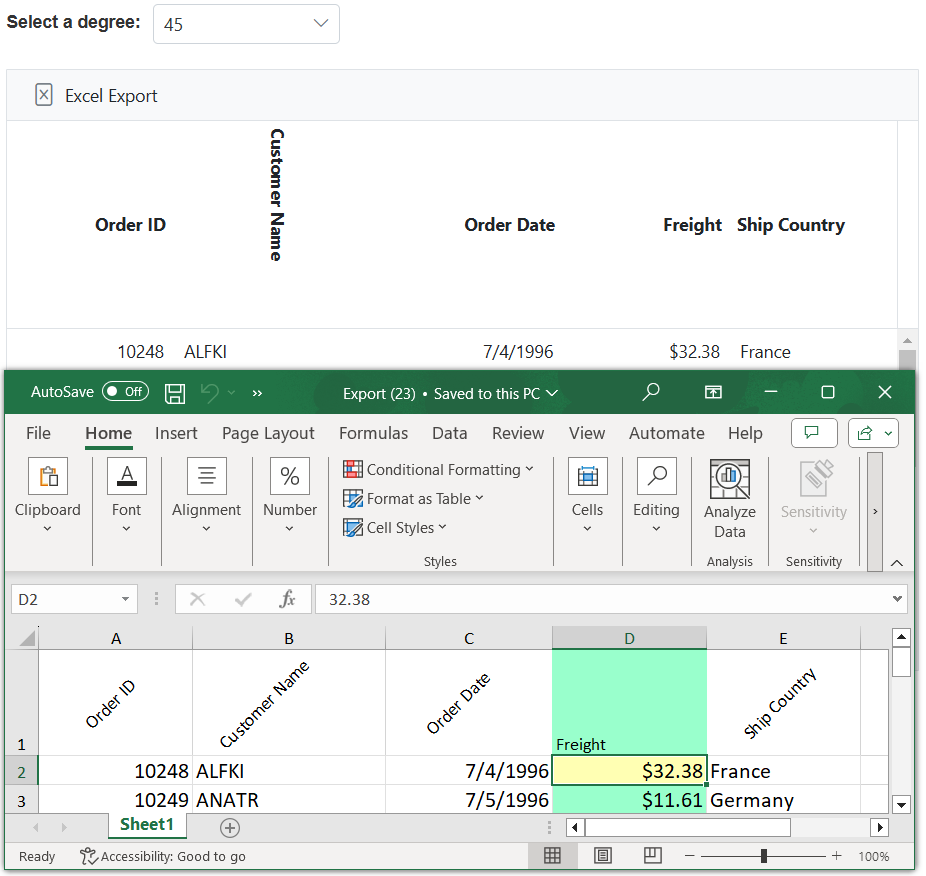
Rotate a header text in the exported grid
The Grid provides support to customize the column header styles, such as changing the text orientation, font color, and more, in the exported Excel file. This feature is useful when you want to enhance the visual appearance of the exported data and provide a unique representation of the Grid in the Excel document.
To achieve this requirement, use the excelHeaderQueryCellInfo event of the Grid. This event is triggered when creating a column header for the Excel document to be exported. By customizing the column header within this event, you can easily rotate the header text to a certain degree in the exported Grid, making the data presentation in the Excel document more visually appealing and tailored to your specific requirements.
In the following demo, using the rotation property of the style argument in the excelHeaderQueryCellInfo event, you can rotate the header text of the column header in the excel exported document.
@{
    var data = new int[] { 90, 180, 45, 135 };
}
<div style="padding-bottom:20px">
    <div style="display: flex">
        <label style="padding: 5px 10px 0 0"> Select a degree:</label>
        <span style="height:fit-content">
            <ejs-dropdownlist id="dropDown" width="150px" placeholder="Select a degree"  dataSource="data">
            </ejs-dropdownlist>
        </span>
    </div>
</div>
<ejs-grid id="grid" dataSource="@ViewBag.dataSource" height="273px" allowExcelExport="true" toolbarClick="toolbarClick" excelHeaderQueryCellInfo="excelHeaderQueryCellInfo" excelQueryCellInfo="excelQueryCellInfo"  toolbar="@(new List<string>() { "ExcelExport" })" created="setHeaderHeight">
    <e-grid-columns>
        <e-grid-column field="OrderID" headerText="Order ID" textAlign="Right" width="120"></e-grid-column>
        <e-grid-column field="CustomerID" headerText="Customer Name" width="150" customAttributes="@(new { @class="orientationcss" })"></e-grid-column>
        <e-grid-column field="OrderDate" headerText="Order Date" format="yMd" textAlign="Right" width="150" ></e-grid-column>
        <e-grid-column field="Freight" headerText="Freight" format="C2" textAlign="Right" width="150" ></e-grid-column>
        <e-grid-column field="ShipCountry" headerText="Ship Country" width="150"></e-grid-column>
    </e-grid-columns>
</ejs-grid>
<script>
    function toolbarClick(args) {
        var grid = document.getElementById("grid").ej2_instances[0];
        if (args.item.id === 'grid_excelexport') {
            grid.excelExport();
        }
    }
    function excelHeaderQueryCellInfo(args) {
        var dropDown = document.getElementById("dropDown").ej2_instances[0];
        let textWidth = document.querySelector(".orientationcss > div").scrollWidth;
        if (args.gridCell.column.field == 'Freight') {
            args.style = { backColor: '#99ffcc', vAlign: 'Bottom' };
        }
        else {
            args.style = { vAlign: 'Center', rotation: dropDown.value };
        }
        args.cell.cellHeight = textWidth;
    }
    function excelQueryCellInfo(args) {
        if (args.column.field == 'Freight') {
            if (args.value < 30) {
                args.style = { backColor: '#99ffcc' };
            }
            else if (args.value < 60) {
                args.style = { backColor: '#ffffb3' };
            }
            else {
                args.style = { backColor: '#ff704d' };
            }
        }
    }
    function setHeaderHeight() {
        var textWidth = document.querySelector(".orientationcss > div").scrollWidth;
        var headerCell = document.querySelectorAll(".e-headercell");
        for (var i = 0; i < headerCell.length; i++) {
            headerCell.item(i).style.height = textWidth + 'px';
        }
    }
</script>
<style>
    .orientationcss .e-headercelldiv {
        transform: rotate(90deg);
    }
</style>
public IActionResult Index()
{
ViewBag.dataSource = OrderDetails.GetAllRecords();
return View();
}
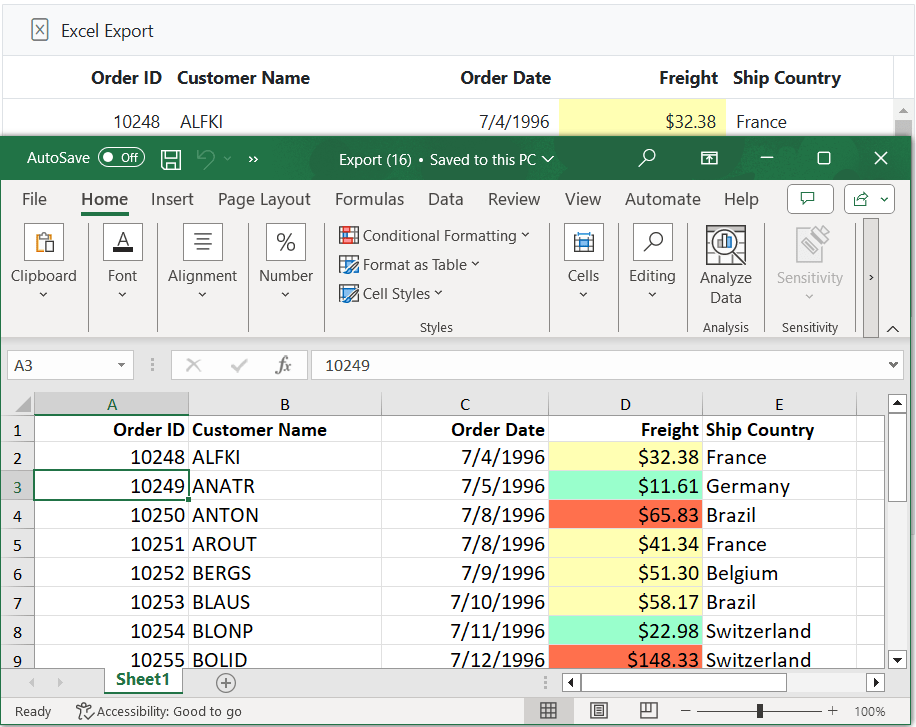
Conditional cell formatting
When exporting data from the Grid, you have an option to conditionally format the cells in the exported Excel document. This allows you to customize the appearance of specific cells based on their values or other criteria.
To achieve this feature, you need to use the excelQueryCellInfo event of the Grid component. This event is triggered for each cell during the export process to Excel. Within this event, you can access the cell object using the args.cell property and modify its properties, such as the background color, based on your desired conditions.
The following example demonstrate how to customize the background color of the Freight column in the exported Excel document using the args.cell and backgroundColor properties of the ExcelQueryCellInfo event.
<ejs-grid id="grid" dataSource="@ViewBag.dataSource" allowExcelExport="true" toolbarClick="toolbarClick" excelQueryCellInfo="excelQueryCellInfo" queryCellInfo="queryCellInfo" toolbar="@(new List<string>() { "ExcelExport" })" height="348px">
    <e-grid-columns>
        <e-grid-column field="OrderID" headerText="Order ID" isPrimaryKey="true" textAlign="Right" width="120"></e-grid-column>
        <e-grid-column field="CustomerID" headerText="Customer Name" width="150"></e-grid-column>
        <e-grid-column field="OrderDate" headerText="Order Date" format="yMd" textAlign="Right" width="130"></e-grid-column>
        <e-grid-column field="Freight" headerText="Freight" textAlign="Right" width="120" format="C2"></e-grid-column>
        <e-grid-column field="ShipCountry" headerText="Ship Country" width="150"></e-grid-column>
    </e-grid-columns>
</ejs-grid>
<script>
    function toolbarClick(args) {
        var grid = document.getElementById("grid").ej2_instances[0];
        if (args.item.id === 'grid_excelexport') {
            grid.excelExport();
        }
    }
    function excelQueryCellInfo(args) {
        if(args.column.field == 'Freight'){
            if(args.value < 30) {
                args.style = {backColor: '#99ffcc'};
            }
            else if(args.value < 60) {
                args.style = {backColor: '#ffffb3'};
            }
            else {
                args.style = {backColor: '#ff704d'};
            }
        }
    }
    function queryCellInfo(args) {
        if(args.column.field == 'Freight'){
            if(args.data['Freight'] < 30) {
                args.cell.bgColor = '#99ffcc';
            }
            else if(args.data['Freight'] < 60) {
                args.cell.bgColor = '#ffffb3';
            }
            else {
                args.cell.bgColor = '#ff704d';
            }
        }
    }
</script>
public IActionResult Index()
{
ViewBag.dataSource = OrderDetails.GetAllRecords();
return View();
}
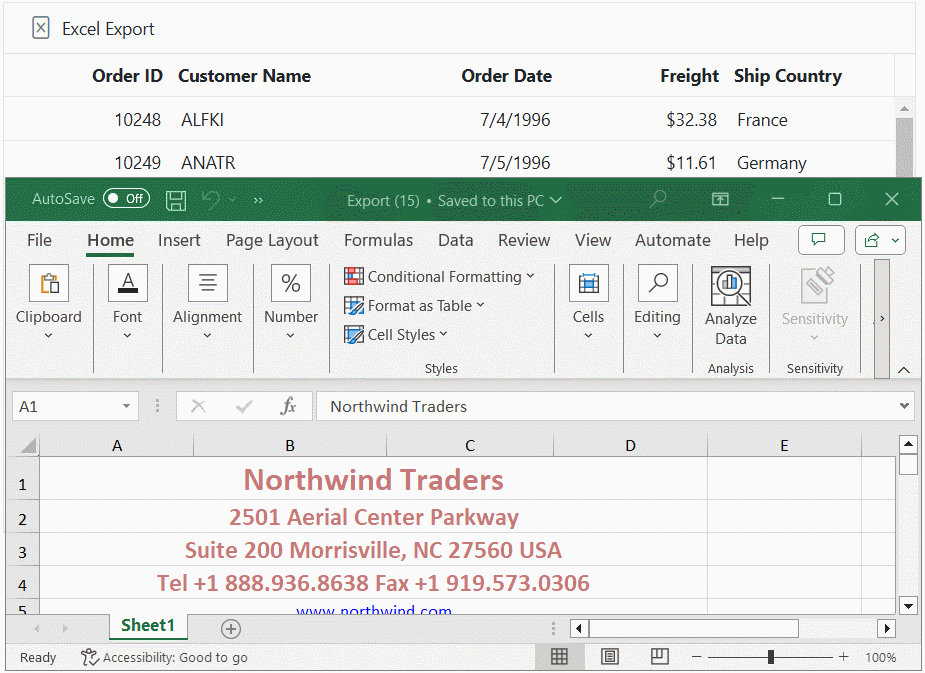
Adding header and footer in the exported Excel file
The Excel or CSV Export feature in Grid component allows you to include header and footer content in the exported Excel or CSV document. This feature is particularly useful when you want to add additional information or branding to the exported Excel or CSV file.
To achieve this, you can use toolbarClick event along with defining the Header and Footer properties in the excelExportProperties object allowing you to customize the header and footer content.
The following example demonstrates how to add a header and footer to the exported grid:
<ejs-grid id="grid" dataSource="@ViewBag.dataSource" allowExcelExport="true" toolbarClick="toolbarClick" toolbar="@(new List<string>() {"ExcelExport"})" height="348px">
    <e-grid-columns>
        <e-grid-column field="OrderID" headerText="Order ID" isPrimaryKey="true" textAlign="Right" width="120"></e-grid-column>
        <e-grid-column field="CustomerID" headerText="Customer Name" width="140"></e-grid-column>
        <e-grid-column field="OrderDate" headerText="Order Date" format="yMd" width="140" ></e-grid-column>
        <e-grid-column field="Freight" headerText="Freight" textAlign="Right" format="C2" width="120"></e-grid-column>
        <e-grid-column field="ShipCountry" headerText="ShipCountry" width="140"></e-grid-column>
    </e-grid-columns>
</ejs-grid>
<script>
    function toolbarClick(args) {
        var grid = document.getElementById("grid").ej2_instances[0];
        if (args.item.id === 'grid_excelexport') {
            var excelExportProperties = {
                header: {
                    headerRows: 7,
                    rows: [
                        { cells: [{ colSpan: 4, value: "Northwind Traders", style: { fontColor: '#C67878', fontSize: 20, hAlign: 'Center', bold: true, } }] },
                        { cells: [{ colSpan: 4, value: "2501 Aerial Center Parkway", style: { fontColor: '#C67878', fontSize: 15, hAlign: 'Center', bold: true, } }] },
                        { cells: [{ colSpan: 4, value: "Suite 200 Morrisville, NC 27560 USA", style: { fontColor: '#C67878', fontSize: 15, hAlign: 'Center', bold: true, } }] },
                        { cells: [{ colSpan: 4, value: "Tel +1 888.936.8638 Fax +1 919.573.0306", style: { fontColor: '#C67878', fontSize: 15, hAlign: 'Center', bold: true, } }] },
                        { cells: [{ colSpan: 4, hyperlink: { target: 'https://www.northwind.com/', displayText: 'www.northwind.com' }, style: { hAlign: 'Center' } }] },
                        { cells: [{ colSpan: 4, hyperlink: { target: 'mailto:support@northwind.com' }, style: { hAlign: 'Center' } }] },
                    ]
                },
                footer: {
                    footerRows: 4,
                    rows: [
                        { cells: [{ colSpan: 4, value: "Thank you for your business!", style: { hAlign: 'Center', bold: true } }] },
                        { cells: [{ colSpan: 4, value: "!Visit Again!", style: { hAlign: 'Center', bold: true } }] }
                    ]
                },
            };
            grid.excelExport(excelExportProperties);
        }
    }
</script>
public IActionResult Index()
{
ViewBag.dataSource = OrderDetails.GetAllRecords();
return View();
}
Export grid as blob
The Grid offers an option to export the data as a Blob instead of downloading it as a file in the browser. To export the grid as a Blob, set the isBlob parameter to true in the excelExport method. The grid returns the promise of a blob in the excelExportComplete event.
The following example demonstrates how to obtain the blob data of the exported grid by executing the promise in the excelExportComplete event.
<ejs-grid id="grid" dataSource="@ViewBag.dataSource" height="348px" allowExcelExport="true" excelExportComplete="excelExportComplete" toolbarClick="toolbarClick" toolbar="@(new List<string>() { "ExcelExport" ,"CsvExport" })">
    <e-grid-columns>
        <e-grid-column field="OrderID" headerText="Order ID" isPrimaryKey="true" textAlign="Right" width="120"></e-grid-column>
        <e-grid-column field="CustomerID" headerText="Customer Name" width="150"></e-grid-column>
        <e-grid-column field="OrderDate" headerText="Order Date" format="yMd" textAlign="Right" width="130"></e-grid-column>
        <e-grid-column field="Freight" headerText="Freight" textAlign="Right" format="C2" width="120"></e-grid-column>
        <e-grid-column field="ShipCountry" visible="false" headerText="Ship Country" width="150"></e-grid-column>
    </e-grid-columns>
</ejs-grid>
<script>
    function toolbarClick(args) {
        var grid = document.getElementById("grid").ej2_instances[0];
        if (args.item.id === 'grid_excelexport') {
            // pass undefined to use default settings
            grid.excelExport(undefined, undefined, undefined, true);
        }
        if (args.item.id === 'grid_csvexport') {
            // pass undefined to use default settings
            grid.csvExport(undefined, undefined, undefined, true);
        }
    }
    function excelExportComplete(args) {
        if (args && args.promise) {
            // execute the promise to get the blob data
            args.promise.then((e) => {
                exportBlob(e.blobData);
            });
        }
    }
    function exportBlob(blob) {
        var a = document.createElement('a');
        document.body.appendChild(a);
        a.style.display = 'none';
        var url = window.URL.createObjectURL(blob); // Fix typo here
        a.href = url;
        a.download = 'Export';
        a.click();
        window.URL.revokeObjectURL(url); // Fix typo here
        document.body.removeChild(a);
    }
</script>
public IActionResult Index()
{
ViewBag.dataSource = OrderDetails.GetAllRecords();
return View();
}