UrlAdaptor in Syncfusion Angular Grid Component
14 Feb 202624 minutes to read
The UrlAdaptor serves as the base adaptor for facilitating communication between remote data services and UI components. It enables seamless data binding and interaction with custom API services or any remote service through URLs. The UrlAdaptor is particularly useful for scenarios where a custom API service with unique logic for handling data and CRUD operations is in place. This approach allows for custom handling of data and CRUD operations, with the resultant data returned in the result and count format for display in the Syncfusion Angular Grid component.
This section describes a step-by-step process for retrieving data using UrlAdaptor, then binding it to the Angular Grid component to facilitate data and CRUD operations.
Creating an API service
To configure a server with Syncfusion Angular Grid, follow these steps:
1. Project Creation:
Open Visual Studio and create an Angular and ASP.NET Core project named UrlAdaptor. To create an Angular and ASP.NET Core application, follow the documentation link for detailed steps.
2. Model Class Creation:
Create a model class named OrdersDetails.cs in the server-side Models folder to represent the order data.
namespace UrlAdaptor.Server.Models
 {
 public class OrdersDetails
 {
    public static List<OrdersDetails> order = new List<OrdersDetails>();
    public OrdersDetails()
    {

    }
    public OrdersDetails(
    int OrderID, string CustomerId, int EmployeeId, double Freight, bool Verified,
    DateTime OrderDate, string ShipCity, string ShipName, string ShipCountry,
    DateTime ShippedDate, string ShipAddress)
    {
    this.OrderID = OrderID;
    this.CustomerID = CustomerId;
    this.EmployeeID = EmployeeId;
    this.Freight = Freight;
    this.ShipCity = ShipCity;
    this.Verified = Verified;
    this.OrderDate = OrderDate;
    this.ShipName = ShipName;
    this.ShipCountry = ShipCountry;
    this.ShippedDate = ShippedDate;
    this.ShipAddress = ShipAddress;
    }

    public static List<OrdersDetails> GetAllRecords()
    {
    if (order.Count() == 0)
    {
        int code = 10000;
        for (int i = 1; i < 10; i++)
        {
        order.Add(new OrdersDetails(code + 1, "ALFKI", i + 0, 2.3 * i, false, new DateTime(1991, 05, 15), "Berlin", "Simons bistro", "Denmark", new DateTime(1996, 7, 16), "Kirchgasse 6"));
        order.Add(new OrdersDetails(code + 2, "ANATR", i + 2, 3.3 * i, true, new DateTime(1990, 04, 04), "Madrid", "Queen Cozinha", "Brazil", new DateTime(1996, 9, 11), "Avda. Azteca 123"));
        order.Add(new OrdersDetails(code + 3, "ANTON", i + 1, 4.3 * i, true, new DateTime(1957, 11, 30), "Cholchester", "Frankenversand", "Germany", new DateTime(1996, 10, 7), "Carrera 52 con Ave. Bolívar #65-98 Llano Largo"));
        order.Add(new OrdersDetails(code + 4, "BLONP", i + 3, 5.3 * i, false, new DateTime(1930, 10, 22), "Marseille", "Ernst Handel", "Austria", new DateTime(1996, 12, 30), "Magazinweg 7"));
        order.Add(new OrdersDetails(code + 5, "BOLID", i + 4, 6.3 * i, true, new DateTime(1953, 02, 18), "Tsawassen", "Hanari Carnes", "Switzerland", new DateTime(1997, 12, 3), "1029 - 12th Ave. S."));
        code += 5;
        }
    }
    return order;
    }

    public int? OrderID { get; set; }
    public string? CustomerID { get; set; }
    public int? EmployeeID { get; set; }
    public double? Freight { get; set; }
    public string? ShipCity { get; set; }
    public bool? Verified { get; set; }
    public DateTime OrderDate { get; set; }
    public string? ShipName { get; set; }
    public string? ShipCountry { get; set; }
    public DateTime ShippedDate { get; set; }
    public string? ShipAddress { get; set; }
 }
}
3. API Controller Creation:
Create a file named GridController.cs under the Controllers folder. This controller handles data communication with the Angular Grid component.
using Microsoft.AspNetCore.Http;
using Microsoft.AspNetCore.Mvc;
using UrlAdaptor.Server.Models;

namespace UrlAdaptor.Server.Controllers
{
  [Route("api/[controller]")]
  [ApiController]
  public class GridController : ControllerBase
  {
    [HttpPost]
    public object Post()
    {
      // Retrieve data from the data source (e.g., database)
      IQueryable<OrdersDetails> DataSource = GetOrderData().AsQueryable();

      // Get the total records count
      int totalRecordsCount = DataSource.Count();

      // Return data based on the request
      return new { result = DataSource, count = totalRecordsCount };
    }

    [HttpGet]
    public List<OrdersDetails> GetOrderData()
    {
      var data = OrdersDetails.GetAllRecords().ToList();
      return data;
    }
  }
}
The GetOrderData method retrieves sample order data. Replace it with custom logic to fetch data from a database or any other source.
4. Run the Application:
Run the application in Visual Studio. The application will be accessible on a URL like https://localhost:xxxx.
After running the application, verify that the server-side API controller successfully returns the order data at the URL (https://localhost:xxxx/api/Grid). Here xxxx represents the port number.

Connecting Syncfusion Angular Grid to an API service
To integrate the Syncfusion Grid component into the Angular and ASP.NET Core project using Visual Studio, follow these steps:
Step 1: Install Syncfusion Package
Open the terminal in the project’s client folder and install the required Syncfusion packages using npm:
npm install @syncfusion/ej2-angular-grids --save
npm install @syncfusion/ej2-data --save
Step 2: Import Grid Module
In the app.module.ts file, import the GridModule from the @syncfusion/ej2-angular-grids package:
import { NgModule } from '@angular/core';
import { BrowserModule } from '@angular/platform-browser';
import { HttpClientModule } from '@angular/common/http';
import { GridModule, EditService, ToolbarService, FilterService, SortService, PageService } from '@syncfusion/ej2-angular-grids';
import { AppComponent } from './app.component';

@NgModule({
  declarations: [
    AppComponent
  ],
  imports: [
    BrowserModule,
    HttpClientModule,
    GridModule
  ],
  providers: [EditService, ToolbarService, FilterService, SortService, PageService],
  bootstrap: [AppComponent]
})
export class AppModule { }
Step 3: Adding CSS reference
Include the necessary CSS files in the styles.css file to style the Syncfusion Angular component:
@import '../node_modules/@syncfusion/ej2-base/styles/material3.css';
@import '../node_modules/@syncfusion/ej2-buttons/styles/material3.css';
@import '../node_modules/@syncfusion/ej2-calendars/styles/material3.css';
@import '../node_modules/@syncfusion/ej2-dropdowns/styles/material3.css';
@import '../node_modules/@syncfusion/ej2-inputs/styles/material3.css';
@import '../node_modules/@syncfusion/ej2-navigations/styles/material3.css';
@import '../node_modules/@syncfusion/ej2-popups/styles/material3.css';
@import '../node_modules/@syncfusion/ej2-splitbuttons/styles/material3.css';
@import '../node_modules/@syncfusion/ej2-angular-grids/styles/material3.css';
Step 4: Adding Syncfusion Component
In the component file (e.g., app.component.ts), import DataManager and UrlAdaptor from @syncfusion/ej2-data. Create a DataManager instance specifying the URL of the API endpoint (https:localhost:xxxx/api/Grid) using the url property and set the adaptor to UrlAdaptor.
import { Component, ViewChild } from '@angular/core';
import { DataManager, UrlAdaptor } from '@syncfusion/ej2-data';
import { GridComponent } from '@syncfusion/ej2-angular-grids';

@Component({
  selector: 'app-root',
  templateUrl: './app.component.html',
})
export class AppComponent {
  public data?: DataManager;

  @ViewChild('grid')
  public grid?: GridComponent;

  ngOnInit(): void {
    this.data = new DataManager({
      url:'https://localhost:xxxx/api/grid', // Here xxxx represents the port number
      adaptor: new UrlAdaptor()
    });
  }
}<ejs-grid #grid [dataSource]='data'>
<e-columns>
<e-column field='OrderID' headerText='Order ID' width='120' textAlign='Right' isPrimaryKey="true"></e-column>
<e-column field='CustomerID' headerText='Customer ID' width='160'></e-column>
<e-column field='ShipCity' headerText='Ship City' width='150'></e-column>
<e-column field='ShipCountry' headerText='Ship Country' width='150'></e-column>
</e-columns>
</ejs-grid>Replace https://localhost:xxxx/api/grid with the actual URL of the API endpoint that provides the data in a consumable format (e.g., JSON).
Run the application in Visual Studio. The application will be accessible on a URL like https://localhost:xxxx.
Ensure the API service is configured to handle CORS (Cross-Origin Resource Sharing) if necessary.
  [program.cs]
  builder.Services.AddCors(options =>
  {
    options.AddDefaultPolicy(builder =>
    {
      builder.AllowAnyOrigin().AllowAnyMethod().AllowAnyHeader();
    });
  });
  var app = builder.Build();
  app.UseCors();
You can find the complete sample of UrlAdaptor in the GitHub link.

- The Syncfusion Grid component provides built-in support for handling various data operations such as searching, sorting, filtering, aggregates and paging on the server-side. These operations can be handled using methods such as PerformSearching, PerformFiltering, PerformSorting, PerformTake and PerformSkip available in the
Syncfusion.EJ2.AspNet.Corepackage. The following sections explore how to manage these data operations using theUrlAdaptor.- In an API service project, add
Syncfusion.EJ2.AspNet.Coreby opening the NuGet package manager in Visual Studio (Tools → NuGet Package Manager → Manage NuGet Packages for Solution), search and install it.- To access DataManagerRequest and QueryableOperation, import
Syncfusion.EJ2.BaseinGridController.csfile.
Handling searching operation
To handle searching operation, ensure that the API endpoint supports custom searching criteria. Implement the searching logic on the server-side using the PerformSearching method from the QueryableOperation class. This allows the custom data source to undergo searching based on the criteria specified in the incoming DataManagerRequest object.

[HttpPost]
public object Post([FromBody] DataManagerRequest DataManagerRequest)
{
  // Retrieve data from the data source (e.g., database)
  IQueryable<OrdersDetails> DataSource = GetOrderData().AsQueryable();
  QueryableOperation queryableOperation = new QueryableOperation(); // Initialize QueryableOperation instance

  // Handling Searching
  if (DataManagerRequest.Search != null && DataManagerRequest.Search.Count > 0)
  {
      DataSource = queryableOperation.PerformSearching(DataSource, DataManagerRequest.Search);
  }
  // Get the total records count
  int totalRecordsCount = DataSource.Count();

  // Return data based on the request
  return new { result = DataSource, count = totalRecordsCount };
}
import { Component, ViewChild } from '@angular/core';
import { DataManager, UrlAdaptor } from '@syncfusion/ej2-data';
import { GridComponent, ToolbarItems } from '@syncfusion/ej2-angular-grids';
@Component({
selector: 'app-root',
templateUrl: './app.component.html',
})
export class AppComponent {
public data?: DataManager;
@ViewChild('grid')
public grid?: GridComponent;
public toolbar?: ToolbarItems[];
ngOnInit(): void {
this.data = new DataManager({
url: 'https://localhost:xxxx/api/Grid', // Replace your hosted link
adaptor: new UrlAdaptor()
});
this.toolbar = ['Search'];
}
}<ejs-grid #grid [dataSource]='data' [toolbar]="toolbar" height="320">
<e-columns>
<e-column field='OrderID' headerText='Order ID' isPrimaryKey=true width='150'></e-column>
<e-column field='CustomerID' headerText='Customer Name' width='150'></e-column>
<e-column field='ShipCity' headerText='ShipCity' width='150' textAlign='Right'></e-column>
</e-columns>
</ejs-grid>Handling filtering operation
To handle filtering operation, ensure that the API endpoint supports custom filtering criteria. Implement the filtering logic on the server-side using the PerformFiltering method from the QueryableOperation class. This allows the custom data source to undergo filtering based on the criteria specified in the incoming DataManagerRequest object.
Single column filtering

Multi column filtering

[HttpPost]
public object Post([FromBody] DataManagerRequest DataManagerRequest)
{
  // Retrieve data from the data source (e.g., database)
  IQueryable<OrdersDetails> DataSource = GetOrderData().AsQueryable();

  QueryableOperation queryableOperation = new QueryableOperation(); // Initialize QueryableOperation instance

  if (DataManagerRequest.Where != null && DataManagerRequest.Where.Count > 0)
  {
    // Handling filtering operation
    foreach (var condition in DataManagerRequest.Where)
    {
      foreach (var predicate in condition.predicates)
      {
        DataSource = queryableOperation.PerformFiltering(DataSource, DataManagerRequest.Where, predicate.Operator);
      }
    }
  }
  // Get the total records count
  int totalRecordsCount = DataSource.Count();

  // Return data based on the request
  return new { result = DataSource, count = totalRecordsCount };
}
import { Component, ViewChild } from '@angular/core';
import { DataManager, UrlAdaptor } from '@syncfusion/ej2-data';
import { GridComponent } from '@syncfusion/ej2-angular-grids';
@Component({
selector: 'app-root',
templateUrl: './app.component.html',
})
export class AppComponent {
public data?: DataManager;
@ViewChild('grid')
public grid?: GridComponent;
ngOnInit(): void {
this.data = new DataManager({
url: 'https://localhost:xxxx/api/Grid', // Replace your hosted link
adaptor: new UrlAdaptor()
});
}
}<ejs-grid #grid [dataSource]='data' allowFiltering='true' height="320">
<e-columns>
<e-column field='OrderID' headerText='Order ID' isPrimaryKey=true width='150'></e-column>
<e-column field='CustomerID' headerText='Customer Name' width='150'></e-column>
<e-column field='ShipCity' headerText='ShipCity' width='150' textAlign='Right'></e-column>
</e-columns>
</ejs-grid>Handling sorting operation
To handle sorting operation, ensure that the API endpoint supports custom sorting criteria. Implement the sorting logic on the server-side using the PerformSorting method from the QueryableOperation class. This allows the custom data source to undergo sorting based on the criteria specified in the incoming DataManagerRequest object.
Single column sorting

Multi column sorting

[HttpPost]
public object Post([FromBody] DataManagerRequest DataManagerRequest)
{
  // Retrieve data from the data source (e.g., database)
  IQueryable<OrdersDetails> DataSource = GetOrderData().AsQueryable();

  QueryableOperation queryableOperation = new QueryableOperation(); // Initialize QueryableOperation instance

  // Handling Sorting operation
  if (DataManagerRequest.Sorted != null && DataManagerRequest.Sorted.Count > 0)
  {
    DataSource = queryableOperation.PerformSorting(DataSource, DataManagerRequest.Sorted);
  }

  // Get the total count of records
  int totalRecordsCount = DataSource.Count();

  // Return data based on the request
  return new { result = DataSource, count = totalRecordsCount };
}
import { Component, ViewChild } from '@angular/core';
import { DataManager, UrlAdaptor } from '@syncfusion/ej2-data';
import { GridComponent } from '@syncfusion/ej2-angular-grids';
@Component({
selector: 'app-root',
templateUrl: './app.component.html',
})
export class AppComponent {
public data?: DataManager;
@ViewChild('grid')
public grid?: GridComponent;
ngOnInit(): void {
this.data = new DataManager({
url: 'https://localhost:xxxx/api/Grid', // Replace your hosted link
adaptor: new UrlAdaptor()
});
}
}<ejs-grid #grid [dataSource]='data' allowSorting='true' height="320">
<e-columns>
<e-column field='OrderID' headerText='Order ID' isPrimaryKey=true width='150'></e-column>
<e-column field='CustomerID' headerText='Customer Name' width='150'></e-column>
<e-column field='ShipCity' headerText='ShipCity' width='150' textAlign='Right'></e-column>
</e-columns>
</ejs-grid>Handling paging operation
To handle paging operation, ensure that the API endpoint supports custom paging criteria. Implement the paging logic on the server-side using the PerformTake and PerformSkip methods from the QueryableOperation class. This allows the custom data source to undergo paging based on the criteria specified in the incoming DataManagerRequest object.

[HttpPost]
public object Post([FromBody] DataManagerRequest DataManagerRequest)
{
  // Retrieve data from the data source (e.g., database)
  IQueryable<OrdersDetails> DataSource = GetOrderData().AsQueryable();

  // Get the total records count
  int totalRecordsCount = DataSource.Count();

  QueryableOperation queryableOperation = new QueryableOperation(); // Initialize QueryableOperation instance

  // Handling paging operation.
  if (DataManagerRequest.Skip != 0)
  {
    // Paging
    DataSource = queryableOperation.PerformSkip(DataSource, DataManagerRequest.Skip);
  }
  if (DataManagerRequest.Take != 0)
  {
    DataSource = queryableOperation.PerformTake(DataSource, DataManagerRequest.Take);
  }

  // Return data based on the request
  return new { result = DataSource, count = totalRecordsCount };
}
import { Component, ViewChild } from '@angular/core';
import { DataManager, UrlAdaptor } from '@syncfusion/ej2-data';
import { GridComponent } from '@syncfusion/ej2-angular-grids';
@Component({
selector: 'app-root',
templateUrl: './app.component.html',
})
export class AppComponent {
public data?: DataManager;
@ViewChild('grid')
public grid?: GridComponent;
ngOnInit(): void {
this.data = new DataManager({
url: 'https://localhost:xxxx/api/Grid', // Replace your hosted link
adaptor: new UrlAdaptor()
});
}
}<ejs-grid #grid [dataSource]='data' allowPaging='true' height="320">
<e-columns>
<e-column field='OrderID' headerText='Order ID' isPrimaryKey=true width='150'></e-column>
<e-column field='CustomerID' headerText='Customer Name' width='150'></e-column>
<e-column field='ShipCity' headerText='ShipCity' width='150' textAlign='Right'></e-column>
</e-columns>
</ejs-grid>Handling CRUD operations
The Syncfusion Angular Grid Component seamlessly integrates CRUD (Create, Read, Update, Delete) operations with server-side controller actions through specific properties: insertUrl, removeUrl, updateUrl, crudUrl, and batchUrl. These properties enable the grid to communicate with the data service for every grid action, facilitating server-side operations.
CRUD Operations Mapping:
CRUD operations within the grid can be mapped to server-side controller actions using specific properties:
- insertUrl: Specifies the URL for inserting new data.
- removeUrl: Specifies the URL for removing existing data.
- updateUrl: Specifies the URL for updating existing data.
- crudUrl: Specifies a single URL for all CRUD operations.
- batchUrl: Specifies the URL for batch editing.
To enable editing in Angular Grid component, refer to the editing documentation. In the below example, the inline edit mode is enabled and toolbar property is configured to display toolbar items for editing purposes.
import { Component, ViewChild } from '@angular/core';
import { DataManager, UrlAdaptor } from '@syncfusion/ej2-data';
import { GridComponent, EditSettingsModel, ToolbarItems } from '@syncfusion/ej2-angular-grids';

@Component({
  selector: 'app-root',
  templateUrl: './app.component.html',
})
export class AppComponent {
  public data?: DataManager;

  @ViewChild('grid')
  public grid?: GridComponent;
  public editSettings?: EditSettingsModel;
  public toolbar?: ToolbarItems[];

  ngOnInit(): void {
    this.data = new DataManager({
      url: 'https://localhost:xxxx/api/grid', // Replace your hosted link
      insertUrl: 'https://localhost:xxxx/api/grid/Insert',
      updateUrl: 'https://localhost:xxxx/api/grid/Update',
      removeUrl: 'https://localhost:xxxx/api/grid/Remove',
      adaptor: new UrlAdaptor()
    });
    this.toolbar = ['Add', 'Edit', 'Update', 'Delete', 'Cancel'];
    this.editSettings = { allowAdding: true, allowDeleting: true, allowEditing: true, mode: 'Batch' };
  }
}<ejs-grid #grid [dataSource]='data' [toolbar]="toolbar" [editSettings]="editSettings">
<e-columns>
<e-column field='OrderID' headerText='Order ID' width='120' textAlign='Right' isPrimaryKey="true"></e-column>
<e-column field='CustomerID' headerText='Customer ID' width='160'></e-column>
<e-column field='ShipCity' headerText='Ship City' width='150'></e-column>
<e-column field='ShipCountry' headerText='Ship Country' width='150'></e-column>
</e-columns>
</ejs-grid>Normal/Inline editing is the default edit mode for the Grid component. To enable CRUD operations, ensure that the isPrimaryKey property is set to true for a specific Grid column, ensuring that its value is unique.
The CRUDModel class structures data sent during CRUD operations:
public class CRUDModel<T> where T : class
{
  public string? action { get; set; }
  public string? keyColumn { get; set; }
  public object? key { get; set; }
  public T? value { get; set; }
  public List<T>? added { get; set; }
  public List<T>? changed { get; set; }
  public List<T>? deleted { get; set; }
  public IDictionary<string, object>? @params { get; set; }
}
Insert operation:
Use the insertUrl property to specify the controller action mapping URL for the insert operation. The newly added record details are bound to the newRecord parameter.

/// <summary>
/// Inserts a new data item into the data collection.
/// </summary>
/// <param name="newRecord">It contains the new record detail which needs to be inserted.</param>
/// <returns>Returns void</returns>
[HttpPost]
[Route("api/Grid/Insert")]
public void Insert([FromBody] CRUDModel<OrdersDetails> newRecord)
{
  if (newRecord.value != null)
  {
    OrdersDetails.GetAllRecords().Insert(0, newRecord.value);
  }
}
Update operation:
For updating existing records, use the updateUrl property to specify the controller action mapping URL for the update operation. The updated record details are bound to the updatedRecord parameter.

/// <summary>
/// Updates an existing data item from the data collection.
/// </summary>
/// <param name="updatedRecord">It contains the updated record detail which needs to be updated.</param>
/// <returns>Returns void</returns>
[HttpPost]
[Route("api/Grid/Update")]
public void Update([FromBody] CRUDModel<OrdersDetails> updatedRecord)
{
  var updatedOrder = updatedRecord.value;
  if (updatedOrder != null)
  {
    var data = OrdersDetails.GetAllRecords().FirstOrDefault(or => or.OrderID == updatedOrder.OrderID);
    if (data != null)
    {
      // Update the existing record
      data.OrderID = updatedOrder.OrderID;
      data.CustomerID = updatedOrder.CustomerID;
      data.ShipCity = updatedOrder.ShipCity;
      data.ShipCountry = updatedOrder.ShipCountry;
      // Update other properties as needed
    }
  }
}
Delete operation:
To delete existing records, use the removeUrl property to specify the controller action mapping URL for the delete operation. The primary key value of the deleted record is bound to the deletedRecord parameter.

/// <summary>
/// Removes a specific data item from the data collection.
/// </summary>
/// <param name="deletedRecord">It contains the specific record detail which needs to be removed.</param>
/// <returns>Returns void</returns>
[HttpPost]
[Route("api/Grid/Remove")]
public void Remove([FromBody] CRUDModel<OrdersDetails> deletedRecord)
{
    int orderId = int.Parse(deletedRecord.key.ToString()); // get key value from the deletedRecord
    var data = OrdersDetails.GetAllRecords().FirstOrDefault(orderData => orderData.OrderID == orderId);
    if (data != null)
    {
        // Remove the record from the data collection
        OrdersDetails.GetAllRecords().Remove(data);
    }
}
You can find the complete sample for the UrlAdaptor in the GitHub link.
Single method for performing all CRUD operations:
Using the crudUrl property, the controller action mapping URL can be specified to perform all CRUD operations at server-side using a single method instead of specifying separate controller action methods for CRUD (insert, update and delete) operations.
The following code example describes this approach:
import { Component, ViewChild } from '@angular/core';
import { DataManager, UrlAdaptor } from '@syncfusion/ej2-data';
import { GridComponent, EditSettingsModel, ToolbarItems } from '@syncfusion/ej2-angular-grids';

@Component({
  selector: 'app-root',
  templateUrl: './app.component.html',
})
export class AppComponent {
  public data?: DataManager;

  @ViewChild('grid')
  public grid?: GridComponent;
  public editSettings?: EditSettingsModel;
  public toolbar?: ToolbarItems[];

  ngOnInit(): void {
    this.data = new DataManager({
      url: 'https://localhost:xxxx/api/grid', // Replace your hosted link
      crudUrl:'https://localhost:xxxx/api/grid/CrudUpdate',
      adaptor: new UrlAdaptor()
    });
    this.toolbar = ['Add', 'Edit', 'Update', 'Delete', 'Cancel'];
    this.editSettings = { allowAdding: true, allowDeleting: true, allowEditing: true, mode: 'Normal' };
  }
}
[HttpPost]
[Route("api/[controller]/CrudUpdate")]
public void CrudUpdate([FromBody] CRUDModel<OrdersDetails> request)
{
// perform update operation
if (request.action == "update")
{
var orderValue = request.value;
OrdersDetails existingRecord = OrdersDetails.GetAllRecords().Where(or => or.OrderID == orderValue.OrderID).FirstOrDefault();
existingRecord.OrderID = orderValue.OrderID;
existingRecord.CustomerID = orderValue.CustomerID;
existingRecord.ShipCity = orderValue.ShipCity;
}
// perform insert operation
else if (request.action == "insert")
{
OrdersDetails.GetAllRecords().Insert(0, request.value);
}
// perform remove operation
else if (request.action == "remove")
{
OrdersDetails.GetAllRecords().Remove(OrdersDetails.GetAllRecords().Where(or => or.OrderID == int.Parse(request.key.ToString())).FirstOrDefault());
}
}Batch operation:
To perform batch operation, define the edit mode as Batch and specify the batchUrl property in the DataManager. Use the Add toolbar button to insert new rows in batch editing mode. To edit a cell, double-click the desired cell and update the value as required. To delete a record, simply select the record and press the Delete toolbar button. All CRUD operations will be executed in a single request. Clicking the Update toolbar button will update the newly added, edited, or deleted records from the OrdersDetails table using a single API POST request.
[app.component.ts]
import { Component, ViewChild } from '@angular/core';
import { GridComponent, ToolbarItems, EditSettingsModel } from '@syncfusion/ej2-angular-grids';
import { DataManager, UrlAdaptor } from '@syncfusion/ej2-data';

@Component({
  selector: 'app-root',
  template:`<ejs-grid #grid [dataSource]='data' [editSettings]='editSettings' [toolbar]='toolbar'>
<e-columns>
<e-column field='OrderID' headerText='Order ID' width='90' textAlign='Right' isPrimaryKey='true'></e-column>
<e-column field="CustomerID" headerText="Customer Name" width="100"></e-column>
<e-column field='ShipCountry' headerText='Ship Country' width=100></e-column>
</e-columns>
</ejs-grid>`
})
export class AppComponent {
  @ViewChild('grid')
  public grid?: GridComponent;
  public data?: DataManager;
  public editSettings?: EditSettingsModel;
  public toolbar?: ToolbarItems[];
  public orderIDRules?: object;
  public customerIDRules?: object;

  ngOnInit(): void {
    this.data = new DataManager({
      url: 'https://localhost:xxxx/api/grid', // Replace your hosted link
      batchUrl:'https://localhost:xxxx/api/grid/BatchUpdate',
      adaptor: new UrlAdaptor()
    });

    this.editSettings = { allowEditing: true, allowAdding: true, allowDeleting: true, mode: 'Batch' };
    this.toolbar = ['Add', 'Edit', 'Delete', 'Update', 'Cancel', 'Search'];
    this.orderIDRules = { required: true };
    this.customerIDRules = { required: true, minLength: 3 };
  }
}
public IActionResult BatchUpdate([FromBody] CRUDModel<OrdersDetails> batchOperation)
{
if (batchOperation.added != null)
{
foreach (var addedOrder in batchOperation.added)
{
OrdersDetails.GetAllRecords().Insert(0, addedOrder);
}
}
if (batchOperation.changed != null)
{
foreach (var changedOrder in batchOperation.changed)
{
var existingOrder = OrdersDetails.GetAllRecords().FirstOrDefault(or => or.OrderID == changedOrder.OrderID);
if (existingOrder != null)
{
existingOrder.CustomerID = changedOrder.CustomerID;
existingOrder.ShipCity = changedOrder.ShipCity;
// Update other properties as needed
}
}
}
if (batchOperation.deleted != null)
{
foreach (var deletedOrder in batchOperation.deleted)
{
var orderToDelete = OrdersDetails.GetAllRecords().FirstOrDefault(or => or.OrderID == deletedOrder.OrderID);
if (orderToDelete != null)
{
OrdersDetails.GetAllRecords().Remove(orderToDelete);
}
}
}
return Json(batchOperation);
}
Foreign key column with UrlAdaptor
Configuration of foreign key column with remote data using UrlAdaptor requires assigning the DataManager instance with the endpoint URL to the particular column data source along with foreign key field and foreign key value properties. When both grid and foreign key column uses a UrlAdaptor, the grid data and the foreign key data are fetched separately from their respective remote endpoints. During operations such as filtering or sorting, the grid sends requests to the server based on the foreign key field and its corresponding value.
[app.component.ts]

import { Component, OnInit, ViewChild } from '@angular/core';
import { orderDetails, customerData } from './data';
import {
  FilterService,
  GridComponent,
  SortService,
  ToolbarService,
  PageService,
  ToolbarItems,
  EditSettingsModel,
  ForeignKeyService,
  GridModule,
} from '@syncfusion/ej2-angular-grids';
import { DataManager, UrlAdaptor } from '@syncfusion/ej2-data';

@Component({
  selector: 'app-root',
  template: `<ejs-grid #grid
    [dataSource]="orders" [allowFiltering]="true" allowPaging="true" [filterSettings]="filterSettings" [toolbar]="toolbarItems" [allowSorting]="true">
    <e-columns>
      <e-column
        field="OrderID"
        headerText="Order ID"
        width="120"
        textAlign="Right"
        isPrimaryKey="true"
      ></e-column>
      <e-column
        field="CustomerID"
        headerText="Customer Name"
        width="150"
        foreignKeyValue="CustomerName"
        foreignKeyField="CustomerID"
        [dataSource]="customers"
      ></e-column>
      <e-column
        field="Freight"
        headerText="Freight"
        width="150"
        format="C2"
        textAlign="Right"
        editType="numericedit"
      ></e-column>
      <e-column field="ShipName" headerText="Ship Name" width="170"></e-column>
      <e-column
        field="ShipCountry"
        headerText="Ship Country"
        width="150"
        editType="dropdownedit"
      ></e-column>
    </e-columns>
  </ejs-grid>`,
  providers: [
    FilterService,
    EditService,
    SortService,
    ToolbarService,
    ForeignKeyService,
    PageService,
  ],
  standalone: true,
  imports: [GridModule],
})
export class AppComponent {
  public orders: DataManager;
  public customers: DataManager;
  public pageSettings: Object;
  public filterSettings: Object;
  public toolbarItems: ToolbarItems[];
  public editOptions: EditSettingsModel;

  @ViewChild('grid')
  public grid: GridComponent;

  public ngOnInit(): void {
    this.orders = new DataManager({
      url: 'http://localhost:XXXX/api/Grid',
      adaptor: new UrlAdaptor(),
    });
    this.customers = new DataManager({
      url: 'http://localhost:XXXX/api/Customers',
      adaptor: new UrlAdaptor(),
    });

    this.pageSettings = { pageCount: 5 };
    this.filterSettings = { type: 'Menu' };
    this.toolbarItems = ['Search'];
  }
}
Handling filter and search operation
Filtering a foreign-key column automatically shows the related text value via foreignKeyValue property, while the actual filtering is performed using the foreignKeyField property. This ensures that the filter request sent to the server uses the actual “CustomerID” field value, allowing the main data source to be filtered accurately.
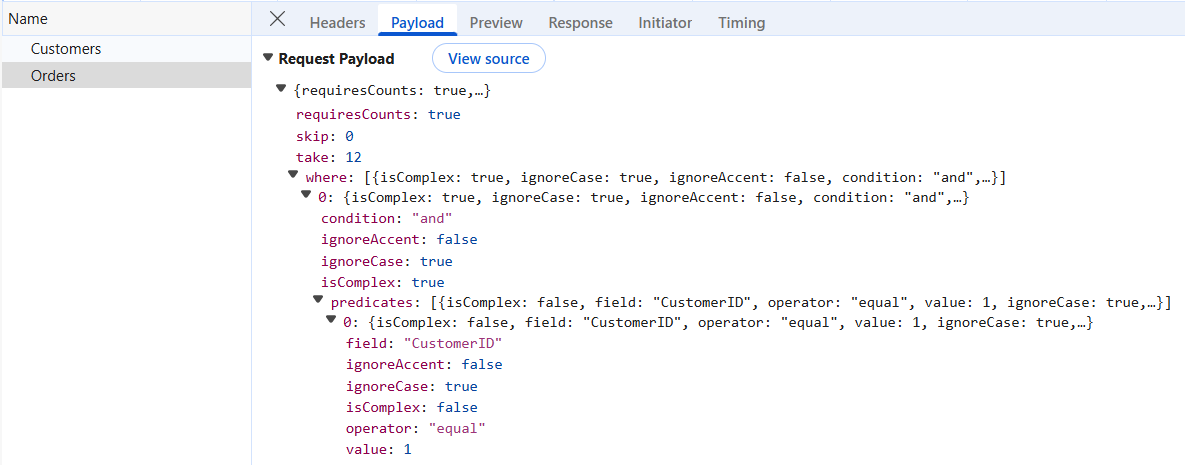
[HttpPost]
public object Post([FromBody] DataManagerRequest DataManagerRequest)
{
  // Retrieve data from the data source.
  IQueryable<OrdersDetails> DataSource = GetOrderData().AsQueryable();

  QueryableOperation queryableOperation = new QueryableOperation(); // Initialize QueryableOperation instance.

  // Handling filtering operation
  if (DataManagerRequest.Where != null && DataManagerRequest.Where.Count > 0)
  {
    DataSource = operation.PerformFiltering(DataSource, DataManagerRequest.Where, DataManagerRequest.Where[0].Operator);
  }

  // Get the total count of records.
  int totalRecordsCount = DataSource.Count();

  // Return data based on the request.
  return new { result = DataSource, count = totalRecordsCount };
Search process in a grid with foreign key columns creates a filter query for each column using the provided search term. For foreign key columns specifically, the grid first queries the associated foreign key data source to retrieve the underlying field value that matches the search term. It then constructs a filter query using that value and the column’s field, applying it to the main dataset.
Handling sort operation
Sort operation on a foreign key column orders records based on the underlying “CustomerID” field value. The sorting query sent to the server includes the corresponding foreign key value. To sort by the foreign key value, supply the foreign key’s data source to the sorted query within the PerformSorting method.
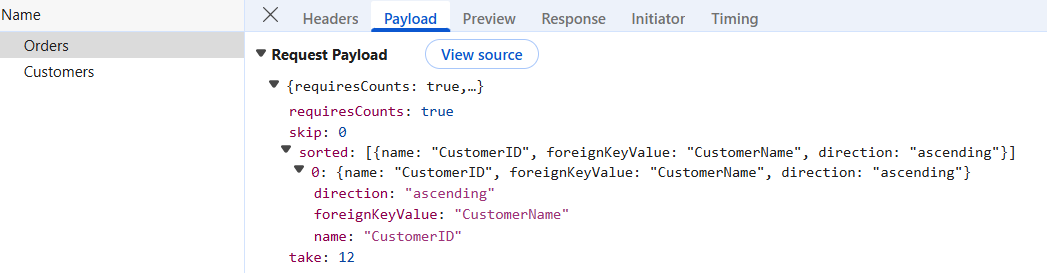
[HttpPost]
public object Post([FromBody] DataManagerRequest DataManagerRequest)
{
  // Retrieve data from the data source (e.g., database).
  IQueryable<OrdersDetails> DataSource = GetOrderData().AsQueryable();

  QueryableOperation queryableOperation = new QueryableOperation(); // Initialize QueryableOperation instance.

  if (DataManagerRequest.Sorted != null && DataManagerRequest.Sorted.Count > 0) //Sorting
  {
    for (int i = 0; i < DataManagerRequest.Sorted.Count; i++)
    {
      if (DataManagerRequest.Sorted[i].ForeignKeyValue == "CustomerName")
      {
        DataManagerRequest.Sorted[i].ForeignKeyDataSource = GetCustomerData().AsQueryable();
      }
    }
    DataSource = operation.PerformSorting(DataSource, DataManagerRequest.Sorted);
  }
  // Get the total count of records.
  int totalRecordsCount = DataSource.Count();

  // Return data based on the request.
  return new { result = DataSource, count = totalRecordsCount };
}
Sort operation for a foreign key column based on its foreign key value mandates including the foreign key data source in the sorted query of the
DataManagerrequest on the server. If the foreign key data source is not passed, the sorting operation will be performed based on the column field.