Data Binding in Angular Grid Component
11 Jun 202624 minutes to read
Data binding is a fundamental technique that empowers the Grid component to integrate data into its interface, enabling the creation of dynamic and interactive grid views. This feature is particularly valuable when working with large datasets or when data needs to be fetched remotely.
The Angular Data Grid utilizes the DataManager, which supports both local binding with JavaScript object arrays and remote binding with RESTful JSON data services. The key property, dataSource, can be assigned to a DataManager instance or a collection of JavaScript object arrays.
The Grid supports two primary data binding methods:
- Local data
- Remote data
To learn about binding local, remote, or observable data to the Angular Grid, see this video:
Loading indicator
The Angular Data Grid provides a loading animation feature, which makes it easy to identify when data is being loaded or refreshed. This feature provides a clear understanding of the grid’s current state and actions, such as sorting, filtering, grouping, and more.
To achieve this, the loadingIndicator.indicatorType property of the grid can be utilized, which supports two types of indicators:
-
Spinner(default) Shimmer
The following example demonstrates setting the loadingIndicator.indicatorType property based on changing the dropdown value using the change event of the DropDownList component. The refreshColumns method is used to apply the changes and display the updated loading indicator type.
import { Component, OnInit, ViewChild } from '@angular/core';
import { ChangeEventArgs, DropDownListAllModule, DropDownListComponent } from '@syncfusion/ej2-angular-dropdowns';
import { FilterService, GridComponent, GridModule, PageService, SortService } from '@syncfusion/ej2-angular-grids';
import { DataManager, UrlAdaptor } from '@syncfusion/ej2-data';

@Component({
    imports: [ GridModule, DropDownListAllModule ],
    providers: [PageService, SortService, FilterService],
    standalone: true,
    selector: 'app-root',
    template: `
    <div style="display: flex">
        <label style="padding: 10px 10px 26px 0"> Change the loading indicator type: </label>
        <ejs-dropdownlist #dropdown style="margin-top:5px" index="0" width="120" [dataSource]="ddlData" [fields]='fields' (change)="valueChange($event)"></ejs-dropdownlist>
    </div>
    <ejs-grid #grid id="grid" style="padding: 5px 5px" height="200" [dataSource]='data' [allowPaging]='true' [allowSorting]='true' [allowFiltering]='true' [pageSettings]='pageSettings' [loadingIndicator]='loadingIndicator'>
        <e-columns>
            <e-column field='EmployeeID' headerText='Employee ID' width='130' textAlign='Right'></e-column>
            <e-column field='Employees' headerText='Employee Name' width='145'></e-column>
            <e-column field='Designation' headerText='Designation' width='130'></e-column>
            <e-column field='CurrentSalary' headerText='Current Salary' width='140' format="C2" textAlign='Right'></e-column>
        </e-columns>
    </ejs-grid>`
})
export class AppComponent implements OnInit {
    public data?: DataManager;
    public loadingIndicator?: any;
    public pageSettings?: object;
    @ViewChild('grid')
    public grid?: GridComponent;
    @ViewChild('dropdown')
    public dropdown?: DropDownListComponent;
    public fields: object = { text: 'value', value: 'id' };
    public ddlData?: object[] = [
        { id: 'Spinner', value: 'Spinner' },
        { id: 'Shimmer', value: 'Shimmer' }
    ]

    ngOnInit(): void {
        this.data = new DataManager({ url: 'https://services.syncfusion.com/angular/production/api/UrlDatasource', adaptor: new UrlAdaptor });
        this.loadingIndicator = { indicatorType: 'Spinner' };
        this.pageSettings = { pageCount: 3 };
    }

    valueChange(args: ChangeEventArgs) {
        if ((this.dropdown as DropDownListComponent).value === 'Shimmer') {
            (this.grid as GridComponent).loadingIndicator.indicatorType = 'Shimmer';
            (this.grid as GridComponent).refreshColumns();
        } else {
            (this.grid as GridComponent).loadingIndicator.indicatorType = 'Spinner';
            (this.grid as GridComponent).refreshColumns();
        }
    }
}
import { bootstrapApplication } from '@angular/platform-browser';
import { AppComponent } from './app.component';
import 'zone.js';
bootstrapApplication(AppComponent).catch((err) => console.error(err));Refresh the datasource using property
Refreshing the data shown in a Angular Data Grid involves updating the data that the grid displays dynamically. This operation reflects changes in the underlying data without reloading the entire page or component.
To achieve this, use the datasource property in conjunction with the [setProperties] method. This ensures the grid reflects changes in the dataSource without requiring a complete page or component reload.
For example, when adding or deleting data source records, follow these steps:
Step 1: Add or delete the data source record using the following code:
this.grid.dataSource.unshift(data); // Add a new record
this.grid.dataSource.splice(selectedRow, 1); // Delete a record
Step 2: Refresh the data source after changes by invoking the setProperties method:
(this.grid as GridComponent).setProperties({ dataSource: (this.grid as GridComponent).dataSource as object[] });The following example demonstrates adding a new record to the data source through an external button:
import { data } from './datasource';
import { Component, OnInit, ViewChild } from '@angular/core';
import { ButtonAllModule } from '@syncfusion/ej2-angular-buttons';
import { EditService, GridComponent, GridModule, PageService, ToolbarService } from '@syncfusion/ej2-angular-grids';

@Component({
    imports: [ GridModule, ButtonAllModule ],
    providers: [EditService, PageService, ToolbarService],
    standalone: true,
    selector: 'app-root',
    template: `
        <div style="padding: 5px 0px 20px 0px ">
            <button ejs-button id="sample"  (click)='changeDatasource()'> Refresh Datasource </button>
        </div>
        <ejs-grid #grid [dataSource]='data' [height]='280' >
            <e-columns>
                <e-column field='OrderID' headerText='Order ID' textAlign='Right' width=90></e-column>
                <e-column field='CustomerID' headerText='Customer ID' width=120></e-column>
                <e-column field='Freight' headerText='Freight' textAlign='Right' format='C2' width=90></e-column>
                <e-column field='ShipCity' headerText='Ship City' width=120 ></e-column>
            </e-columns>
        </ejs-grid>`
})
export class AppComponent implements OnInit {
    public data?: object[];
    @ViewChild('grid') public grid?: GridComponent;
    public  newRecords:object ={};
    ngOnInit(): void {
        this.data = data;
    }
    changeDatasource(): void {

      for (let i = 0; i < 5; i++) {
         this.newRecords = {
            OrderID: this.generateOrderId(),
            CustomerID: this.generateCustomerId(),
            ShipCity: this.generateShipCity(),
            Freight: this.generateFreight(),
            ShipName: this.generateShipName()
        };

        ((this.grid as GridComponent).dataSource as object[]).unshift(this. newRecords);
        (this.grid as GridComponent).setProperties({ dataSource:  (this.grid as GridComponent).dataSource as object[] });
      }
    }

    // Generate a random OrderID
    generateOrderId(): number {
        return Math.floor(10000 + Math.random() * 90000);
    }
    // Generate a random CustomerID
    generateCustomerId(): string {
        const characters = 'ABCDEFGHIJKLMNOPQRSTUVWXYZ';
        let result = '';
        for (let i = 0; i < 5; i++) {
            result += characters.charAt(Math.floor(Math.random() * characters.length));
        }
        return result;
    }
    // Generate a random ShipCity
    generateShipCity(): string {
        const cities = ['London', 'Paris', 'New York', 'Tokyo', 'Berlin'];
        return cities[Math.floor(Math.random() * cities.length)];
    }
    // Generate a random Freight value
    generateFreight(): number {
        return Math.random() * 100;
    }
    // Generate a random ShipName
    generateShipName(): string {
        const names = ['Que Delícia', 'Bueno Foods', 'Island Trading', 'Laughing Bacchus Winecellars'];
        return names[Math.floor(Math.random() * names.length)];
    }
}
import { bootstrapApplication } from '@angular/platform-browser';
import { AppComponent } from './app.component';
import 'zone.js';
bootstrapApplication(AppComponent).catch((err) => console.error(err));Dynamically change the datasource or columns or both
The Angular Data Grid component supports dynamic modification of the data source, columns, or both. This feature refreshes the grid’s content and structure without requiring a complete page reload.
To achieve dynamic changes, the changeDataSource method allows updating the grid’s data source dynamically. This method enables updating the data source, columns, or both, based on application requirements. However, it is important to note that during the changing process for the data source and columns, the grid’s existing actions such as sorting, filtering, grouping, aggregation, and searching will be reset. The changeDataSource method has two optional arguments: the first argument represents the data source, and the second argument represents the columns. The various uses of the changeDataSource method are explained in the following topic.
1. Change both data source and columns:
To modify both the existing columns and the data source, pass both arguments to the changeDataSource method. The following example demonstrates changing both the data source and columns.
Assign a JavaScript object array to the dataSource property to bind local data to the grid. The code below provides an example of creating a data source for the grid.
export let data: Object[] = [
    {
        OrderID: 10248, CustomerID: 'VINET', Freight: 32.38,
        ShipCity: 'Reims'
    },
    {
        OrderID: 10249, CustomerID: 'TOMSP', Freight: 11.61,
        ShipCity: 'Münster'
    },
    {
        OrderID: 10250, CustomerID: 'HANAR', Freight: 61.34,
        ShipCity: 'Rio de Janeiro'
    }];
The following code demonstrates creating columns for the grid based on the provided grid data source:
public newColumn: ColumnModel[] = [
    { field: 'OrderID', headerText: 'Order ID', textAlign: 'Right', width: 125 },
    { field: 'CustomerID', headerText: 'Customer ID', width: 125 },
];
The following code demonstrates updating the data source and columns defined above using the changeDataSource method:
this.gridInstance.changeDataSource(data, newColumn);2. Modify only the existing columns:
To modify existing columns in a grid, add or remove columns or replace the entire set of columns using the changeDataSource method. To use this method, set the first parameter to null and provide the new columns as the second parameter. Note that if a column field is not specified in the dataSource, its corresponding column values will be empty. The following example illustrates modifying existing columns.
The following code demonstrates adding new columns with existing grid columns “newColumn” using the changeDataSource method:
public newColumn1: ColumnModel[] = [
    { field: 'Freight', headerText: 'Freight', textAlign: 'Right', width: 125 },
    { field: 'ShipCity', headerText: 'ShipCity', width: 125 },
];
let column: any = this.newColumn.push(...this.newColumn1);
this.gridInstance.changeDataSource(null, column);
3. Modify only the data source:
The changeDataSource method provides option to change the entire data source in the grid by passing the new data source as the first argument. The optional second argument can specify new columns for the grid. Provide the data source as the first argument; the optional second argument can specify new columns for the grid. If columns are not specified, the grid auto-generates columns based on the data source. The following example demonstrates modifying the data source.
Assign a JavaScript object array to the dataSource property to bind local data to the grid. The code below provides an example of creating a new data source for the grid.
export let employeeData: Object[] = [
    {
        FirstName: 'Nancy', City: 'Seattle', Region: 'WA',
        Country: 'USA'
    },
    {
        FirstName: 'Andrew', City: 'London', Region: null,
        Country: 'UK',
    },
    {
        FirstName: 'Janet', City: 'Kirkland', Region: 'WA',
        Country: 'USA'
    }];
The following code demonstrates using the changeDataSource method to bind the new employeeData to the grid:
this.gridInstance.changeDataSource(employeeData);import { data } from './datasource';
import { Component, OnInit, ViewChild } from '@angular/core';
import { FormsModule } from '@angular/forms';
import { ButtonAllModule } from '@syncfusion/ej2-angular-buttons';
import { FilterService, GridComponent, GridModule, GroupService, PageService, SortService } from '@syncfusion/ej2-angular-grids';
@Component({
imports: [ FormsModule, GridModule, ButtonAllModule ],
providers: [ PageService, SortService, FilterService, GroupService ],
standalone: true,
selector: 'app-root',
template: `<div style="padding:0px 0px 20px 0px">
<button ejs-button (click)=next($event)>Change datasource and column</button>
</div>
<ejs-grid #Grid [dataSource]="data" allowPaging="true" [pageSettings]="pageSettings" >
<e-columns>
<e-column field='OrderID' headerText='Order ID' textAlign='Right' width=120></e-column>
<e-column field='CustomerID' headerText='Customer ID' textAlign='Right' width=120></e-column>
<e-column field='Freight' headerText='Freight' textAlign='Right' width=120></e-column>
</e-columns>
</ejs-grid>`
})
export class AppComponent implements OnInit {
public data?: object[];
public isDataLoading = true;
public pageSettings?: object = { pageSize: 5, pageCount: 3 }
@ViewChild('Grid') public grid?: GridComponent;
public count = 0;
public newColumn = [
{ field: 'OrderID', headerText: 'Order ID', textAlign: 'Right', width: 125 },
{ field: 'CustomerName', headerText: 'Customer Name', width: 125 },
{ field: 'OrderDate', headerText: 'Order Date', width: 130, format: 'yMd', textAlign: 'Right'},
{ field: 'Freight', headerText: 'Freight', width: 120, textAlign: 'Right'},
];
ngOnInit(): void {
this.data= data
}
next(args:MouseEvent) {
this.count = this.count + 100;
(this.grid as GridComponent).changeDataSource(data.slice(0, this.count + 100), this.newColumn as Object[]);
}
}import { bootstrapApplication } from '@angular/platform-browser';
import { AppComponent } from './app.component';
import 'zone.js';
bootstrapApplication(AppComponent).catch((err) => console.error(err));
- The Grid state persistence feature does not support the
changeDataSourcemethod.- In this document, the above sample uses local data for the
changeDataSourcemethod. For those using remote data sources, refer to the FlexibleData resource.
Prevent converting local time zone format for date column
By default, the Syncfusion Angular Grid automatically converts date values to the local time zone of the client system. However, in some scenarios, it may be necessary to display the original date as received from the server without timezone conversion.
To prevent timezone conversion for date columns, use the serverTimezoneOffset property from DataUtil. Setting this property to “0” ensures dates remain in the original format received from the server without conversion to the local timezone.
The following example demonstrates preventing local time zone conversion for date columns in the Syncfusion Angular Grid using the DataUtil.serverTimezoneOffset property:
import { Component, OnInit, ViewChild } from '@angular/core';
import { CheckBoxComponent, CheckBoxModule } from '@syncfusion/ej2-angular-buttons';
import { DropDownListComponent, DropDownListModule } from '@syncfusion/ej2-angular-dropdowns';
import { GridComponent, GridModule } from '@syncfusion/ej2-angular-grids';
import { DataManager, DataUtil, WebApiAdaptor } from '@syncfusion/ej2-data';
import { ChangeEventArgs } from '@syncfusion/ej2-dropdowns';

let hostUrl: string = 'https://services.syncfusion.com/js/production/api/orders';

@Component({
    imports: [GridModule, DropDownListModule, CheckBoxModule],
    standalone: true,
    selector: 'app-root',
    template: `
        <div style="display: flex; align-items: center; margin-bottom: 10px;">
            <label style="margin-right: 10px">Select Timezone:</label>
            <ejs-dropdownlist #timezoneDropdown id="timezone" width="150" [dataSource]="timeZones" index="0" (change)="onTimezoneChange($event)"></ejs-dropdownlist>
        </div>
        <div style="margin-bottom: 20px;">
            <ejs-checkbox #timezoneCheckbox label="Prevent Timezone Conversion"  (change)="onCheckboxChange($event)"></ejs-checkbox>
        </div>
        <ejs-grid #grid [dataSource]='data' height='250px' (load)="onLoad()">
          <e-columns>
              <e-column field='OrderID' headerText='Order ID' textAlign='Right' width=120></e-column>
              <e-column field='CustomerID' headerText='Customer ID' width=140></e-column>
              <e-column field='Freight' headerText='Freight' textAlign='Right' format='C' width=120></e-column>
              <e-column field='OrderDate' headerText='Order Date' textAlign='Right' width=140></e-column>
          </e-columns>
        </ejs-grid>`
})
export class AppComponent implements OnInit {
  @ViewChild('grid') grid!: GridComponent;
  @ViewChild('timezoneDropdown') timezoneDropdown!: DropDownListComponent;
  @ViewChild('timezoneCheckbox') timezoneCheckbox!: CheckBoxComponent;
  public data!: DataManager;
  public selectedTimezone: number  = -12;
  public timeZones: { value: number; text: string; }[] = [
    { value: -12, text: "-12:00 UTC" },
    { value: -11, text: "-11:00 UTC" },
    { value: -10, text: "-10:00 UTC" },
    { value: -9, text: "-09:00 UTC" },
    { value: -8, text: "-08:00 UTC" },
    { value: -7, text: "-07:00 UTC" },
    { value: -6, text: "-06:00 UTC" },
    { value: -5, text: "-05:00 UTC" },
    { value: -4, text: "-04:00 UTC" },
    { value: -3, text: "-03:00 UTC" },
    { value: -2, text: "-02:00 UTC" },
    { value: -1, text: "-01:00 UTC" },
    { value: 0, text: "+00:00 UTC" },
    { value: 1, text: "+01:00 UTC" },
    { value: 2, text: "+02:00 UTC" },
    { value: 3, text: "+03:00 UTC" },
    { value: 4, text: "+04:00 UTC" },
    { value: 5, text: "+05:00 UTC" },
    { value: 5.5, text: "+05:30 UTC" },
    { value: 6, text: "+06:00 UTC" },
    { value: 7, text: "+07:00 UTC" },
    { value: 8, text: "+08:00 UTC" },
    { value: 9, text: "+09:00 UTC" },
    { value: 10, text: "+10:00 UTC" },
    { value: 11, text: "+11:00 UTC" },
    { value: 12, text: "+12:00 UTC" },
    { value: 13, text: "+13:00 UTC" },
    { value: 14, text: "+14:00 UTC" },
  ];

  public ngOnInit(): void {
    this.data = new DataManager({
      url: hostUrl,
      adaptor: new WebApiAdaptor(),
      crossDomain: true,
    });
  }

  public onLoad(): void {
    DataUtil.serverTimezoneOffset = this.timezoneCheckbox.checked ? 0 : this.selectedTimezone;
  }

  public onTimezoneChange(event: ChangeEventArgs): void {
    this.selectedTimezone = Number(event.itemData.value);
    this.grid.freezeRefresh();
  }

  public onCheckboxChange(event:ChangeEventArgs): void {
    this.grid.freezeRefresh();
  }
}
import { bootstrapApplication } from '@angular/platform-browser';
import { AppComponent } from './app.component';
import 'zone.js';
bootstrapApplication(AppComponent).catch((err) => console.error(err));Set custom headers using a custom adaptor
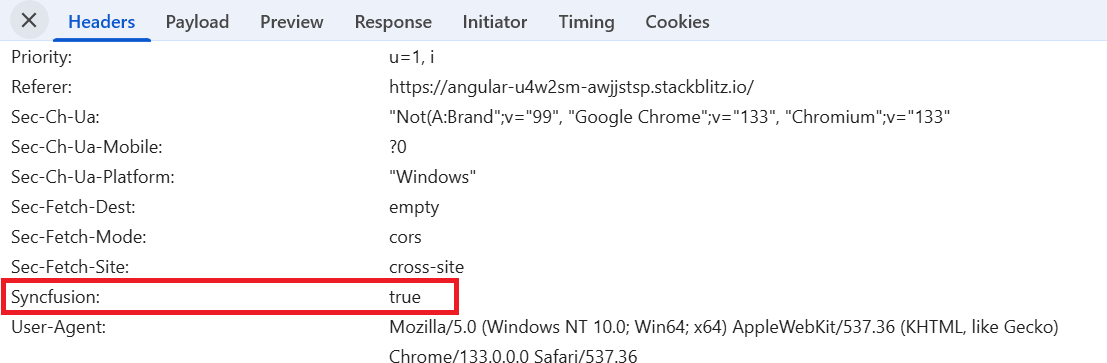
Custom headers in HTTP requests are used to send additional information such as authentication tokens, API keys, or metadata required by the server. These headers improve security and enable better control over data communication. In the Angular Data Grid, custom headers can be added when making API requests, ensuring that each request carries the necessary information for server-side validation and processing.
This method is particularly useful when integrating the grid with authenticated APIs, where requests must include authorization tokens or other security credentials to ensure secure access.
To achieve this, extend the WebApiAdaptor to create a custom adaptor. The beforeSend method in the custom adaptor enables modification of request headers before sending them to the server, ensuring that every request from the grid includes the required headers.
The following example demonstrates setting custom headers using the custom adaptor in Angular Data Grid.
import { Component, OnInit, ViewChild } from '@angular/core';
import { GridComponent, GridModule } from '@syncfusion/ej2-angular-grids';
import { DataManager, WebApiAdaptor } from '@syncfusion/ej2-data';

const SERVICE_URI: string ='https://services.syncfusion.com/angular/production/';
class CustomAdaptor extends WebApiAdaptor {
  override beforeSend(args:any, xhr:any, settings:any) {
    xhr.withCredentials = true;
    super.beforeSend(args, xhr, settings);
    xhr.headers.set('Syncfusion', true); // Assign custom headers here.
  }
}
@Component({
  imports: [ GridModule],
  standalone: true,
  selector: 'app-root',
  templateUrl: 'app.template.html'
})

export class AppComponent implements OnInit {
  @ViewChild('grid')
  public grid?: GridComponent;
  public data?: DataManager;
  ngOnInit(): void {
    this.data = new DataManager({
    url: SERVICE_URI + 'api/Orders',
    adaptor: new CustomAdaptor(),
    });
  }
}<ejs-grid #grid [dataSource]='data' height='270px'>
<e-columns>
<e-column field='OrderID' headerText='Order ID' width='120' textAlign='Right'></e-column>
<e-column field='CustomerID' headerText='Customer ID' width='160'></e-column>
<e-column field='EmployeeID' headerText='Employee ID' width='120' textAlign='Right'></e-column>
<e-column field='Freight' headerText='Freight' width='150' format="C2" textAlign='Right'></e-column>
<e-column field='ShipCountry' headerText='Ship Country' width='150' ></e-column>
</e-columns>
</ejs-grid>import { bootstrapApplication } from '@angular/platform-browser';
import { AppComponent } from './app.component';
import 'zone.js';
bootstrapApplication(AppComponent).catch((err) => console.error(err));