CustomAdaptor in Syncfusion Angular Grid
14 Feb 202624 minutes to read
The CustomAdaptor in the Syncfusion Angular Grid enables developers to create custom adaptors by extending built-in adaptors. Custom adaptors provide control over query processing, request handling, and response manipulation of the built-in adaptor functionality. The CustomAdaptor extends OData V4 services, enabling efficient data fetching and manipulation. By default, three built-in methods are available for CustomAdaptor implementation.
Types of CustomAdaptor methods
Custom adaptors support three core methods for data operations.
ProcessQuery
The ProcessQuery method handles query execution sent to a dataSource, such as a database or custom data service. This method performs operations like data retrieval, insertion, updating, or deletion. The ProcessQuery method accepts two parameters:
-
DataManager: Modifies the URL dynamically and manages data source configuration. -
Query: Sets additional parameter values or modifies queries including sorting, filtering, and grouping operations.
DataManager

Query

public override processQuery(dm: DataManager, query: Query): Object {
    dm.dataSource.url = 'https://localhost:xxxx/odata/orders'; //Change the url.
    query.addParams('Syncfusion in Angular Grid', 'true'); // Add the additional parameter.
    return super.processQuery.apply(this, arguments as any);
}
beforeSend
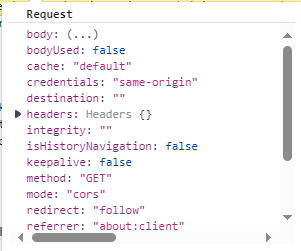
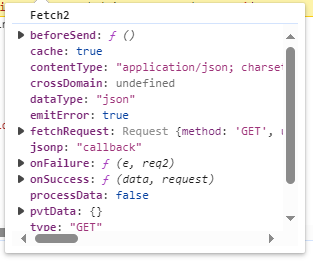
The beforeSend method executes before sending a request to the server. This method allows modification of parameters, request headers, and data, or performs validation before request processing. It accepts three parameters:
-
DataManager: Provides thedataSourceandadaptorconfiguration values. -
Request: Enables custom headers, such as setting theAuthorizationheader for authentication. -
Settings: Optional parameter that allows additional request configurations.
DataManager
Request
Settings
public override beforeSend(dm: DataManager, request: Request, settings?: any) {
  request.headers.set('Authorization', `true`);
  super.beforeSend(dm, request, settings);
}
processResponse
The processResponse method handles server responses after asynchronous requests. This method parses response data, manages errors, and prepares data for further processing. The method accepts multiple optional parameters, allowing customization based on specific requirements.
public override processResponse() {
   let i = 0;
    const original: any = super.processResponse.apply(this, arguments as any);
    // Adding serial number.
    if (original.result) {
      original.result.forEach((item: any) => setValue('SNo', ++i, item));
    }
    return original;
}
This guide provides detailed instructions on binding data and performing CRUD (Create, Read, Update, Delete) actions using the CustomAdaptor by extending the ODataV4Adaptor in the Syncfusion Angular Grid.
Creating a Custom service
To configure a server with Syncfusion Angular Grid, follow these steps:
1. Project Creation:
Open Visual Studio and create an Angular and ASP.NET Core project named CustomAdaptor. To create an Angular and ASP.NET Core application, follow the documentation link for detailed steps.
2. Install NuGet Packages
Using the NuGet package manager in Visual Studio (Tools → NuGet Package Manager → Manage NuGet Packages for Solution), install the Microsoft.AspNetCore.OData NuGet package.
3. Model Class Creation:
Create a model class named OrdersDetails.cs in the server-side Models folder to represent the order data.
using System.ComponentModel.DataAnnotations;

namespace ODataV4Adaptor.Server.Models
{
    public class OrdersDetails
    {
        public static List<OrdersDetails> order = new List<OrdersDetails>();
        public OrdersDetails()
        {

        }
        public OrdersDetails(
        int OrderID, string CustomerId, int EmployeeID, string ShipCountry)
        {
            this.OrderID = OrderID;
            this.CustomerID = CustomerId;
            this.EmployeeID = EmployeeID;
            this.ShipCountry = ShipCountry;
        }

        public static List<OrdersDetails> GetAllRecords()
        {
            if (order.Count() == 0)
            {
                int code = 10000;
                for (int i = 1; i < 10; i++)
                {
                    order.Add(new OrdersDetails(code + 1, "ALFKI", i + 0, "Denmark"));
                    order.Add(new OrdersDetails(code + 2, "ANATR", i + 2, "Brazil"));
                    order.Add(new OrdersDetails(code + 3, "ANTON", i + 1, "Germany"));
                    order.Add(new OrdersDetails(code + 4, "BLONP", i + 3, "Austria"));
                    order.Add(new OrdersDetails(code + 5, "BOLID", i + 4, "Switzerland"));
                    code += 5;
                }
            }
            return order;
        }
        [Key]
        public int? OrderID { get; set; }
        public string? CustomerID { get; set; }
        public int? EmployeeID { get; set; }
        public string? ShipCountry { get; set; }
    }
}
4. Build the Entity Data Model
To construct the Entity Data Model for the OData service, utilize the ODataConventionModelBuilder to define the model structure. Create an instance of the ODataConventionModelBuilder, then register the entity set Orders using the EntitySet<T> method, where OrdersDetails represents the CLR type containing order details.
// Create an ODataConventionModelBuilder to build the OData model.
var modelBuilder = new ODataConventionModelBuilder();

// Register the "Orders" entity set with the OData model builder.
modelBuilder.EntitySet<OrdersDetails>("Orders");
5. Register the OData Services
Once the Entity Data Model is built, register the OData services in the ASP.NET Core application. Here’s the configuration:
// Add controllers with OData support to the service collection.
builder.Services.AddControllers().AddOData(
    options => options
        .Count()
        .AddRouteComponents("odata", modelBuilder.GetEdmModel()));
6. Add controllers
Add controllers to expose the OData endpoints. Here’s an example:
using Microsoft.AspNetCore.Mvc;
using Microsoft.AspNetCore.OData.Query;
using ODataV4Adaptor.Server.Models;

namespace ODataV4Adaptor.Server.Controllers
{
    [Route("[controller]")]
    [ApiController]
    public class OrdersController : ControllerBase
    {
        /// <summary>
        /// Retrieves all orders.
        /// </summary>
        /// <returns>The collection of orders.</returns>
        [HttpGet]
        [EnableQuery]
        public IActionResult Get()
        {
            var data = OrdersDetails.GetAllRecords().AsQueryable();
            return Ok(data);
        }
    }
}
7. Run the Application:
Run the application in Visual Studio. The application will be accessible on a URL like https://localhost:xxxx.
After running the application, verify that the server-side API controller successfully returns the order data at the URL (https://localhost:xxxx/odata/Orders). Here xxxx represents the port number.
Connecting Syncfusion Angular Grid to a Custom service extending the ODataV4 service
To integrate the Syncfusion Grid into the Angular and ASP.NET Core project using Visual Studio, follow these steps:
Step 1: Install Syncfusion Package
Open the terminal in the project’s client folder and install the required Syncfusion packages using npm:
npm install @syncfusion/ej2-angular-grids --save
npm install @syncfusion/ej2-data --save
Step 2: Import Grid Module
In the app.module.ts file, import the GridModule from the @syncfusion/ej2-angular-grids package:
import { GridModule } from '@syncfusion/ej2-angular-grids';

@NgModule({
  imports: [
    // Other imports...
    GridModule,
  ],
})
export class AppModule { }
Step 3: Adding CSS reference
Include the necessary CSS files in the styles.css file to style the Syncfusion Angular Grid:
@import '../node_modules/@syncfusion/ej2-base/styles/material3.css';
@import '../node_modules/@syncfusion/ej2-buttons/styles/material3.css';
@import '../node_modules/@syncfusion/ej2-calendars/styles/material3.css';
@import '../node_modules/@syncfusion/ej2-dropdowns/styles/material3.css';
@import '../node_modules/@syncfusion/ej2-inputs/styles/material3.css';
@import '../node_modules/@syncfusion/ej2-navigations/styles/material3.css';
@import '../node_modules/@syncfusion/ej2-popups/styles/material3.css';
@import '../node_modules/@syncfusion/ej2-splitbuttons/styles/material3.css';
@import '../node_modules/@syncfusion/ej2-angular-grids/styles/material3.css';
Step 4: Adding Custom Adaptor
Create a component file (e.g., CustomAdaptor.ts). Import DataManager and ODataV4Adaptor from @syncfusion/ej2-data. Extend the ODataV4Adaptor class to define the custom adaptor. This adaptor implements three key methods: processQuery, beforeSend, and processResponse.
-
The
processQuerymethod modifies the API endpoint URL and sets additional parameters required for query execution. -
The
beforeSendmethod adds custom headers, such as theAuthorizationheader, before sending the request. -
The
processResponsemethod customizes the response by modifying data, such as adding a new field (SNo) to the dataset.
import {DataManager, ODataV4Adaptor, Query} from '@syncfusion/ej2-data';
import { setValue } from '@syncfusion/ej2-base';
export class SerialNoAdaptor extends ODataV4Adaptor {
    public override processQuery(dm: any, query: any): Object {
    dm.dataSource.url = 'https://localhost:xxxx/odata/orders'; //Change the url.
    query.addParams('Syncfusion in Angular Grid', 'true'); // Add the additional parameter.
    return super.processQuery.apply(this, arguments as any);
  }
   public override beforeSend(dm: any, request: any, settings: any): void {
     request.headers.set('Authorization', `true`);
     super.beforeSend(dm, request, settings);
   }
  public override processResponse() {
    let i = 0;
    const original: any = super.processResponse.apply(this, arguments as any);
    // Adding serial number.
    if (original.result) {
      original.result.forEach((item: any) => setValue('SNo', ++i, item));
    }
    return original;
  }
}
Step 5: Adding Syncfusion Component
In the component file (e.g., app.component.ts), import DataManager from @syncfusion/ej2-data and CustomAdaptor from ./customadaptor file. Create a DataManager instance specifying the URL of the API endpoint(https:localhost:xxxx/odata/Orders) using the url property. Set CustomAdaptor as the adaptor to handle data requests.
import { Component } from '@angular/core';
import { DataManager } from '@syncfusion/ej2-data';
import { CustomAdaptor } from './customadaptor';
@Component({
  selector: 'app-root',
  templateUrl: 'app.component.html',
})
export class AppComponent {
  public data: DataManager;
  ngOnInit(): void {
    this.data = new DataManager({
      url: 'https://localhost:xxxx/odata/Orders',
      adaptor: new CustomAdaptor(),
      crossDomain: true,
    });
  }
}
Replace https://localhost:xxxx/odata/Orders with the actual URL of the API endpoint that provides the data in a consumable format (e.g., JSON).
Run the application in Visual Studio. The application will be accessible on a URL like https://localhost:xxxx.
Ensure the API service is configured to handle CORS (Cross-Origin Resource Sharing) if necessary.
  [program.cs]
  builder.Services.AddCors(options =>
  {
    options.AddDefaultPolicy(builder =>
    {
      builder.AllowAnyOrigin().AllowAnyMethod().AllowAnyHeader();
    });
  });
  var app = builder.Build();
  app.UseCors();
Handling filtering operation
To enable filtering in the web application using the custom adaptor, extend the OData support in the service configuration. This involves adding the Filter method within the OData setup, allowing data to be filtered based on specified criteria. Once configured, clients can use the $filter query option in requests to retrieve specific data entries.
// Create a new instance of the web application builder.
var builder = WebApplication.CreateBuilder(args);

// Create an ODataConventionModelBuilder to build the OData model.
var modelBuilder = new ODataConventionModelBuilder();

// Register the "Orders" entity set with the OData model builder.
modelBuilder.EntitySet<OrdersDetails>("Orders");

// Add services to the container.

// Add controllers with OData support to the service collection.
builder.Services.AddControllers().AddOData(
    options => options
        .Count()
        .Filter() // Use Filter method for filtering.
.AddRouteComponents("odata", modelBuilder.GetEdmModel()));<div class="control-section">
<ejs-grid #grid [dataSource]='data' allowFiltering='true'>
<e-columns>
<e-column field='OrderID' headerText='Order ID' width='120' textAlign='Right' isPrimaryKey='true'></e-column>
<e-column field='CustomerID' headerText='Customer ID' width='160'></e-column>
<e-column field='EmployeeID' headerText='Employee ID' width='120' textAlign='Right'></e-column>
<e-column field='ShipCountry' headerText='Ship Country' width='150' ></e-column>
</e-columns>
</ejs-grid>
</div>import { Component } from '@angular/core';
import { DataManager } from '@syncfusion/ej2-data';
import { FilterService } from '@syncfusion/ej2-angular-grids'
import { CustomAdaptor } from './customadaptor';
@Component({
selector: 'app-root',
templateUrl: 'app.component.html',
providers: [FilterService],
})
export class AppComponent {
public data: DataManager;
ngOnInit(): void {
this.data = new DataManager({
url: 'https://localhost:xxxx/odata/Orders',
adaptor: new CustomAdaptor(),
crossDomain: true,
});
}
}import { HttpClientModule } from '@angular/common/http';
import { NgModule } from '@angular/core';
import { BrowserModule } from '@angular/platform-browser';
import { AppRoutingModule } from './app-routing.module';
import { AppComponent } from './app.component';
import { FilterService, GridModule } from '@syncfusion/ej2-angular-grids';
@NgModule({
declarations: [
AppComponent
],
imports: [
BrowserModule, HttpClientModule,
AppRoutingModule,
GridModule
],
providers: [FilterService],
bootstrap: [AppComponent]
})
export class AppModule { }Single column filtering
Multi column filtering
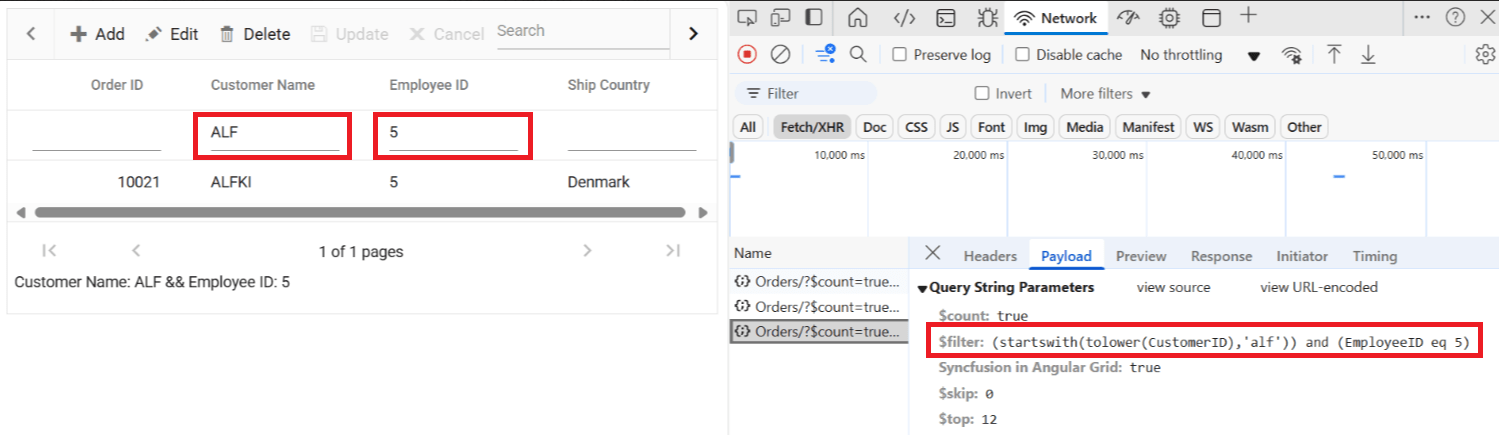
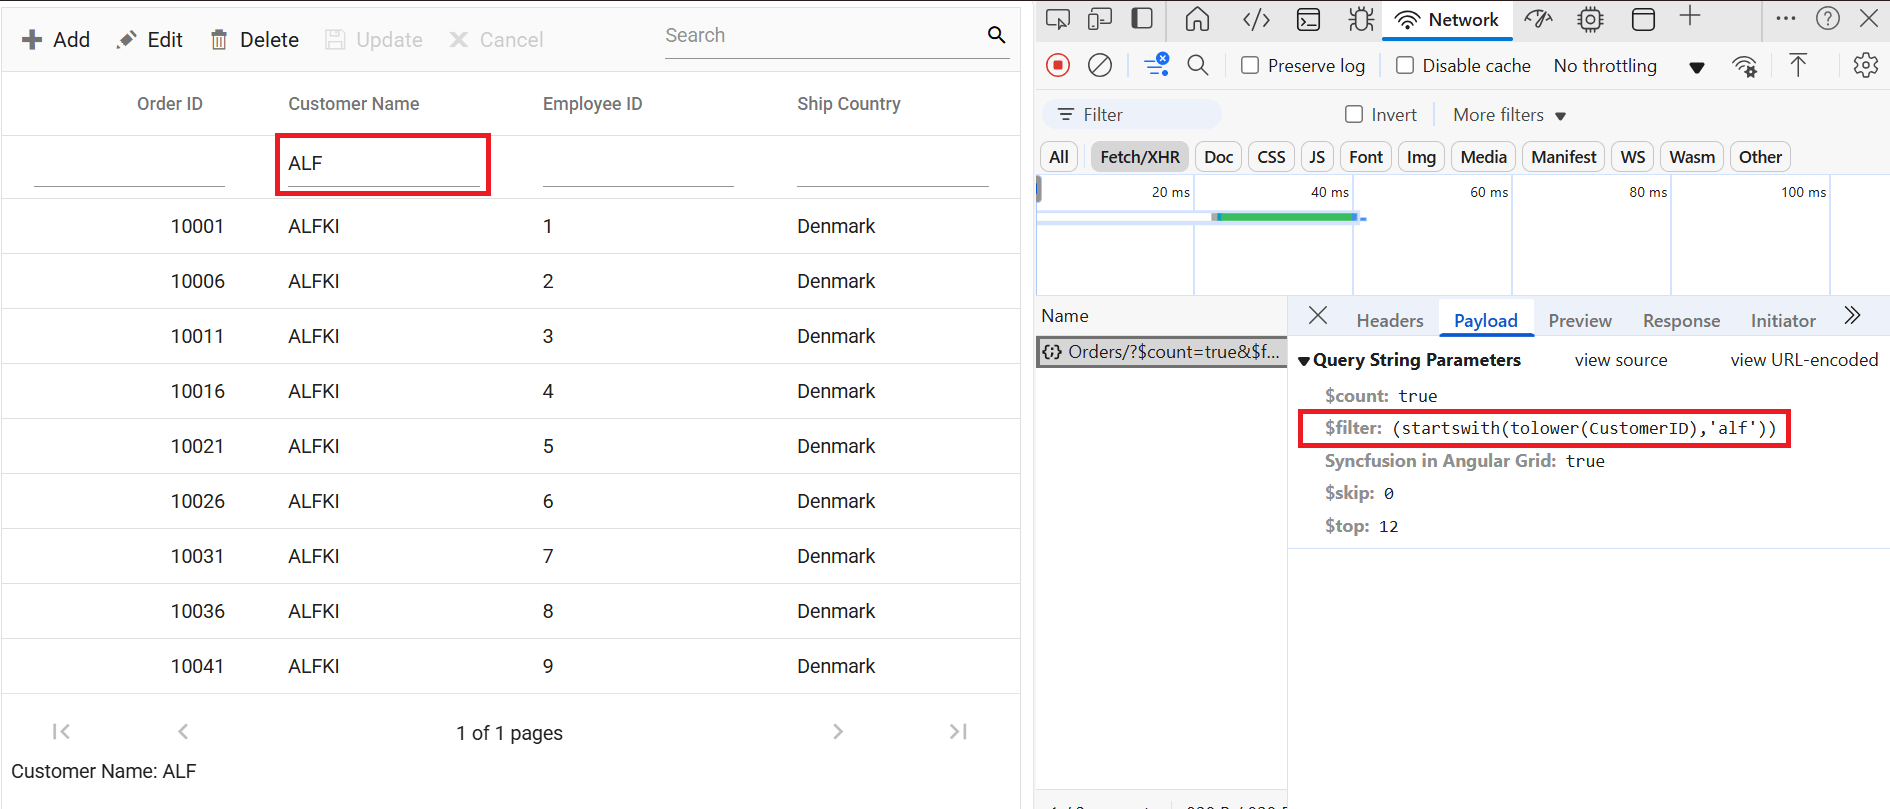
Handling searching operation
To enable search functionality in the web application using the custom adaptor, extend the OData support in the service configuration. This requires adding the Filter method within the OData setup, allowing data to be filtered based on specified criteria. Once configured, clients can use the $filter query option in requests to search for specific data entries.
// Create a new instance of the web application builder.
var builder = WebApplication.CreateBuilder(args);

// Create an ODataConventionModelBuilder to build the OData model.
var modelBuilder = new ODataConventionModelBuilder();

// Register the "Orders" entity set with the OData model builder.
modelBuilder.EntitySet<OrdersDetails>("Orders");

// Add services to the container.

// Add controllers with OData support to the service collection.
builder.Services.AddControllers().AddOData(
    options => options
        .Count()
        .Filter() // Use Filter method for searching.
.AddRouteComponents("odata", modelBuilder.GetEdmModel()));<div class="control-section">
<ejs-grid #grid [dataSource]='data' [toolbar]='toolbar'>
<e-columns>
<e-column field='OrderID' headerText='Order ID' width='120' textAlign='Right' isPrimaryKey='true'></e-column>
<e-column field='CustomerID' headerText='Customer ID' width='160'></e-column>
<e-column field='EmployeeID' headerText='Employee ID' width='120' textAlign='Right'></e-column>
<e-column field='ShipCountry' headerText='Ship Country' width='150' ></e-column>
</e-columns>
</ejs-grid>
</div>import { Component } from '@angular/core';
import { DataManager } from '@syncfusion/ej2-data';
import { ToolbarService } from '@syncfusion/ej2-angular-grids'
import { CustomAdaptor } from './customadaptor';
@Component({
selector: 'app-root',
templateUrl: 'app.component.html',
providers: [ToolbarService],
})
export class AppComponent {
public data: DataManager;
public toolbar: string[];
ngOnInit(): void {
this.data = new DataManager({
url: 'https://localhost:xxxx/odata/Orders',
adaptor: new CustomAdaptor(),
crossDomain: true,
});
this.toolbar = ['Search'];
}
}import { HttpClientModule } from '@angular/common/http';
import { NgModule } from '@angular/core';
import { BrowserModule } from '@angular/platform-browser';
import { AppRoutingModule } from './app-routing.module';
import { AppComponent } from './app.component';
import { GridModule, ToolbarService } from '@syncfusion/ej2-angular-grids';
@NgModule({
declarations: [
AppComponent
],
imports: [
BrowserModule, HttpClientModule,
AppRoutingModule,
GridModule
],
providers: [ToolbarService],
bootstrap: [AppComponent]
})
export class AppModule { }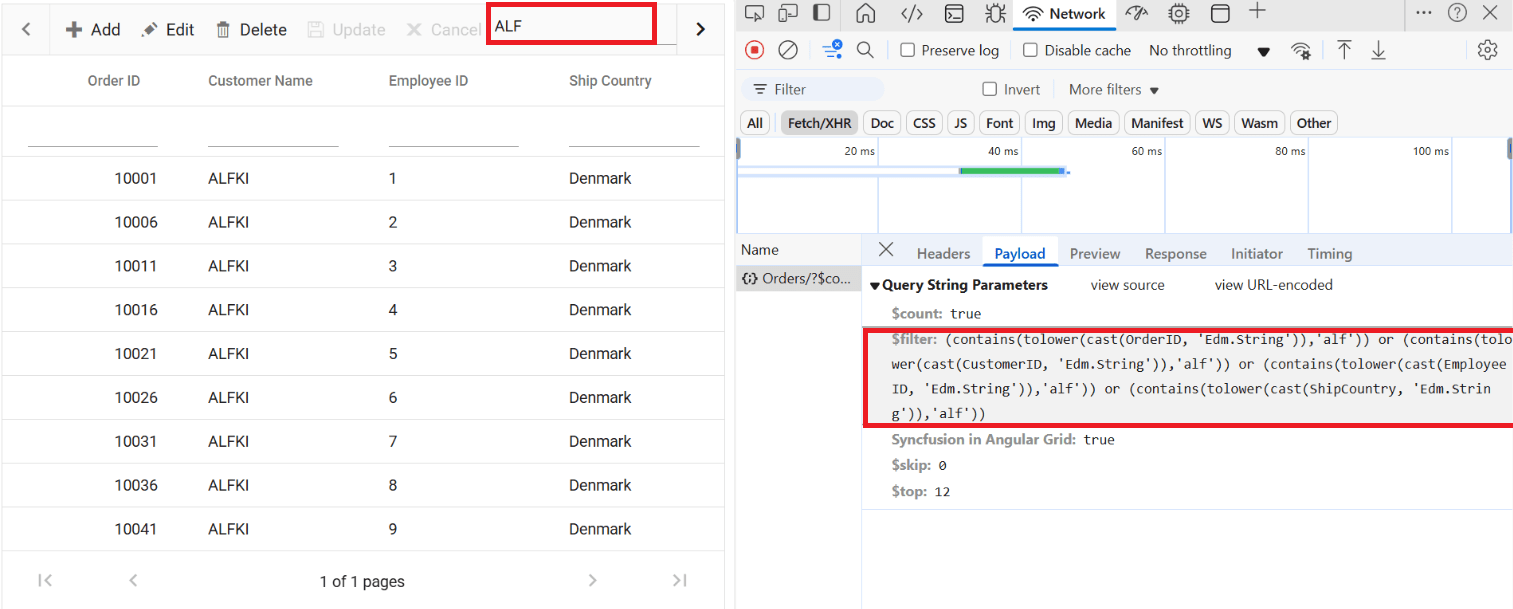
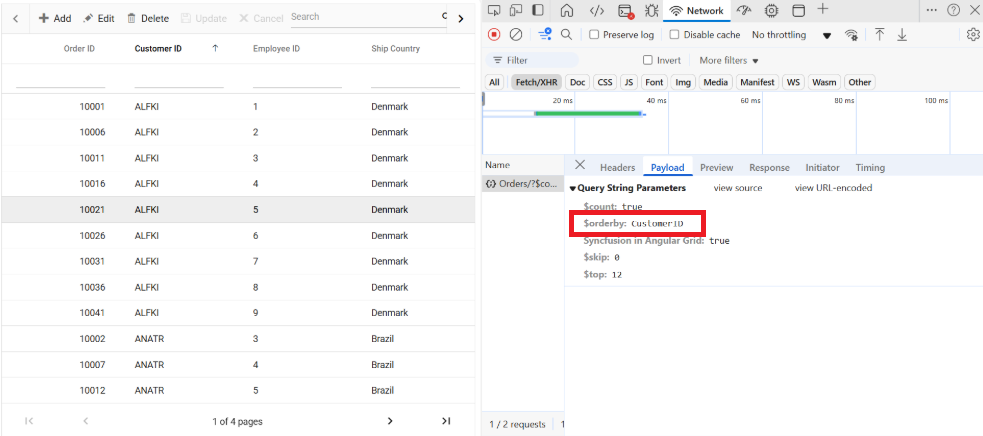
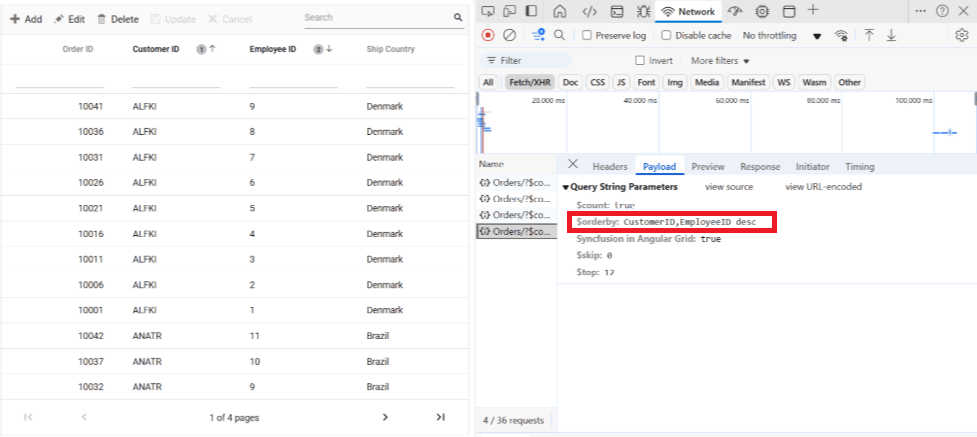
Handling sorting operation
To enable sorting operations in the web application using the custom adaptor, configure the custom adaptor to extend OData support in the service collection. This involves adding the OrderBy method within the OData setup, allowing data to be sorted based on specified criteria. Once enabled, clients can use the $orderby query option in requests to sort data entries by desired attributes.
// Create a new instance of the web application builder.
var builder = WebApplication.CreateBuilder(args);

// Create an ODataConventionModelBuilder to build the OData model.
var modelBuilder = new ODataConventionModelBuilder();

// Register the "Orders" entity set with the OData model builder.
modelBuilder.EntitySet<OrdersDetails>("Orders");

// Add services to the container.

// Add controllers with OData support to the service collection.
builder.Services.AddControllers().AddOData(
    options => options
        .Count()
        .OrderBy() // Use this method for sorting.
.AddRouteComponents("odata", modelBuilder.GetEdmModel()));<div class="control-section">
<ejs-grid #grid [dataSource]='data' [allowSorting]='true'>
<e-columns>
<e-column field='OrderID' headerText='Order ID' width='120' textAlign='Right' isPrimaryKey='true'></e-column>
<e-column field='CustomerID' headerText='Customer ID' width='160'></e-column>
<e-column field='EmployeeID' headerText='Employee ID' width='120' textAlign='Right'></e-column>
<e-column field='ShipCountry' headerText='Ship Country' width='150' ></e-column>
</e-columns>
</ejs-grid>
</div>import { Component } from '@angular/core';
import { DataManager } from '@syncfusion/ej2-data';
import { SortService } from '@syncfusion/ej2-angular-grids'
import { CustomAdaptor } from './customadaptor';
@Component({
selector: 'app-root',
templateUrl: 'app.component.html',
providers: [SortService],
})
export class AppComponent {
public data: DataManager;
ngOnInit(): void {
this.data = new DataManager({
url: 'https://localhost:xxxx/odata/Orders',
adaptor: new CustomAdaptor(),
crossDomain: true,
});
}
}import { HttpClientModule } from '@angular/common/http';
import { NgModule } from '@angular/core';
import { BrowserModule } from '@angular/platform-browser';
import { AppRoutingModule } from './app-routing.module';
import { AppComponent } from './app.component';
import { SortService, GridModule } from '@syncfusion/ej2-angular-grids';
@NgModule({
declarations: [
AppComponent
],
imports: [
BrowserModule, HttpClientModule,
AppRoutingModule,
GridModule
],
providers: [SortService],
bootstrap: [AppComponent]
})
export class AppModule { }Single column sorting
Multi column sorting
Handling paging operation
To implement paging in the web application using the CustomAdaptor with OData, use the SetMaxTop method in the OData setup to define the maximum number of records returned per request. Once configured, clients can utilize the $skip and $top query options to specify the number of records to skip and retrieve, respectively.
// Create a new instance of the web application builder.
var builder = WebApplication.CreateBuilder(args);

// Create an ODataConventionModelBuilder to build the OData model.
var modelBuilder = new ODataConventionModelBuilder();

// Register the "Orders" entity set with the OData model builder.
modelBuilder.EntitySet<OrdersDetails>("Orders");

// Add services to the container.

// Add controllers with OData support to the service collection.
builder.Services.AddControllers().AddOData(
    options => options
        .Count()
        .SetMaxTop(null)
.AddRouteComponents("odata", modelBuilder.GetEdmModel()));<div class="control-section">
<ejs-grid #grid [dataSource]='data' [allowPaging]='true'>
<e-columns>
<e-column field='OrderID' headerText='Order ID' width='120' textAlign='Right' isPrimaryKey='true'></e-column>
<e-column field='CustomerID' headerText='Customer ID' width='160'></e-column>
<e-column field='EmployeeID' headerText='Employee ID' width='120' textAlign='Right'></e-column>
<e-column field='ShipCountry' headerText='Ship Country' width='150' ></e-column>
</e-columns>
</ejs-grid>
</div>import { Component } from '@angular/core';
import { DataManager } from '@syncfusion/ej2-data';
import { PageService } from '@syncfusion/ej2-angular-grids'
import { CustomAdaptor } from './customadaptor';
@Component({
selector: 'app-root',
templateUrl: 'app.component.html',
providers: [PageService],
})
export class AppComponent {
public data: DataManager;
ngOnInit(): void {
this.data = new DataManager({
url: 'https://localhost:xxxx/odata/Orders',
adaptor: new CustomAdaptor(),
crossDomain: true,
});
}
}import { HttpClientModule } from '@angular/common/http';
import { NgModule } from '@angular/core';
import { BrowserModule } from '@angular/platform-browser';
import { AppRoutingModule } from './app-routing.module';
import { AppComponent } from './app.component';
import { GridModule, PageService } from '@syncfusion/ej2-angular-grids';
@NgModule({
declarations: [
AppComponent
],
imports: [
BrowserModule, HttpClientModule,
AppRoutingModule,
GridModule
],
providers: [PageService],
bootstrap: [AppComponent]
})
export class AppModule { }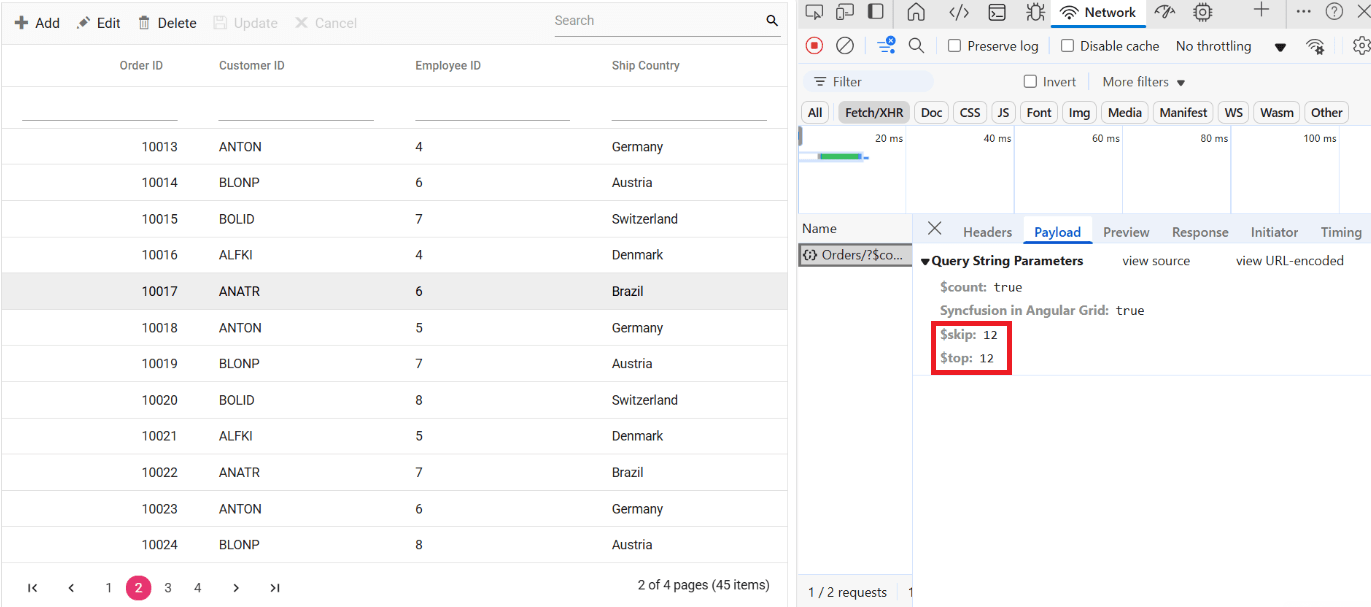
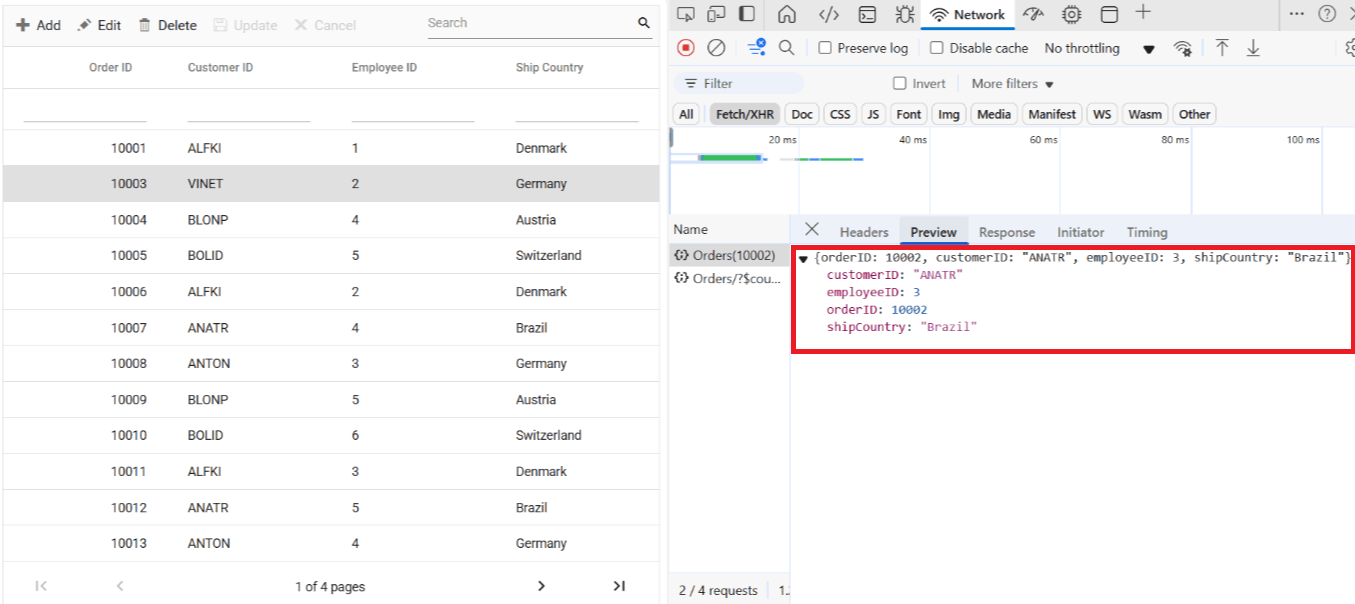
Handling CRUD operations
To manage CRUD (Create, Read, Update, Delete) operations using CustomAdaptor, follow the provided guide for configuring the Syncfusion Angular Grid for editing and utilize the sample implementation of the OrdersController in the server application. This controller processes HTTP requests for CRUD operations, including GET, POST, PATCH, and DELETE.
To enable CRUD operations in the Syncfusion Grid within an Angular application, follow these steps:
<div class="control-section">
    <ejs-grid #grid [dataSource]='data' [editSettings]='editSettings' [toolbar]='toolbar'>
        <e-columns>
            <e-column field='OrderID' headerText='Order ID' width='140' textAlign='Right' isPrimaryKey='true' [validationRules]='orderidrules'></e-column>
            <e-column field='CustomerID' headerText='Customer ID' width='140' [validationRules]='customeridrules'></e-column>
            <e-column field='EmployeeID' headerText='Employee ID' width='120' textAlign='Right'></e-column>
            <e-column field='ShipCountry' headerText='Ship Country' width='150' ></e-column>
        </e-columns>
    </ejs-grid>
</div>
import { Component } from '@angular/core';
import { DataManager } from '@syncfusion/ej2-data';
import { EditService, ToolbarService } from '@syncfusion/ej2-angular-grids'
import { CustomAdaptor } from './customadaptor';
@Component({
selector: 'app-root',
templateUrl: 'app.component.html',
providers: [EditService, ToolbarService],
})
export class AppComponent {
public data: DataManager;
public editSettings: Object;
public toolbar: string[];
public orderidrules: Object;
public customeridrules: Object;
ngOnInit(): void {
this.data = new DataManager({
url: 'https://localhost:xxxx/odata/Orders',
adaptor: new CustomAdaptor(),
crossDomain: true,
});
this.editSettings = { allowEditing: true, allowAdding: true, allowDeleting: true };
this.toolbar = ['Add', 'Edit', 'Delete', 'Update', 'Cancel'];
this.orderidrules = { required: true};
this.customeridrules = { required: true, minLength: 3 };
}
}import { HttpClientModule } from '@angular/common/http';
import { NgModule } from '@angular/core';
import { BrowserModule } from '@angular/platform-browser';
import { AppRoutingModule } from './app-routing.module';
import { AppComponent } from './app.component';
import { EditService, GridModule, ToolbarService } from '@syncfusion/ej2-angular-grids';
@NgModule({
declarations: [
AppComponent
],
imports: [
BrowserModule, HttpClientModule,
AppRoutingModule,
GridModule
],
providers: [EditService, ToolbarService],
bootstrap: [AppComponent]
})
export class AppModule { }Normal/Inline editing is the default edit mode for the Syncfusion Grid. To enable CRUD operations, ensure that the isPrimaryKey property is set to true for a specific Grid column, ensuring that its value is unique.
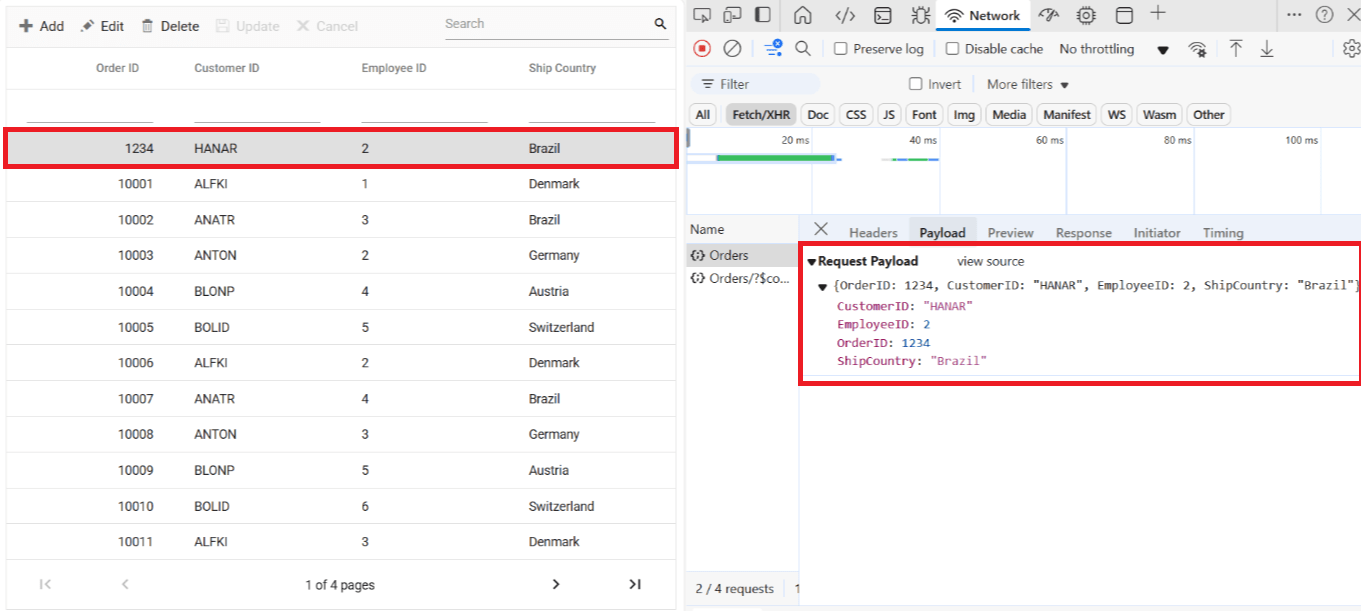
Insert Record
To insert a new record into the Syncfusion Grid, utilize the HttpPost method in the server application. Below is a sample implementation of inserting a record using the OrdersController:
/// <summary>
/// Inserts a new order to the collection.
/// </summary>
/// <param name="addRecord">The order to be inserted.</param>
/// <returns>It returns the newly inserted record detail.</returns>
[HttpPost]
[EnableQuery]
public IActionResult Post([FromBody] OrdersDetails addRecord)
{
    if (order == null)
    {
        return BadRequest("Null order");
    }

    OrdersDetails.GetAllRecords().Insert(0, addRecord);
    return Ok(addRecord);
}
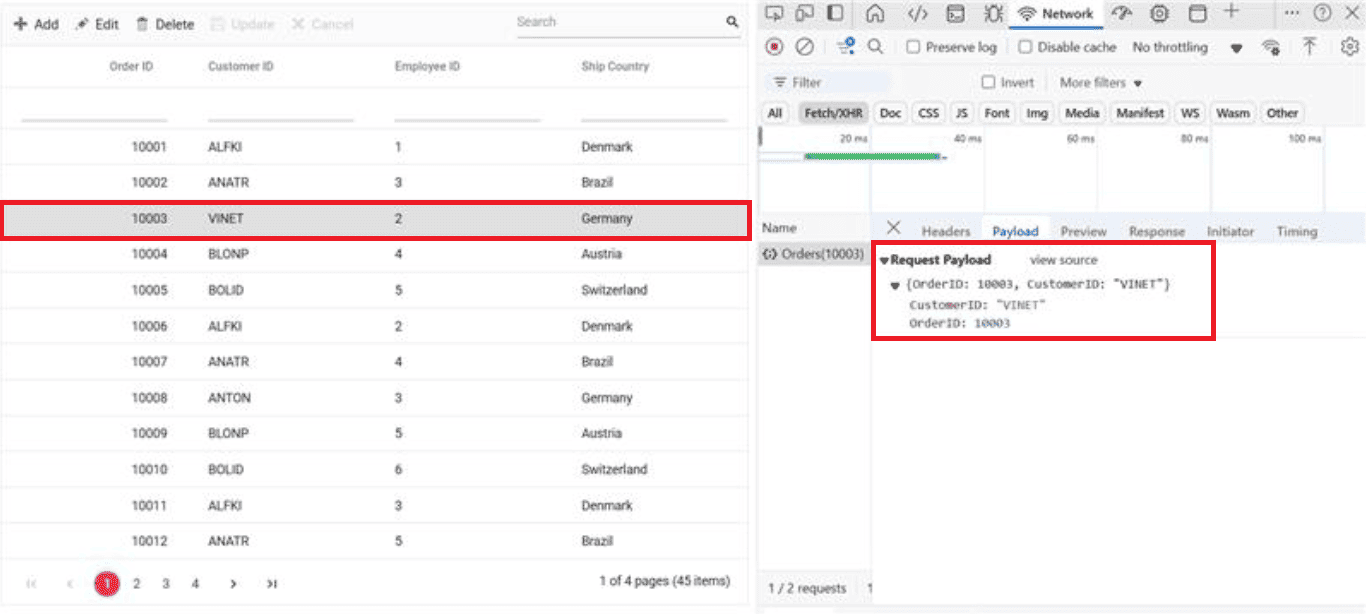
Update Record
Updating a record in the Syncfusion Grid can be achieved by utilizing the HttpPatch method in the controller. Here’s a sample implementation of updating a record:
/// <summary>
/// Updates an existing order.
/// </summary>
/// <param name="key">The ID of the order to update.</param>
/// <param name="updateRecord">The updated order details.</param>
/// <returns>It returns the updated order details.</returns>
[HttpPatch("{key}")]
public IActionResult Patch(int key, [FromBody] OrdersDetails updatedOrder)
{
    if (updatedOrder == null)
    {
        return BadRequest("No records");
    }
    var existingOrder = OrdersDetails.GetAllRecords().FirstOrDefault(o => o.OrderID == key);
    if (existingOrder != null)
    {
        // If the order exists, update its properties.
        existingOrder.CustomerID = updatedOrder.CustomerID ?? existingOrder.CustomerID;
        existingOrder.EmployeeID = updatedOrder.EmployeeID ?? existingOrder.EmployeeID;
        existingOrder.ShipCountry = updatedOrder.ShipCountry ?? existingOrder.ShipCountry;
    }
    return Ok(existingOrder);
}
Delete Record
To delete a record from the Syncfusion Grid, utilize the HttpDelete method in the controller. Below is a sample implementation:
/// <summary>
/// Deletes an order.
/// </summary>
/// <param name="key">The key of the order to be deleted.</param>
/// <returns>The deleted order.</returns>
[HttpDelete("{key}")]
public IActionResult Delete(int key)
{
    var order = OrdersDetails.GetAllRecords().FirstOrDefault(o => o.OrderID == key);
    if (order != null)
    {
        OrdersDetails.GetAllRecords().Remove(order);
    }
    return Ok(order);
}