Row auto height in Angular Schedule component
7 Jul 202616 minutes to read
By default, the height of the Scheduler rows in Timeline views is static. Therefore, when the same time ranges hold multiple overlapping appointments, a +n more text indicator is displayed. With this feature enabled, you can now view all overlapping appointments in a specific time range by auto-adjusting the row height according to the number of appointments, instead of displaying the +n more text indicators.
To enable auto row height adjustments on Scheduler Timeline views and the Month view, set the rowAutoHeight property to true (default is false).
This auto row height adjustment applies only to all Timeline views and the calendar Month view.
Now, let us see how it works on those applicable views with examples.
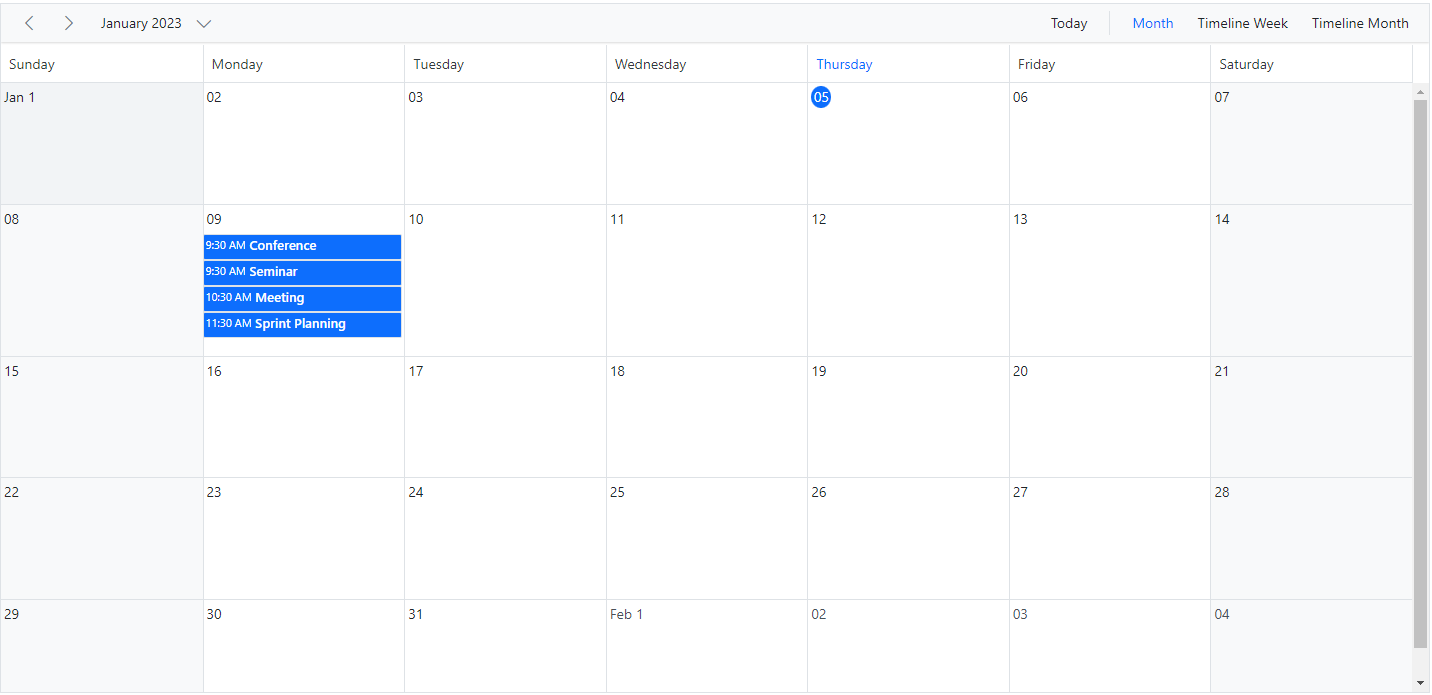
Calendar month view
By default, the rows of the calendar Month view can hold only a limited number of appointments based on its row height, and the rest of the overlapping appointments are indicated with a +n more text indicator. The following example shows how the month view row auto-adjusts based on the number of appointments when this rowAutoHeight feature is enabled.
import { NgModule } from '@angular/core'
import { BrowserModule } from '@angular/platform-browser'
import { ScheduleModule } from '@syncfusion/ej2-angular-schedule'
import { ButtonModule } from '@syncfusion/ej2-angular-buttons'
import { DayService, WeekService, WorkWeekService, MonthService, AgendaService, MonthAgendaService} from '@syncfusion/ej2-angular-schedule'


import { Component } from '@angular/core';
import { EventSettingsModel, View } from '@syncfusion/ej2-angular-schedule';
import { scheduleData } from './datasource';

@Component({
imports: [

        ScheduleModule,
        ButtonModule
    ],

providers: [DayService,
                WeekService,
                WorkWeekService,
                MonthService,
                AgendaService,
                MonthAgendaService],
standalone: true,
  selector: 'app-root',
  // specifies the template string for the Schedule component
  template: `<ejs-schedule width='100%' height='550px' [views]="scheduleViews" [rowAutoHeight]="rowAutoHeight" [selectedDate]="selectedDate" [eventSettings]="eventSettings" [currentView]="currentView">
  <e-views><e-view option='Month' ></e-view></e-views></ejs-schedule>`
})
export class AppComponent {
  public selectedDate: Date = new Date(2018, 1, 15);
  public scheduleViews: View[] = ['Month'];
  public rowAutoHeight: boolean = true;
  public currentView: View = 'Month';
  public eventSettings: EventSettingsModel = { dataSource: scheduleData };
 }
import { bootstrapApplication } from '@angular/platform-browser';
import { AppComponent } from './app.component';
import 'zone.js';
bootstrapApplication(AppComponent).catch((err) => console.error(err));Timeline views
When the rowAutoHeight feature is enabled in Timeline views, the row height auto-adjusts based on the number of overlapping events in the same time range, as demonstrated in the following example.
import { NgModule } from '@angular/core'
import { BrowserModule } from '@angular/platform-browser'
import { ScheduleModule } from '@syncfusion/ej2-angular-schedule'
import { ButtonModule } from '@syncfusion/ej2-angular-buttons'
import { DayService, WeekService, WorkWeekService, MonthService, AgendaService, MonthAgendaService} from '@syncfusion/ej2-angular-schedule'


import { Component } from '@angular/core';
import { EventSettingsModel, TimelineViewsService, TimelineMonthService, View } from '@syncfusion/ej2-angular-schedule';
import { eventData } from './datasource';

@Component({
imports: [

        ScheduleModule,
        ButtonModule
    ],

providers: [DayService,
                WeekService,
                WorkWeekService,
                MonthService,
                AgendaService,
                MonthAgendaService,
                TimelineViewsService, TimelineMonthService,],
standalone: true,
  selector: 'app-root',
  // specifies the template string for the Schedule component
  template: `<ejs-schedule width='100%' height='550px' [views]="scheduleViews" [selectedDate]="selectedDate" [eventSettings]="eventSettings" [rowAutoHeight]="rowAutoHeight" [currentView]="currentView">
  <e-views> <e-view option='TimelineDay'></e-view>
            <e-view option='TimelineWeek'></e-view>
            <e-view option='TimelineWorkWeek'></e-view>
            <e-view option='TimelineMonth'></e-view>
            <e-view option='Agenda'></e-view>
  </e-views></ejs-schedule>`
})
export class AppComponent {
  public selectedDate: Date = new Date(2018, 1, 15);
  public rowAutoHeight: boolean = true;
  public scheduleViews: View[] = ['TimelineWeek'];
  public currentView: View = 'TimelineWeek';
  public eventSettings: EventSettingsModel = { dataSource: eventData };
 }
import { bootstrapApplication } from '@angular/platform-browser';
import { AppComponent } from './app.component';
import 'zone.js';
bootstrapApplication(AppComponent).catch((err) => console.error(err));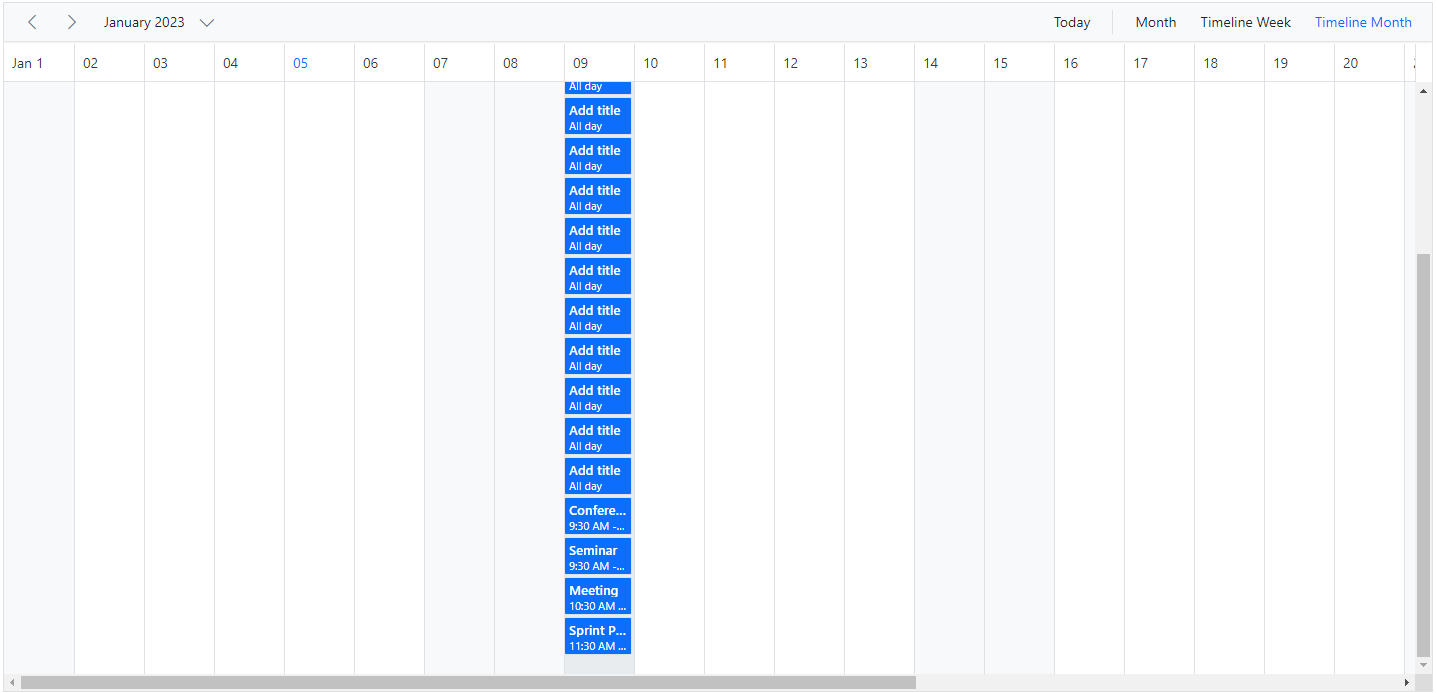
Timeline views with multiple resources
The following example shows how the auto row adjustment feature works on Timeline views with multiple resources.
import { NgModule } from '@angular/core'
import { BrowserModule } from '@angular/platform-browser'
import { ScheduleModule } from '@syncfusion/ej2-angular-schedule'
import { ButtonModule } from '@syncfusion/ej2-angular-buttons'
import { DayService, WeekService, WorkWeekService, MonthService, MonthAgendaService} from '@syncfusion/ej2-angular-schedule'


import { Component } from '@angular/core';
import { ScheduleComponent, EventSettingsModel, TimelineViewsService, DragAndDropService, GroupModel, ResizeService, View, TimelineMonthService, AgendaService } from '@syncfusion/ej2-angular-schedule';
import { roomData } from './datasource';

@Component({
imports: [

        ScheduleModule,
        ButtonModule
    ],

providers: [DayService,
                WeekService,
                WorkWeekService,
                MonthService,
                AgendaService,
                MonthAgendaService,
                TimelineViewsService, ResizeService, DragAndDropService, TimelineMonthService],
standalone: true,
  selector: 'app-root',
  // specifies the template string for the Schedule component
  template: `<ejs-schedule width='100%' height='550px' [views]="scheduleViews" [selectedDate]="selectedDate" [eventSettings]="eventSettings"  [group]="group" [currentView]="currentView" [rowAutoHeight]="rowAutoHeight">
  <e-resources><e-resource field='RoomId' title='Room Type' [dataSource]='resourceDataSource' [allowMultiple]='allowMultiple' name='MeetingRoom' textField='text' idField='id' colorField='color'></e-resource>
  <e-views> <e-view option='TimelineDay'></e-view>
            <e-view option='TimelineWeek'></e-view>
            <e-view option='TimelineWorkWeek'></e-view>
            <e-view option='TimelineMonth'></e-view>
            <e-view option='Agenda'></e-view></e-views></e-resources></ejs-schedule>`
})
export class AppComponent {
  public selectedDate: Date = new Date(2018, 7, 1);
  public rowAutoHeight: boolean = true;
  public scheduleViews: View[] = ['TimelineWeek'];
  public currentView: View = 'TimelineWeek';
  public group: GroupModel = {
    enableCompactView: false,
    resources: ['MeetingRoom']
  };
  public allowMultiple: Boolean = true;
  public resourceDataSource: Object[] = [
    { text: 'Room A', id: 1, color: '#98AFC7' },
    { text: 'Room B', id: 2, color: '#99c68e' },
    { text: 'Room C', id: 3, color: '#C2B280' },
    { text: 'Room D', id: 4, color: '#3090C7' },
    { text: 'Room E', id: 5, color: '#95b9' },
    { text: 'Room F', id: 6, color: '#95b9c7' },
    { text: 'Room G', id: 7, color: '#deb887' },
    { text: 'Room H', id: 8, color: '#3090C7' },
    { text: 'Room I', id: 9, color: '#98AFC7' },
    { text: 'Room J', id: 10, color: '#778899' }
  ];

  public eventSettings: EventSettingsModel = {
    dataSource: roomData,
    fields: {
      id: 'Id',
      subject: { name: 'Subject', title: 'Summary' },
      location: { name: 'Location', title: 'Location' },
      description: { name: 'Description', title: 'Comments' },
      startTime: { name: 'StartTime', title: 'From' },
      endTime: { name: 'EndTime', title: 'To' }
    }
  };

 }
import { bootstrapApplication } from '@angular/platform-browser';
import { AppComponent } from './app.component';
import 'zone.js';
bootstrapApplication(AppComponent).catch((err) => console.error(err));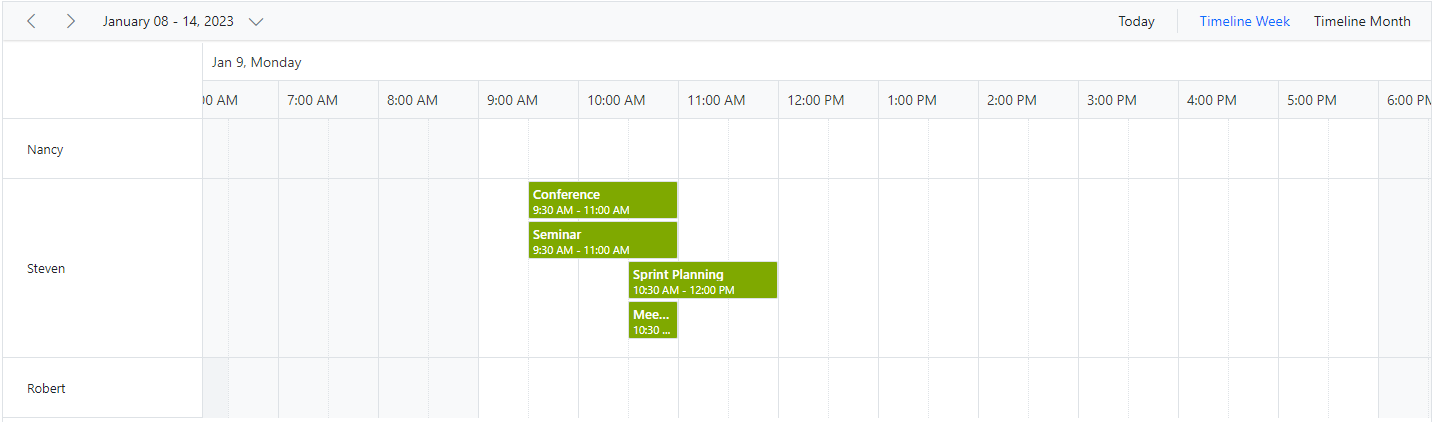
Appointments occupying entire cell
By default, with the feature rowAutoHeight, there will be a space in the bottom of the cell when appointment is rendered. To avoid this space, we can set true to the property ignoreWhitespace with in eventSettings whereas its default property value is false. In the following code example, the whitespace below the appointments has been ignored.
import { NgModule } from '@angular/core'
import { BrowserModule } from '@angular/platform-browser'
import { ScheduleModule } from '@syncfusion/ej2-angular-schedule'
import { TimePickerModule } from '@syncfusion/ej2-angular-calendars'
import { DayService, WeekService, WorkWeekService, MonthService, AgendaService, MonthAgendaService,  TimelineViewsService, TimelineMonthService, EventSettingsModel, GroupModel} from '@syncfusion/ej2-angular-schedule'


import { Component } from '@angular/core';
import { resourceData } from './datasource';

@Component({
imports: [

        ScheduleModule,
        TimePickerModule
    ],

providers: [DayService,
                WeekService,
                WorkWeekService,
                MonthService,
                AgendaService,
                MonthAgendaService,
                TimelineViewsService, TimelineMonthService],
standalone: true,
    selector: "app-root",
    // specifies the template string for the Schedule component
    template: `
    <ejs-schedule width="100%" height="550px" [selectedDate]="selectedDate" [views]="views"
      [currentView]='currentView' [rowAutoHeight]="rowAutoHeight" [eventSettings]="eventSettings" [group]='group'>
      <e-resources>
        <e-resource field="RoomId" title="Room" name="Rooms"
            [dataSource]="roomDataSource"
            textField="RoomText" idField="Id" colorField="RoomColor">
        </e-resource>
        <e-resource field="OwnerId" title="Owner" name="Owners"
          [dataSource]="ownerDataSource" [allowMultiple]="allowMultipleCategory"
          textField='OwnerText' idField='Id' groupIDField='OwnerGroupId' colorField='OwnerColor'>
        </e-resource>
      </e-resources>
    </ejs-schedule>`
})
export class AppComponent {
    public selectedDate: Date = new Date(2021, 7, 4);
    public currentView: string = 'TimelineWeek';
    public rowAutoHeight: boolean = true;
    public views: Array<string> = ['TimelineWeek', 'TimelineMonth'];
    public eventSettings: EventSettingsModel = {
        dataSource: resourceData,
        ignoreWhitespace: true

    };
    public group: GroupModel = {
        resources: ['Rooms', 'Owners']
    };
    public roomDataSource: Object[] = [
        { RoomText: 'ROOM 1', Id: 1, RoomColor: '#cb6bb2' },
        { RoomText: 'ROOM 2', Id: 2, RoomColor: '#56ca85' }
    ];
    public allowMultipleOwner: Boolean = true;
    public ownerDataSource: Object[] = [
        { OwnerText: 'Nancy', Id: 1, OwnerGroupId: 1, OwnerColor: '#ffaa00' },
        { OwnerText: 'Steven', Id: 2, OwnerGroupId: 2, OwnerColor: '#f8a398' },
        { OwnerText: 'Michael', Id: 3, OwnerGroupId: 1, OwnerColor: '#7499e1' }
    ];
allowMultipleCategory: any;
}
import { bootstrapApplication } from '@angular/platform-browser';
import { AppComponent } from './app.component';
import 'zone.js';
bootstrapApplication(AppComponent).catch((err) => console.error(err));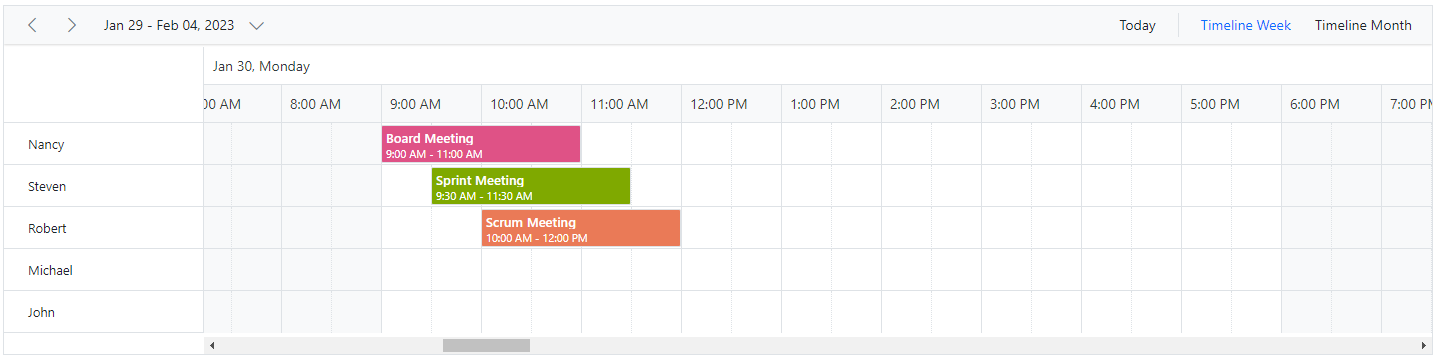
Note: The ignoreWhitespace property applies only when the rowAutoHeight feature is enabled in the Scheduler.
You can refer to our Angular Scheduler feature tour page for its groundbreaking feature representations. You can also explore our Angular Scheduler example to knows how to present and manipulate data.