How can I help you?
Batch editing in ASP.NET MVC Grid component
18 Dec 202424 minutes to read
Batch editing is a powerful feature in the Grid component that allows you to edit multiple cells simultaneously. It provides a convenient way to make changes to multiple cells and save them in a single request to the data source. This feature is particularly useful when dealing with large datasets or when you need to update multiple cells at once.
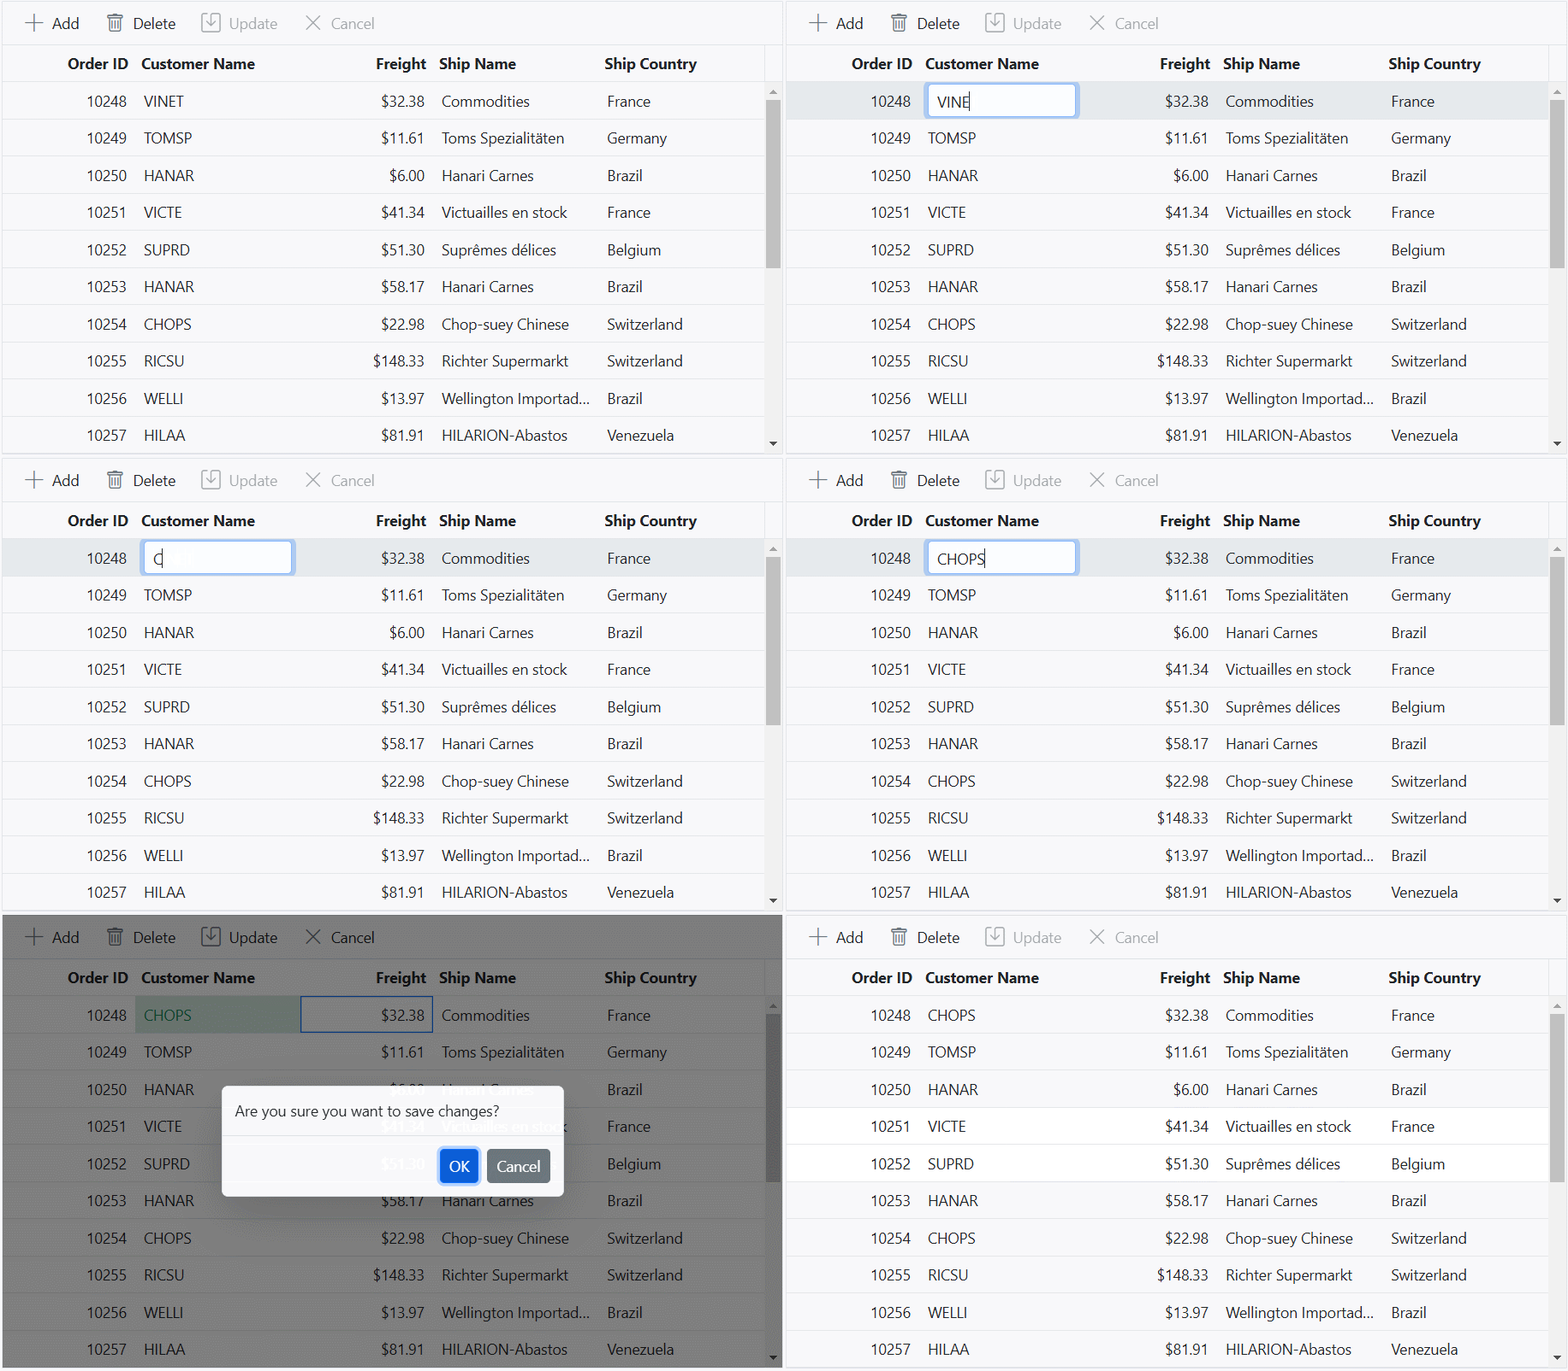
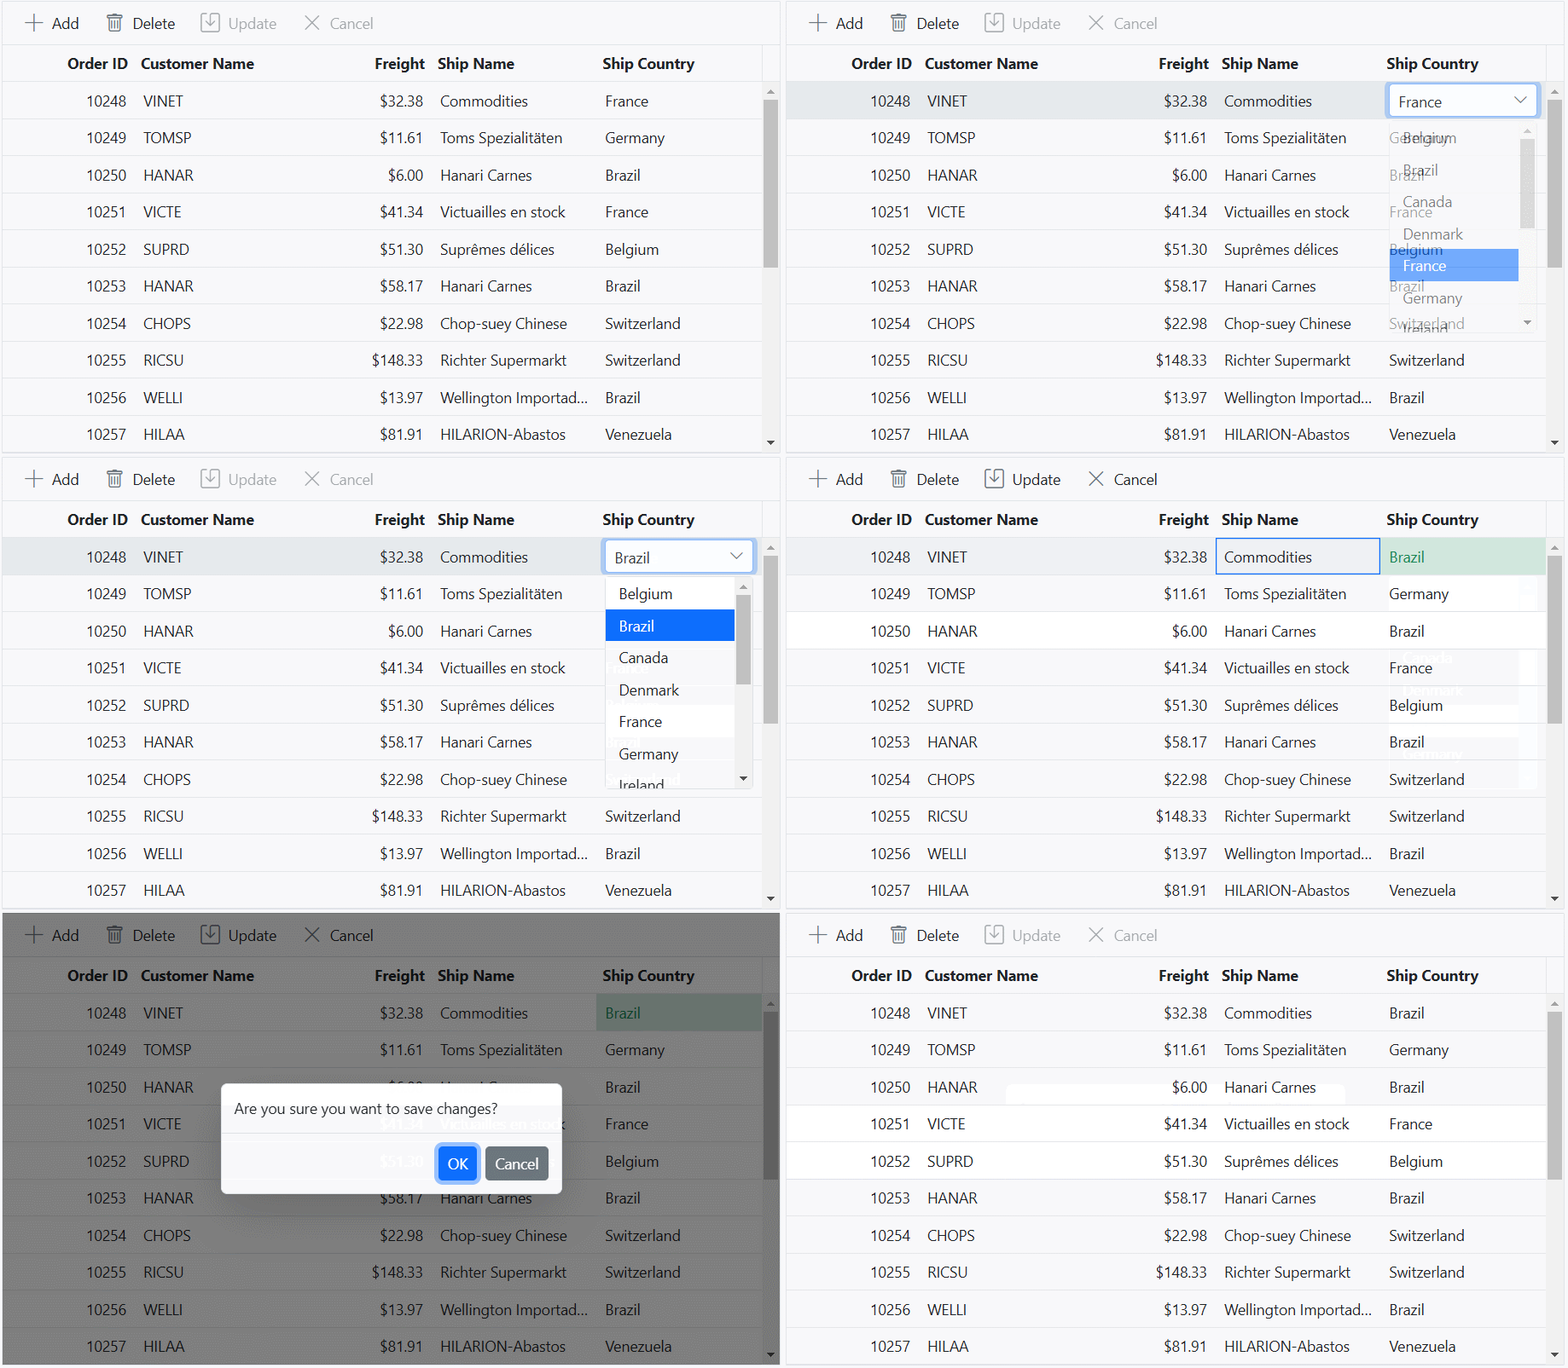
In batch edit mode, when you double-click on a grid cell, the target cell changes to an editable state. You can perform bulk update of the added, changed, and deleted data by either clicking on the toolbar’s Update button or by externally invoking the batchSave method.
To enable batch editing mode, you need to set the EditSettings.Mode property to Batch. This property determines the editing mode of the Grid and allows you to activate the batch editing feature.
Here’s an example how to enable batch editing in the ASP.NET MVC grid component:
@Html.EJS().Grid("grid").DataSource((IEnumerable<object>)ViewBag.DataSource).Height("348px").Columns(col =>
{
    col.Field("OrderID").HeaderText("Order ID").IsPrimaryKey(true).Width("120").ValidationRules(new { required = "true"}).TextAlign(Syncfusion.EJ2.Grids.TextAlign.Right).Add();
    col.Field("CustomerID").HeaderText("Customer Name").Width("150").ValidationRules(new { required = "true"}).Add();
    col.Field("Freight").HeaderText("Freight").Width("120").Format("C2").EditType("numericedit").ValidationRules(new { required = "true",min=1,max=1000}).TextAlign(Syncfusion.EJ2.Grids.TextAlign.Right).Add();
    col.Field("ShipName").HeaderText("Ship Name").Width("150").ValidationRules(new { required = "true"}).Add();
    col.Field("ShipCountry").HeaderText("Ship Country").EditType("dropdownedit").Width("150").ValidationRules(new { required = "true"}).Add();
}).EditSettings(edit => { edit.AllowAdding(true).AllowEditing(true).AllowDeleting(true).Mode(Syncfusion.EJ2.Grids.EditMode.Batch); }).Toolbar(new List<string>() { "Add", "Delete", "Update", "Cancel" }).Render()
public IActionResult Index()
{
ViewBag.DataSource = OrderDetails.GetAllRecords();
return View();
}
Automatically update the column based on another column edited value
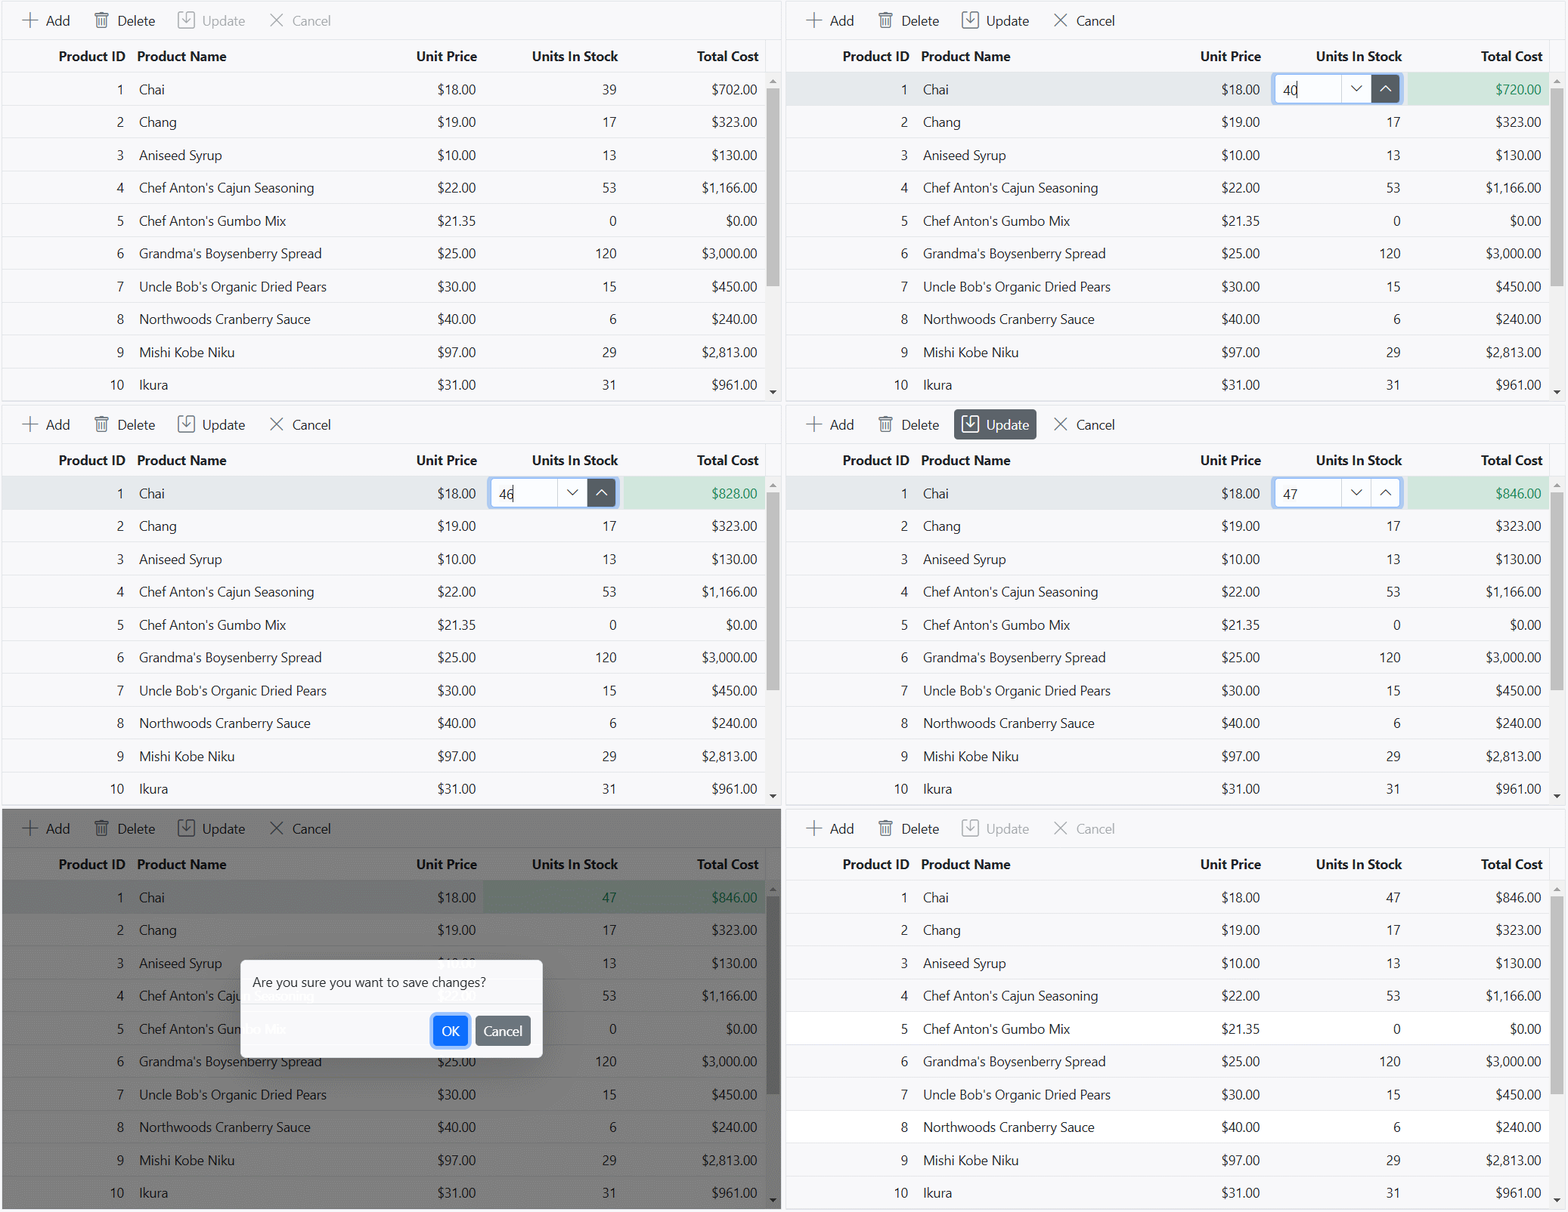
You can automatically update the value of a column based on the edited value of another column in batch mode. This feature is useful when you want to dynamically calculate and update a column’s value in real-time based on the changes made in another related column. This can be achieved using the Cell Edit Template feature in the Grid component.
In the following example, the TotalCost column value is updated based on changes to the UnitPrice and UnitInStock columns during batch editing.
@Html.EJS().Grid("grid").DataSource((IEnumerable<object>)ViewBag.DataSource).Height("348px").Columns(col =>
{
  col.Field("ProductID").HeaderText("Product ID").IsPrimaryKey(true).Width("110").TextAlign(Syncfusion.EJ2.Grids.TextAlign.Right).ValidationRules(new { required = "true" }).Add();
  col.Field("ProductName").HeaderText("Product Name").Width("180").ValidationRules(new { required = "true" }).Add();
  col.Field("UnitPrice").HeaderText("Unit Price").Width("120").EditType("numericedit").Format("C2").Edit(new {create = "priceCreate", read = "priceRead", destroy = "priceDestroy", write = "priceWrite"}).ValidationRules(new { required = "true", min=1 }).TextAlign(Syncfusion.EJ2.Grids.TextAlign.Right).Add();
  col.Field("UnitsInStock").HeaderText("Units In Stock").Width("120").EditType("numericedit").Edit(new {create = "stockCreate", read = "stockRead", destroy = "stockDestroy", write = "stockWrite"}).ValidationRules(new { required = "true", min=1 }).TextAlign(Syncfusion.EJ2.Grids.TextAlign.Right).Add();
  col.Field("TotalCost").HeaderText("Total Cost").Width("120").Format("C2").TextAlign(Syncfusion.EJ2.Grids.TextAlign.Right).Add();
}).CellEdit("cellEdit").EditSettings(edit => { edit.AllowAdding(true).AllowEditing(true).AllowDeleting(true).Mode(Syncfusion.EJ2.Grids.EditMode.Batch); }).Toolbar(new List<string>() { "Add", "Edit", "Delete", "Update", "Cancel" }).Render()
<script>
  var priceElement;
  var priceObject;
  var stockElement;
  var stockObject;
  function priceCreate() {
    priceElement = document.createElement('input');
    return priceElement;
  }
  function priceRead() {
    return priceObject.value;
  }
  function priceDestroy() {
    priceObject.destroy();
  }
  function priceWrite(args) {
    var grid = document.getElementById('grid').ej2_instances[0];
    var rowData = args.rowData;
    var rowIndex = grid.getRowInfo(args.row).rowIndex;
    priceObject = new ej.inputs.NumericTextBox(
    {
      value: args.rowData[args.column.field],
      change: function(args) {
        var totalCostValue = args.value * rowData['UnitsInStock'];
        grid.updateCell(rowIndex, 'TotalCost', totalCostValue);
      }
    });
    priceObject.appendTo(priceElement);
  }
  function cellEdit(args) {
    if(args.columnName == "TotalCost") {
      args.cancel = true;
    }
  }
  function stockCreate() {
    stockElement = document.createElement('input');
    return stockElement;
  }
    function stockRead() {
      return stockObject.value;
    }
    function stockDestroy() {
      stockObject.destroy();
    }
    function stockWrite(args) {
      var grid = document.getElementById('grid').ej2_instances[0];
      var rowData = args.rowData;
      var rowIndex = grid.getRowInfo(args.row).rowIndex;
      stockObject = new ej.inputs.NumericTextBox(
      {
        value: args.rowData[args.column.field],
        change: function(args) {
          var totalCostValue = args.value * rowData['UnitPrice'];
          grid.updateCell(rowIndex, 'TotalCost', totalCostValue);
        }
      });
      stockObject.appendTo(stockElement);
    }
</script>
public IActionResult Index()
{
ViewBag.DataSource = OrderDetails.GetAllRecords();
return View();
}
- You can utilize the
updateCellmethod to update cells in batch mode.
Cancel edit based on condition
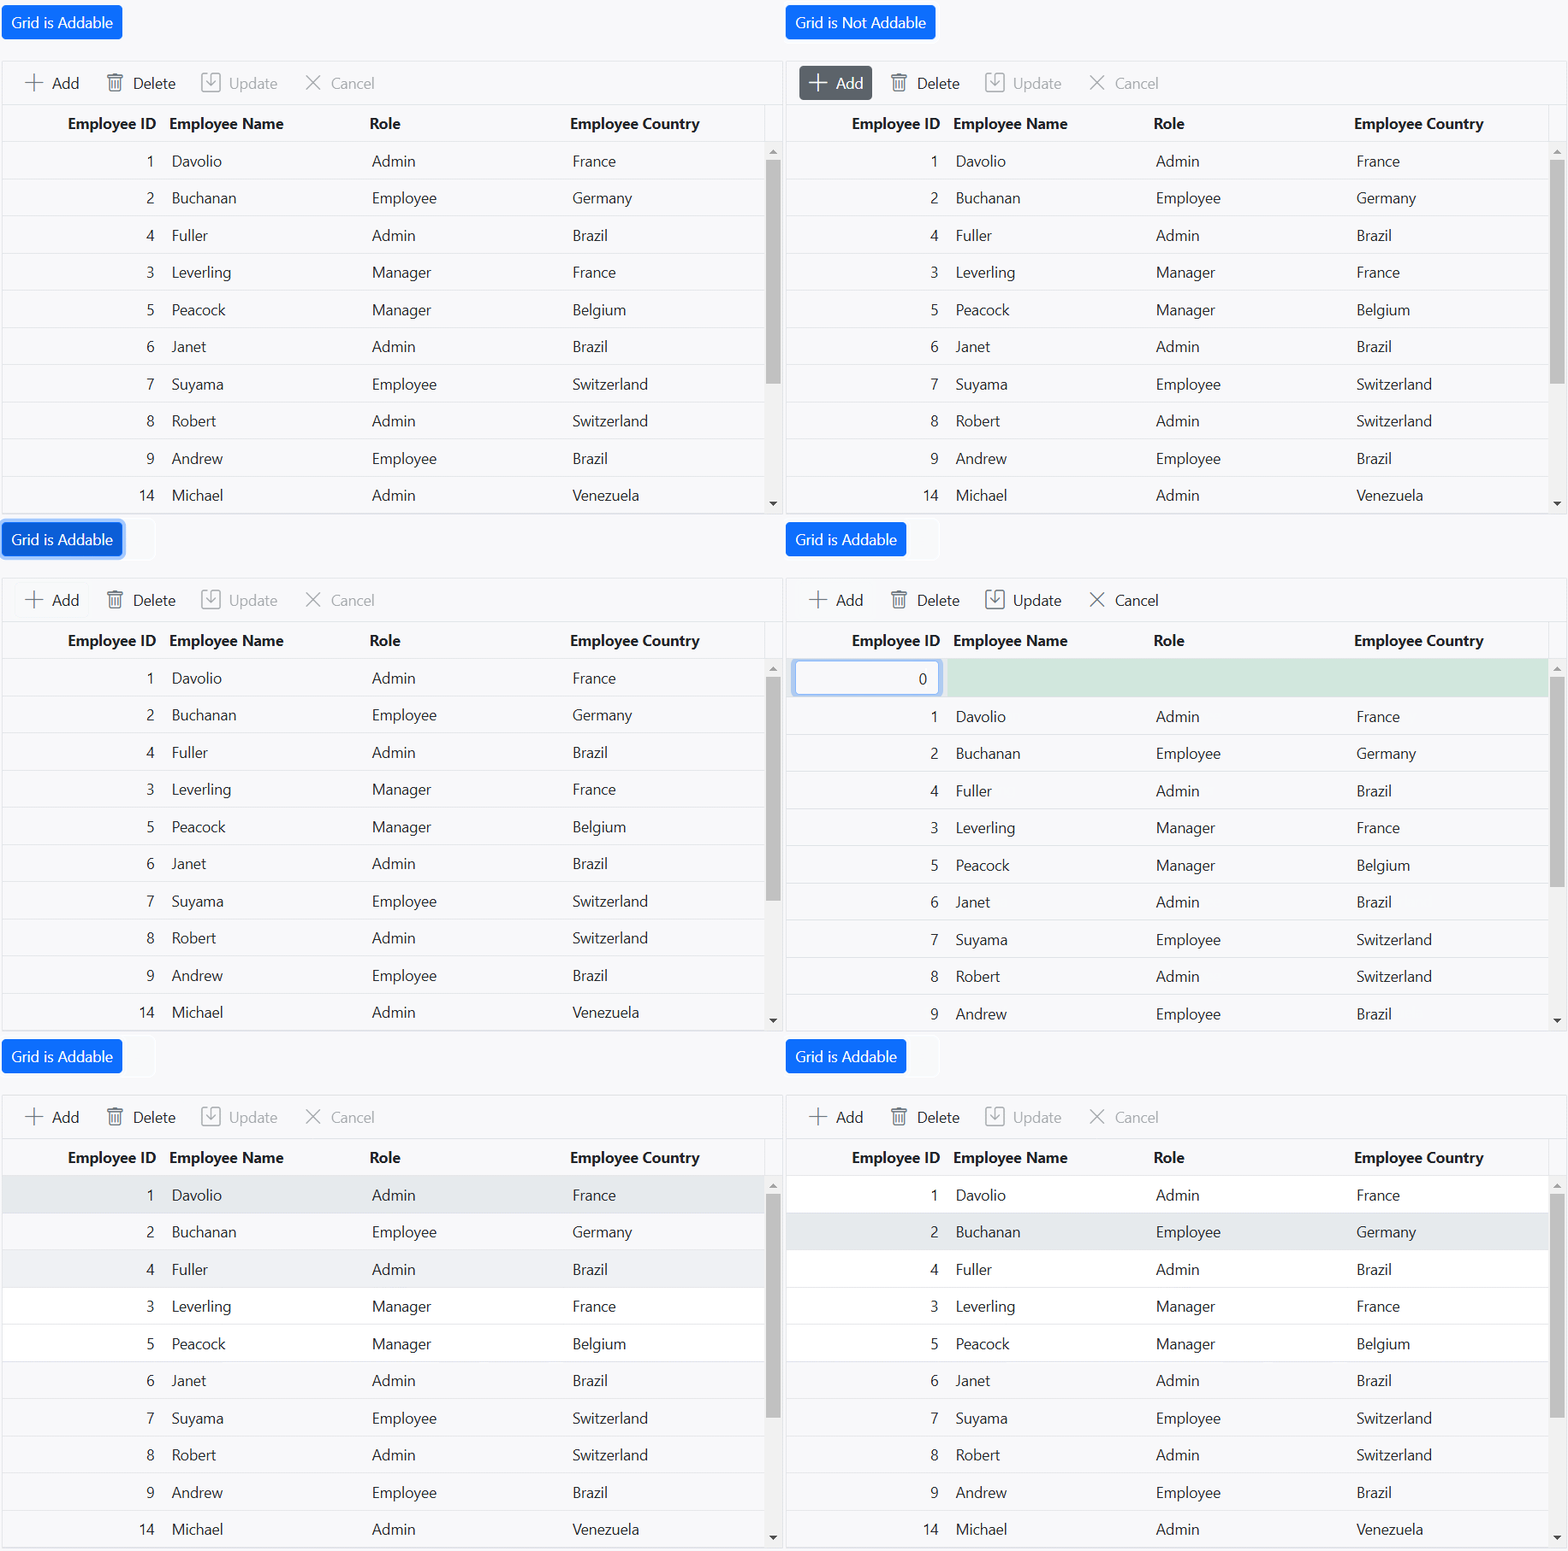
The Grid component provides to cancel the CRUD operations (Edit, Add, Delete) for particular row or cell in batch edit mode based on specific conditions. This feature allows you to control over whether editing should be allowed or prevented for certain rows or cells in the grid.
To cancel the edit action, you need to handle the CellEdit event. This event is triggered when a cell enters the edit mode. Within the event handler, you can add a condition to check whether the edit operation should be allowed or canceled. If the condition is met, set the args.Cancel property to true to cancel the edit operation.
To cancel the add action, you need to handle the BeforeBatchAdd event. This event is triggered before a new record is added to the batch changes. Within the event handler, you can add a condition to determine whether the add operation should proceed or be canceled. If the condition is met, set the args.Cancel property to true to cancel the add operation.
To cancel the delete action, you need to handle the BeforeBatchDelete event. This event is triggered before a record is deleted from the batch changes. Within the event handler, you can add a condition to control whether the delete operation should take place or be canceled. If the condition is met, set the args.Cancel property to true to cancel the delete operation.
In the below demo, prevent the CRUD operation based on the Role column value. If the Role Column is Admin, then edit/delete action is prevented for that row.
<div style="padding-bottom:20px">
    @Html.EJS().Button("add").Content("Grid is Addable").CssClass("e-primary").Render()
</div>
@Html.EJS().Grid("grid").DataSource((IEnumerable<object>)ViewBag.DataSource).Height("348px").Columns(col =>
{
   col.Field("EmployeeID").HeaderText("Employee ID").IsPrimaryKey(true).Width("120").ValidationRules(new { required = "true"}).TextAlign(Syncfusion.EJ2.Grids.TextAlign.Right).Add();
    col.Field("EmployeeName").HeaderText("Employee Name").Width("150").ValidationRules(new { required = "true"}).Add();
    col.Field("Role").HeaderText("Role").Width("150").ValidationRules(new { required = "true"}).Add();
    col.Field("EmployeeCountry").HeaderText("Employee Country").EditType("dropdownedit").Width("150").ValidationRules(new { required = "true"}).Add();
}).BeforeBatchAdd("beforeBatchAdd").CellEdit("cellEdit").BeforeBatchDelete("beforeBatchDelete").EditSettings(edit => { edit.AllowAdding(true).AllowEditing(true).AllowDeleting(true).Mode(Syncfusion.EJ2.Grids.EditMode.Batch); }).Toolbar(new List<string>() { "Add", "Delete", "Update", "Cancel" }).Render()
<script>
    var isAddable = true;
    function cellEdit(args) {
        if (args.rowData['Role'] == 'Admin') {
            args.cancel = true;
        }
    }
    function beforeBatchAdd(args) {
        if (!isAddable) {
            args.cancel = true;
        }
    }
    function beforeBatchDelete(args) {
        if (args.rowData['Role'] == 'Admin') {
            args.cancel = true;
        }
    }
    document.getElementById('add').onclick = () => {
        var button = document.getElementById('add').ej2_instances[0];
        button.content == 'Grid is Addable' ? (button.content = 'Grid is Not Addable') : (button.content = 'Grid is Addable');
        isAddable = !isAddable;
    };
</script>
public IActionResult Index()
{
ViewBag.DataSource = OrderDetails.GetAllRecords();
return View();
}
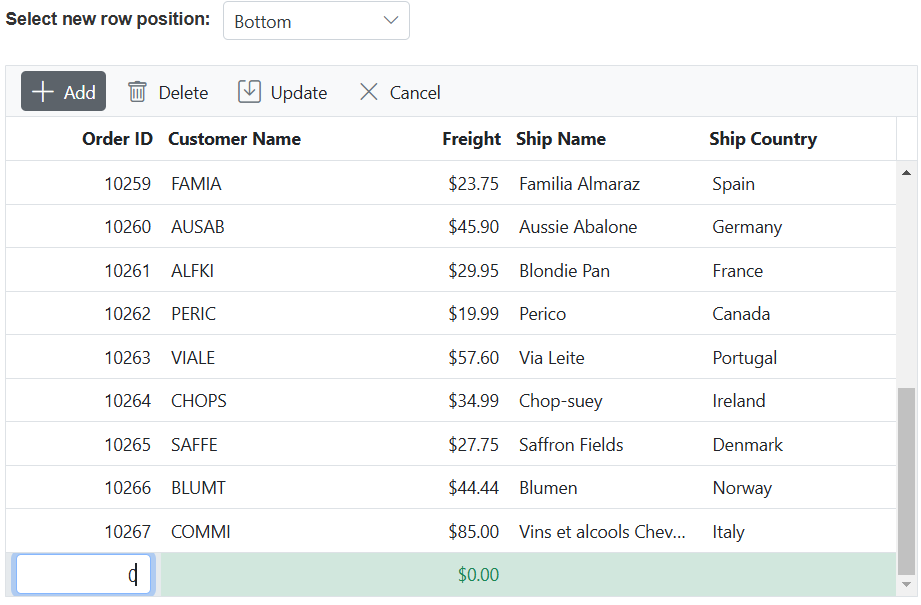
Adding a new row at the bottom of the grid
The grid component allows you to add a new row at the bottom of the grid, allowing you to insert a new record at the end of the existing data set. This feature is particularly useful when you want to conveniently add new records without the need to scroll up or manually reposition the newly added row. To achieve this, you can make use of the NewRowPosition property in the EditSettings configuration and set it to Bottom.
- If you set
NewRowPositionas Bottom, you can use the TAB key to easily move between cells or rows in edit mode. As you enter data in each cell and press TAB, the grid will automatically create new rows below the current row, allowing you to conveniently add data for multiple rows without having to leave the edit mode.- If you set
NewRowPositionas Top, the grid will display a blank row form at the top by default, allowing you to enter data for the new record. However, when the data is saved or updated, it will be inserted at the bottom of the grid ,ensuring the new record appears at the end of the existing data set.- If the paging feature is enabled, updating the row will automatically move it to the last page based on the page size.This behavior applies to both local and remote data binding.
- If scrolling is enabled, you can use the TAB key to add a new row, even if the new row is added beyond the currently visible area of the grid.
- Add
NewRowPositionis supported for Normal and Batch editing modes.
Here’s an example that demonstrates how to enable adding new rows at the bottom of the grid using NewRowPosition property:
@{
   ViewBag.dropDownData = new List<object>
   {
      new { value = "Top", text = "Top" },
      new { value = "Bottom", text = "Bottom" },
   };
}
<div style="padding-bottom:20px">
    <div style="display: flex">
        <label style="padding: 5px 10px 0 0"> Select new row position:</label>
        <span style="height:fit-content">
         @Html.EJS().DropDownList("dropDown").Width("150px").Index(0).DataSource(@ViewBag.dropDownData).Change("changePosition").Render()
        </span>
    </div>
</div>
@Html.EJS().Grid("grid").DataSource((IEnumerable<object>)ViewBag.DataSource).Height("348px").Columns(col =>
{
    col.Field("OrderID").HeaderText("Order ID").IsPrimaryKey(true).Width("120").ValidationRules(new { required = "true"}).TextAlign(Syncfusion.EJ2.Grids.TextAlign.Right).Add();
    col.Field("CustomerID").HeaderText("Customer Name").Width("150").ValidationRules(new { required = "true"}).Add();
    col.Field("Freight").HeaderText("Freight").Width("120").Format("C2").EditType("numericedit").ValidationRules(new { required = "true", min=3 ,max=1000 }).TextAlign(Syncfusion.EJ2.Grids.TextAlign.Right).Add();
    col.Field("ShipName").HeaderText("Ship Name").Width("150").ValidationRules(new { required = "true"}).Add();
    col.Field("ShipCountry").HeaderText("Ship Country").EditType("dropdownedit").Width("150").ValidationRules(new { required = "true"}).Add();
}).EditSettings(edit => { edit.AllowAdding(true).AllowEditing(true).AllowDeleting(true).Mode(Syncfusion.EJ2.Grids.EditMode.Batch); }).Toolbar(new List<string>() { "Add", "Delete", "Update", "Cancel" }).Render()
<script>
    function changePosition(args) {
        var grid=document.getElementById('grid').ej2_instances[0];
        grid.editSettings.newRowPosition = args.value;
    }
</script>
public IActionResult Index()
{
ViewBag.DataSource = OrderDetails.GetAllRecords();
return View();
}
Confirmation dialog
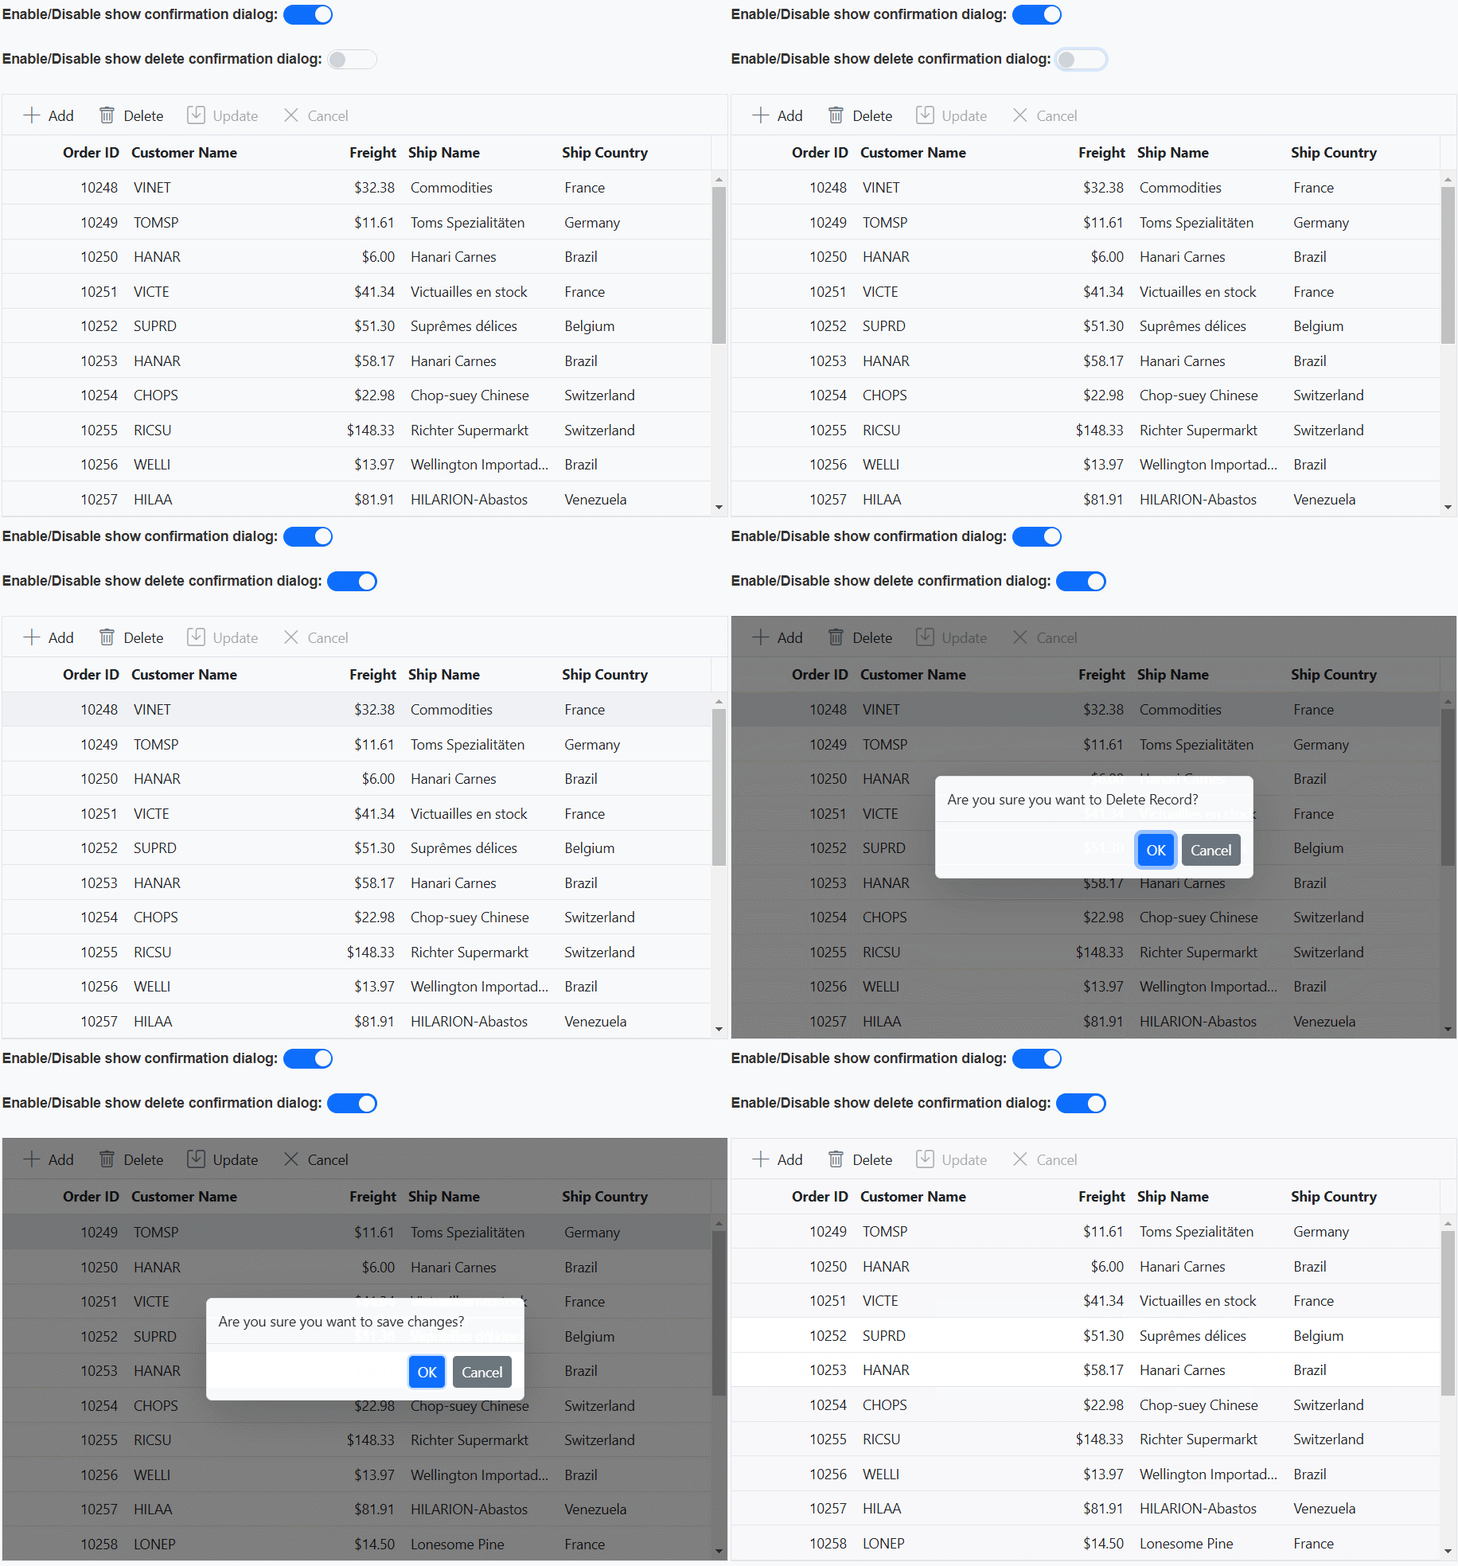
Displaying a confirmation dialog provides an additional layer of confirmation when performing actions like saving a record or canceling changes in the grid. This dialog prompts for confirmation before proceeding with the action, ensuring that accidental or undesired changes are avoided. The grid component offers a built-in confirmation dialog that can be used to confirm save, cancel, and other actions.
To enable the confirmation dialog, you can set the EditSettings.ShowConfirmDialog property of the EditSettings configuration to true. The default value is true.
EditSettings.ShowConfirmDialogrequires the EditSettings.Mode to be Batch- If
EditSettings.ShowConfirmDialogset to false, then confirmation dialog does not display in batch editing.- While performing both update and delete operations, a separate delete confirmation dialog is shown at the time of clicking the delete button or pressing the delete key itself.
Here’s an example that demonstrates how to enable/disable the confirmation dialog using the ShowConfirmDialog property:
<div style="padding-bottom: 20px; display: flex">
   <label style="margin-right:5px;font-weight: bold;"> Enable/Disable show confirmation dialog:</label>
   @Html.EJS().Switch("switch").Checked(true).Change("toggleShowConfirmDialog").Render()
</div>
<div style="padding-bottom: 20px; display: flex">
   <label style="margin-right:5px;font-weight: bold;"> Enable/Disable show delete confirmation dialog:</label>
   @Html.EJS().Switch("switchDelete").Change("toggleShowDeleteConfirmDialog").Render()
</div>
@Html.EJS().Grid("grid").DataSource((IEnumerable<object>)ViewBag.DataSource).Height("348px").Columns(col =>
{
    col.Field("OrderID").HeaderText("Order ID").IsPrimaryKey(true).Width("120").ValidationRules(new { required = "true"}).TextAlign(Syncfusion.EJ2.Grids.TextAlign.Right).Add();
    col.Field("CustomerID").HeaderText("Customer Name").Width("150").ValidationRules(new { required = "true"}).Add();
    col.Field("Freight").HeaderText("Freight").Width("120").Format("C2").EditType("numericedit").ValidationRules(new { required = "true", min=3 ,max=1000 }).TextAlign(Syncfusion.EJ2.Grids.TextAlign.Right).Add();
    col.Field("ShipName").HeaderText("Ship Name").Width("150").ValidationRules(new { required = "true"}).Add();
    col.Field("ShipCountry").HeaderText("Ship Country").EditType("dropdownedit").Width("150").ValidationRules(new { required = "true"}).Add();
}).EditSettings(edit => { edit.AllowAdding(true).AllowEditing(true).AllowDeleting(true).Mode(Syncfusion.EJ2.Grids.EditMode.Batch); }).Toolbar(new List<string>() { "Add", "Delete", "Update", "Cancel" }).Render()
<script>
    function toggleShowDeleteConfirmDialog(args) {
        var grid=document.getElementById('grid').ej2_instances[0];
        grid.editSettings.showDeleteConfirmDialog = args.checked;
    }
    function toggleShowConfirmDialog(args)
    {
      var grid=document.getElementById('grid').ej2_instances[0];
      grid.editSettings.showConfirmDialog = args.checked;
    }
</script>
public IActionResult Index()
{
ViewBag.DataSource =OrderDetails.GetAllRecords();
return View();
}
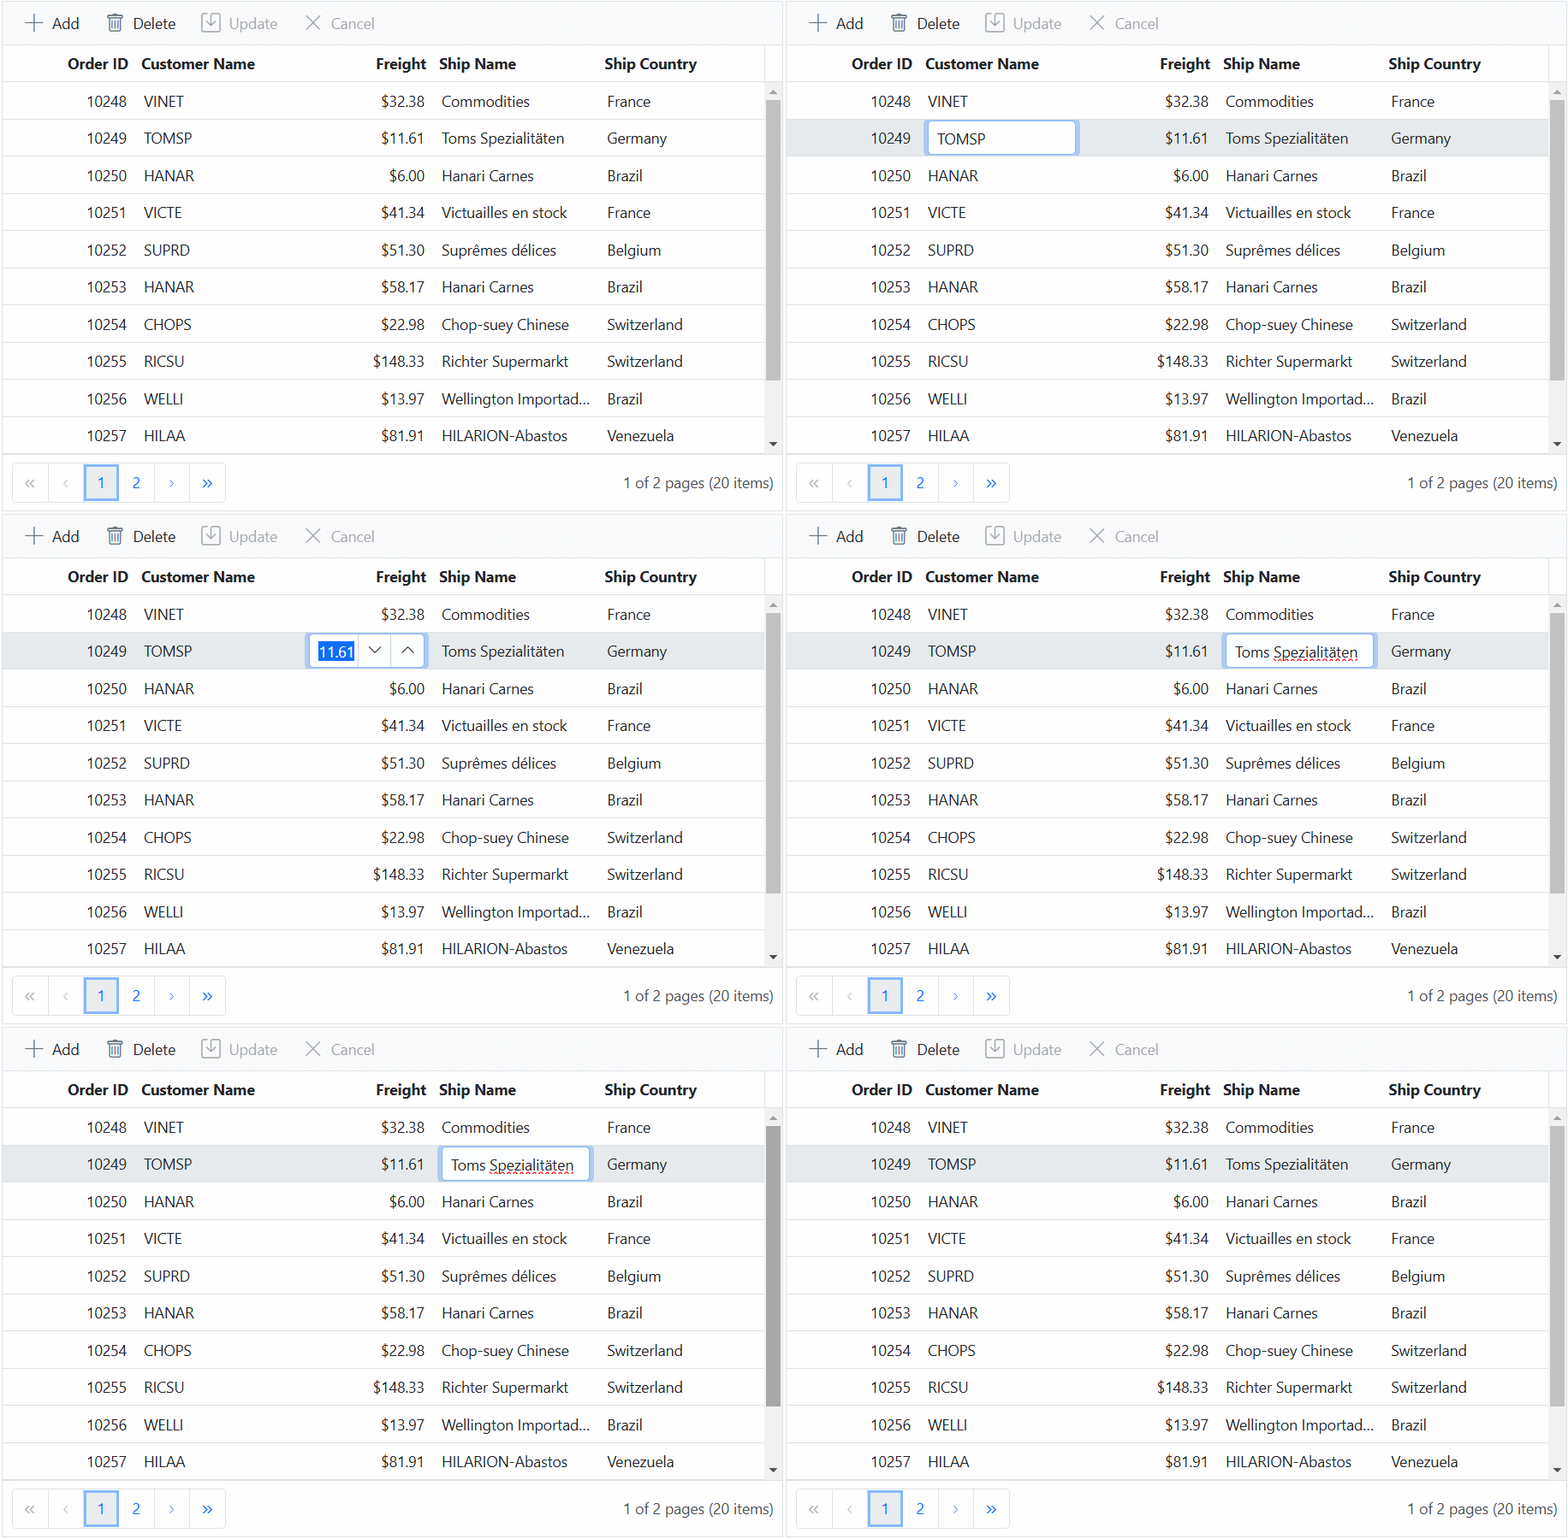
How to make editing in single click and arrow keys
You can enable editing in a single click and navigate between cells or rows using arrow keys without having to double-click or use the mouse for navigation. By default, in batch mode, the TAB key can be used to edit or move to the next cell or row and the Enter key is used to move to the next row cell. However, you can customize this behavior to enable editing with a single click or using arrow keys.
To enable editing in a single click, you can handle the Created event of the Grid. Within the event handler,bind the click event to the grid cells and call the editCell method to make the clicked cell editable.
To enable editing using arrow keys, you can handle the Load event of the Grid component. Inside the event handler, you can bind the keydown event to the grid element and check for arrow key presses. Based on the arrow key pressed, you can identify the next or previous cell using the editCell method and make it editable.
Here’s an example that demonstrates how to achieve both single-click editing and arrow key navigation using the Created and Load events in conjunction with the editCell method:
@Html.EJS().Grid("grid").DataSource((IEnumerable<object>)ViewBag.DataSource).Height("348px").AllowPaging().EnableHover(false).Columns(col => {
    col.Field("OrderID").HeaderText("Order ID").IsPrimaryKey(true).Width("120").ValidationRules(new { required = "true" }).TextAlign(Syncfusion.EJ2.Grids.TextAlign.Right).Add();
    col.Field("CustomerID").HeaderText("Customer Name").Width("150").ValidationRules(new { required = "true" }).Add();
    col.Field("Freight").HeaderText("Freight").Width("120").Format("C2").EditType("numericedit").ValidationRules(new { required = "true", min=3, max=1000 }).TextAlign(Syncfusion.EJ2.Grids.TextAlign.Right).Add();
    col.Field("ShipName").HeaderText("Ship Name").Width("150").ValidationRules(new { required = "true" }).Add();
    col.Field("ShipCountry").HeaderText("Ship Country").EditType("dropdownedit").Width("150").ValidationRules(new { required = "true" }).Add();
}).Created("created").Load("load").EditSettings(edit => { edit.AllowAdding(true).AllowEditing(true).AllowDeleting(true).Mode(Syncfusion.EJ2.Grids.EditMode.Batch); }).Toolbar(new List < string > () { "Add", "Delete", "Update", "Cancel" }).Render()
<script>
    function created() {
        var grid = document.getElementById('grid').ej2_instances[0];
    grid.getContentTable().addEventListener('click', function(args) {
        if (args.target.classList.contains('e-rowcell')) {
        grid.editModule.editCell(parseInt(args.target.getAttribute('index')),
            grid.getColumnByIndex(parseInt(args.target.getAttribute('aria-colindex')) - 1).field);
            }
        });
    }
    function load() {
        var grid = document.getElementById('grid').ej2_instances[0];
    grid.element.addEventListener('keydown', function(event) {
        var closestTableCell = e.target.closest('td');
    if (event.keyCode === 39 && !ej.base.isNullOrUndefined(closestTableCell.nextSibling)) {
        editACell(closestTableCell.nextSibling);
        }
    if (event.keyCode === 37 && !ej.base.isNullOrUndefined(closestTableCell.previousSibling) && !grid.getColumnByIndex(parseInt(closestTableCell.previousSibling.getAttribute('aria-colindex'))-1).isPrimaryKey) {
        editACell(closestTableCell.previousSibling);
        }
    if (event.keyCode === 40 && !ej.base.isNullOrUndefined(closestTableCell.closest('tr').nextSibling)) {
        editACell(closestTableCell.closest('tr').nextSibling.querySelectorAll('td')[parseInt(closestTableCell.getAttribute('aria-colindex')) - 1]);
        }
    if (event.keyCode === 38 && !ej.base.isNullOrUndefined(closestTableCell.closest('tr').previousSibling)) {
        editACell(closestTableCell.closest('tr').previousSibling.querySelectorAll('td')[parseInt(closestTableCell.getAttribute('aria-colindex')) - 1]);}});
    }
    function editACell(args) {
        var grid = document.getElementById('grid').ej2_instances[0];
    grid.editModule.editCell(parseInt(args.getAttribute('index')),grid.getColumnByIndex(parseInt(args.getAttribute('aria-colindex'))-1).field);
    }
</script>
public IActionResult Index()
{
ViewBag.DataSource = OrderDetails.GetAllRecords();
return View();
}
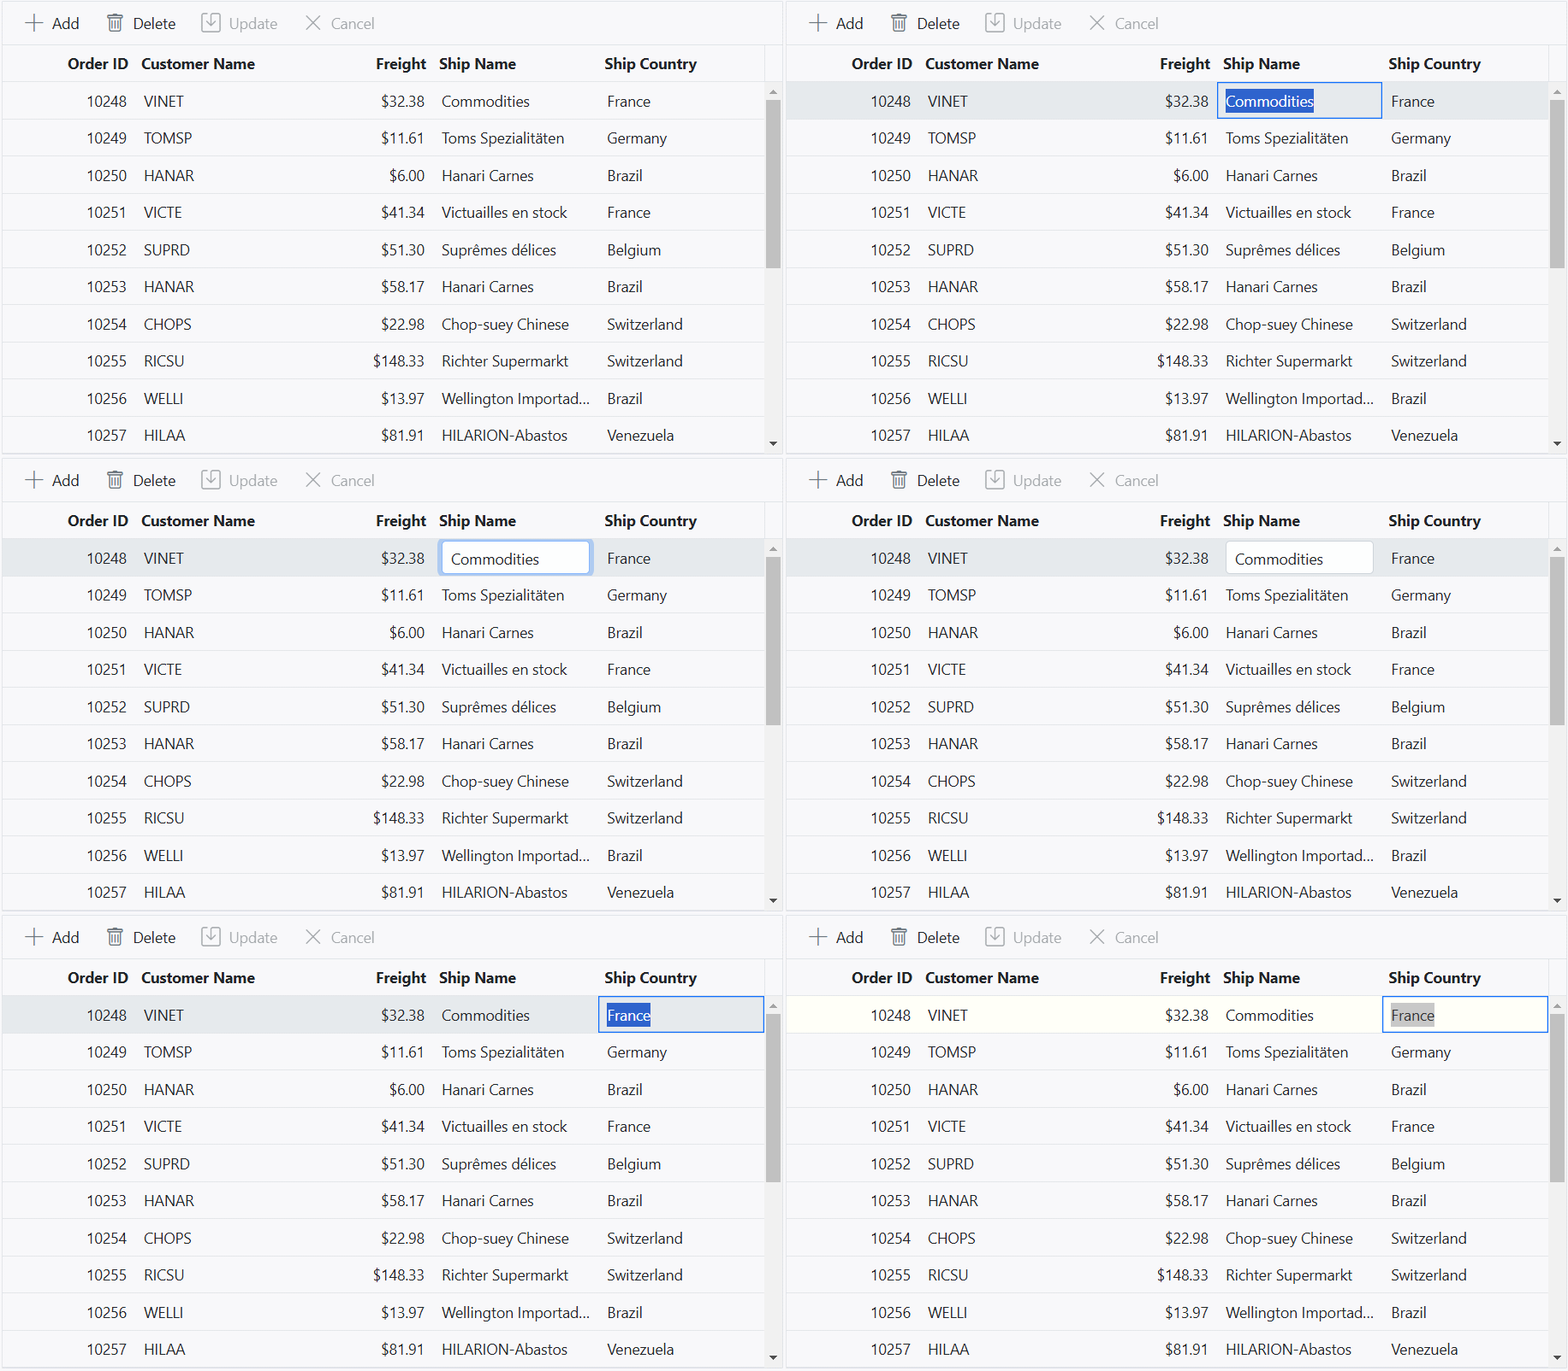
Disable editing for a particular cell
You can prevent editing of specific cells based on certain conditions in the Grid component. This feature is useful when you want to restrict editing for certain cells, such as read-only data, calculated values, or protected information. It helps maintain data integrity and ensures that only authorized changes can be made in the grid.
To disable editing for a particular cell in batch mode, use the CellEdit event of the grid. You can then use the args.Cancel property and set it to true to prevent editing for that cell.
Here’s an example demonstrating how you can disable editing for cells containing the value France using the CellEdit event:
@Html.EJS().Grid("grid").DataSource((IEnumerable<object>)ViewBag.DataSource).Height("348px").Columns(col =>
{
    col.Field("OrderID").HeaderText("Order ID").IsPrimaryKey(true).Width("120").ValidationRules(new { required = "true"}).TextAlign(Syncfusion.EJ2.Grids.TextAlign.Right).Add();
    col.Field("CustomerID").HeaderText("Customer Name").Width("150").ValidationRules(new { required = "true"}).Add();
    col.Field("Freight").HeaderText("Freight").Width("120").Format("C2").EditType("numericedit").ValidationRules(new { required = "true", min=3 ,max=1000 }).TextAlign(Syncfusion.EJ2.Grids.TextAlign.Right).Add();
    col.Field("ShipName").HeaderText("Ship Name").Width("150").ValidationRules(new { required = "true"}).Add();
    col.Field("ShipCountry").HeaderText("Ship Country").EditType("dropdownedit").Width("150").ValidationRules(new { required = "true"}).Add();
}).CellEdit("cellEdit").EditSettings(edit => { edit.AllowAdding(true).AllowEditing(true).AllowDeleting(true).Mode(Syncfusion.EJ2.Grids.EditMode.Batch); }).Toolbar(new List<string>() { "Add", "Delete", "Update", "Cancel" }).Render()
<script>
    function cellEdit(args){
        if (args.value === 'France') {
            args.cancel = true;
        }
    }
</script>
public IActionResult Index()
{
ViewBag.DataSource =OrderDetails.GetAllRecords();
return View();
}
Save or update the changes immediately
The Grid component provides a convenient way to save or update changes immediately in batch mode without the need for a separate Save button. This feature is particularly useful when you want to allow you to edit data efficiently without having to manually trigger a save action. You can achieve this by utilizing the CellSaved event and the batchSave method.
By default, when you use the batchSave method to save or update data, a confirmation dialog is displayed. This dialog prompts for confirmation before proceeding with the save or cancel action, ensuring that accidental or undesired changes are avoided.
The CellSaved event is triggered when a cell is saved in the Grid. It provides a way to perform custom logic when a cell is saved or updated.
The batchSave method is a built-in function provided by the Grid’s edit service. It is used to save multiple changes made to added, edited, and deleted records in the batch mode.
- To avoid the confirmation dialog when using the
batchSavemethod, you can set EditSettings.ShowConfirmDialog to false. However, please note that to use this property, the EditSettings.Mode must be set to Batch. This combination of properties allows you to save or update changes immediately without the need for a confirmation dialog.
Here’s an example that demonstrates how to achieve immediate saving or updating of changes using the CellSaved event and the batchSave method:
@Html.EJS().Grid("grid").DataSource((IEnumerable<object>)ViewBag.DataSource).Height("348px").Columns(col =>
{
    col.Field("OrderID").HeaderText("Order ID").IsPrimaryKey(true).Width("120").ValidationRules(new { required = "true"}).TextAlign(Syncfusion.EJ2.Grids.TextAlign.Right).Add();
    col.Field("CustomerID").HeaderText("Customer Name").Width("150").ValidationRules(new { required = "true"}).Add();
    col.Field("Freight").HeaderText("Freight").Width("120").Format("C2").EditType("numericedit").ValidationRules(new { required = "true", min=3 ,max=1000 }).TextAlign(Syncfusion.EJ2.Grids.TextAlign.Right).Add();
    col.Field("ShipName").HeaderText("Ship Name").Width("150").ValidationRules(new { required = "true"}).Add();
    col.Field("ShipCountry").HeaderText("Ship Country").EditType("dropdownedit").Width("150").ValidationRules(new { required = "true"}).Add();
}).CellSaved("cellSaved").EditSettings(edit => { edit.AllowAdding(true).AllowEditing(true).AllowDeleting(true).ShowConfirmDialog(true).Mode(Syncfusion.EJ2.Grids.EditMode.Batch); }).Toolbar(new List<string>() { "Add", "Delete", "Update", "Cancel" }).Render()
<script>
    function cellSaved() {
        var grid=document.getElementById('grid').ej2_instances[0];
        grid.editModule.batchSave();
    }
</script>
public IActionResult Index()
{
ViewBag.DataSource =OrderDetails.GetAllRecords();
return View();
}