How can I help you?
Editing in ASP.NET MVC Grid Component
7 May 202524 minutes to read
The Grid component provides powerful options for dynamically inserting, deleting, and updating records, enabling you to modify data directly within the grid. This feature is useful when you want to enable you to perform CRUD (Create, Read, Update, Delete) operations seamlessly.
To enable editing functionality directly within the grid, you need to configure the AllowEditing, AllowAdding, and AllowDeleting properties within the EditSettings to true.
Editing feature requires a primary key column for CRUD operations. To define the primary key, set Columns.IsPrimaryKey to true in particular column.
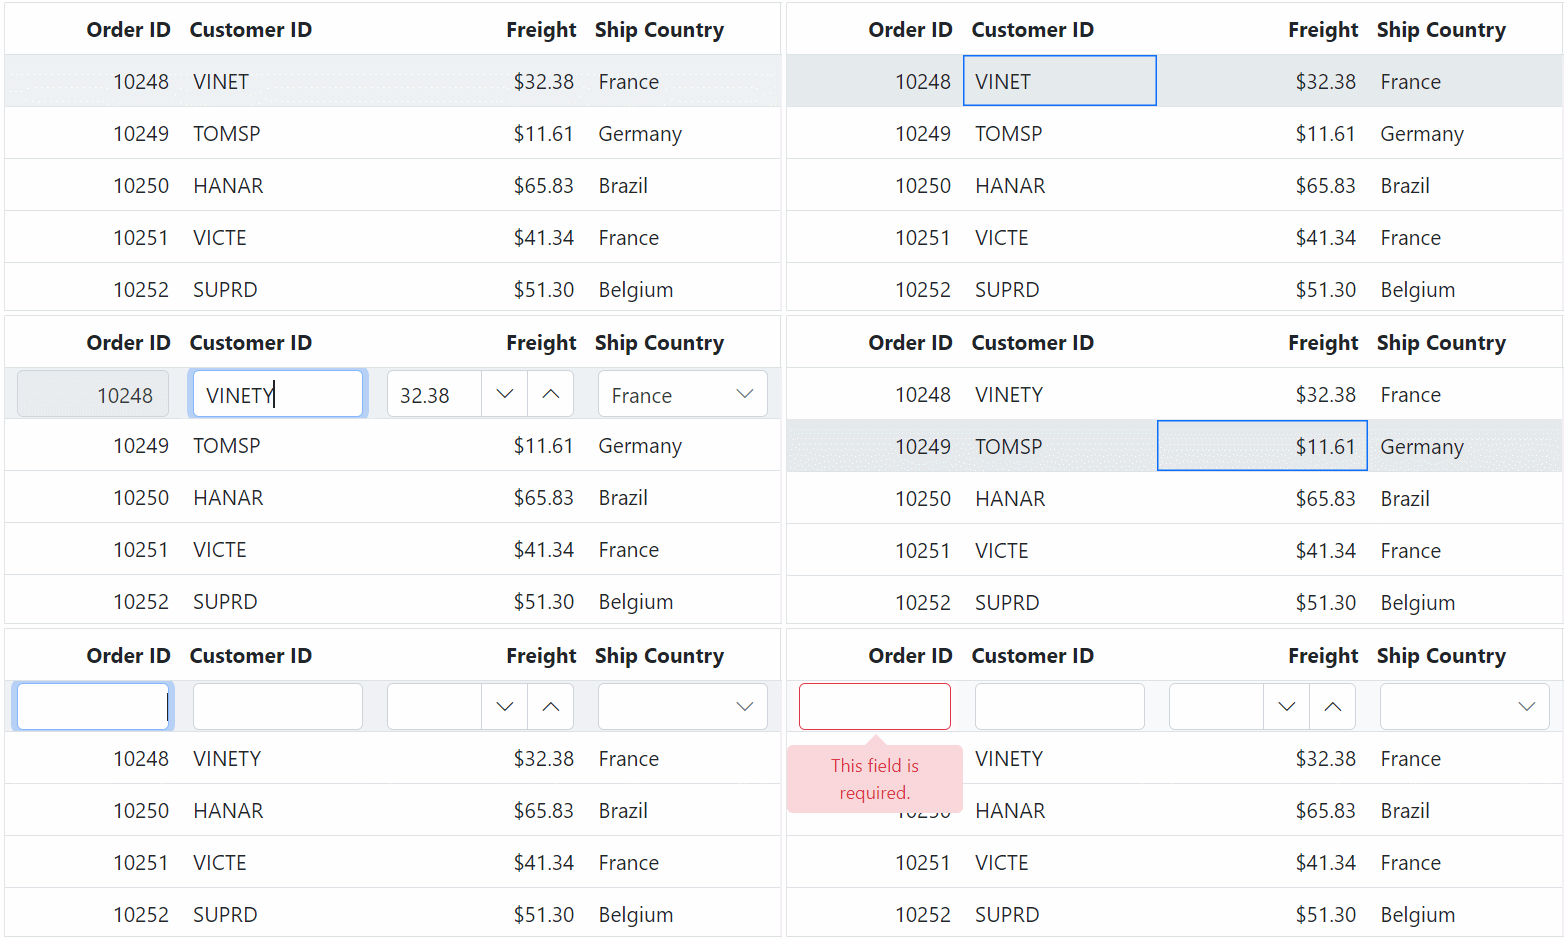
You can start the edit action either by double clicking the particular row or by selecting the required row and click on Edit button in the toolbar. Similarly, you can add a new record to grid either by clicking on Add button in the toolbar or on an external button which is bound to invoke the addRecord method of the grid, Save and Cancel while in edit mode is possible using respective toolbar icon in grid. Deletion of the record is possible by selecting the required row and click on Delete button in the toolbar.
@Html.EJS().Grid("Grid").DataSource((IEnumerable<object>)ViewBag.DataSource).Columns(col =>
{
    col.Field("OrderID").HeaderText("Order ID").IsPrimaryKey(true).Width("100").ValidationRules(new { required = true, number = true }).TextAlign(Syncfusion.EJ2.Grids.TextAlign.Right).Add();
    col.Field("CustomerID").HeaderText("Customer Name").ValidationRules(new { required = true}).Width("120").Add();
    col.Field("Freight").HeaderText("Freight").Width("120").EditType("numericedit").ValidationRules(new { required = true, min = 1, max = 1000 }).TextAlign(Syncfusion.EJ2.Grids.TextAlign.Right).Format("C2").Add();
    col.Field("ShipCountry").HeaderText("Ship Country").EditType("dropdownedit").Width("150").Add();
}).EditSettings(edit => { edit.AllowAdding(true).AllowEditing(true).AllowDeleting(true).Mode(Syncfusion.EJ2.Grids.EditMode.Normal); }).Render()
public IActionResult Index()
{
ViewBag.DataSource = OrderDetails.GetAllRecords();
return View();
}
- If
Columns.IsIdentityis enabled, then it will be considered as a read-only column when editing and adding a record.- You can disable editing for a particular column, by specifying
Columns.AllowEditingto false.- You can use the Insert key to add a new row to the grid and use the Delete key to delete the selected row from the grid.
Toolbar with edit option
The toolbar with edit option feature in the Grid component provides a built-in toolbar that includes various items for executing editing actions. This feature allows you to easily perform edit operations on the grid data, such as modifying cell values, updating changes, and canceling edits.
To enable this feature, you need to configure the Toolbar property of the Grid component. This property allows you to define the items that will be displayed in the grid toolbar. By including the relevant items like Edit, Add, Delete, Update, and Cancel within the Toolbar property, you can enable the edit options in the toolbar.
Here’s an example of how to enable the toolbar with edit option in the Grid:
@Html.EJS().Grid("EditToolbar").DataSource((IEnumerable<object>)ViewBag.DataSource).Columns(col =>
{
   col.Field("OrderID").HeaderText("Order ID").IsPrimaryKey(true).Width("120").TextAlign(Syncfusion.EJ2.Grids.TextAlign.Right).ValidationRules(new { required = true number=true }).Add();
   col.Field("CustomerID").HeaderText("Customer Name").Width("150").ValidationRules(new { required = true}).Add();
   col.Field("Freight").HeaderText("Freight").Width("120").Format("C2").EditType("numericedit").TextAlign(Syncfusion.EJ2.Grids.TextAlign.Right).ValidationRules(new { required = true, number=true }).Add();
   col.Field("ShipCountry").HeaderText("Ship Country").Width("150").EditType("dropdownedit").ValidationRules(new { required = true}).Add();

}).EditSettings(edit => { edit.AllowAdding(true).AllowEditing(true).AllowDeleting(true).Mode(Syncfusion.EJ2.Grids.EditMode.Normal); }).Toolbar(new List<string>() { "Add", "Edit", "Delete", "Update", "Cancel" }).Render()
public IActionResult Index()
{
ViewBag.DataSource = OrderDetails.GetAllRecords();
return View();
}
Disable editing for particular column
In Grid component, you have an option to disable editing for a specific column. This feature is useful when you want to prevent editing certain columns, such as columns that contain calculated values or read-only data.
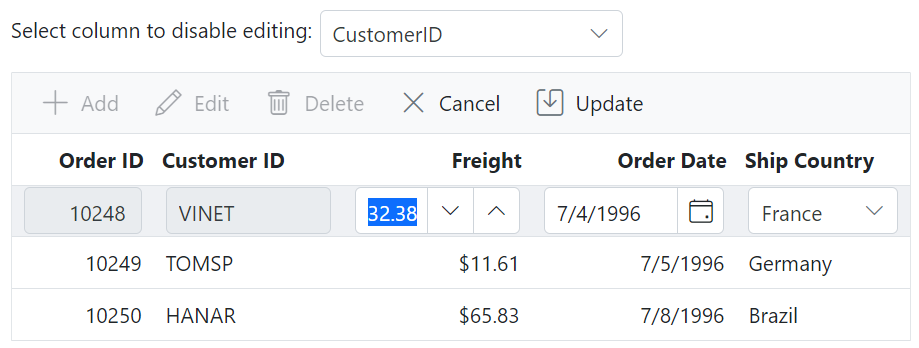
To disable editing for a particular column, you can use the AllowEditing property of the columns object. By setting this property to false, you can prevent editing for that specific column.
Here’s an example that demonstrates how to disable editing for the column in the Grid:
<div style="display: flex">
    <label style="margin: 3px 5px 5px 0px">Select column to disable editing: </label>
    <span style="height:fit-content; margin-bottom:10px">
        @Html.EJS().DropDownList("DropDown").Width("180px").DataSource(@ViewBag.dropdownData).Index(0).Change("change").Render()
    </span>
</div>

@Html.EJS().Grid("Grid").DataSource((IEnumerable<object>)ViewBag.DataSource).Columns(col =>
{
    col.Field("OrderID").HeaderText("Order ID").IsPrimaryKey(true).Width("120").ValidationRules(new { required = true, number = true }).TextAlign(Syncfusion.EJ2.Grids.TextAlign.Right).Add();
    col.Field("CustomerID").HeaderText("Customer ID").ValidationRules(new { required = true }).Width("120").Add();
    col.Field("Freight").HeaderText("Freight").Width("120").EditType("numericedit").ValidationRules(new { required = true }).TextAlign(Syncfusion.EJ2.Grids.TextAlign.Right).Format("C2").Add();
    col.Field("OrderDate").HeaderText("Order Date").Width("130").EditType("datepickeredit").Format("yMd").TextAlign(Syncfusion.EJ2.Grids.TextAlign.Right).Add();
    col.Field("ShipCountry").HeaderText("Ship Country").EditType("dropdownedit").ValidationRules(new { required = true }).Width("150").Add();
}).EditSettings(edit => { edit.AllowAdding(true).AllowEditing(true).AllowDeleting(true); }).Toolbar(new List<string>() { "Add", "Edit", "Delete", "Update", "Cancel" }).Render()

<script>
    var currentColumn;
    function change(args) {
        // Reset the allowEditing property of the previously selected column
        if (currentColumn) {
            currentColumn.allowEditing = true;
        }
        // Update the 'allowEditing' property for the selected column
        var grid = document.getElementById("Grid").ej2_instances[0];
        currentColumn = grid.getColumnByField(args.value);
        currentColumn.allowEditing = false;
    }
</script>
public IActionResult Index()
{
ViewBag.datasource = OrderDetails.GetAllRecords();
ViewBag.dropdownData = new string[] { "OrderID", "CustomerID", "Freight", "OrderDate", "ShipCountry" };
return View();
}
- If you have set the
IsPrimaryKeyproperty to true for a column, editing will be automatically disabled for that column.- You can disable the particular row using ActionBegin event. Please refer this link.
- You can disable the particular cell using CellEdit event. Please refer this link.
Editing template column
The editing template column feature in the Grid allows you to create custom editing templates for specific columns in the grid. This feature is particularly useful when you need to customize the editing experience for certain columns, such as using custom input controls or displaying additional information during editing.
To enable the editing template column feature, you need to define the Field property for the specific column in the grid’s configuration. The Field property maps the column to the corresponding field name in the data source, allowing you to edit the value of that field.
In the below demo, the ShipCountry column is rendered with the template.
@Html.EJS().Grid("Grid").DataSource((IEnumerable<object>)ViewBag.DataSource).Columns(col =>
{
   col.Field("OrderID").HeaderText("Order ID").IsPrimaryKey(true).ValidationRules(new { required = true, number = true }).Width("100").TextAlign(Syncfusion.EJ2.Grids.TextAlign.Right).Add();
   col.Field("CustomerID").HeaderText("Customer Name").ValidationRules(new { required = true }).Width("120").Add();
   col.Field("Freight").HeaderText("Freight").ValidationRules(new { required = true}).Width("120").Format("C2").TextAlign(Syncfusion.EJ2.Grids.TextAlign.Right).Add();
   col.Field("ShipCountry").HeaderText("Ship Country").Width("150").Template("#template").EditType("dropdownedit").Add();

}).AllowPaging().EditSettings(edit => { edit.AllowAdding(true).AllowEditing(true).AllowDeleting(true); }).Toolbar(new List<string>() { "Add", "Edit", "Delete", "Update", "Cancel" }).Render()

<script id="template" type="text/x-template">
    <a href="#">${ShipCountry}</a>
</script>
public IActionResult Index()
{
ViewBag.DataSource = OrderDetails.GetAllRecords();
return View();
}| Before Editing | After Editing |
|---|---|
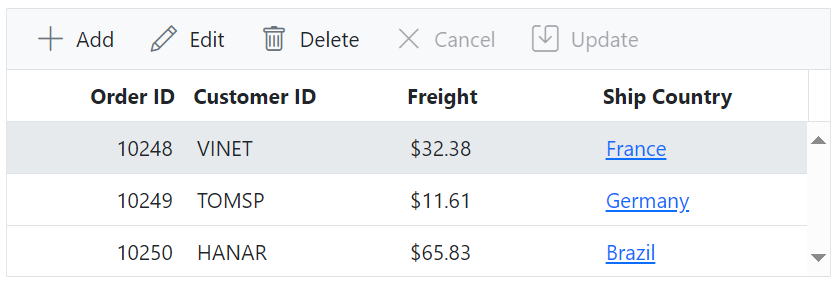 |
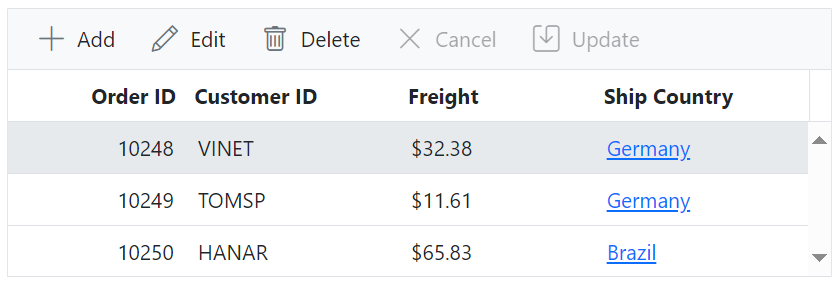 |
Customize delete confirmation dialog
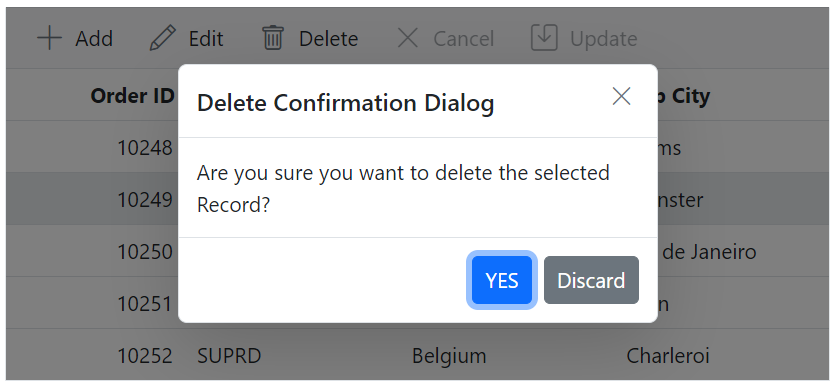
Customizing the delete confirmation dialog in Grid allows you to personalize the appearance, content, and behavior of the dialog that appears when you attempts to delete an item. You can modify properties like header, showCloseIcon, and height to tailor the edit dialog to your specific requirements. Additionally, you can override default localization strings to provide custom text for buttons or other elements within the dialog.
To customize the delete confirmation dialog, you can utilize the ToolbarClick event. This event is triggered when a toolbar item, such as the delete button, is clicked.
- To enable the confirmation dialog for the delete operation in the Grid, you can set the ShowDeleteConfirmDialog property of the
EditSettingsconfiguration to true.- You can refer the Grid Default text list for more localization.
The following example that demonstrates how to customize the delete confirmation dialog using the ToolbarClick event:
@Html.EJS().Grid("Grid").DataSource((IEnumerable<object>)ViewBag.DataSource).ToolbarClick("toolbarClick").Columns(col =>
{
   col.Field("OrderID").HeaderText("Order ID").IsPrimaryKey(true).Width("120").Add();
   col.Field("CustomerID").HeaderText("Customer ID").Width("150").Add();
   col.Field("ShipCountry").HeaderText("Ship Country").Width("120").Add();
   col.Field("ShipCity").HeaderText("Ship City").Width("130").Add();

}).EditSettings(edit => { edit.AllowAdding(true).AllowEditing(true).AllowDeleting(true); }).Toolbar(new List<string>() { "Add", "Edit", "Delete", "Update", "Cancel" }).Render()

<script>
    ej.base.L10n.load({
        'en-US': {
            grid: {
                'OKButton': 'YES',
                'CancelButton': 'Discard',
                'ConfirmDelete': 'Are you sure you want to delete the selected Record?'
            }
        }
    });
</script>
<script>
    function toolbarClick(args) {
        if (args.item.text === 'Delete') {
            var grid = document.getElementById('Grid').ej2_instances[0]
            var dialogObj = grid.editModule.dialogObj;
            dialogObj.header = 'Delete Confirmation Dialog';
            dialogObj.showCloseIcon = true;
        }
    }
</script>
public IActionResult Index()
{
ViewBag.DataSource = OrderDetails.GetAllRecords();
return View();
}
Update boolean column value with a single click
The Syncfusion® Grid allows you to update a boolean column value with a single click in the normal mode of editing. This feature streamlines the process of toggling boolean values within the grid, enhancing interaction and efficiency. This can be achieved through the use of the column template feature.
In the following sample, the CheckBox component is rendered as a template in the Verified column to make it editable with a single click.
@Html.EJS().Grid("Grid").DataSource((IEnumerable<object>)ViewBag.DataSource).QueryCellInfo("queryCellInfo").Columns(col =>
{
   col.Field("OrderID").HeaderText("Order ID").IsPrimaryKey(true).ValidationRules(new { required = true, number = true }).Width("120").TextAlign(Syncfusion.EJ2.Grids.TextAlign.Right).Add();
   col.Field("CustomerID").HeaderText("Customer ID").ValidationRules(new { required = true }).Width("120").Add();
   col.Field("OrderDate").HeaderText("Order Date").ValidationRules(new { required = true}).Width("130").EditType("datepickeredit").Format("M/d/yy").TextAlign(Syncfusion.EJ2.Grids.TextAlign.Right).Add();
   col.Field("Freight").HeaderText("Freight").ValidationRules(new { required = true}).Width("90").Format("C2").TextAlign(Syncfusion.EJ2.Grids.TextAlign.Right).Add();
   col.Field("Verified").HeaderText("Verified").ValidationRules(new { required = true}).Template("#template").Width("90").Add();

}).AllowPaging().EditSettings(edit => { edit.AllowAdding(true).AllowEditing(true).AllowDeleting(true); }).Toolbar(new List<string>() { "Add", "Edit", "Delete", "Update", "Cancel" }).Render()

<script type="text/x-template" id="template">
    <input type="checkbox" id="checkbox">
</script>
<script>
    function queryCellInfo(args) {
        if (args.column.headerText === 'Verified') {
            var checkbox = new ej.buttons.CheckBox
                ({
                    checked: args.data.Verified
                });
            checkbox.appendTo(args.cell.querySelector('input'));
        }
    }
</script>
public IActionResult Index()
{
ViewBag.DataSource = OrderDetails.GetAllRecords();
return View();
}
Edit enum column
The Syncfusion® Grid provides a feature that allows you to edit enum type data in a grid column. This is particularly useful when you need to edit enumerated list data efficiently.
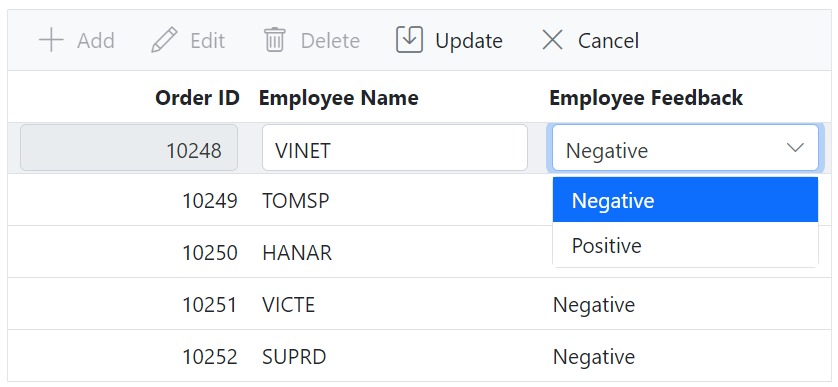
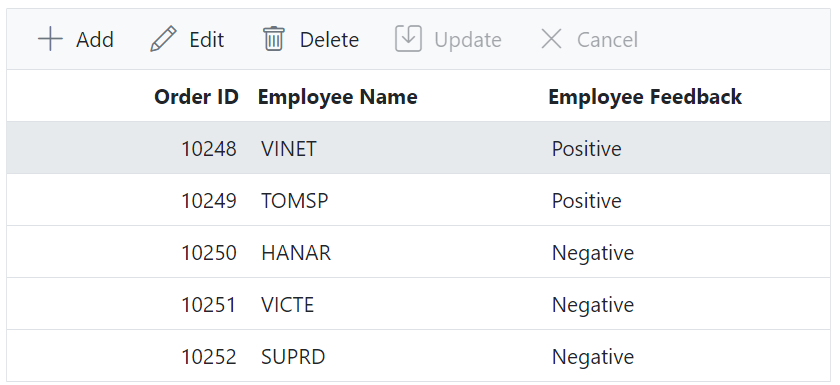
In the following example, the DropDownList component is rendered within the cell edit template for the Employee Feedback column using edit property.
@Html.EJS().Grid("Grid").DataSource((IEnumerable<object>)ViewBag.DataSource).ActionBegin("actionBegin").ActionComplete("actionComplete").Columns(col =>
    {
        col.Field("OrderID").HeaderText("Order ID").IsPrimaryKey(true).TextAlign(Syncfusion.EJ2.Grids.TextAlign.Right).Width(100).Add();
        col.Field("CustomerID").HeaderText("Employee Name").TextAlign(Syncfusion.EJ2.Grids.TextAlign.Left).Width(120).Add();
        col.Field("FeedbackDetails").HeaderText("Employee Feedback").TextAlign(Syncfusion.EJ2.Grids.TextAlign.Left).Width(120).Edit(new { create = "create", read = "read", write = "write" }).Add();
}).EditSettings(edit => edit.AllowEditing(true).AllowAdding(true).AllowDeleting(true)).Toolbar(new List<string>() { "Add", "Edit", "Delete", "Update", "Cancel" }).Render()

<script>
    var dropDownObj;
    var dropDownElem;
    var orderData;
    var Feedback = { Positive: 0, Negative: 1 };

    var dropDownEnumValue = Object.keys(Feedback).filter(
        (key) => !isNaN(Number(Feedback[key]))
    );

    function create(args) {
        dropDownElem = document.createElement('input');
        return dropDownElem;
    }
    function read(args) {
        return dropDownObj.text;
    }
    function write(args) {
        dropDownObj = new ej.dropdowns.DropDownList({
            dataSource: dropDownEnumValue,
            fields: { text: 'FeedbackDetails', value: 'FeedbackDetails' },
            value: orderData.FeedbackDetails, // Check if orderData is defined
            change: function () { // Update orderData when the dropdown selection changes
                if (dropDownObj && orderData) {
                    orderData.FeedbackDetails = dropDownObj.value;
                }
            }
        });
        dropDownObj.appendTo(dropDownElem);
        args.element.value = args.rowData.FeedbackDetails;
    }

    function actionComplete(args) {
        if (args.requestType === 'beginEdit') {
            var grid = document.getElementById("Grid").ej2_instances[0];
            var rowData = grid.getCurrentViewRecords()[args.rowIndex];
            dropDownObj.value = rowData.FeedbackDetails;
            dropDownObj.dataBind();
        }
    }

    function actionBegin(args) {
        if (args.requestType === 'beginEdit' || args.requestType === 'add') {
            orderData = Object.assign({}, args.rowData);
        }
        if (args.requestType === 'save') {
            (args.data)['FeedbackDetails'] = orderData['FeedbackDetails'];
        }
    }
</script>
public IActionResult Index()
{
ViewBag.DataSource = OrderDetails.GetAllRecords();
return View();
}| On Editing | After Editing |
|---|---|
 |
 |
Edit complex column
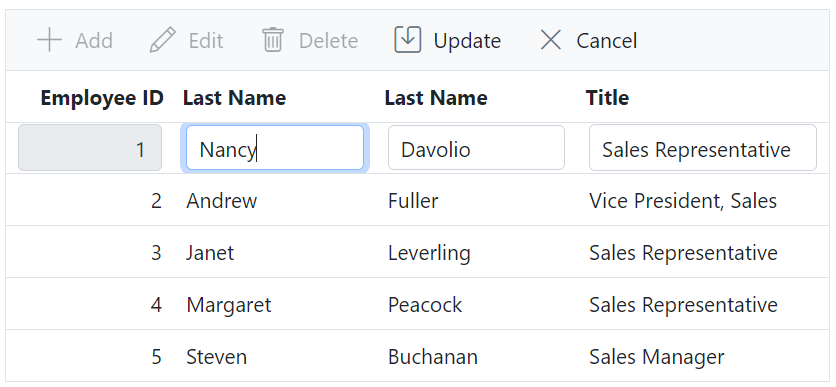
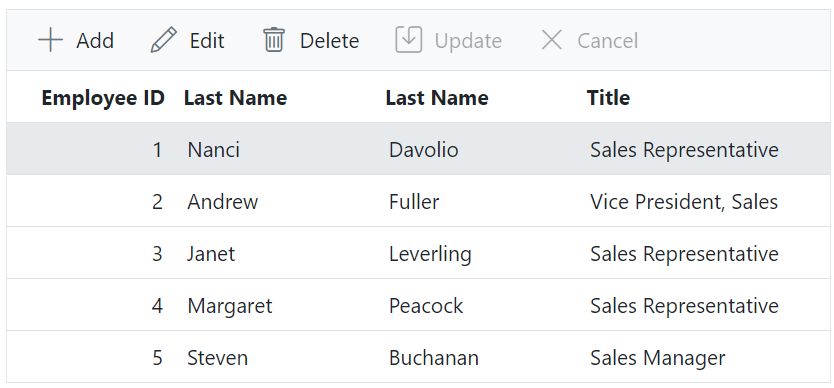
The edit template for complex column in Grid is used to customize the editing experience when dealing with complex data structures. This capability is particularly useful for handling nested data objects within grid columns. By default, the grid binds complex data to column fields using the dot (.) operator. However, when you render custom elements, such as input fields, in the edit template for a complex column, you must use the (___) underscore operator instead of the dot (.) operator to bind the complex object.
In the following sample, the input element is rendered in the edit template of the FirstName and LastName column. The edited changes can be saved using the name property of the input element. Since the complex data is bound to the FirstName and LastName column, The name property should be defined as Name__FirstName** and **Name__LastName, respectively, instead of using the dot notation (Name.FirstName and Name.LastName).
@Html.EJS().Grid("Grid").DataSource((IEnumerable<object>)ViewBag.ComplexDataSource).Columns(col =>
{
    col.Field("EmployeeID").HeaderText("Employee ID").TextAlign(Syncfusion.EJ2.Grids.TextAlign.Right).Width("120").Add();
    col.Field("Name.FirstName").HeaderText("First Name").EditTemplate("#firstNameEditTemplate").Width("200").Add();
    col.Field("Name.LastName").HeaderText("Last Name").EditTemplate("#lastNameEditTemplate").Width("200").Add();
    col.Field("Title").HeaderText("Title").Width("150").Add();
}).Render()
<script id="firstNameEditTemplate">
    @{
       <input class="e-input" type="text" name="Name___FirstName" id="Name___FirstName" value="${Name.FirstName}" />
    }
</script>
<script id="lastNameEditTemplate">
    @{
        <input class="e-input" type="text" name="Name___LastName" id="Name___LastName" value="${Name.LastName}" />
    }
</script>
public IActionResult Index()
{
ViewBag.ComplexDataSource = ComplexData.GetAllRecords();
return View();
}| On Editing | After Editing |
|---|---|
 |
 |
Edit foreign key column
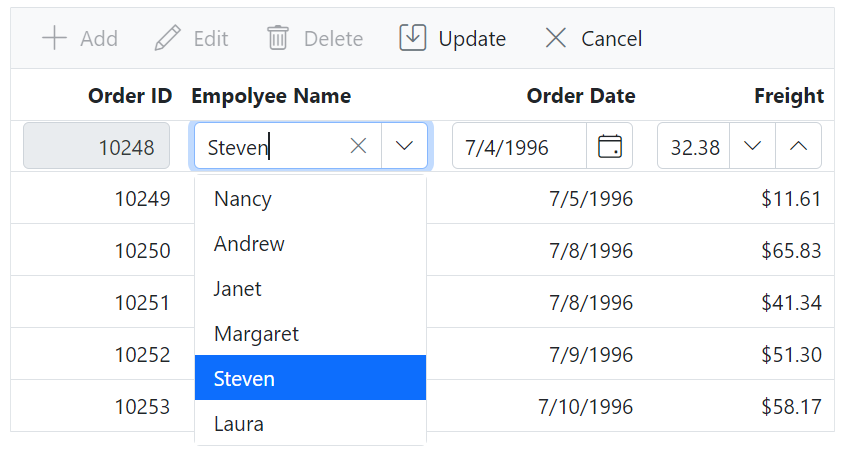
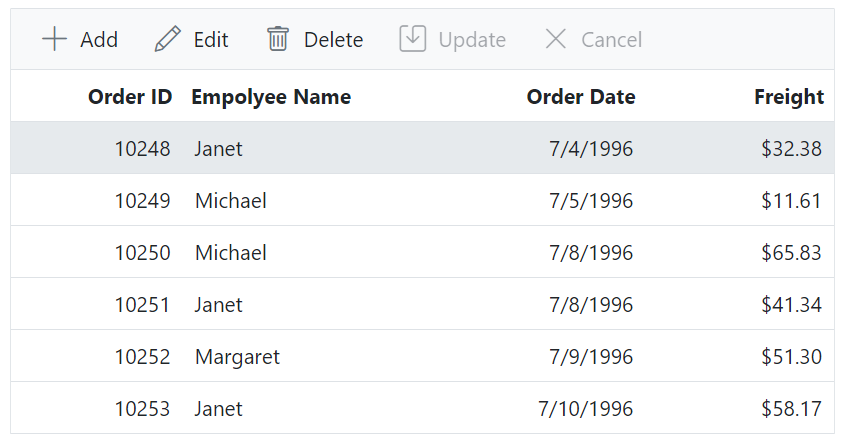
The Syncfusion® Grid offers a powerful editing feature for foreign key columns, enhancing the default rendering of the DropDownList component during editing. This flexibility is particularly useful when you need to customize the editor for foreign key columns. By default, the Syncfusion® Grid renders the DropDownList component as the editor for foreign key columns during editing. However, you can enhance and customize this behavior by leveraging the cell edit template for the column using edit property. The edit property allows you to specify a cell edit template that serves as an editor for a particular column.
In the following code example, the Employee Name is a foreign key column. When editing, the ComboBox component is rendered instead of DropDownList.
@Html.EJS().Grid("Grid").DataSource((IEnumerable<object>)ViewBag.DataSource).Columns(col =>
    {
        col.Field("OrderID").HeaderText("Order ID").IsPrimaryKey(true).Width("120").TextAlign(Syncfusion.EJ2.Grids.TextAlign.Right).Add();
        col.Field("EmployeeID").HeaderText("Employee Name").ForeignKeyValue("FirstName").DataSource((IEnumerable<object>)ViewBag.EmployeeDataSource).Edit(new { create = "create", read = "read", destroy = "destroy", write = "write" }).Width("150").Add();
        col.Field("OrderDate").HeaderText("Order Date").Width("130").EditType("datepickeredit").Format("yMd").TextAlign(Syncfusion.EJ2.Grids.TextAlign.Right).Add();
        col.Field("Freight").HeaderText("Freight").Width("120").EditType("numericedit").TextAlign(Syncfusion.EJ2.Grids.TextAlign.Right).Format("C2").Add();
}).EditSettings(edit => edit.AllowEditing(true).AllowAdding(true).AllowDeleting(true)).Toolbar(new List<string>() { "Add", "Edit", "Delete", "Update", "Cancel" }).Render()

<script>
    var comboBoxData = [
        { FirstName: 'Nancy', EmployeeID: 1 },
        { FirstName: 'Andrew', EmployeeID: 6 },
        { FirstName: 'Janet', EmployeeID: 3 },
        { FirstName: 'Margaret', EmployeeID: 4 },
        { FirstName: 'Steven', EmployeeID: 5 },
        { FirstName: 'Laura', EmployeeID: 8 }
    ]
    var comboBoxObj;
    function create(args) {
        return ej.base.createElement('input');
    }
    function read(args) {
        var employeeData = @Html.Raw(JsonConvert.SerializeObject(ViewBag.EmployeeDataSource));
        var value = new ej.data.DataManager(employeeData).executeLocal(new ej.data.Query().where('FirstName', 'equal', comboBoxObj.value));
        return value.length && value[0]['EmployeeID']; // to convert foreign key value to local value.
    }
    function destroy(){
        // to destroy the custom control.
        comboBoxObj.destroy();
    }
    function write(args) {
        comboBoxObj = new ej.dropdowns.ComboBox({
            dataSource: comboBoxData,
            fields: { value: args.column.foreignKeyValue },
            value: args.foreignKeyData[0][args.column.foreignKeyValue]
        });
        comboBoxObj.appendTo(args.element);
    }
</script>
public IActionResult Index()
{
ViewBag.DataSource = OrderDetails.GetAllRecords();
ViewBag.EmployeeDataSource = EmployeeDetails.GetAllRecords();
return View();
}| On Editing | After Editing |
|---|---|
 |
 |
How to perform CRUD action externally
Performing CRUD (Create, Read, Update, Delete) actions externally in the Syncfusion® Grid allows you to manipulate grid data outside the grid itself. This can be useful in scenarios where you want to manage data operations programmatically.
Using separate toolbar
The Syncfusion® Grid enables external CRUD operations, allowing you to efficiently manage data manipulation within the grid. This capability is particularly useful when you need to manage data operations using a separate toolbar.
To perform CRUD operations externally, the following methods are available:
addRecord - To add a new record. If no data is passed then add form will be shown.
startEdit - To edit the selected row.
deleteRecord - To delete a selected row.
endEdit - If the grid is in editable state, then you can save a record by invoking this method.
closeEdit - To cancel the edited state.
The following example demonstrates the integration of the Syncfusion® Grid with a separate toolbar for external CRUD operations. The toolbar contains buttons for Add, Edit, Delete, Update, and Cancel.
@(Html.EJS().Toolbar("Toolbar")
    .Items(new List<ToolbarItem> {
        new ToolbarItem { Id="add", Text = "Add" },
        new ToolbarItem { Id="edit", Text = "Edit" },
        new ToolbarItem { Id="delete", Text = "Delete"},
        new ToolbarItem { Id="update", Text = "Update" },
        new ToolbarItem { Id="cancel", Text = "Cancel" },
    })
    .Clicked("onToolbarClick")
    .Render()
)

@Html.EJS().Grid("EditToolbar").DataSource((IEnumerable<object>)ViewBag.DataSource).Columns(col =>
{
   col.Field("OrderID").HeaderText("Order ID").IsPrimaryKey(true).Width("120").TextAlign(Syncfusion.EJ2.Grids.TextAlign.Right).ValidationRules(new { required = true number=true }).Add();
   col.Field("CustomerID").HeaderText("Customer ID").Width("120").ValidationRules(new { required = true}).Add();
   col.Field("Freight").HeaderText("Freight").ValidationRules(new { required = true, number=true }).Width("120").Format("C2").EditType("numericedit").TextAlign(Syncfusion.EJ2.Grids.TextAlign.Right).Add();
   col.Field("OrderDate").HeaderText("Order Date").ValidationRules(new { required = true }).Width("130").EditType("datepickeredit").Format("yMd").TextAlign(Syncfusion.EJ2.Grids.TextAlign.Right).Add();
   col.Field("ShipCountry").HeaderText("Ship Country").Width("150").EditType("dropdownedit").ValidationRules(new { required = true}).Add();

}).EditSettings(edit => { edit.AllowAdding(true).AllowEditing(true).AllowDeleting(true).Mode(Syncfusion.EJ2.Grids.EditMode.Normal); }).Toolbar(new List<string>() { "Add", "Edit", "Delete", "Update", "Cancel" }).Render()

<script>
   function onToolbarClick(args) {
      var grid = document.getElementById("Grid").ej2_instances[0];
      switch (args.item.id) {
         case 'add':
            grid.addRecord();
            break;
         case 'edit':
            grid.startEdit();
            break;
         case 'delete':
            grid.deleteRecord();
            break;
         case 'update':
            grid.endEdit();
            break;
         case 'cancel':
            grid.closeEdit();
            break;
      }
   }
</script>
public IActionResult Index()
{
ViewBag.DataSource = OrderDetails.GetAllRecords();
return View();
}
Using external form
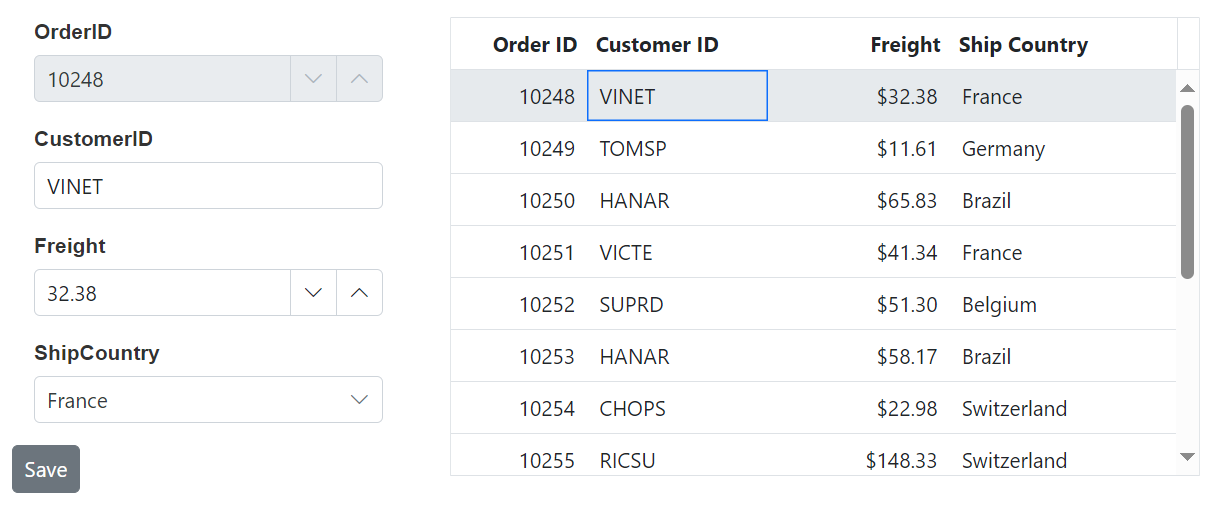
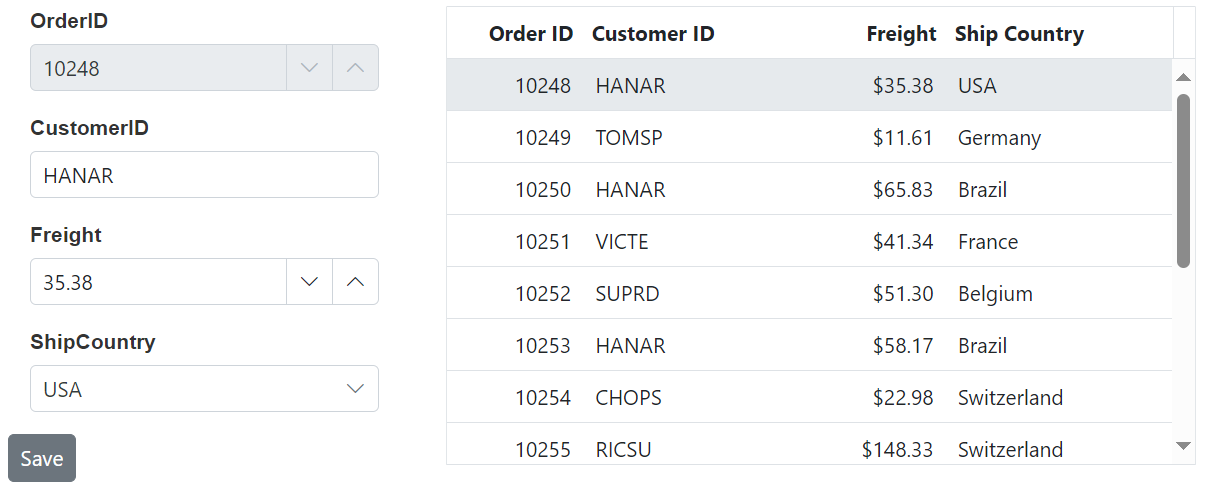
Performing the edit operation in a custom external form in the Syncfusion® Grid is a valuable feature when you need to customize the edit operation within a separate form rather than the default in-grid editing.
To enable the use of an external form for editing in Syncfusion® Grid, you can make use of the RowSelected event. This property specifies whether the edit operation should be triggered when a row is selected.
In the following example, it demonstrates how to edit the form using an external form by utilizing the RowSelected event:
<div id="container">
    <div class="row">
        <div class="col-xs-6 col-md-3">
            <div>
                <div class="form-row">
                    <div class="form-group col-md-12">
                        <label for="orderedit">OrderID</label>
                        <input id="order" class="form-control" type="text" disabled />
                    </div>
                </div>
                <div class="form-row">
                    <div class="form-group col-md-12">
                        <label for="customeredit">CustomerID</label>
                        <input id="customer" type="text" tabindex="2" />
                    </div>
                </div>
                <div class="form-row">
                    <div class="form-group col-md-12">
                        <label for="freightedit">Freight</label>
                        <input id="freight" type="text">
                    </div>
                </div>
                <div class="form-row">
                    <div class="form-group col-md-12">
                        <label for="countryedit">ShipCountry</label>
                        <input id="country" type="text" tabindex="1" />
                    </div>
                </div>
            </div>
            <button class="e-btn" id="save">Save</button>
        </div>
        <div class="col-xs-6 col-md-9">
            @Html.EJS().Grid("Grid").DataSource((IEnumerable<object>)ViewBag.DataSource).RowSelected("rowSelected").Height("315").Width(500).Columns(col =>
            {
               col.Field("OrderID").HeaderText("Order ID").Width("120").TextAlign(Syncfusion.EJ2.Grids.TextAlign.Right).Add();
               col.Field("CustomerID").HeaderText("Customer ID").Width("120").Add();
               col.Field("Freight").HeaderText("Freight").Width("120").TextAlign(Syncfusion.EJ2.Grids.TextAlign.Right).Format("C2").Add();
               col.Field("ShipCountry").HeaderText("Ship Country").Width("120").Add();
            }).EditSettings(edit => { edit.AllowEditing(true); }).Render()
        </div>
    </div>
</div>

<script>
    class Order {
        constructor() {
            this.OrderID = null;
            this.CustomerID = null;
            this.Freight = null;
            this.ShipCountry = null;
        }
    }
    var dropDownData = [
        { shipCountry: 'Germany' },
        { shipCountry: 'Brazil' },
        { shipCountry: 'France' },
        { shipCountry: 'Belgium' },
        { shipCountry: 'Switzerland' },
        { shipCountry: 'Venezuela' },
        { shipCountry: 'USA' },
        { shipCountry: 'Mexico' },
        { shipCountry: 'Italy' },
        { shipCountry: 'Sweden' },
        { shipCountry: 'Finland' },
        { shipCountry: 'Spain' },
        { shipCountry: 'Canada' },
        { shipCountry: 'Portugal' },
        { shipCountry: 'Denmark' },
        { shipCountry: 'Austria' },
        { shipCountry: 'UK' },
        { shipCountry: 'Ireland' },
        { shipCountry: 'Norway' },
        { shipCountry: 'Argentina' },
    ];

    var selectedProduct = new Order();

    var orderIdInput = new ej.inputs.NumericTextBox({
        format: '###.##',
        value: selectedProduct.OrderID,
    });
    orderIdInput.appendTo('#order');

    var customerIdInput = new ej.inputs.TextBox({
        value: selectedProduct.CustomerID,
        change: function () {
            selectedProduct.CustomerID = customerIdInput.value;
        }
    });
    customerIdInput.appendTo('#customer');

    var freightInput = new ej.inputs.NumericTextBox({
        value: selectedProduct.Freight,
        change: function () {
            selectedProduct.Freight = freightInput.value;
        }
    });
    freightInput.appendTo('#freight');

    var shipCountryInput = new ej.dropdowns.DropDownList({
        dataSource: dropDownData,
        fields: { text: 'shipCountry', value: 'shipCountry' },
        value: selectedProduct.ShipCountry,
        change: function () {
            selectedProduct.ShipCountry = shipCountryInput.value;
        }
    });
    shipCountryInput.appendTo('#country');


    document.getElementById('save').onclick = function () {
        var grid = document.getElementById("Grid").ej2_instances[0];
        var index = grid.getSelectedRowIndexes()[0];
        grid.updateRow(index, selectedProduct);
    };

    function rowSelected(args) {
        selectedProduct = Object.assign({}, args.data);
        orderIdInput.value = selectedProduct.OrderID;
        customerIdInput.value = selectedProduct.CustomerID;
        freightInput.value = selectedProduct.Freight;
        shipCountryInput.value = selectedProduct.ShipCountry;
    }
</script>
public IActionResult Index()
{
ViewBag.DataSource = OrderDetails.GetAllRecords();
return View();
}| On Editing | After Editing |
|---|---|
 |
 |
Troubleshoot editing works only for first row
The Editing functionalities can be performed based upon the primary key value of the selected row. If IsPrimaryKey property is not defined in the grid, then edit or delete action take places the first row. To overcome this, ensure that you establish the IsPrimaryKey property as true for the relevant column responsible for holding the unique identifier for each row.
How to make a grid column always editable
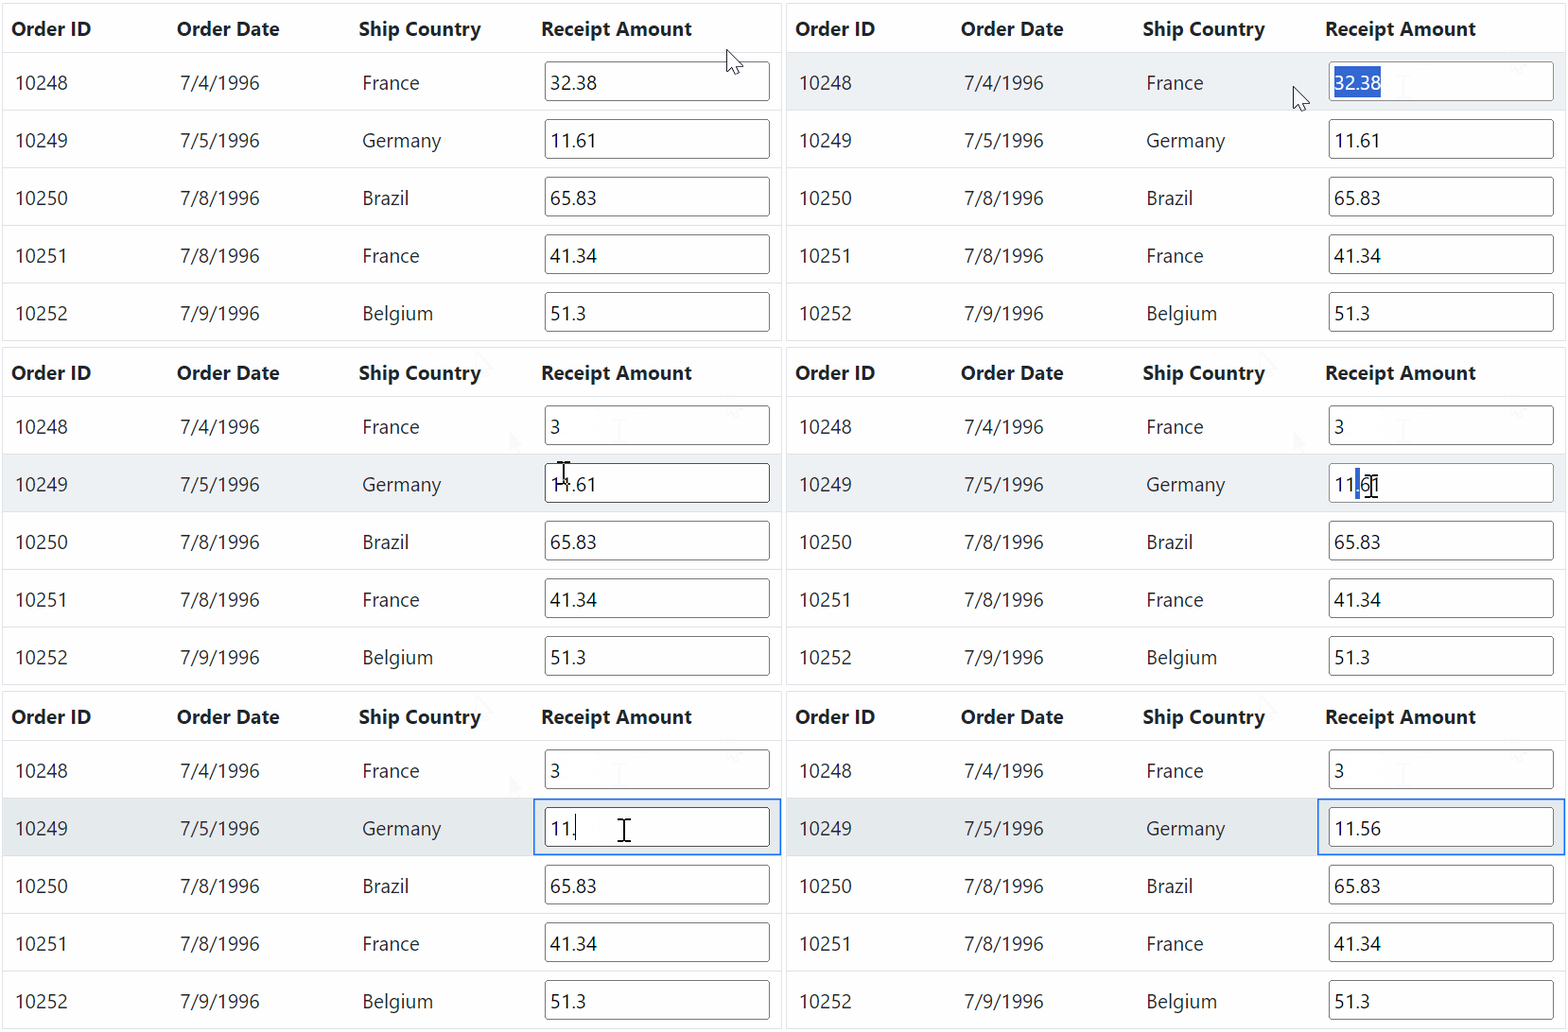
To make a Grid column always editable, you can utilize the column template feature of the Grid. This feature is useful when you want to edit a particular column’s values directly within the grid.
In the following example, the textbox is rendered in the Freight column using a column template. The keyup event for the Grid is bound using the Created event of the Grid, and the edited changes are saved in the data source using the updateRow method of the Grid.
@Html.EJS().Grid("Grid").DataSource((IEnumerable<object>)ViewBag.DataSource).Created("created").Columns(col =>
{
    col.Field("OrderID").HeaderText("Order ID").Width("120").TextAlign(Syncfusion.EJ2.Grids.TextAlign.Right).IsPrimaryKey(true).Add();
    col.Field("OrderDate").HeaderText("Order Date").TextAlign(Syncfusion.EJ2.Grids.TextAlign.Right).Format("yMd").Width("130").Add();
    col.Field("ShipCountry").HeaderText("Ship Country").Width("140").Add();
    col.Field("Freight").HeaderText("Receipt Amount").Width("150").Template("#template").Add();

}).Render()
<script id="template" type="text/x-template">
    <input id='${OrderID}' value='${Freight}' class='templateinput' type='text' style='width: 100%'>
</script>

<script>
    function created() {
        document.getElementById('Grid').ej2_instances[0].element.addEventListener('keyup', function (e) { // Bind the keyup event for the grid.
            if (e.target.classList.contains('templateinput')) { // Based on this condition, you can find whether the target is an input element or not.
                var row = ej.grids.parentsUntil(e.target, 'e-row');
                var rowIndex = row.rowIndex; // Get the row index.
                var uid = row.getAttribute('data-uid');
                var rowData = document.getElementById('Grid').ej2_instances[0].getRowObjectFromUID(uid).data; // Get the row data.
                rowData.Freight = e.target.value; // Update the new value for the corresponding column.
                document.getElementById('Grid').ej2_instances[0].updateRow(rowIndex, rowData); // Update the modified value in the row data.
            }
        });
    }
</script>
public IActionResult Index()
{
ViewBag.DataSource = OrderDetails.GetAllRecords();
return View();
}
See Also
- Update column value based on other column values in ASP.NET MVC Grid
- Populate field depending the value selected from another field in ASP.NET MVC Grid
- How to apply two different validation in same column in ASP.NET MVC Grid
- Using Uploader and Textarea in the Grid when edit record in ASP.NET MVC Grid