Editor window and quick popups
10 Jul 202624 minutes to read
Scheduler makes use of popups and dialog to display the required notifications, as well as includes an editor window with event fields for making the appointment creation and editing process easier. You can also easily customize the editor window and the fields present in it, and can also apply validations on those fields.
Event editor
The editor window usually opens on the Scheduler, when a cell or event is double clicked. When a cell is double clicked, the detailed editor window opens in “Add new” mode, whereas when an event is double clicked, the same is opened in an “Edit” mode.
In mobile devices, you can open the detailed editor window in edit mode by clicking the edit icon on the popup, that opens on single tapping an event. You can also open it in add mode by single tapping a cell, which will display a + indication, clicking on it again will open the editor window.
NOTE
You can also prevent the editor window from opening, by rendering Scheduler in a
readonlymode or by doing code customization within thepopupOpenevent.
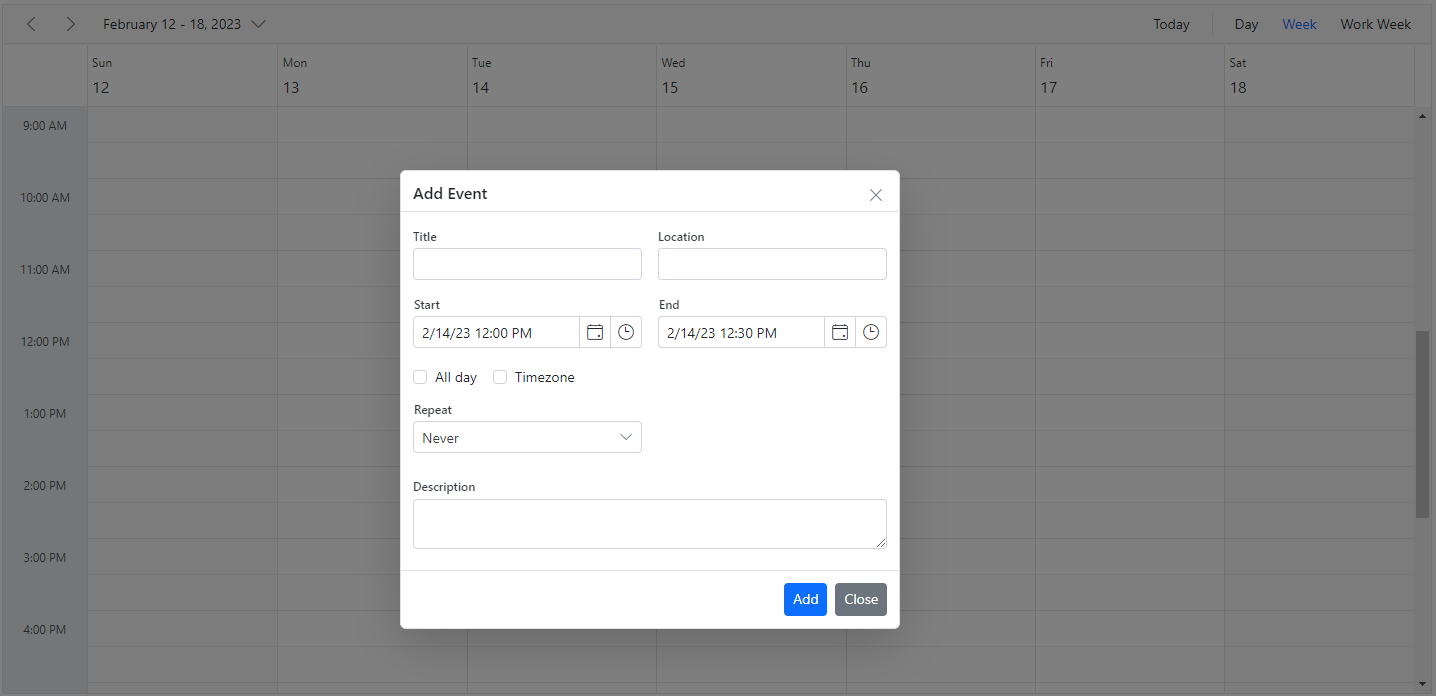
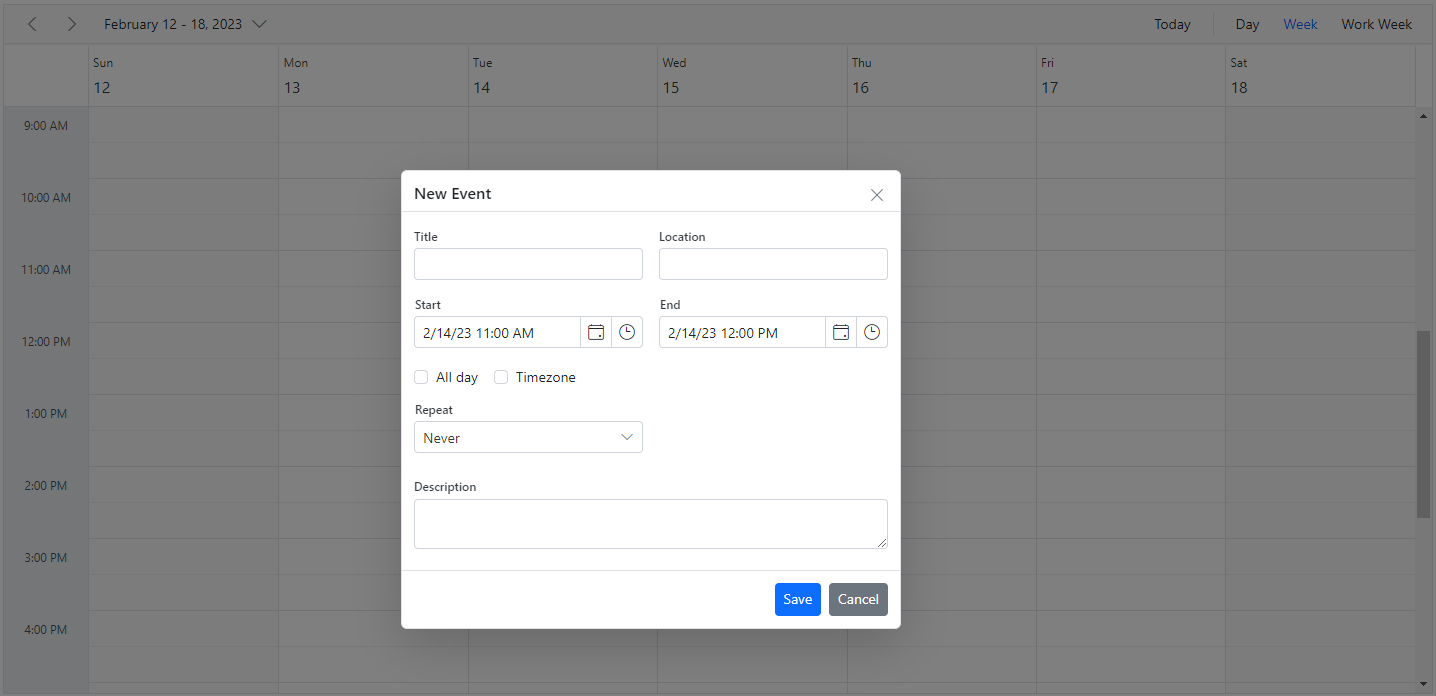
How to change the editor window header title and text of footer buttons
You can change the header title and the text of buttons displayed at the footer of the editor window by changing the appropriate localized word collection used in the Scheduler.
@using Syncfusion.EJ2.Schedule

<ejs-schedule id="schedule" height="550" selectedDate="new DateTime(2023, 2, 15)" views="@ViewBag.view">
    <e-schedule-eventsettings dataSource="@ViewBag.datasource"></e-schedule-eventsettings>
</ejs-schedule>

<script type="text/javascript">
    var L10n = ej.base.L10n;
    L10n.load({
        'en-US': {
            'schedule': {
                'saveButton': 'Add',
                'cancelButton': 'Close',
                'deleteButton': 'Remove',
                'newEvent': 'Add Event',
            },
        }
    });
</script>
public ActionResult Index()
{
ViewBag.datasource = GetScheduleData();
List<ScheduleView> viewOption = new List<ScheduleView>()
{
new ScheduleView { Option = Syncfusion.EJ2.Schedule.View.Day },
new ScheduleView { Option = Syncfusion.EJ2.Schedule.View.Week },
new ScheduleView { Option = Syncfusion.EJ2.Schedule.View.WorkWeek }
};
ViewBag.view = viewOption;
return View();
}
public List<AppointmentData> GetScheduleData()
{
List<AppointmentData> appData = new List<AppointmentData>();
appData.Add(new AppointmentData
{
Id = 1,
Subject = "Meeting",
StartTime = new DateTime(2023, 2, 15, 10, 0, 0),
EndTime = new DateTime(2023, 2, 15, 12, 30, 0),
IsAllDay = false,
});
return appData;
}
public class AppointmentData
{
public int Id { get; set; }
public string Subject { get; set; }
public DateTime StartTime { get; set; }
public DateTime EndTime { get; set; }
public bool IsAllDay { get; set; }
}
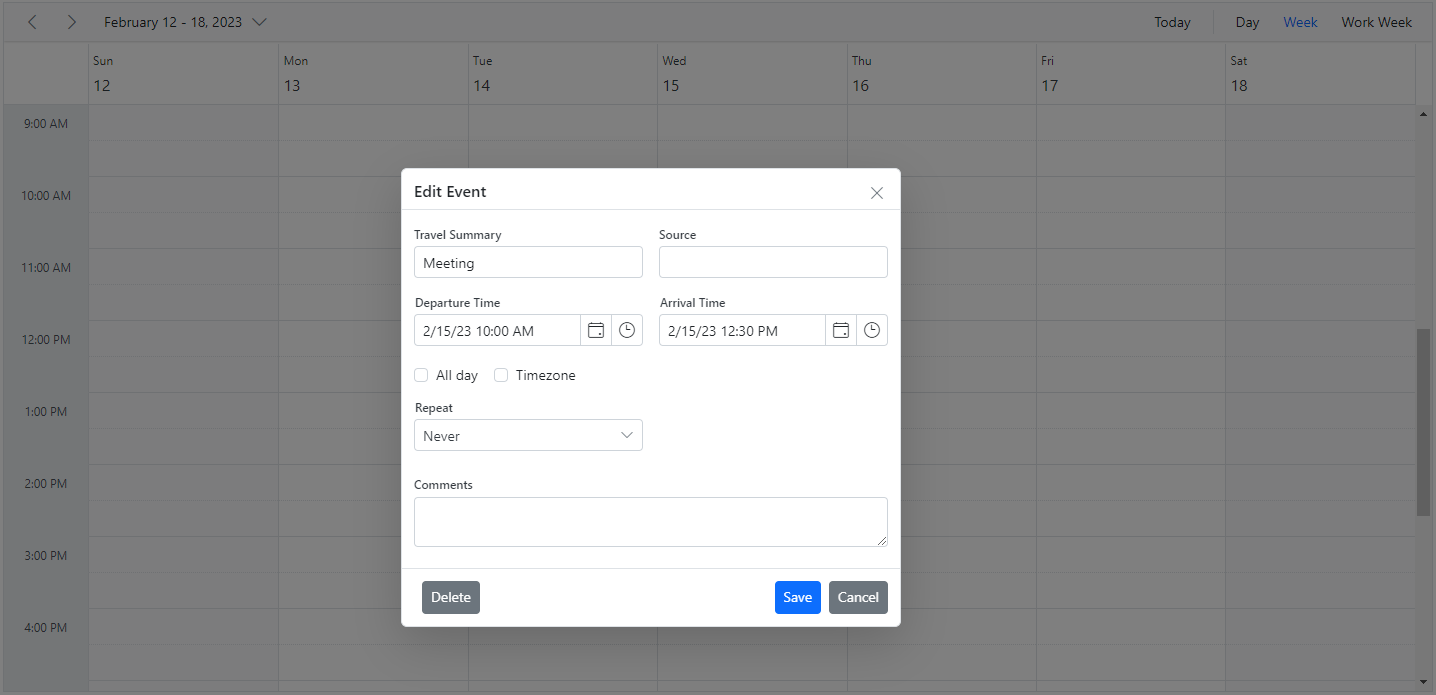
How to change the label text of default editor fields
To change the default labels such as Subject, Location and other field names in the editor window, make use of the title property available within the field option of e-schedule-eventsettings.
@using Syncfusion.EJ2.Schedule

<ejs-schedule id="schedule" height="550" selectedDate="new DateTime(2023, 2, 15)" views="@ViewBag.view">
    <e-schedule-eventsettings dataSource="@ViewBag.datasource">
        <e-eventsettings-fields>
            <e-field-subject name="Subject" title="Travel Summary"></e-field-subject>
            <e-field-location name="Location" title="Source"></e-field-location>
            <e-field-description name="Description" title="Comments"></e-field-description>
            <e-field-starttime name="StartTime" title="Departure Time"></e-field-starttime>
            <e-field-endtime name="EndTime" title="Arrival Time"></e-field-endtime>
        </e-eventsettings-fields>
    </e-schedule-eventsettings>
</ejs-schedule>
public ActionResult Index()
{
ViewBag.datasource = GetScheduleData();
List<ScheduleView> viewOption = new List<ScheduleView>()
{
new ScheduleView { Option = Syncfusion.EJ2.Schedule.View.Day },
new ScheduleView { Option = Syncfusion.EJ2.Schedule.View.Week },
new ScheduleView { Option = Syncfusion.EJ2.Schedule.View.WorkWeek }
};
ViewBag.view = viewOption;
return View();
}
public List<AppointmentData> GetScheduleData()
{
List<AppointmentData> appData = new List<AppointmentData>();
appData.Add(new AppointmentData
{
Id = 1,
Subject = "Meeting",
StartTime = new DateTime(2023, 2, 15, 10, 0, 0),
EndTime = new DateTime(2023, 2, 15, 12, 30, 0),
IsAllDay = false,
});
return appData;
}
public class AppointmentData
{
public int Id { get; set; }
public string Subject { get; set; }
public DateTime StartTime { get; set; }
public DateTime EndTime { get; set; }
public bool IsAllDay { get; set; }
}
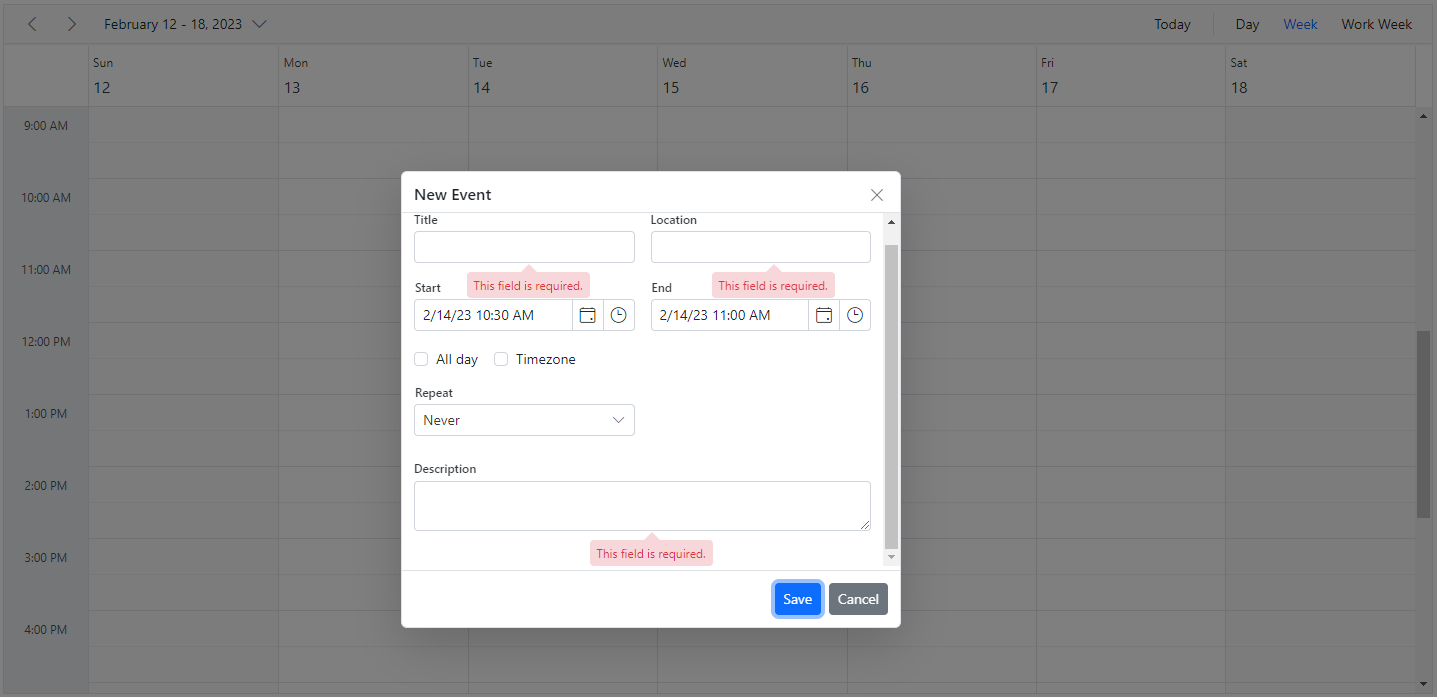
Field validation
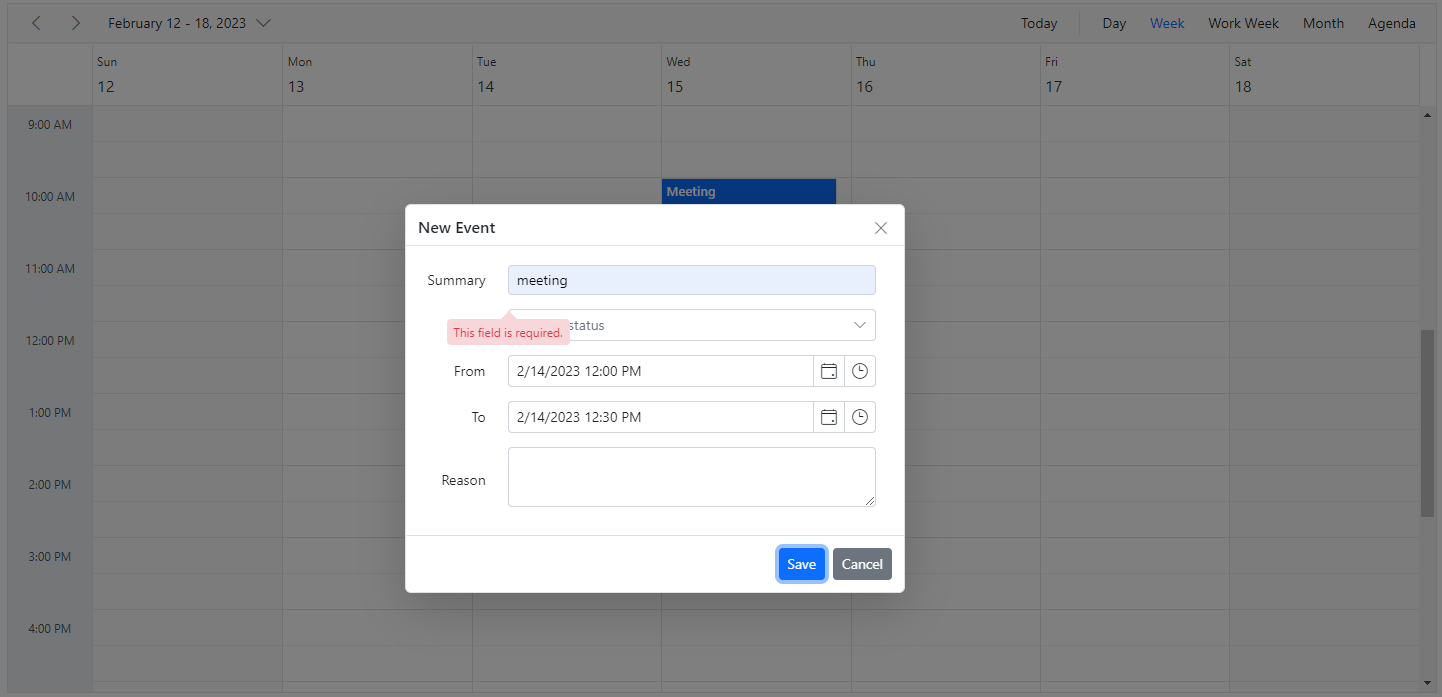
It is possible to validate the required fields of the editor window from client-side before submitting it, by adding appropriate validation rules to each field. The appointment fields have been extended to accept both string and object type values. To perform validations, it is necessary to specify object values for the event fields.
@using Syncfusion.EJ2.Schedule

@{
    var validationRules = new Dictionary<string, object>() { { "required", true } };
    var locationValidationRules = new Dictionary<string, object>() { { "required", true }, { "regex", new string[] { "^[a-zA-Z0-9- ]*$", "Special character(s) not allowed in this field" } } };
    var descriptionValidationRules = new Dictionary<string, object>() { { "required", true }, { "minLength", 5 }, { "maxLength", 500 } };
}

<ejs-schedule id="schedule" height="550" selectedDate="new DateTime(2023, 2, 15)" views="@ViewBag.view">
    <e-schedule-eventsettings dataSource="@ViewBag.datasource">
        <e-eventsettings-fields>
            <e-field-subject name="Subject" validation="validationRules"></e-field-subject>
            <e-field-location name="Location" validation="locationValidationRules"></e-field-location>
            <e-field-description name="Description" validation="descriptionValidationRules"></e-field-description>
            <e-field-starttime name="StartTime" validation="validationRules"></e-field-starttime>
            <e-field-endtime name="EndTime" validation="validationRules"></e-field-endtime>
        </e-eventsettings-fields>
    </e-schedule-eventsettings>
</ejs-schedule>
public ActionResult Index()
{
ViewBag.datasource = GetScheduleData();
List<ScheduleView> viewOption = new List<ScheduleView>()
{
new ScheduleView { Option = Syncfusion.EJ2.Schedule.View.Day },
new ScheduleView { Option = Syncfusion.EJ2.Schedule.View.Week },
new ScheduleView { Option = Syncfusion.EJ2.Schedule.View.WorkWeek }
};
ViewBag.view = viewOption;
return View();
}
public List<AppointmentData> GetScheduleData()
{
List<AppointmentData> appData = new List<AppointmentData>();
appData.Add(new AppointmentData
{
Id = 1,
Subject = "Meeting",
StartTime = new DateTime(2023, 2, 15, 10, 0, 0),
EndTime = new DateTime(2023, 2, 15, 12, 30, 0),
IsAllDay = false,
});
return appData;
}
public class AppointmentData
{
public int Id { get; set; }
public string Subject { get; set; }
public DateTime StartTime { get; set; }
public DateTime EndTime { get; set; }
public bool IsAllDay { get; set; }
}
NOTE
Applicable validation rules can be referred from form validation documentation.
Add additional fields to the default editor
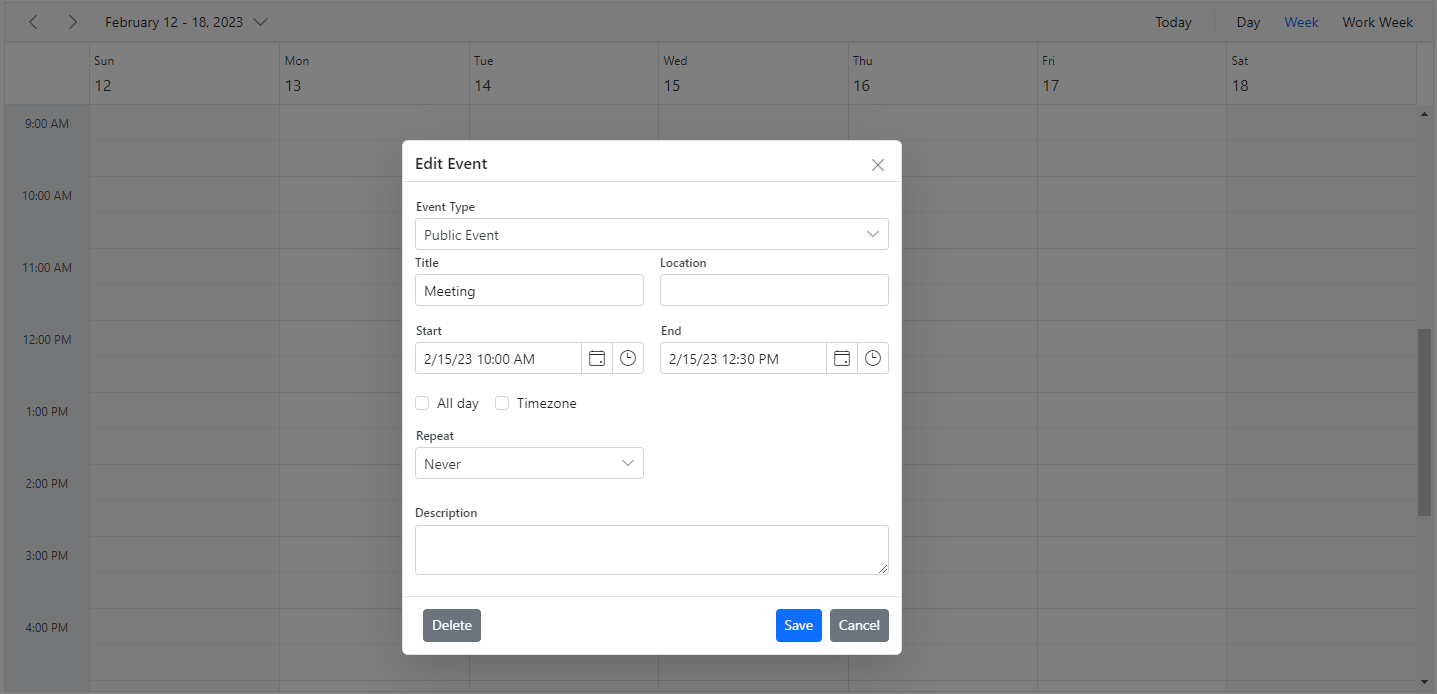
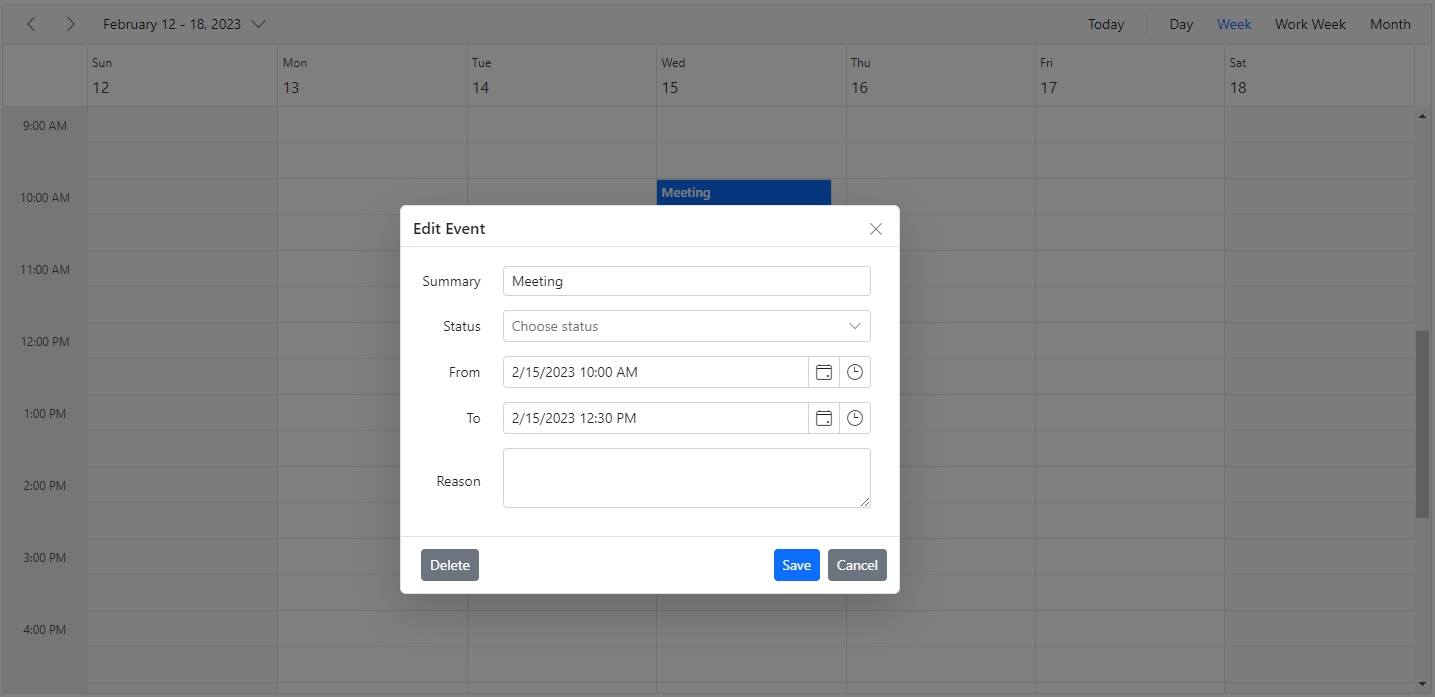
The additional fields can be added to the default event editor by making use of the popupOpen event which gets triggered before the event editor opens on the Scheduler. The popupOpen is a client-side event that triggers before any of the generic popups opens on the Scheduler. The additional field (any of the form elements) should be added with a common class name e-field, so as to handle and process those additional data along with the default event object. In the following example, an additional field Event Type has been added to the default event editor and its value is processed accordingly.
@using Syncfusion.EJ2.Schedule

<ejs-schedule id="schedule" height="550" selectedDate="new DateTime(2023, 2, 15)" views="@ViewBag.view" popupOpen="onPopupOpen">
    <e-schedule-eventsettings dataSource="@ViewBag.datasource"></e-schedule-eventsettings>
</ejs-schedule>

<script type="text/javascript">
        function onPopupOpen(args) {
        if (args.type === 'Editor') {
            if (!args.element.querySelector('.custom-field-row')) {
                var row = ej.base.createElement('div', { className: 'custom-field-row' });
                var formElement = args.element.querySelector('.e-schedule-form');
                formElement.firstChild.insertBefore(row, args.element.querySelector('.e-title-location-row'));
                var container = ej.base.createElement('div', { className: 'custom-field-container' });
                var inputEle = ej.base.createElement('input', {
                    className: 'e-field', attrs: { name: 'EventType' }
                });
                container.appendChild(inputEle);
                row.appendChild(container);
                var drowDownList = new ej.dropdowns.DropDownList({
                    dataSource: [
                        { text: 'Public Event', value: 'public-event' },
                        { text: 'Maintenance', value: 'maintenance' },
                        { text: 'Commercial Event', value: 'commercial-event' },
                        { text: 'Family Event', value: 'family-event' }
                    ],
                    fields: { text: 'text', value: 'value' },
                    value: (args.data).EventType,
                    floatLabelType: 'Always', placeholder: 'Event Type'
                });
                drowDownList.appendTo(inputEle);
                inputEle.setAttribute('name', 'EventType');
            }
        }
    }
</script>
public ActionResult Index()
{
ViewBag.datasource = GetScheduleData();
List<ScheduleView> viewOption = new List<ScheduleView>()
{
new ScheduleView { Option = Syncfusion.EJ2.Schedule.View.Day },
new ScheduleView { Option = Syncfusion.EJ2.Schedule.View.Week },
new ScheduleView { Option = Syncfusion.EJ2.Schedule.View.WorkWeek }
};
ViewBag.view = viewOption;
return View();
}
public List<AppointmentData> GetScheduleData()
{
List<AppointmentData> appData = new List<AppointmentData>();
appData.Add(new AppointmentData
{
Id = 1,
Subject = "Meeting",
StartTime = new DateTime(2023, 2, 15, 10, 0, 0),
EndTime = new DateTime(2023, 2, 15, 12, 30, 0),
IsAllDay = false,
});
return appData;
}
public class AppointmentData
{
public int Id { get; set; }
public string Subject { get; set; }
public DateTime StartTime { get; set; }
public DateTime EndTime { get; set; }
public bool IsAllDay { get; set; }
}
Customizing the default time duration in editor window
In default event editor window, start and end time duration are processed based on the interval value set within the timeScale property. By default, interval value is set to 30, and therefore the start/end time duration within the event editor will be in a 30 minutes time difference. You can change this duration value by changing the duration option within the popupOpen event as shown in the following code example.
@using Syncfusion.EJ2.Schedule

<ejs-schedule id="schedule" height="550" selectedDate="new DateTime(2023, 2, 15)" views="@ViewBag.view" popupOpen="onPopupOpen">
    <e-schedule-eventsettings dataSource="@ViewBag.datasource"></e-schedule-eventsettings>
</ejs-schedule>

<script type="text/javascript">
    function onPopupOpen(args) {
        if (args.type === 'Editor') {
            args.duration = 60;
        }
    }
</script>
public ActionResult Index()
{
ViewBag.datasource = GetScheduleData();
List<ScheduleView> viewOption = new List<ScheduleView>()
{
new ScheduleView { Option = Syncfusion.EJ2.Schedule.View.Day },
new ScheduleView { Option = Syncfusion.EJ2.Schedule.View.Week },
new ScheduleView { Option = Syncfusion.EJ2.Schedule.View.WorkWeek }
};
ViewBag.view = viewOption;
return View();
}
public List<AppointmentData> GetScheduleData()
{
List<AppointmentData> appData = new List<AppointmentData>();
appData.Add(new AppointmentData
{
Id = 1,
Subject = "Meeting",
StartTime = new DateTime(2023, 2, 15, 10, 0, 0),
EndTime = new DateTime(2023, 2, 15, 12, 30, 0),
IsAllDay = false,
});
return appData;
}
public class AppointmentData
{
public int Id { get; set; }
public string Subject { get; set; }
public DateTime StartTime { get; set; }
public DateTime EndTime { get; set; }
public bool IsAllDay { get; set; }
}
How to prevent the display of editor and quick popups
It is possible to prevent the display of editor and quick popup windows by passing the value true to cancel option within the popupOpen event.
@using Syncfusion.EJ2.Schedule

<ejs-schedule id="schedule" height="550" selectedDate="new DateTime(2018, 2, 15)" views="@ViewBag.view" popupOpen="onPopupOpen">
    <e-schedule-eventsettings dataSource="@ViewBag.datasource"></e-schedule-eventsettings>
</ejs-schedule>

<script type="text/javascript">
    function onPopupOpen(args) {
        args.cancel = true;
    }
</script>
public ActionResult Index()
{
ViewBag.datasource = GetScheduleData();
List<ScheduleView> viewOption = new List<ScheduleView>()
{
new ScheduleView { Option = Syncfusion.EJ2.Schedule.View.Day },
new ScheduleView { Option = Syncfusion.EJ2.Schedule.View.Week },
new ScheduleView { Option = Syncfusion.EJ2.Schedule.View.WorkWeek }
};
ViewBag.view = viewOption;
return View();
}
public List<AppointmentData> GetScheduleData()
{
List<AppointmentData> appData = new List<AppointmentData>();
appData.Add(new AppointmentData
{
Id = 1,
Subject = "Meeting",
StartTime = new DateTime(2018, 2, 15, 10, 0, 0),
EndTime = new DateTime(2018, 2, 15, 12, 30, 0),
IsAllDay = false,
});
return appData;
}
public class AppointmentData
{
public int Id { get; set; }
public string Subject { get; set; }
public DateTime StartTime { get; set; }
public DateTime EndTime { get; set; }
public bool IsAllDay { get; set; }
}In case, if you need to prevent only specific popups on Scheduler, then you can check the condition based on the popup type. The types of the popup that can be checked within the popupOpen event are as follows.
| Type | Description |
|---|---|
Editor |
For Detailed editor window. |
QuickInfo |
For Quick popup which opens on cell click. |
EditEventInfo |
For Quick popup which opens on event click. |
ViewEventInfo |
For Quick popup which opens on responsive mode. |
EditorContainer |
For more event indicator popup. |
Quick popups
The quick info popups are the ones that gets opened, when a cell or appointment is single clicked on the desktop mode. On single clicking a cell, you can simply provide a subject and save it. Also, while single clicking on an event, a popup will be displayed where you can get the overview of the event information. You can also edit or delete those events through the options available in it.
By default, these popups are displayed over cells and appointments of Scheduler and to disable this action, set false to showQuickInfo property.
@using Syncfusion.EJ2.Schedule

<ejs-schedule id="schedule" height="550" showQuickInfo="false" selectedDate="new DateTime(2018, 2, 15)" views="@ViewBag.view">
    <e-schedule-eventsettings dataSource="@ViewBag.datasource"></e-schedule-eventsettings>
</ejs-schedule>
public ActionResult Index()
{
ViewBag.datasource = GetScheduleData();
List<ScheduleView> viewOption = new List<ScheduleView>()
{
new ScheduleView { Option = Syncfusion.EJ2.Schedule.View.Day },
new ScheduleView { Option = Syncfusion.EJ2.Schedule.View.Week },
new ScheduleView { Option = Syncfusion.EJ2.Schedule.View.WorkWeek }
};
ViewBag.view = viewOption;
return View();
}
public List<AppointmentData> GetScheduleData()
{
List<AppointmentData> appData = new List<AppointmentData>();
appData.Add(new AppointmentData
{
Id = 1,
Subject = "Meeting",
StartTime = new DateTime(2018, 2, 15, 10, 0, 0),
EndTime = new DateTime(2018, 2, 15, 12, 30, 0),
IsAllDay = false,
});
return appData;
}
public class AppointmentData
{
public int Id { get; set; }
public string Subject { get; set; }
public DateTime StartTime { get; set; }
public DateTime EndTime { get; set; }
public bool IsAllDay { get; set; }
}NOTE
The quick popup that opens while single clicking on the cells are not applicable on mobile devices.
How to open Quick Info popup on multiple cell selection
By default the QuickInfo popup will open on single click of the cell. To open the quick info popup on multiple cell selection, you need to select the cells and press enter key. You can open this popup immediately after multiple cell selection by setting up true to quickInfoOnSelectionEnd property where as its default value is false.
@using Syncfusion.EJ2.Schedule

<ejs-schedule id="schedule" height="550" quickInfoOnSelectionEnd="true">
</ejs-schedule>
public ActionResult Index()
{
return View();
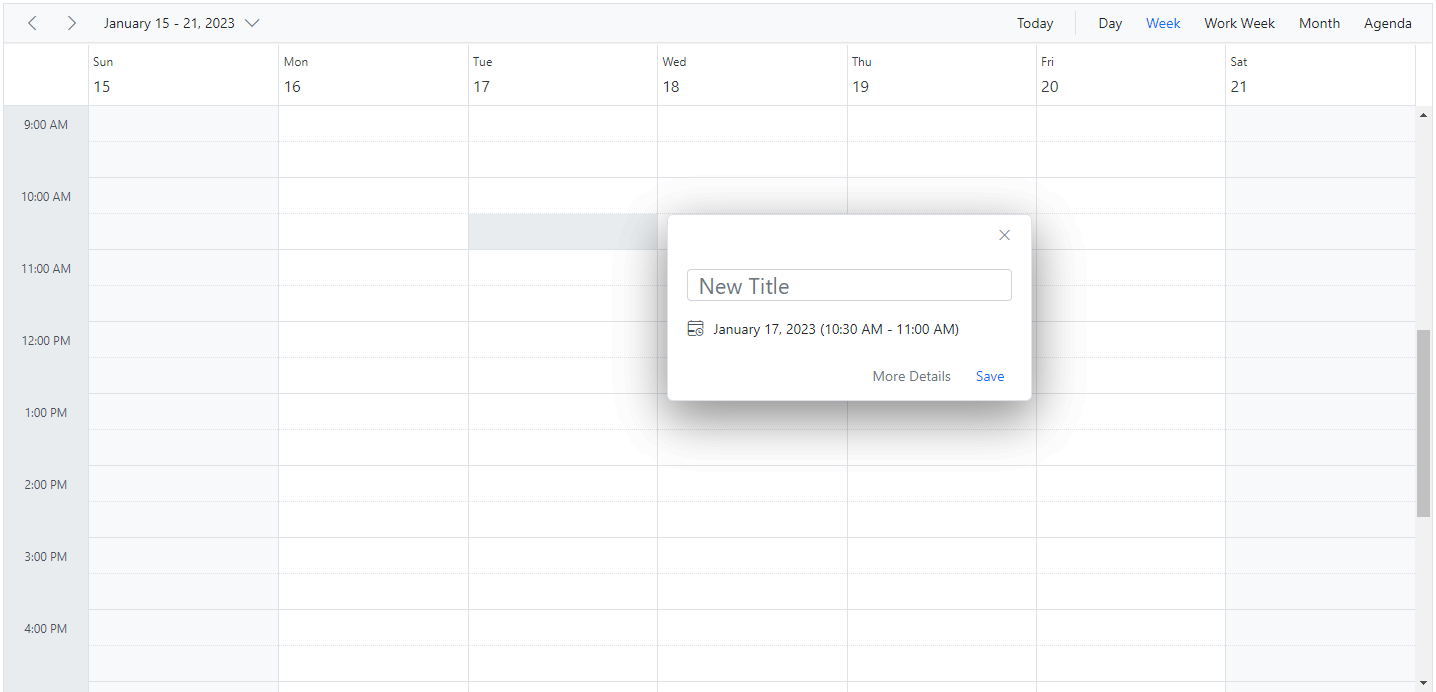
}How to change the watermark text of quick popup subject
By default, Add Title text is displayed on the subject field of quick popup. To change the default watermark text, change the value of the appropriate localized word collection used in the Scheduler.
var L10n = ej.base.L10n;
L10n.load({
    'en-US': {
        'schedule': {
          'addTitle' : 'New Title'
        }
    }
});
Customizing quick popups
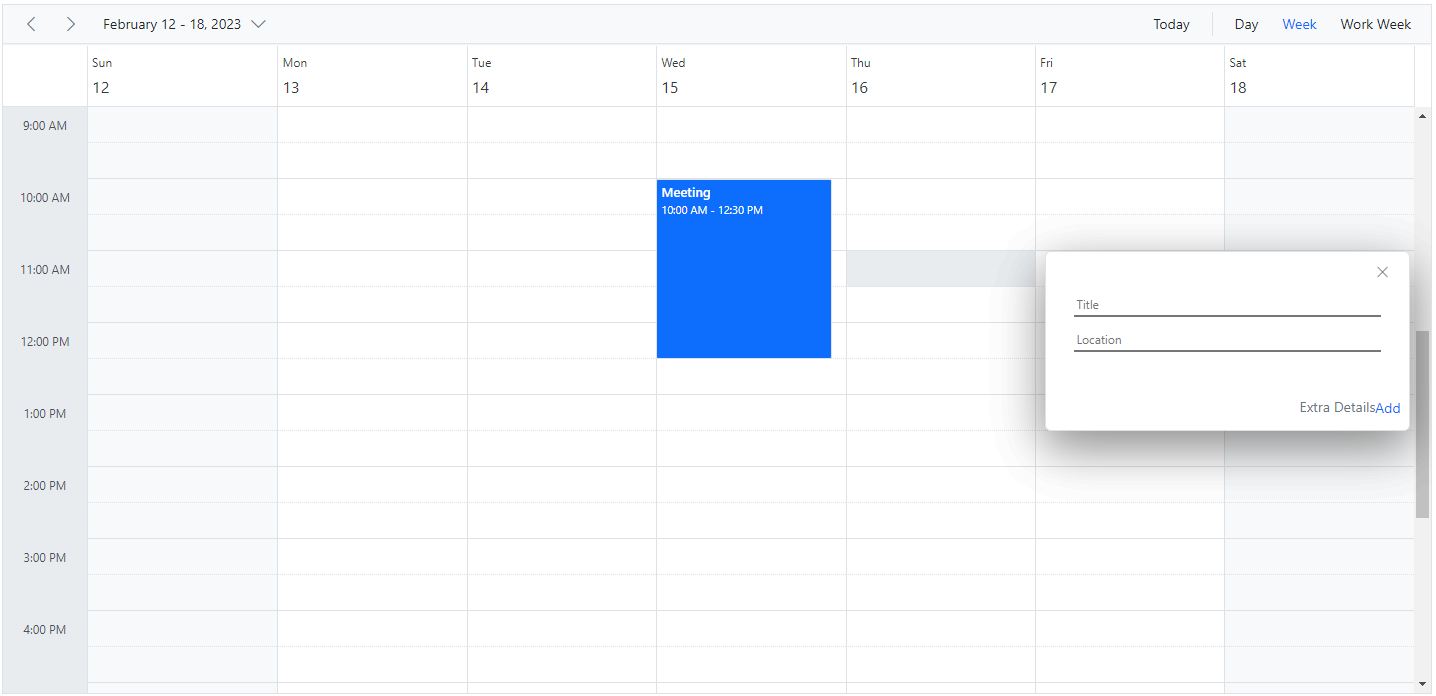
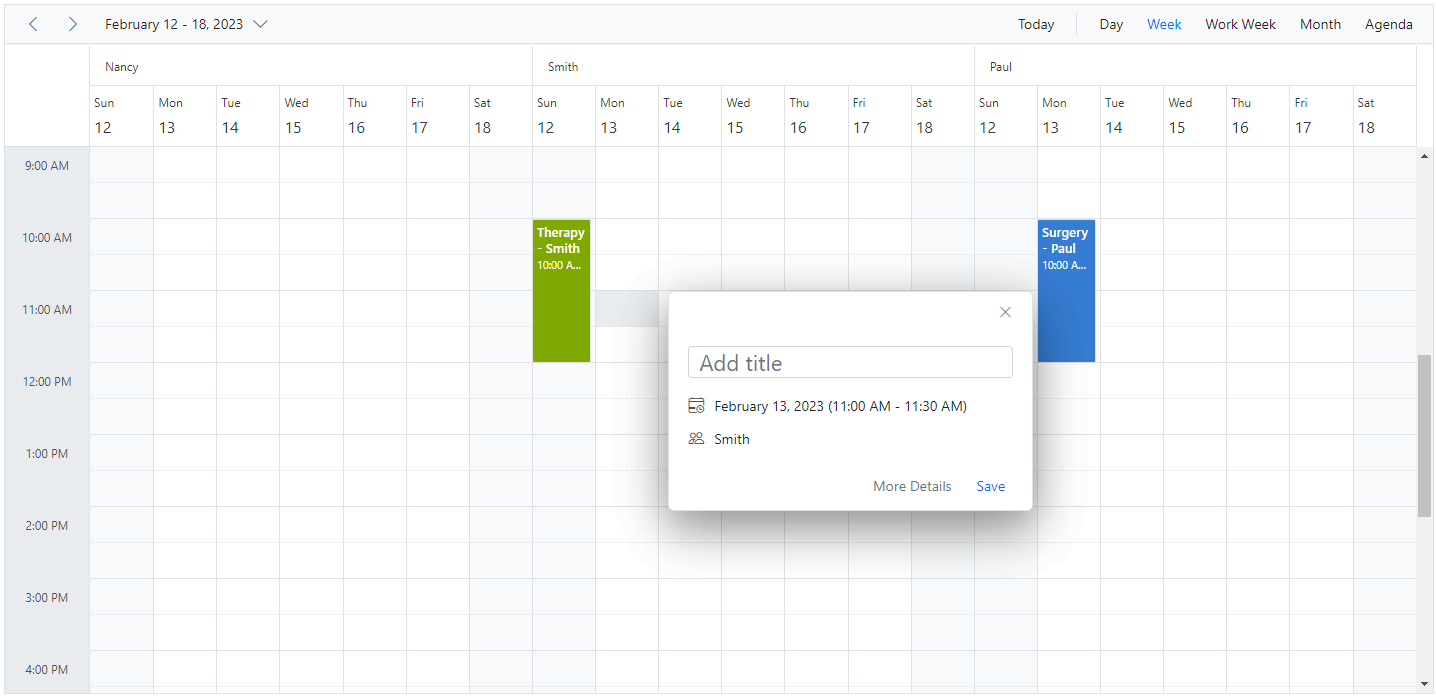
The look and feel of the built-in quick popup window, which opens when single clicked on the cells or appointments can be customized by making use of the quickInfoTemplates property of the Scheduler. There are 3 sub-options available to customize them easily,
- header - Accepts the template design that customizes the header part of the quick popup.
- content - Accepts the template design that customizes the content part of the quick popup.
- footer - Accepts the template design that customizes the footer part of the quick popup.
@using Syncfusion.EJ2.Schedule

<ejs-schedule id="schedule" height="550" selectedDate="new DateTime(2023, 2, 15)" views="@ViewBag.view">
    <e-schedule-eventsettings dataSource="@ViewBag.datasource"></e-schedule-eventsettings>
    <e-schedule-quickinfotemplates header="#headerTemplate" content="#contentTemplate" footer="#footerTemplate">
    </e-schedule-quickinfotemplates>
</ejs-schedule>

<style>
    .e-textlabel {
        font-weight: bold;
        padding-right: 5px;
    }

    .custom-event-editor td {
        padding: 5px;
    }

    .e-quick-popup-wrapper .e-cell-content {
        padding: 0 10px 10px 10px;
    }

    .e-quick-popup-wrapper .e-cell-content div {
        padding-bottom: 10px;
    }

    .e-quick-popup-wrapper .e-cell-content .e-field {
        border-left-width: 0;
        border-top-width: 0;
        border-right-width: 0;
        height: 25px;
        width: 100%;
    }

    .e-quick-popup-wrapper .e-event-content {
        display: flex;
    }

    .e-quick-popup-wrapper .e-event-content img {
        width: 100px;
    }

    .e-quick-popup-wrapper .e-event-header {
        position: absolute;
        right: 0;
    }

    .e-quick-popup-wrapper .e-cell-footer .e-event-create,
    .e-quick-popup-wrapper .e-event-footer .e-event-edit {
        position: absolute;
        right: 0;
    }

    .e-quick-popup-wrapper .e-event-footer .e-event-delete {
        padding-left: 100px;
    }

    .e-quick-popup-wrapper .e-event-content .subject {
        padding-top: 30px;
        font-weight: 500;
        font-size: 14px;
    }
</style>
<script id="headerTemplate" type="text/x-template">
    <div>
        ${if (elementType === 'cell')}
        <div class="e-cell-header">
            <div class="e-header-icon-wrapper">
                <button class="e-close" title="Close"></button>
            </div>
        </div>
        ${else}
        <div class="e-event-header">
            <div class="e-header-icon-wrapper">
                <button class="e-close" title="CLOSE"></button>
            </div>
        </div>
        ${/if}
    </div>
</script>
<script id="contentTemplate" type="text/x-template">
    <div>
        ${if (elementType === 'cell')}
        <div class="e-cell-content">
            <form class="e-schedule-form">
                <div>
                    <input class="subject e-field" type="text" name="Subject" placeholder="Title">
                </div>
                <div>
                    <input class="location e-field" type="text" name="Location" placeholder="Location">
                </div>
            </form>
        </div>
        ${else}
        <div class="e-event-content">
            <div class="e-subject-wrap">
                ${if (Subject)}
                <div class="subject">${Subject}</div>${/if} ${if (Location)}
                <div class="location">${Location}</div>${/if} ${if (Description)}
                <div class="description">${Description}</div>${/if}
            </div>
        </div>
        ${/if}
    </div>
</script>
<script id="footerTemplate" type="text/x-template">
    <div>
        ${if (elementType === 'cell')}
        <div class="e-cell-footer">
            <button class="e-event-details" title="Extra Details">Extra Details</button>
            <button class="e-event-create" title="Add">Add</button>
        </div>
        ${else}
        <div class="e-event-footer">
            <button class="e-event-edit" title="Edit">Edit</button>
            <button class="e-event-delete" title="Delete">Delete</button>
        </div>
        ${/if}
    </div>
</script>
public ActionResult Index()
{
ViewBag.datasource = GetScheduleData();
List<ScheduleView> viewOption = new List<ScheduleView>()
{
new ScheduleView { Option = Syncfusion.EJ2.Schedule.View.Day },
new ScheduleView { Option = Syncfusion.EJ2.Schedule.View.Week },
new ScheduleView { Option = Syncfusion.EJ2.Schedule.View.WorkWeek }
};
ViewBag.view = viewOption;
return View();
}
public List<AppointmentData> GetScheduleData()
{
List<AppointmentData> appData = new List<AppointmentData>();
appData.Add(new AppointmentData
{
Id = 1,
Subject = "Meeting",
StartTime = new DateTime(2023, 2, 15, 10, 0, 0),
EndTime = new DateTime(2023, 2, 15, 12, 30, 0),
IsAllDay = false,
});
return appData;
}
public class AppointmentData
{
public int Id { get; set; }
public string Subject { get; set; }
public DateTime StartTime { get; set; }
public DateTime EndTime { get; set; }
public bool IsAllDay { get; set; }
}
NOTE
The quick popup in adaptive mode can also be customized using
quickInfoTemplatesusinge-deviceclass.
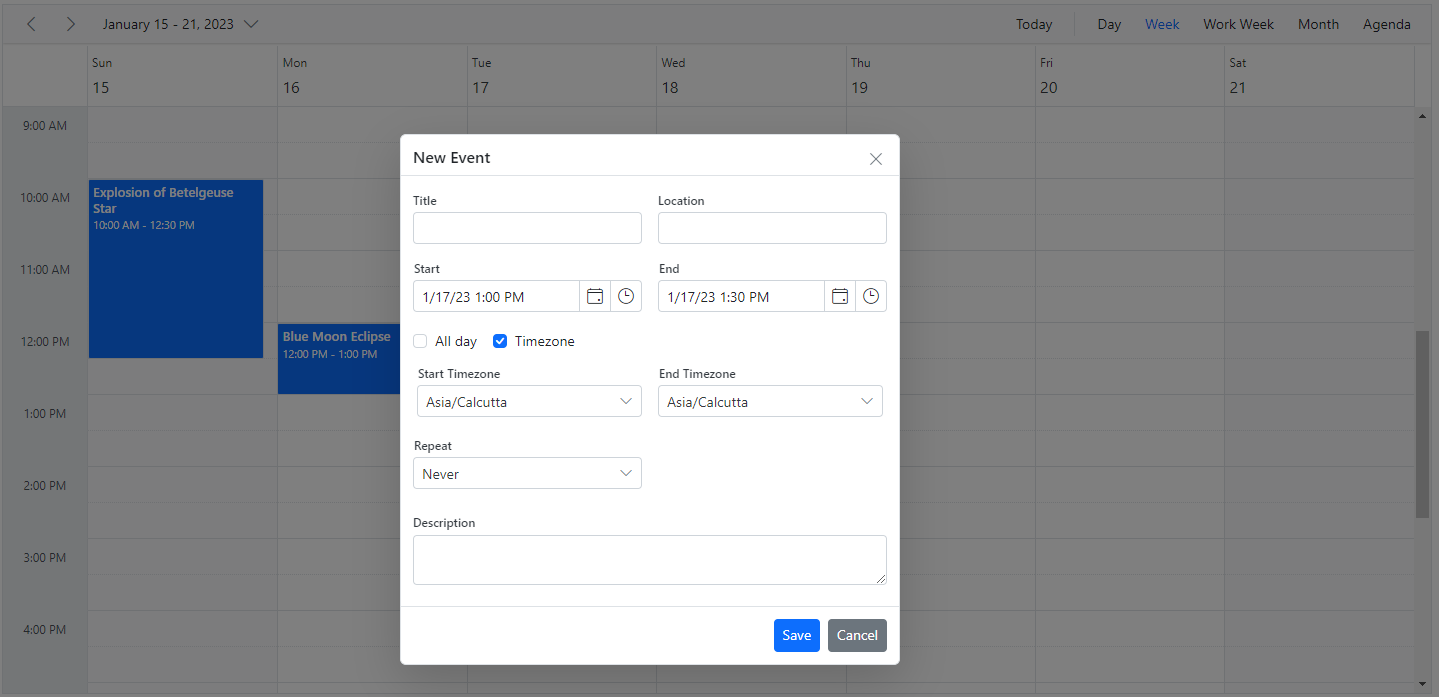
Customizing timezone collection in the editor window
By default, the timezone collections in the editor window have been loaded with built-in timezone collections. Now we can be able to customize the timezone collections using the timezoneDataSource property with the collection of TimezoneFields data.
@using Syncfusion.EJ2.Schedule

<ejs-schedule id="schedule" height="550" selectedDate="new DateTime(2023, 1, 15)"
    timezoneDataSource="@ViewBag.timezoneDataSource">
    <e-schedule-eventsettings dataSource="@ViewBag.datasource"></e-schedule-eventsettings>
</ejs-schedule>
public ActionResult Index()
{
ViewBag.datasource = GetScheduleData();
return View();
}
public List<AppointmentData> GetScheduleData()
{
List<AppointmentData> appData = new List<AppointmentData>();
appData.Add(new AppointmentData
{
Id = 1,
Subject = "Explosion of Betelgeuse Star",
StartTime= new DateTime(2023, 1, 15, 10, 0, 0),
EndTime= new DateTime(2023, 1, 15, 12, 30, 0),
IsAllDay= false
});
appData.Add(new AppointmentData
{
Id = 2,
Subject = "Blue Moon Eclipse",
StartTime = new DateTime(2023, 1, 16, 12, 0, 0),
EndTime = new DateTime(2023, 1, 16, 13, 0, 0),
IsAllDay = false
});
return appData;
}
public class AppointmentData
{
public int Id { get; set; }
public string Subject { get; set; }
public DateTime StartTime { get; set; }
public DateTime EndTime { get; set; }
public bool IsAllDay { get; set; }
}
Customizing event editor using template
The event editor window can be customized by making use of the editorTemplate option. Here, the custom window design is built with the required fields using the script template and its type should be of text/x-template.
Each field defined within template should contain the e-field class, so as to allow the processing of those field values internally. The ID of this customized script template section is assigned to the editorTemplate option, so that these customized fields will be replaced onto the default editor window.
Note: e-field class only applicable for DropDownList, DateTimePicker, MultiSelect, DatePicker, CheckBox and TextBox components. Since we have processed the field values internally for the above mentioned components.
As we are using our Syncfusion® sub-components within our editor using template in the following example, the custom defined form elements needs to be configured as required Syncfusion® components such as DropDownList and DateTimePicker within the popupOpen event. This particular step can be skipped, if the user needs to simply use the usual form elements.
@using Syncfusion.EJ2.Schedule

<ejs-schedule id="schedule" height="550" selectedDate="new DateTime(2023, 2, 15)" views="@ViewBag.view" popupOpen="onPopupOpen" editorTemplate="#EventEditorTemplate" showQuickInfo="false" >
    <e-schedule-eventsettings dataSource="@ViewBag.datasource"></e-schedule-eventsettings>
</ejs-schedule>

<style>
    .custom-event-editor .e-textlabel {
        padding-right: 15px;
        text-align: right;
    }

    .custom-event-editor td {
        padding: 7px;
        padding-right: 16px;
    }
</style>
<script id="EventEditorTemplate" type="text/template">
    <table class="custom-event-editor" width="100%" cellpadding="5">
        <tbody>
            <tr>
                <td class="e-textlabel">Summary</td>
                <td colspan="4">
                    <input id="Subject" class="e-field e-input" type="text" value="" name="Subject" style="width: 100%" />
                </td>
            </tr>
            <tr>
                <td class="e-textlabel">Status</td>
                <td colspan="4">
                    <input type="text" id="EventType" name="EventType" class="e-field" style="width: 100%" />
                </td>
            </tr>
            <tr>
                <td class="e-textlabel">From</td>
                <td colspan="4">
                    <input id="StartTime" class="e-field" type="text" name="StartTime" />
                </td>
            </tr>
            <tr>
                <td class="e-textlabel">To</td>
                <td colspan="4">
                    <input id="EndTime" class="e-field" type="text" name="EndTime" />
                </td>
            </tr>
            <tr>
                <td class="e-textlabel">Reason</td>
                <td colspan="4">
                    <textarea id="Description" class="e-field e-input" name="Description" rows="3" cols="50" style="width: 100%; height: 60px !important; resize: vertical"></textarea>
                </td>
            </tr>
        </tbody>
    </table>
</script>

<script type="text/javascript">
    function onPopupOpen(args) {
        if (args.type === 'Editor') {
            var statusElement = args.element.querySelector('#EventType');
            if (!statusElement.classList.contains('e-dropdownlist')) {
                var dropDownListObject = new ej.dropdowns.DropDownList({
                    placeholder: 'Choose status', value: statusElement.value,
                    dataSource: ['New', 'Requested', 'Confirmed']
                });
                dropDownListObject.appendTo(statusElement);
                statusElement.setAttribute('name', 'EventType');
            }
            var startElement = args.element.querySelector('#StartTime');
            if (!startElement.classList.contains('e-datetimepicker')) {
                new ej.calendars.DateTimePicker({ value: new Date(startElement.value) || new Date() }, startElement);
            }
            var endElement = args.element.querySelector('#EndTime');
            if (!endElement.classList.contains('e-datetimepicker')) {
                new ej.calendars.DateTimePicker({ value: new Date(endElement.value) || new Date() }, endElement);
            }
        }
    }
</script>
public ActionResult Index()
{
ViewBag.datasource = GetScheduleData();
List<ScheduleView> viewOption = new List<ScheduleView>()
{
new ScheduleView { Option = Syncfusion.EJ2.Schedule.View.Day },
new ScheduleView { Option = Syncfusion.EJ2.Schedule.View.Week },
new ScheduleView { Option = Syncfusion.EJ2.Schedule.View.WorkWeek },
new ScheduleView { Option = Syncfusion.EJ2.Schedule.View.Month }
};
ViewBag.view = viewOption;
return View();
}
public List<AppointmentData> GetScheduleData()
{
List<AppointmentData> appData = new List<AppointmentData>();
appData.Add(new AppointmentData
{
Id = 1,
Subject = "Meeting",
StartTime = new DateTime(2023, 2, 15, 10, 0, 0),
EndTime = new DateTime(2023, 2, 15, 12, 30, 0),
IsAllDay = false,
});
return appData;
}
public class AppointmentData
{
public int Id { get; set; }
public string Subject { get; set; }
public DateTime StartTime { get; set; }
public DateTime EndTime { get; set; }
public bool IsAllDay { get; set; }
}
How to customize header and footer using template
The editor window’s header and footer can be enhanced with custom designs using the editorHeaderTemplate and editorFooterTemplate options. To achieve this, create a script template that includes the necessary fields. Ensure that the template type is set to text/x-template.
In this demo, we tailor the editor’s header according to the appointment’s subject field using the editorHeaderTemplate. Furthermore, we make use of the editorFooterTemplate to handle the functionality of validating specific fields before proceeding with the save action or canceling it if validation requirements are not
met.
@using Syncfusion.EJ2.Schedule

<ejs-schedule id="schedule" height="550" popupOpen="onPopupOpen" editorHeaderTemplate="#editor-header" editorFooterTemplate="#editor-footer"  >
    <e-schedule-eventsettings dataSource="@ViewBag.datasource"></e-schedule-eventsettings>
</ejs-schedule>

<style>
#verify {
  position: fixed;
  padding: 0 20px;
}

#text {
  cursor: pointer;
  display: inline-block;
  font-family: "Roboto", -apple-system, BlinkMacSystemFont, "Segoe UI", "Helvetica Neue", sans-serif;
  font-size: 14px;
  font-weight: normal;
  line-height: 14px;
  user-select: none;
  margin-left: 8px;
  vertical-align: middle;
  white-space: normal;
}

#right-button {
  padding: 0 10px;
}
</style>

<script id="editor-header" type="text/x-template">
    ${if (!Subject)}<div>Create New Event</div>${else}<div>${Subject}</div>${/if}
</script>

<script id="editor-footer" type="text/x-template">
    <div id="verify">
        <input type="checkbox" id="check-box" value="unchecked">
        <label id="text">Verified</label>
    </div>
    <div id="right-button">
        <button id="Save" class="e-control e-btn e-primary" disabled data-ripple="true">Save</button>
        <button id="Cancel" class="e-control e-btn e-primary"  data-ripple="true">Cancel</button>
    </div>
</script>

<script type="text/javascript">
    function onPopupOpen(args) {
        if (args.type === 'Editor') {
            let scheduleObj = document.getElementById('scheduler').ej2_instances[0];
            const saveButton = args.element.querySelector("#Save");
            const cancelButton = args.element.querySelector("#Cancel");
            const checkBox = args.element.querySelector("#check-box");
            checkBox.onchange = () => {
                if (!checkBox.checked) {
                    saveButton.setAttribute("disabled", "");
                } else {
                    saveButton.removeAttribute("disabled");
                }
            };
            saveButton.onclick = () => {
                const data = {
                    Id: args.data.Id,
                    Subject: args.element.querySelector("#Subject").value,
                    StartTime: args.element.querySelector("#StartTime").ej2_instances[0].value,
                    EndTime: args.element.querySelector("#EndTime").ej2_instances[0].value,
                    IsAllDay: args.element.querySelector("#IsAllDay").checked,
                };
                if (args.target.classList.contains("e-appointment")) {
                    scheduleObj.saveEvent(data, "Save");
                } else {
                    data.Id = scheduleObj.getEventMaxID();
                    scheduleObj.addEvent(data);
                }
                scheduleObj.closeEditor();
            };
            cancelButton.onclick = () => {
                scheduleObj.closeEditor();
            };
        }
    }
</script>
public ActionResult Index()
{
ViewBag.datasource = GetScheduleData();
return View();
}
public List<AppointmentData> GetScheduleData()
{
List<AppointmentData> appData = new List<AppointmentData>();
appData.Add(new AppointmentData
{
Id = 1,
Subject = "Surgery - Andrew",
StartTime = new DateTime(DateTime.Today.Year, DateTime.Today.Month, DateTime.Today.Day, 9, 0, 0),
EndTime = new DateTime(DateTime.Today.Year, DateTime.Today.Month, DateTime.Today.Day, 10, 0, 0),
IsAllDay = false,
},
{
Id: 2,
Subject: "Consulting - John",
StartTime = new DateTime(DateTime.Today.Year, DateTime.Today.Month, DateTime.Today.Day, 10, 0, 0),
EndTime = new DateTime(DateTime.Today.Year, DateTime.Today.Month, DateTime.Today.Day, 11, 30, 0),
IsAllDay: false
},
{
Id: 3,
Subject: "Therapy - Robert",
StartTime = new DateTime(DateTime.Today.Year, DateTime.Today.Month, DateTime.Today.Day, 11, 30, 0),
EndTime = new DateTime(DateTime.Today.Year, DateTime.Today.Month, DateTime.Today.Day, 12, 30, 0),
IsAllDay: false
},
{
Id: 4,
Subject: "Observation - Steven",
StartTime = new DateTime(DateTime.Today.Year, DateTime.Today.Month, DateTime.Today.Day, 12, 30, 0),
EndTime = new DateTime(DateTime.Today.Year, DateTime.Today.Month, DateTime.Today.Day, 13, 30, 0),
IsAllDay: false
}
);
return appData;
}
public class AppointmentData
{
public int Id { get; set; }
public string Subject { get; set; }
public DateTime StartTime { get; set; }
public DateTime EndTime { get; set; }
public bool IsAllDay { get; set; }
}
How to add resource options within editor template
The resource field can be added within editor template with MultiSelect control for allow multiple resources.
@using Syncfusion.EJ2.Schedule

<ejs-schedule id="schedule" width="100%" height="550px" selectedDate="new DateTime(2023, 2, 15)" popupOpen="onPopupOpen" editorTemplate="#EventEditorTemplate" >
    <e-schedule-group resources="@ViewBag.Resources"></e-schedule-group>
    <e-schedule-resources>
        <e-schedule-resource dataSource="@ViewBag.Owners" field="OwnerId" title="Owners" allowMultiple="true" name="Owners" textField="text" idField="id" colorField="color"></e-schedule-resource>
    </e-schedule-resources>
    <e-schedule-eventsettings dataSource="@ViewBag.datasource"></e-schedule-eventsettings>
</ejs-schedule>

<style>
    .custom-event-editor .e-textlabel {
        padding-right: 15px;
        text-align: right;
    }

    .custom-event-editor td {
        padding: 7px;
        padding-right: 16px;
    }
</style>

<script id="EventEditorTemplate" type="text/x-template">
    <table class="custom-event-editor" width="100%" cellpadding="5">
        <tbody>
            <tr>
                <td class="e-textlabel">Summary</td>
                <td colspan="4">
                    <input id="Subject" class="e-field e-input" type="text" value="" name="Subject" style="width: 100%" />
                </td>
            </tr>
            <tr>
                <td class="e-textlabel">From</td>
                <td colspan="4">
                    <input id="StartTime" class="e-field" type="text" name="StartTime" />
                </td>
            </tr>
            <tr>
                <td class="e-textlabel">To</td>
                <td colspan="4">
                    <input id="EndTime" class="e-field" type="text" name="EndTime" />
                </td>
            </tr>
            <tr>
                <td class="e-textlabel">Owner</td>
                <td colspan="4">
                    <input type="text" id="OwnerId" name="OwnerId" class="e-field" style="width: 100%" />
                </td>
            </tr>
            <tr>
                <td class="e-textlabel">Reason</td>
                <td colspan="4">
                    <textarea id="Description" class="e-field e-input" name="Description" rows="3" cols="50" style="width: 100%; height: 60px !important; resize: vertical">
                    </textarea>
                </td>
            </tr>
        </tbody>
    </table>
</script>

<script type="text/javascript">
    function onPopupOpen (args) {
        if (args.type === 'Editor') {
            var ownerData = @Html.Raw(Json.Serialize(ViewBag.Owners));
            var startElement = args.element.querySelector('#StartTime');
            if (!startElement.classList.contains('e-datetimepicker')) {
                new ej.calendars.DateTimePicker({ value: new Date(startElement.value) || new Date() }, startElement);
            }
            var endElement = args.element.querySelector('#EndTime');
            if (!endElement.classList.contains('e-datetimepicker')) {
                new ej.calendars.DateTimePicker({ value: new Date(endElement.value) || new Date() }, endElement);
            }
            var processElement = args.element.querySelector('#OwnerId');
            if (!processElement.classList.contains('e-multiselect')) {
                var multiSelectObject = new ej.dropdowns.MultiSelect({
                    placeholder: 'Select a owner',
                    dataSource: ownerData,
                    fields: { text: 'text', value: 'id' },
                    value: (args.data.OwnerId instanceof Array) ? args.data.OwnerId : [args.data.OwnerId]
                });
                multiSelectObject.appendTo(processElement);
            }
        }
    }
</script>
public ActionResult Index()
{
ViewBag.datasource = GetEventsData();
List<OwnerRes> owners = new List<OwnerRes>();
owners.Add(new OwnerRes { text = "Nancy", id = 1, color = "#1aaa55" });
owners.Add(new OwnerRes { text = "Smith", id = 2, color = "#7fa900" });
owners.Add(new OwnerRes { text = "Paul", id = 3, color = "#357cd2" });
ViewBag.Owners = owners;
string[] resources = new string[] { "Owners" };
ViewBag.Resources = resources;
return View();
}
public class OwnerRes
{
public string text { set; get; }
public int id { set; get; }
public string color { set; get; }
}
public List<EventsData> GetEventsData()
{
List<EventsData> eventsData = new List<EventsData>();
eventsData.Add(new EventsData
{
Id = 1,
Subject = "Surgery - Nancy",
StartTime = new DateTime(2023, 2, 11, 10, 0, 0),
EndTime = new DateTime(2023, 2, 11, 12, 0, 0),
EventType = "Confirmed",
OwnerId = 1
});
eventsData.Add(new EventsData
{
Id = 2,
Subject = "Therapy - Smith",
StartTime = new DateTime(2023, 2, 12, 10, 0, 0),
EndTime = new DateTime(2023, 2, 12, 12, 0, 0),
EventType = "New",
OwnerId = 2
});
eventsData.Add(new EventsData
{
Id = 3,
Subject = "Surgery - Paul",
StartTime = new DateTime(2023, 2, 13, 10, 0, 0),
EndTime = new DateTime(2023, 2, 13, 12, 0, 0),
EventType = "Requested",
OwnerId = 3
});
return eventsData;
}
public class EventsData
{
public int Id { get; set; }
public string Subject { get; set; }
public DateTime StartTime { get; set; }
public DateTime EndTime { get; set; }
public string EventType { get; set; }
public int OwnerId { get; set; }
}
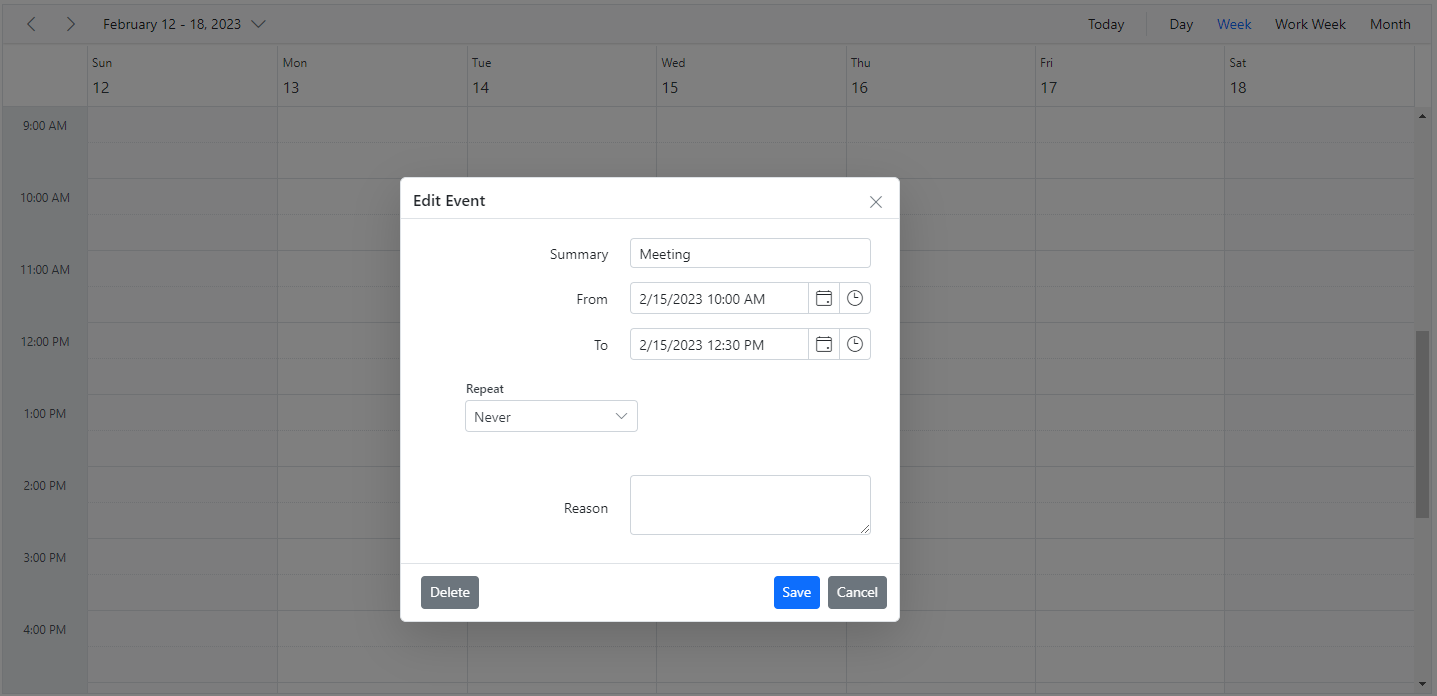
How to add recurrence options within editor template
The following code example shows how to add recurrence options within the editor template.
@using Syncfusion.EJ2.Schedule

<ejs-schedule id="schedule" height="550" selectedDate="new DateTime(2023, 2, 15)" views="@ViewBag.view" popupOpen="onPopupOpen" editorTemplate="#EventEditorTemplate" showQuickInfo="false" >
    <e-schedule-eventsettings dataSource="@ViewBag.datasource"></e-schedule-eventsettings>
</ejs-schedule>

<style>
    .custom-event-editor .e-textlabel {
        padding-right: 15px;
        text-align: right;
    }

    .custom-event-editor td {
        padding: 7px;
        padding-right: 16px;
    }
</style>
<script id="EventEditorTemplate" type="text/x-template">
    <table class="custom-event-editor" width="100%" cellpadding="5">
        <tbody>
            <tr>
                <td class="e-textlabel">Summary</td>
                <td colspan="4">
                    <input id="Subject" class="e-field e-input" type="text" value="" name="Subject" style="width: 100%" />
                </td>
            </tr>
            <tr>
            <td class="e-textlabel">From</td>
                <td colspan="4">
                    <input id="StartTime" class="e-field" type="text" name="StartTime" />
                </td>
            </tr>
            <tr>
                <td class="e-textlabel">To</td>
                <td colspan="4">
                    <input id="EndTime" class="e-field" type="text" name="EndTime" />
                </td>
            </tr>
            <tr>
                <td colspan="4">
                    <div id='RecurrenceEditor'></div>
                </td>
            </tr>
            <tr>
                <td class="e-textlabel">Reason</td>
                <td colspan="4">
                    <textarea id="Description" class="e-field e-input" name="Description" rows="3" cols="50" style="width: 100%; height: 60px !important; resize: vertical"></textarea>
                </td>
            </tr>
        </tbody>
    </table>
</script>

<script type="text/javascript">
    function onPopupOpen(args) {
        if (args.type === 'Editor') {
            var startElement = args.element.querySelector('#StartTime');
            var scheduleObj = document.getElementById('schedule').ej2_instances[0];
            if (!startElement.classList.contains('e-datetimepicker')) {
                new ej.calendars.DateTimePicker({ value: new Date(startElement.value) || new Date() }, startElement);
            }
            var endElement = args.element.querySelector('#EndTime');
            if (!endElement.classList.contains('e-datetimepicker')) {
                new ej.calendars.DateTimePicker({ value: new Date(endElement.value) || new Date() }, endElement);
            }
            var recurElement = args.element.querySelector('#RecurrenceEditor');
            if (!recurElement.classList.contains('e-recurrenceeditor')) {
                recurrObject = new ej.schedule.RecurrenceEditor({
                });
                recurrObject.appendTo(recurElement);
                scheduleObj.eventWindow.recurrenceEditor = recurrObject;
            }
        }
    }
</script>
public ActionResult Index()
{
ViewBag.datasource = GetScheduleData();
List<ScheduleView> viewOption = new List<ScheduleView>()
{
new ScheduleView { Option = Syncfusion.EJ2.Schedule.View.Day },
new ScheduleView { Option = Syncfusion.EJ2.Schedule.View.Week },
new ScheduleView { Option = Syncfusion.EJ2.Schedule.View.WorkWeek },
new ScheduleView { Option = Syncfusion.EJ2.Schedule.View.Month }
};
ViewBag.view = viewOption;
return View();
}
public List<AppointmentData> GetScheduleData()
{
List<AppointmentData> appData = new List<AppointmentData>();
appData.Add(new AppointmentData
{
Id = 1,
Subject = "Meeting",
StartTime = new DateTime(2023, 2, 15, 10, 0, 0),
EndTime = new DateTime(2023, 2, 15, 12, 30, 0),
IsAllDay = false,
});
return appData;
}
public class AppointmentData
{
public int Id { get; set; }
public string Subject { get; set; }
public DateTime StartTime { get; set; }
public DateTime EndTime { get; set; }
public bool IsAllDay { get; set; }
}
Apply validations on editor template fields
In the following code example, validation has been added to the status field.
@using Syncfusion.EJ2.Schedule

<ejs-schedule id="schedule" height="550" selectedDate="new DateTime(2023, 2, 15)" editorTemplate="#EventEditorTemplate" popupOpen="onPopupOpen">
    <e-schedule-eventsettings dataSource="@ViewBag.datasource"></e-schedule-eventsettings>
</ejs-schedule>

<style>
    .custom-event-editor .e-textlabel {
        padding-right: 15px;
        text-align: right;
    }

    .custom-event-editor td {
        padding: 7px;
        padding-right: 16px;
    }
</style>

<script id="EventEditorTemplate" type="text/x-template">
    <table class="custom-event-editor" width="100%" cellpadding="5">
        <tbody>
            <tr>
                <td class="e-textlabel">Summary</td>
                <td colspan="4">
                    <input id="Subject" class="e-field e-input" type="text" value="" name="Subject" style="width: 100%" />
                </td>
            </tr>
            <tr>
                <td class="e-textlabel">Status</td>
                <td colspan="4">
                    <input type="text" id="EventType" name="EventType" class="e-field" style="width: 100%" />
                </td>
            </tr>
            <tr>
            <td class="e-textlabel">From</td>
                <td colspan="4">
                    <input id="StartTime" class="e-field" type="text" name="StartTime" />
                </td>
            </tr>
            <tr>
                <td class="e-textlabel">To</td>
                <td colspan="4">
                    <input id="EndTime" class="e-field" type="text" name="EndTime" />
                </td>
            </tr>
            <tr>
                <td class="e-textlabel">Reason</td>
                <td colspan="4">
                    <textarea id="Description" class="e-field e-input" name="Description" rows="3" cols="50" style="width: 100%; height: 60px !important; resize: vertical"></textarea>
                </td>
            </tr>
        </tbody>
    </table>
</script>

<script type="text/javascript">
    function onPopupOpen(args) {
        if (args.type === 'Editor') {
            if (!ej.base.isNullOrUndefined(document.getElementById("EventType_Error"))) {
                document.getElementById("EventType_Error").style.display = "none";
                document.getElementById("EventType_Error").style.left = "351px";
            }
            var formElement = args.element.querySelector('.e-schedule-form');
            var statusElement = args.element.querySelector('#EventType');
            if (!statusElement.classList.contains('e-dropdownlist')) {
                var dropDownListObject = new ej.dropdowns.DropDownList({
                    placeholder: 'Select a status', value: statusElement.value,
                    dataSource: ['New', 'Requested', 'Confirmed'],
                    select: valueChange
                });
                dropDownListObject.appendTo(statusElement);
            }
            function valueChange() {
                if (!ej.base.isNullOrUndefined(document.getElementById("EventType_Error"))) {
                    document.getElementById("EventType_Error").style.display = "none";
                }
            }
            var validator = ((formElement).ej2_instances[0]);
            validator.addRules('EventType', { required: true });
            var startElement = args.element.querySelector('#StartTime');
            if (!startElement.classList.contains('e-datetimepicker')) {
                new ej.calendars.DateTimePicker({ value: new Date(startElement.value) || new Date() }, startElement);
            }
            var endElement = args.element.querySelector('#EndTime');
            if (!endElement.classList.contains('e-datetimepicker')) {
                new ej.calendars.DateTimePicker({ value: new Date(endElement.value) || new Date() }, endElement);
            }
        }
    }
</script>
public ActionResult Index()
{
ViewBag.datasource = GetScheduleData();
return View();
}
public List<AppointmentData> GetScheduleData()
{
List<AppointmentData> appData = new List<AppointmentData>();
appData.Add(new AppointmentData
{
Id = 1,
Subject = "Meeting",
StartTime = new DateTime(2023, 2, 15, 10, 0, 0),
EndTime = new DateTime(2023, 2, 15, 12, 30, 0),
IsAllDay = false,
});
return appData;
}
public class AppointmentData
{
public int Id { get; set; }
public string Subject { get; set; }
public DateTime StartTime { get; set; }
public DateTime EndTime { get; set; }
public bool IsAllDay { get; set; }
}
How to save the customized event editor using template
The e-field class is not added to each field defined within the template, so you should allow to set those field values externally by using the popupClose event.
NOTE
You can allow to retrieve the data only on the
saveanddeleteoption. Data cannot be retrieved on thecloseandcanceloptions in the editor window.
The following code example shows how to save the customized event editor using a template by the popupClose event.
@using Syncfusion.EJ2.Schedule

<ejs-schedule id="schedule" height="550" selectedDate="new DateTime(2018, 2, 15)" views="@ViewBag.view" popupOpen="onPopupOpen" popupClose="onPopupClose" editorTemplate="#EventEditorTemplate" showQuickInfo="false" >
    <e-schedule-eventsettings dataSource="@ViewBag.datasource"></e-schedule-eventsettings>
</ejs-schedule>

<style>
    .custom-event-editor .e-textlabel {
        padding-right: 15px;
        text-align: right;
    }

    .custom-event-editor td {
        padding: 7px;
        padding-right: 16px;
    }
</style>
<script id="EventEditorTemplate" type="text/template">
    <table class="custom-event-editor" width="100%" cellpadding="5">
        <tbody>
            <tr>
                <td class="e-textlabel">Summary</td>
                <td colspan="4">
                    <input id="Subject" class="e-input" type="text" value="" name="Subject" style="width: 100%" />
                </td>
            </tr>
            <tr>
                <td class="e-textlabel">Status</td>
                <td colspan="4">
                    <input type="text" id="EventType" name="EventType" style="width: 100%" />
                </td>
            </tr>
            <tr>
                <td class="e-textlabel">From</td>
                <td colspan="4">
                    <input id="StartTime" class="e-field" type="text" name="StartTime" />
                </td>
            </tr>
            <tr>
                <td class="e-textlabel">To</td>
                <td colspan="4">
                    <input id="EndTime" type="text" name="EndTime" />
                </td>
            </tr>
            <tr>
                <td class="e-textlabel">Reason</td>
                <td colspan="4">
                    <textarea id="Description" class="e-input" name="Description" rows="3" cols="50" style="width: 100%; height: 60px !important; resize: vertical"></textarea>
                </td>
            </tr>
        </tbody>
    </table>
</script>

<script type="text/javascript">
    function onPopupOpen(args) {
            if (args.type === 'Editor') {
                var subjectElement = args.element.querySelector('#Subject');
                if (subjectElement) {
                    subjectElement.value = (args.data).Subject || "";
                }
                var statusElement = args.element.querySelector('#EventType');
                if (!statusElement.classList.contains('e-dropdownlist')) {
                    var dropDownListObject = new ej.dropdowns.DropDownList({
                        placeholder: 'Choose status', value: (args.data).EventType,
                        dataSource: ['New', 'Requested', 'Confirmed']
                    });
                    dropDownListObject.appendTo(statusElement);
                }
                var startElement = args.element.querySelector('#StartTime');
                if (!startElement.classList.contains('e-datetimepicker')) {
                    startElement.value = (args.data).StartTime;
                    new ej.calendars.DateTimePicker({ value: new Date(startElement.value) || new Date() }, startElement);
                }
                var endElement = args.element.querySelector('#EndTime');
                if (!endElement.classList.contains('e-datetimepicker')) {
                    endElement.value = (args.data).EndTime;
                    new ej.calendars.DateTimePicker({ value: new Date(endElement.value) || new Date() }, endElement);
                }
                var descriptionElement = args.element.querySelector('#Description');
                if (descriptionElement) {
                    descriptionElement.value = (args.data).Description || "";
                }
            }
        }
    function onPopupClose(args) {
            if (args.type === 'Editor' && !ej.base.isNullOrUndefined(args.data)) {
                var subjectElement = args.element.querySelector('#Subject');
                if (subjectElement) {
                    (args.data).Subject = subjectElement.value;
                }
                var statusElement = args.element.querySelector('#EventType');
                if (statusElement) {
                    (args.data).EventType = statusElement.value;
                }
                var startElement = args.element.querySelector('#StartTime');
                if (startElement) {
                    (args.data).StartTime = startElement.value;
                }
                var endElement = args.element.querySelector('#EndTime');
                if (endElement) {
                    (args.data).EndTime = endElement.value;
                }
                var descriptionElement = args.element.querySelector('#Description');
                if (descriptionElement) {
                    (args.data).Description = descriptionElement.value;
                }
            }
    }
</script>
public ActionResult Index()
{
ViewBag.datasource = GetScheduleData();
List<ScheduleView> viewOption = new List<ScheduleView>()
{
new ScheduleView { Option = Syncfusion.EJ2.Schedule.View.Day },
new ScheduleView { Option = Syncfusion.EJ2.Schedule.View.Week },
new ScheduleView { Option = Syncfusion.EJ2.Schedule.View.WorkWeek },
new ScheduleView { Option = Syncfusion.EJ2.Schedule.View.Month }
};
ViewBag.view = viewOption;
return View();
}
public List<AppointmentData> GetScheduleData()
{
List<AppointmentData> appData = new List<AppointmentData>();
appData.Add(new AppointmentData
{
Id = 1,
Subject = "Surgery - Andrew",
EventType = "Confirmed",
StartTime = new DateTime(2018, 2, 12, 9, 30, 0),
EndTime = new DateTime(2018, 2, 12, 10, 30, 0),
OwnerId = 3
});
return appData;
}
public class AppointmentData
{
public int Id { get; set; }
public string Subject { get; set; }
public string EventType { get; set; }
public DateTime StartTime { get; set; }
public DateTime EndTime { get; set; }
public bool IsAllDay { get; set; }
public int OwnerId { get; set; }
}In case, if you need to prevent only specific popups on Scheduler, then you can check the condition based on the popup type. The types of the popup that can be checked within the popupClose event are as follows.
| Type | Description |
|---|---|
Editor |
For Detailed editor window. |
QuickInfo |
For Quick popup which opens on cell click. |
EditEventInfo |
For Quick popup which opens on event click. |
ViewEventInfo |
For Quick popup which opens on responsive mode. |
EventContainer |
For more event indicator popup. |
RecurrenceAlert |
For edit recurrence event alert popup. |
DeleteAlert |
For delete confirmation popup. |
ValidationAlert |
For validation alert popup. |
RecurrenceValidationAlert |
For recurrence validation alert popup. |
More events indicator and popup
When the number of appointments count that lies on a particular time range * default appointment height exceeds the default height of a cell in month view and all other timeline views, a + more text indicator will be displayed at the bottom of those cells. This indicator denotes that the cell contains few more appointments in it and clicking on that will display a popup displaying all the appointments present on that day.
NOTE
To disable this option of showing popup with all hidden appointments, while clicking on the text indicator, you can do code customization within the
popupOpenevent.
The same indicator is displayed on all-day row in calendar views such as day, week and work week views alone, when the number of appointment count present in a cell exceeds three. Clicking on the text indicator here will not open a popup, but will allow the expand/collapse option for viewing the remaining appointments present in the all-day row.
The following code example shows how to disable the display of such popups while clicking on the more text indicator.
@using Syncfusion.EJ2.Schedule

<ejs-schedule id="schedule" height="550" selectedDate="new DateTime(2023, 2, 15)" views="@ViewBag.view" currentView="Month" popupOpen="onPopupOpen">
    <e-schedule-eventsettings dataSource="@ViewBag.datasource"></e-schedule-eventsettings>
</ejs-schedule>

<script type="text/javascript">
    function onPopupOpen(args) {
        if (args.type === 'EventContainer') {
            args.cancel = true;
        }
    }
</script>
public ActionResult Index()
{
ViewBag.datasource = GetScheduleData();
List<ScheduleView> viewOption = new List<ScheduleView>()
{
new ScheduleView { Option = Syncfusion.EJ2.Schedule.View.Day },
new ScheduleView { Option = Syncfusion.EJ2.Schedule.View.Week },
new ScheduleView { Option = Syncfusion.EJ2.Schedule.View.WorkWeek },
new ScheduleView { Option = Syncfusion.EJ2.Schedule.View.Month }
};
ViewBag.view = viewOption;
return View();
}
public List<AppointmentData> GetScheduleData()
{
List<AppointmentData> appData = new List<AppointmentData>();
appData.Add(new AppointmentData{ Id = 1, Subject = "Meeting-1", StartTime = new DateTime(2023, 2, 15, 10, 0, 0), EndTime = new DateTime(2023, 2, 15, 12, 30, 0), IsAllDay = true });
appData.Add(new AppointmentData{ Id = 2, Subject = "Meeting-2", StartTime = new DateTime(2023, 2, 15, 10, 0, 0), EndTime = new DateTime(2023, 2, 15, 12, 30, 0), IsAllDay = true });
appData.Add(new AppointmentData{ Id = 3, Subject = "Meeting-3", StartTime = new DateTime(2023, 2, 15, 10, 0, 0), EndTime = new DateTime(2023, 2, 15, 12, 30, 0), IsAllDay = true });
appData.Add(new AppointmentData{ Id = 4, Subject = "Meeting-4", StartTime = new DateTime(2023, 2, 15, 10, 0, 0), EndTime = new DateTime(2023, 2, 15, 12, 30, 0), IsAllDay = true });
return appData;
}
public class AppointmentData
{
public int Id { get; set; }
public string Subject { get; set; }
public DateTime StartTime { get; set; }
public DateTime EndTime { get; set; }
public bool IsAllDay { get; set; }
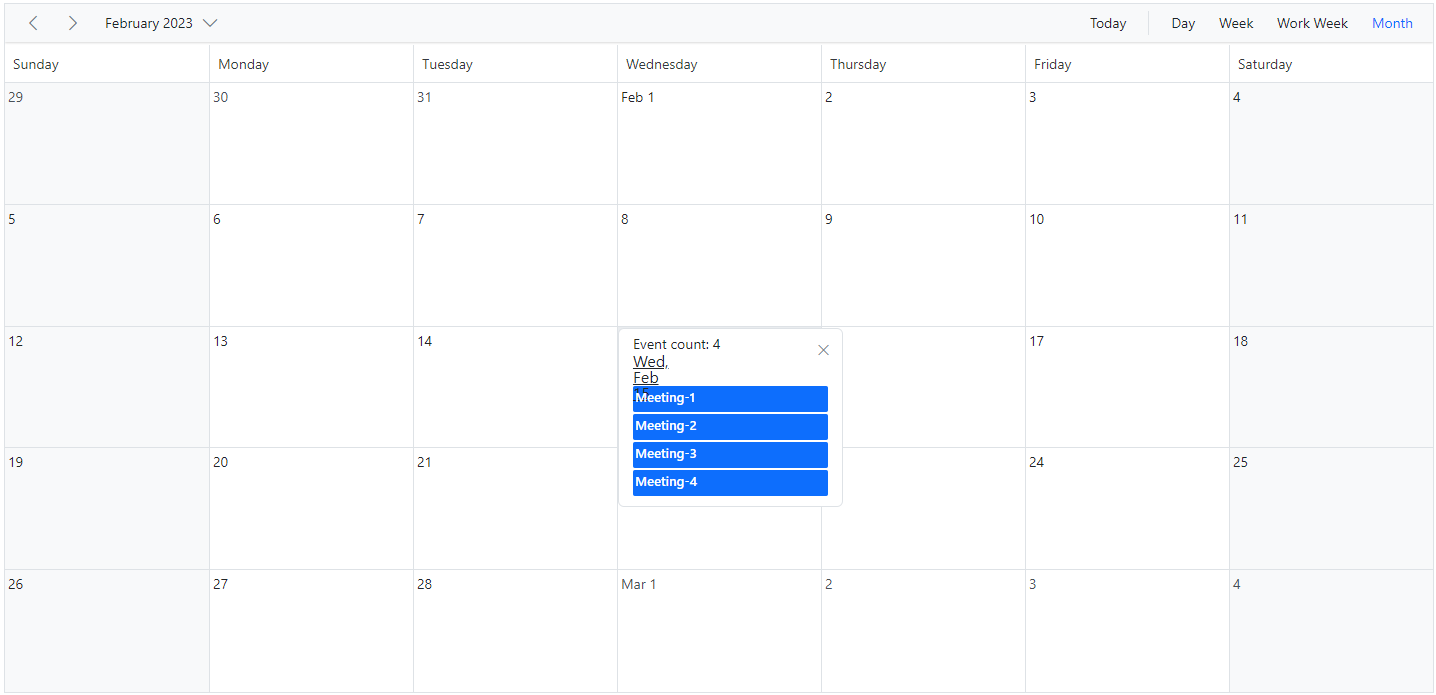
}How to customize the popup that opens on more indicator
The following code example shows you how to customize the default more indicator popup in which number of events rendered count on the day has been shown in the header.
@using Syncfusion.EJ2.Schedule

<ejs-schedule id="schedule" height="550" currentView="Month" selectedDate="new DateTime(2023, 2, 15)" views="@ViewBag.view" popupOpen="onPopupOpen">
    <e-schedule-eventsettings dataSource="@ViewBag.datasource"></e-schedule-eventsettings>
</ejs-schedule>

<script type="text/javascript">
    function onPopupOpen(args) {
        if (args.type === 'EventContainer') {
            var instance = new ej.base.Internationalization();
            var date = instance.formatDate(args.data.date, { skeleton: 'MMMEd' });
            args.element.querySelector('.e-header-date').innerText = date;
            args.element.querySelector('.e-header-day').innerText = 'Event count: ' + args.data.event.length;
        }
    }
</script>
public ActionResult Index()
{
ViewBag.datasource = GetScheduleData();
List<ScheduleView> viewOption = new List<ScheduleView>()
{
new ScheduleView { Option = Syncfusion.EJ2.Schedule.View.Day },
new ScheduleView { Option = Syncfusion.EJ2.Schedule.View.Week },
new ScheduleView { Option = Syncfusion.EJ2.Schedule.View.WorkWeek },
new ScheduleView { Option = Syncfusion.EJ2.Schedule.View.Month }
};
ViewBag.view = viewOption;
return View();
}
public List<AppointmentData> GetScheduleData()
{
List<AppointmentData> appData = new List<AppointmentData>();
appData.Add(new AppointmentData{ Id = 1, Subject = "Meeting-1", StartTime = new DateTime(2023, 2, 15, 10, 0, 0), EndTime = new DateTime(2023, 2, 15, 12, 30, 0), IsAllDay = true });
appData.Add(new AppointmentData{ Id = 2, Subject = "Meeting-2", StartTime = new DateTime(2023, 2, 15, 10, 0, 0), EndTime = new DateTime(2023, 2, 15, 12, 30, 0), IsAllDay = true });
appData.Add(new AppointmentData{ Id = 3, Subject = "Meeting-3", StartTime = new DateTime(2023, 2, 15, 10, 0, 0), EndTime = new DateTime(2023, 2, 15, 12, 30, 0), IsAllDay = true });
appData.Add(new AppointmentData{ Id = 4, Subject = "Meeting-4", StartTime = new DateTime(2023, 2, 15, 10, 0, 0), EndTime = new DateTime(2023, 2, 15, 12, 30, 0), IsAllDay = true });
return appData;
}
public class AppointmentData
{
public int Id { get; set; }
public string Subject { get; set; }
public DateTime StartTime { get; set; }
public DateTime EndTime { get; set; }
public bool IsAllDay { get; set; }
}
How to prevent the display of popup when clicking on the more text indicator
It is possible to prevent the display of popup window by passing the value true to cancel option within the MoreEventsClick event.
@using Syncfusion.EJ2.Schedule

<ejs-schedule id="schedule" height="550" selectedDate="new DateTime(2018, 2, 15)" views="@ViewBag.view" currentView="Month" moreEventsClick="onMoreEventsClick">
    <e-schedule-eventsettings dataSource="@ViewBag.datasource"></e-schedule-eventsettings>
</ejs-schedule>

<script type="text/javascript">
    function onMoreEventsClick(args) {
        args.cancel = true;
    }
</script>
public ActionResult Index()
{
ViewBag.datasource = GetScheduleData();
List<ScheduleView> viewOption = new List<ScheduleView>()
{
new ScheduleView { Option = Syncfusion.EJ2.Schedule.View.Day },
new ScheduleView { Option = Syncfusion.EJ2.Schedule.View.Week },
new ScheduleView { Option = Syncfusion.EJ2.Schedule.View.WorkWeek },
new ScheduleView { Option = Syncfusion.EJ2.Schedule.View.Month }
};
ViewBag.view = viewOption;
return View();
}
public List<AppointmentData> GetScheduleData()
{
List<AppointmentData> appData = new List<AppointmentData>();
appData.Add(new AppointmentData { Id = 1, Subject = "Meeting-1", StartTime = new DateTime(2018, 2, 15, 10, 0, 0), EndTime = new DateTime(2018, 2, 15, 12, 30, 0), IsAllDay = true });
appData.Add(new AppointmentData { Id = 2, Subject = "Meeting-2", StartTime = new DateTime(2018, 2, 15, 10, 0, 0), EndTime = new DateTime(2018, 2, 15, 12, 30, 0), IsAllDay = true });
appData.Add(new AppointmentData { Id = 3, Subject = "Meeting-3", StartTime = new DateTime(2018, 2, 15, 10, 0, 0), EndTime = new DateTime(2018, 2, 15, 12, 30, 0), IsAllDay = true });
appData.Add(new AppointmentData { Id = 4, Subject = "Meeting-4", StartTime = new DateTime(2018, 2, 15, 10, 0, 0), EndTime = new DateTime(2018, 2, 15, 12, 30, 0), IsAllDay = true });
return appData;
}
public class AppointmentData
{
public int Id { get; set; }
public string Subject { get; set; }
public DateTime StartTime { get; set; }
public DateTime EndTime { get; set; }
public bool IsAllDay { get; set; }
}How to navigate Day view when clicking on more text indicator
The following code example shows you how to customize the moreEventsClick property to navigate to the Day view when clicking on the more text indicator.
@using Syncfusion.EJ2.Schedule

<ejs-schedule id="schedule" height="550" selectedDate="new DateTime(2018, 2, 15)" views="@ViewBag.view" currentView="Month" moreEventsClick="onMoreEventsClick">
    <e-schedule-eventsettings dataSource="@ViewBag.datasource"></e-schedule-eventsettings>
</ejs-schedule>

<script type="text/javascript">
    function onMoreEventsClick(args) {
        args.isPopupOpen = false;
    }
</script>
public ActionResult Index()
{
ViewBag.datasource = GetScheduleData();
List<ScheduleView> viewOption = new List<ScheduleView>()
{
new ScheduleView { Option = Syncfusion.EJ2.Schedule.View.Day },
new ScheduleView { Option = Syncfusion.EJ2.Schedule.View.Week },
new ScheduleView { Option = Syncfusion.EJ2.Schedule.View.WorkWeek },
new ScheduleView { Option = Syncfusion.EJ2.Schedule.View.Month }
};
ViewBag.view = viewOption;
return View();
}
public List<AppointmentData> GetScheduleData()
{
List<AppointmentData> appData = new List<AppointmentData>();
appData.Add(new AppointmentData { Id = 1, Subject = "Meeting-1", StartTime = new DateTime(2018, 2, 15, 10, 0, 0), EndTime = new DateTime(2018, 2, 15, 12, 30, 0), IsAllDay = true });
appData.Add(new AppointmentData { Id = 2, Subject = "Meeting-2", StartTime = new DateTime(2018, 2, 15, 10, 0, 0), EndTime = new DateTime(2018, 2, 15, 12, 30, 0), IsAllDay = true });
appData.Add(new AppointmentData { Id = 3, Subject = "Meeting-3", StartTime = new DateTime(2018, 2, 15, 10, 0, 0), EndTime = new DateTime(2018, 2, 15, 12, 30, 0), IsAllDay = true });
appData.Add(new AppointmentData { Id = 4, Subject = "Meeting-4", StartTime = new DateTime(2018, 2, 15, 10, 0, 0), EndTime = new DateTime(2018, 2, 15, 12, 30, 0), IsAllDay = true });
return appData;
}
public class AppointmentData
{
public int Id { get; set; }
public string Subject { get; set; }
public DateTime StartTime { get; set; }
public DateTime EndTime { get; set; }
public bool IsAllDay { get; set; }
}How to close the editor window manually
You can close the editor window by using closeEditor method.
@using Syncfusion.EJ2.Schedule

<ejs-schedule id="schedule" height="550" selectedDate="new DateTime(2022, 2, 5)" views="@ViewBag.view" popupOpen="onPopupOpen" >
    <e-schedule-eventsettings dataSource="@ViewBag.datasource"></e-schedule-eventsettings>
</ejs-schedule>

<script type="text/javascript">
    function onPopupOpen(args) {
        if (args.type === 'Editor') {
            if (!args.element.querySelector('#closeEditor')) {
                var btnElement = ej.base.createElement("BUTTON", { id: 'closeEditor' });
                args.element.querySelector('.e-footer-content').appendChild(btnElement);
                var btnObj = new ej.buttons.Button();
                btnElement.textContent = "Close Editor";
                btnObj.appendTo('#closeEditor');
                btnObj.element.onclick = function () {
                    scheduleObj.closeEditor();
                };
            }
        }
    }
</script>
public ActionResult Index()
{
ViewBag.datasource = GetScheduleData();
List<ScheduleView> viewOption = new List<ScheduleView>()
{
new ScheduleView { Option = Syncfusion.EJ2.Schedule.View.Day },
new ScheduleView { Option = Syncfusion.EJ2.Schedule.View.Week },
new ScheduleView { Option = Syncfusion.EJ2.Schedule.View.WorkWeek },
new ScheduleView { Option = Syncfusion.EJ2.Schedule.View.Month }
};
ViewBag.view = viewOption;
return View();
}
public List<AppointmentData> GetScheduleData()
{
List<AppointmentData> appData = new List<AppointmentData>();
appData.Add(new AppointmentData
{ Id = 1, Subject = "Blue Moon Eclipse", StartTime = new DateTime(2022, 2, 13, 9, 30, 0), EndTime = new DateTime(2022, 2, 13, 11, 0, 0) });
appData.Add(new AppointmentData
{ Id = 2, Subject = "Milky Way as Melting pot", StartTime = new DateTime(2022, 2, 15, 9, 30, 0), EndTime = new DateTime(2022, 2, 15, 11, 0, 0) });
return appData;
}
public class AppointmentData
{
public int Id { get; set; }
public string Subject { get; set; }
public DateTime StartTime { get; set; }
public DateTime EndTime { get; set; }
}How to open the quick info popup manually
You can open the quick info popup in scheduler by using the openQuickInfoPopup public method. To open the cell quick info popup, you can pass the cell data as an argument to the method. To open the event quick info popup, you should pass the event data object as an argument to the method.
@using Syncfusion.EJ2.Schedule

<div>
    <ejs-button id="btn1" content="Show Cell QuickInfo Popup"></ejs-button>
    <ejs-button id="btn2" content="Show Event QuickInfo Popup"></ejs-button>
</div>

<ejs-schedule id="schedule" height="550" selectedDate="new DateTime(2022, 2, 5)" views="@ViewBag.view" >
    <e-schedule-eventsettings dataSource="@ViewBag.datasource"></e-schedule-eventsettings>
</ejs-schedule>

<script type="text/javascript">
    document.getElementById('btn1').onclick = function () {
        var scheduleObj = document.getElementById('schedule').ej2_instances[0];
        var cellData = {
            Subject: 'Milky Way as Melting pot',
            StartTime: new Date(2022, 2, 5, 20, 0, 0),
            EndTime: new Date(2022, 2, 5, 21, 0, 0)
        };
        scheduleObj.openQuickInfoPopup(cellData, 'Add');
    };
    document.getElementById('btn2').onclick = function () {
        var scheduleObj = document.getElementById('schedule').ej2_instances[0];
        var eventData = {
            Id: 2,
            Subject: 'Milky Way as Melting pot',
            StartTime: new Date(2022, 2, 5, 20, 0, 0),
            EndTime: new Date(2022, 2, 5, 21, 0, 0)
        };
        scheduleObj.openQuickInfoPopup(eventData, 'Save');
    };
</script>
public ActionResult Index()
{
List<ScheduleView> viewOption = new List<ScheduleView>()
{
new ScheduleView { Option = Syncfusion.EJ2.Schedule.View.Day },
new ScheduleView { Option = Syncfusion.EJ2.Schedule.View.Week },
new ScheduleView { Option = Syncfusion.EJ2.Schedule.View.WorkWeek },
new ScheduleView { Option = Syncfusion.EJ2.Schedule.View.Month }
};
ViewBag.view = viewOption;
return View();
}
public List<AppointmentData> GetScheduleData()
{
List<AppointmentData> appData = new List<AppointmentData>();
appData.Add(new AppointmentData
{ Id = 1, Subject = "Blue Moon Eclipse", StartTime = new DateTime(2022, 2, 13, 9, 30, 0), EndTime = new DateTime(2022, 2, 13, 11, 0, 0) });
appData.Add(new AppointmentData
{ Id = 2, Subject = "Milky Way as Melting pot", StartTime = new DateTime(2022, 2, 15, 9, 30, 0), EndTime = new DateTime(2022, 2, 15, 11, 0, 0) });
return appData;
}
public class AppointmentData
{
public int Id { get; set; }
public string Subject { get; set; }
public DateTime StartTime { get; set; }
public DateTime EndTime { get; set; }
}How to close the quick info popup manually
You can close the quick info popup in scheduler by using the closeQuickInfoPopup public method. The following code example demonstrates the how to close quick info popup manually.
@using Syncfusion.EJ2.Schedule

<div>
    <ejs-button id="btn1" content="Close Quick Info Popup"></ejs-button>
</div>

<ejs-schedule id="schedule" height="550" selectedDate="new DateTime(2022, 2, 5)" views="@ViewBag.view" >
    <e-schedule-eventsettings dataSource="@ViewBag.datasource"></e-schedule-eventsettings>
</ejs-schedule>

<script type="text/javascript">
    document.getElementById('btn1').onclick = function () {
        var scheduleObj = document.getElementById('schedule').ej2_instances[0];
        scheduleObj.closeQuickInfoPopup();
    };

</script>
public ActionResult Index()
{
ViewBag.datasource = GetScheduleData();
List<ScheduleView> viewOption = new List<ScheduleView>()
{
new ScheduleView { Option = Syncfusion.EJ2.Schedule.View.Day },
new ScheduleView { Option = Syncfusion.EJ2.Schedule.View.Week },
new ScheduleView { Option = Syncfusion.EJ2.Schedule.View.WorkWeek },
new ScheduleView { Option = Syncfusion.EJ2.Schedule.View.Month }
};
ViewBag.view = viewOption;
return View();
}
public List<AppointmentData> GetScheduleData()
{
List<AppointmentData> appData = new List<AppointmentData>();
appData.Add(new AppointmentData
{ Id = 1, Subject = "Blue Moon Eclipse", StartTime = new DateTime(2022, 2, 13, 9, 30, 0), EndTime = new DateTime(2022, 2, 13, 11, 0, 0) });
appData.Add(new AppointmentData
{ Id = 2, Subject = "Milky Way as Melting pot", StartTime = new DateTime(2022, 2, 15, 9, 30, 0), EndTime = new DateTime(2022, 2, 15, 11, 0, 0) });
return appData;
}
public class AppointmentData
{
public int Id { get; set; }
public string Subject { get; set; }
public DateTime StartTime { get; set; }
public DateTime EndTime { get; set; }
}NOTE
You can refer to our ASP.NET Core Scheduler feature tour page for its groundbreaking feature representations. You can also explore our ASP.NET Core Scheduler example to knows how to present and manipulate data.