How can I help you?
Getting Started with the Vue Schedule Component in Vue 2
7 Feb 202624 minutes to read
This article provides a step-by-step guide to creating a Vue 2 application using Vue-CLI and integrating the Syncfusion® Vue Schedule component. It covers project setup, component installation, module injection, data binding, and basic customization.
Ready to streamline your Syncfusion® Vue development? Discover the full potential of Syncfusion® Vue components with Syncfusion® AI Coding Assistant. Effortlessly integrate, configure, and enhance your projects with intelligent, context-aware code suggestions, streamlined setups, and real-time insights—all seamlessly integrated into your preferred AI-powered IDEs like VS Code, Cursor, Syncfusion® CodeStudio and more. Explore Syncfusion® AI Coding Assistant
Check the following video to learn how to build a Vue Scheduler application:
Prerequisites
System requirements for Syncfusion® Vue UI components
Setting up the Vue 2 project
To generate a Vue 2 project using Vue-CLI, use the vue create command. Follow these steps to install Vue CLI and create a new project:
npm install -g @vue/cli
vue create quickstart
cd quickstart
npm run serve
or
yarn global add @vue/cli
vue create quickstart
cd quickstart
yarn run serve
When creating a new project, choose the option Default ([Vue 2] babel, eslint) from the menu.
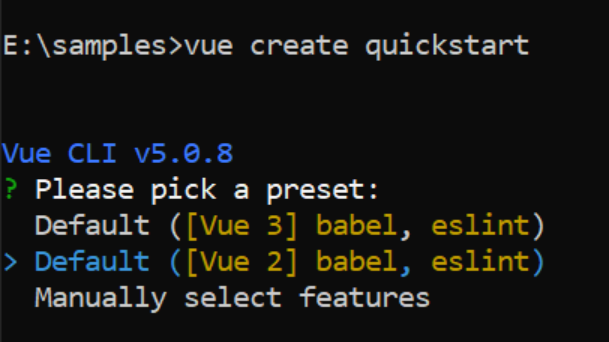
Once the quickstart project is set up with default settings, proceed to add Syncfusion® components to the project.
Add Syncfusion® Vue packages
Syncfusion® packages are available at npmjs.com. To use Vue components, install the required npm package.
This article uses the Vue Schedule component as an example. Install the @syncfusion/ej2-vue-schedule package by running the following command:
npm install @syncfusion/ej2-vue-schedule --saveor
yarn add @syncfusion/ej2-vue-scheduleThe –save will instruct NPM to include the Scheduler package inside of the
dependenciessection of thepackage.json.
Import Syncfusion® CSS styles
You can import themes for the Syncfusion® Vue component in various ways, such as using CSS or SASS styles from npm packages, CDN, CRG and Theme Studio. Refer to themes topic to know more about built-in themes and different ways to refer to themes in a Vue project.
In this article, the material3 theme is applied using CSS styles, which are available in installed packages. The necessary material3 CSS styles for the Schedule component and its dependents were imported into the <style> section of src/App.vue file.
<style>
@import '/node_modules/@syncfusion/ej2-base/styles/material3.css';
@import '/node_modules/@syncfusion/ej2-buttons/styles/material3.css';
@import '/node_modules/@syncfusion/ej2-calendars/styles/material3.css';
@import '/node_modules/@syncfusion/ej2-dropdowns/styles/material3.css';
@import '/node_modules/@syncfusion/ej2-inputs/styles/material3.css';
@import '/node_modules/@syncfusion/ej2-navigations/styles/material3.css';
@import '/node_modules/@syncfusion/ej2-popups/styles/material3.css';
@import '/node_modules/@syncfusion/ej2-vue-schedule/styles/material3.css';
</style>
Add Syncfusion® Vue component
Follow the below steps to add the Vue Schedule component using:
1. First, import and register the Schedule component in the script section of the src/App.vue file.
<script>
import { ScheduleComponent } from '@syncfusion/ej2-vue-schedule';
</script>
2. In the template section, define the Schedule component property.
<template>
  <div id='app'>
    <ejs-schedule ></ejs-schedule>
  </div>
</template>
Module injection
The crucial step on creating a Schedule with specific views, is to inject the required modules. The modules that are available with common Schedule basic functionality are as follows.
- Day - Inject this module for displaying day view.
- Week - Inject this module for displaying week view.
- WorkWeek - Inject this module for displaying work week view.
- Month - Inject this module for displaying month view.
- Agenda - Inject this module for displaying agenda view.
- MonthAgenda - Inject this module for displaying month agenda view.
- TimelineViews - Inject this module for displaying timeline day, timeline week, timeline work week view.
- TimelineMonth - Inject this module for displaying timeline month view.
These modules should be injected into the Schedule using the provide method within the app.vue file as shown below. On doing so, only the injected views will be loaded and displayed on the Schedule.
[src/app/app.vue]
<template>
  <div id='app'>
    <ejs-schedule ></ejs-schedule>
  </div>
</template>
<script>
import { ScheduleComponent, Day, Week, WorkWeek, Month, Agenda } from '@syncfusion/ej2-vue-schedule';

export default {
  components: {
    'ejs-schedule': ScheduleComponent
  },
  provide: {
    schedule: [Day, Week, WorkWeek, Month, Agenda]
  }
}
</script>
Run the project
To run the project, use the following command:
npm run serveor
yarn run serveThe output will display the empty Scheduler.
Populating Appointments
To populate the empty Scheduler with appointments, define either the local JSON data or remote data through the dataSource property available within the eventSettings option. To define any appointments, start and end time fields are mandatory. In the following example, you can see the appointment defined with default fields such as Id, Subject, StartTime and EndTime.
<template>
  <div id='app'>
      <ejs-schedule height='550px' :selectedDate='selectedDate' :eventSettings='eventSettings'></ejs-schedule>
  </div>
</template>
<script>
  import { ScheduleComponent, Day, Week, WorkWeek, Month, Agenda } from '@syncfusion/ej2-vue-schedule';
  export default {
      components: {
        'ejs-schedule': ScheduleComponent
      },
      data () {
        return {
          selectedDate: new Date(2018, 1, 15),
          eventSettings: {
            dataSource: [{
              Id: 1,
              Subject: 'Meeting',
              StartTime: new Date(2018, 1, 15, 10, 0),
              EndTime: new Date(2018, 1, 15, 12, 30)
            }]
          }
        }
      },
      provide: {
        schedule: [Day, Week, WorkWeek, Month, Agenda]
      }
  }
</script>
You can also provide different names to these default fields, for which the custom names of those fields must be mapped appropriately within fields property as shown below.
<template>
  <div id='app'>
      <ejs-schedule height='550px' :selectedDate='selectedDate' :eventSettings='eventSettings'></ejs-schedule>
  </div>
</template>
<script>
  import { ScheduleComponent, Day, Week, WorkWeek, Month, Agenda } from '@syncfusion/ej2-vue-schedule';

  let data = [{
    Id: 2,
    EventName: 'Meeting',
    StartTime: new Date(2018, 1, 15, 10, 0),
    EndTime: new Date(2018, 1, 15, 12, 30),
    IsAllDay: false
  }];

  export default {
    components: {
      'ejs-schedule': ScheduleComponent
    },
    data () {
      return {
        selectedDate: new Date(2018, 1, 15),
        eventSettings: {
          dataSource: data,
          fields: {
            id: 'Id',
            subject: { name: 'EventName' },
            isAllDay: { name: 'IsAllDay' },
            startTime: { name: 'StartTime' },
            endTime: { name: 'EndTime' }
          }
        }
      }
    },
    provide: {
      schedule: [Day, Week, WorkWeek, Month, Agenda]
    }
  }
</script>
The other fields available in Scheduler can be referred from here.
Setting Date
Scheduler usually displays the system date as its current date. To change the current date of Scheduler with specific date, define the `selectedDate property.
[src/app/app.vue]
<template>
  <div id='app'>
      <ejs-schedule height='550px' :selectedDate='selectedDate'></ejs-schedule>
  </div>
</template>
<script>
  import { ScheduleComponent, Day, Week, WorkWeek, Month, Agenda } from '@syncfusion/ej2-vue-schedule';

  export default {
    components: {
      'ejs-schedule': ScheduleComponent
    },
    data (){
      return {
        selectedDate: new Date(2018, 1, 15)
      }
    },
    provide: {
      schedule: [Day, Week, WorkWeek, Month, Agenda]
    }
  }
</script>
Setting View
Scheduler displays week view by default. To change the current view, define the applicable view name to the currentView property. The applicable view names are,
- Day
- Week
- WorkWeek
- Month
- Year
- Agenda
- MonthAgenda
- TimelineDay
- TimelineWeek
- TimelineWorkWeek
- TimelineMonth
- TimelineYear
<template>
    <div id='app'>
        <ejs-schedule height='550px' :selectedDate='selectedDate' :currentView='currentView'>
        </ejs-schedule>
    </div>
</template>
<script>
  import { ScheduleComponent, Day, WorkWeek, Agenda, Month, Week } from '@syncfusion/ej2-vue-schedule';
  export default {
    components: {
      'ejs-schedule': ScheduleComponent
    },
    data () {
      return {
        selectedDate: new Date(2018, 1, 15),
        currentView: 'Month',
      }
    },
    provide: {
      schedule: [Day, WorkWeek, Agenda, Month, Week]
    }
  }
</script>
Individual View Customization
Each individual Scheduler views can be customized with its own options such as setting different start and end hour on Week and Work Week views, whereas hiding the weekend days on Month view alone.
This can be achieved by defining views property to accept the array of object type, where each object depicts the individual view customization.
The output will display the Scheduler with the specified view configuration.
<template>
  <div id='app'>
    <ejs-schedule height='550px' width='100%' :selectedDate='selectedDate' :eventSettings='eventSettings'>
      <e-views>
        <e-view option='Week' startHour='07:00' endHour='15:00'></e-view>
        <e-view option='WorkWeek' startHour='10:00' endHour='18:00'></e-view>
        <e-view option='Month' showWeekend=false></e-view>
      </e-views>
    </ejs-schedule>
  </div>
</template>
<script>
import { scheduleData } from './datasource.js';
import { extend } from '@syncfusion/ej2-base';
import { ScheduleComponent, ViewsDirective, ViewDirective, WorkWeek, Month, Week } from '@syncfusion/ej2-vue-schedule';

export default {
  name: "App",
  components: {
    'ejs-schedule': ScheduleComponent,
    'e-view': ViewDirective,
    'e-views': ViewsDirective
  },
  data() {
    return {
      eventSettings: { dataSource: extend([], scheduleData, null, true) },
      selectedDate: new Date(2018, 1, 15)
    }
  },
  provide: {
    schedule: [WorkWeek, Month, Week]
  }
}
</script>
<style>
@import '../node_modules/@syncfusion/ej2-base/styles/material3.css';
@import '../node_modules/@syncfusion/ej2-buttons/styles/material3.css';
@import '../node_modules/@syncfusion/ej2-calendars/styles/material3.css';
@import '../node_modules/@syncfusion/ej2-dropdowns/styles/material3.css';
@import '../node_modules/@syncfusion/ej2-inputs/styles/material3.css';
@import '../node_modules/@syncfusion/ej2-navigations/styles/material3.css';
@import '../node_modules/@syncfusion/ej2-popups/styles/material3.css';
@import '../node_modules/@syncfusion/ej2-vue-schedule/styles/material3.css';
</style>
define(["require", "exports"], function (require, exports) {
"use strict";
Object.defineProperty(exports, "__esModule", { value: true });
exports.scheduleData = [
{
Id: 1,
Subject: 'Conference',
StartTime: new Date(2018, 1, 7, 10, 0),
EndTime: new Date(2018, 1, 7, 11, 0),
IsAllDay: false
}, {
Id: 2,
Subject: 'Meeting - 1',
StartTime: new Date(2018, 1, 15, 10, 0),
EndTime: new Date(2018, 1, 16, 12, 30),
IsAllDay: false
}, {
Id: 3,
Subject: 'Paris',
StartTime: new Date(2018, 1, 13, 12, 0),
EndTime: new Date(2018, 1, 13, 12, 30),
IsAllDay: false
}, {
Id: 4,
Subject: 'Vacation',
StartTime: new Date(2018, 1, 12, 10, 0),
EndTime: new Date(2018, 1, 12, 10, 30),
IsAllDay: false
}
];
exports.eventData = [
{
Id: 1,
Subject: 'Explosion of Betelgeuse Star',
StartTime: new Date(2018, 1, 11, 9, 30),
EndTime: new Date(2018, 1, 11, 11, 0),
CategoryColor: '#1aaa55'
}, {
Id: 2,
Subject: 'Thule Air Crash Report',
StartTime: new Date(2018, 1, 12, 12, 0),
EndTime: new Date(2018, 1, 12, 14, 0),
CategoryColor: '#357cd2'
}, {
Id: 3,
Subject: 'Blue Moon Eclipse',
StartTime: new Date(2018, 1, 13, 9, 30),
EndTime: new Date(2018, 1, 13, 11, 0),
CategoryColor: '#7fa900'
}, {
Id: 4,
Subject: 'Meteor Showers in 2018',
StartTime: new Date(2018, 1, 14, 13, 0),
EndTime: new Date(2018, 1, 14, 14, 30),
CategoryColor: '#ea7a57'
}, {
Id: 5,
Subject: 'Milky Way as Melting pot',
StartTime: new Date(2018, 1, 15, 12, 0),
EndTime: new Date(2018, 1, 15, 14, 0),
CategoryColor: '#00bdae'
}, {
Id: 6,
Subject: 'Mysteries of Bermuda Triangle',
StartTime: new Date(2018, 1, 15, 9, 30),
EndTime: new Date(2018, 1, 15, 11, 0),
CategoryColor: '#f57f17'
}, {
Id: 7,
Subject: 'Glaciers and Snowflakes',
StartTime: new Date(2018, 1, 16, 11, 0),
EndTime: new Date(2018, 1, 16, 12, 30),
CategoryColor: '#1aaa55'
}, {
Id: 8,
Subject: 'Life on Mars',
StartTime: new Date(2018, 1, 17, 9, 0),
EndTime: new Date(2018, 1, 17, 10, 0),
CategoryColor: '#357cd2'
}, {
Id: 9,
Subject: 'Alien Civilization',
StartTime: new Date(2018, 1, 19, 11, 0),
EndTime: new Date(2018, 1, 19, 13, 0),
CategoryColor: '#7fa900'
}, {
Id: 10,
Subject: 'Wildlife Galleries',
StartTime: new Date(2018, 1, 21, 11, 0),
EndTime: new Date(2018, 1, 21, 13, 0),
CategoryColor: '#ea7a57'
}, {
Id: 11,
Subject: 'Best Photography 2018',
StartTime: new Date(2018, 1, 22, 9, 30),
EndTime: new Date(2018, 1, 22, 11, 0),
CategoryColor: '#00bdae'
}, {
Id: 12,
Subject: 'Smarter Puppies',
StartTime: new Date(2018, 1, 9, 10, 0),
EndTime: new Date(2018, 1, 9, 11, 30),
CategoryColor: '#f57f17'
}, {
Id: 13,
Subject: 'Myths of Andromeda Galaxy',
StartTime: new Date(2018, 1, 7, 10, 30),
EndTime: new Date(2018, 1, 7, 12, 30),
CategoryColor: '#1aaa55'
}, {
Id: 14,
Subject: 'Aliens vs Humans',
StartTime: new Date(2018, 1, 5, 10, 0),
EndTime: new Date(2018, 1, 5, 11, 30),
CategoryColor: '#357cd2'
}, {
Id: 15,
Subject: 'Facts of Humming Birds',
StartTime: new Date(2018, 1, 20, 9, 30),
EndTime: new Date(2018, 1, 20, 11, 0),
CategoryColor: '#7fa900'
}, {
Id: 16,
Subject: 'Sky Gazers',
StartTime: new Date(2018, 1, 23, 11, 0),
EndTime: new Date(2018, 1, 23, 13, 0),
CategoryColor: '#ea7a57'
}, {
Id: 17,
Subject: 'The Cycle of Seasons',
StartTime: new Date(2018, 1, 12, 5, 30),
EndTime: new Date(2018, 1, 12, 7, 30),
CategoryColor: '#00bdae'
}, {
Id: 18,
Subject: 'Space Galaxies and Planets',
StartTime: new Date(2018, 1, 12, 17, 0),
EndTime: new Date(2018, 1, 12, 18, 30),
CategoryColor: '#f57f17'
}, {
Id: 19,
Subject: 'Lifecycle of Bumblebee',
StartTime: new Date(2018, 1, 15, 6, 0),
EndTime: new Date(2018, 1, 15, 7, 30),
CategoryColor: '#7fa900'
}, {
Id: 20,
Subject: 'Sky Gazers',
StartTime: new Date(2018, 1, 15, 16, 0),
EndTime: new Date(2018, 1, 15, 18, 0),
CategoryColor: '#ea7a57'
},
{
Id: 21,
Subject: 'Explosion of Betelgeuse Star',
StartTime: new Date(2018, 0, 11, 9, 30),
EndTime: new Date(2018, 0, 11, 11, 0),
CategoryColor: '#1aaa55'
}, {
Id: 22,
Subject: 'Thule Air Crash Report',
StartTime: new Date(2018, 0, 12, 12, 0),
EndTime: new Date(2018, 0, 12, 14, 0),
CategoryColor: '#357cd2'
}, {
Id: 23,
Subject: 'Blue Moon Eclipse',
StartTime: new Date(2018, 0, 13, 9, 30),
EndTime: new Date(2018, 0, 13, 11, 0),
CategoryColor: '#7fa900'
}, {
Id: 24,
Subject: 'Meteor Showers in 2018',
StartTime: new Date(2018, 0, 14, 13, 0),
EndTime: new Date(2018, 0, 14, 14, 30),
CategoryColor: '#ea7a57'
}, {
Id: 25,
Subject: 'Milky Way as Melting pot',
StartTime: new Date(2018, 0, 15, 12, 0),
EndTime: new Date(2018, 0, 15, 14, 0),
CategoryColor: '#00bdae'
}, {
Id: 26,
Subject: 'Mysteries of Bermuda Triangle',
StartTime: new Date(2018, 0, 15, 9, 30),
EndTime: new Date(2018, 0, 15, 11, 0),
CategoryColor: '#f57f17'
}, {
Id: 27,
Subject: 'Glaciers and Snowflakes',
StartTime: new Date(2018, 0, 16, 11, 0),
EndTime: new Date(2018, 0, 16, 12, 30),
CategoryColor: '#1aaa55'
}, {
Id: 28,
Subject: 'Life on Mars',
StartTime: new Date(2018, 0, 17, 9, 0),
EndTime: new Date(2018, 0, 17, 10, 0),
CategoryColor: '#357cd2'
}, {
Id: 29,
Subject: 'Alien Civilization',
StartTime: new Date(2018, 0, 19, 11, 0),
EndTime: new Date(2018, 0, 19, 13, 0),
CategoryColor: '#7fa900'
}, {
Id: 30,
Subject: 'Wildlife Galleries',
StartTime: new Date(2018, 0, 21, 11, 0),
EndTime: new Date(2018, 0, 21, 13, 0),
CategoryColor: '#ea7a57'
}, {
Id: 31,
Subject: 'Best Photography 2018',
StartTime: new Date(2018, 0, 22, 9, 30),
EndTime: new Date(2018, 0, 22, 11, 0),
CategoryColor: '#00bdae'
}, {
Id: 32,
Subject: 'Smarter Puppies',
StartTime: new Date(2018, 0, 9, 10, 0),
EndTime: new Date(2018, 0, 9, 11, 30),
CategoryColor: '#f57f17'
}, {
Id: 33,
Subject: 'Myths of Andromeda Galaxy',
StartTime: new Date(2018, 0, 7, 10, 30),
EndTime: new Date(2018, 0, 7, 12, 30),
CategoryColor: '#1aaa55'
}, {
Id: 34,
Subject: 'Aliens vs Humans',
StartTime: new Date(2018, 0, 5, 10, 0),
EndTime: new Date(2018, 0, 5, 11, 30),
CategoryColor: '#357cd2'
}, {
Id: 35,
Subject: 'Facts of Humming Birds',
StartTime: new Date(2018, 0, 20, 9, 30),
EndTime: new Date(2018, 0, 20, 11, 0),
CategoryColor: '#7fa900'
}, {
Id: 36,
Subject: 'Sky Gazers',
StartTime: new Date(2018, 0, 23, 11, 0),
EndTime: new Date(2018, 0, 23, 13, 0),
CategoryColor: '#ea7a57'
}, {
Id: 37,
Subject: 'The Cycle of Seasons',
StartTime: new Date(2018, 0, 12, 5, 30),
EndTime: new Date(2018, 0, 12, 7, 30),
CategoryColor: '#00bdae'
}, {
Id: 38,
Subject: 'Space Galaxies and Planets',
StartTime: new Date(2018, 0, 12, 17, 0),
EndTime: new Date(2018, 0, 12, 18, 30),
CategoryColor: '#f57f17'
}, {
Id: 39,
Subject: 'Lifecycle of Bumblebee',
StartTime: new Date(2018, 0, 15, 6, 0),
EndTime: new Date(2018, 0, 15, 7, 30),
CategoryColor: '#7fa900'
}, {
Id: 40,
Subject: 'Sky Gazers',
StartTime: new Date(2018, 0, 15, 16, 0),
EndTime: new Date(2018, 0, 15, 18, 0),
CategoryColor: '#ea7a57'
},
{
Id: 41,
Subject: 'Explosion of Betelgeuse Star',
StartTime: new Date(2018, 2, 11, 9, 30),
EndTime: new Date(2018, 2, 11, 11, 0),
CategoryColor: '#1aaa55'
}, {
Id: 42,
Subject: 'Thule Air Crash Report',
StartTime: new Date(2018, 2, 12, 12, 0),
EndTime: new Date(2018, 2, 12, 14, 0),
CategoryColor: '#357cd2'
}, {
Id: 43,
Subject: 'Blue Moon Eclipse',
StartTime: new Date(2018, 2, 13, 9, 30),
EndTime: new Date(2018, 2, 13, 11, 0),
CategoryColor: '#7fa900'
}, {
Id: 44,
Subject: 'Meteor Showers in 2018',
StartTime: new Date(2018, 2, 14, 13, 0),
EndTime: new Date(2018, 2, 14, 14, 30),
CategoryColor: '#ea7a57'
}, {
Id: 45,
Subject: 'Milky Way as Melting pot',
StartTime: new Date(2018, 1, 15, 12, 0),
EndTime: new Date(2018, 1, 15, 14, 0),
CategoryColor: '#00bdae'
}, {
Id: 46,
Subject: 'Mysteries of Bermuda Triangle',
StartTime: new Date(2018, 2, 15, 9, 30),
EndTime: new Date(2018, 2, 15, 11, 0),
CategoryColor: '#f57f17'
}, {
Id: 47,
Subject: 'Glaciers and Snowflakes',
StartTime: new Date(2018, 2, 16, 11, 0),
EndTime: new Date(2018, 2, 16, 12, 30),
CategoryColor: '#1aaa55'
}, {
Id: 48,
Subject: 'Life on Mars',
StartTime: new Date(2018, 2, 17, 9, 0),
EndTime: new Date(2018, 2, 17, 10, 0),
CategoryColor: '#357cd2'
}, {
Id: 49,
Subject: 'Alien Civilization',
StartTime: new Date(2018, 2, 19, 11, 0),
EndTime: new Date(2018, 2, 19, 13, 0),
CategoryColor: '#7fa900'
}, {
Id: 50,
Subject: 'Wildlife Galleries',
StartTime: new Date(2018, 2, 21, 11, 0),
EndTime: new Date(2018, 2, 21, 13, 0),
CategoryColor: '#ea7a57'
}, {
Id: 51,
Subject: 'Best Photography 2018',
StartTime: new Date(2018, 2, 22, 9, 30),
EndTime: new Date(2018, 2, 22, 11, 0),
CategoryColor: '#00bdae'
}, {
Id: 52,
Subject: 'Smarter Puppies',
StartTime: new Date(2018, 2, 9, 10, 0),
EndTime: new Date(2018, 2, 9, 11, 30),
CategoryColor: '#f57f17'
}, {
Id: 53,
Subject: 'Myths of Andromeda Galaxy',
StartTime: new Date(2018, 2, 7, 10, 30),
EndTime: new Date(2018, 2, 7, 12, 30),
CategoryColor: '#1aaa55'
}, {
Id: 54,
Subject: 'Aliens vs Humans',
StartTime: new Date(2018, 2, 5, 10, 0),
EndTime: new Date(2018, 2, 5, 11, 30),
CategoryColor: '#357cd2'
}, {
Id: 55,
Subject: 'Facts of Humming Birds',
StartTime: new Date(2018, 2, 20, 9, 30),
EndTime: new Date(2018, 2, 20, 11, 0),
CategoryColor: '#7fa900'
}, {
Id: 56,
Subject: 'Sky Gazers',
StartTime: new Date(2018, 2, 23, 11, 0),
EndTime: new Date(2018, 2, 23, 13, 0),
CategoryColor: '#ea7a57'
}, {
Id: 57,
Subject: 'The Cycle of Seasons',
StartTime: new Date(2018, 2, 12, 5, 30),
EndTime: new Date(2018, 2, 12, 7, 30),
CategoryColor: '#00bdae'
}, {
Id: 58,
Subject: 'Space Galaxies and Planets',
StartTime: new Date(2018, 2, 12, 17, 0),
EndTime: new Date(2018, 2, 12, 18, 30),
CategoryColor: '#f57f17'
}, {
Id: 59,
Subject: 'Lifecycle of Bumblebee',
StartTime: new Date(2018, 2, 15, 6, 0),
EndTime: new Date(2018, 2, 15, 7, 30),
CategoryColor: '#7fa900'
}, {
Id: 60,
Subject: 'Sky Gazers',
StartTime: new Date(2018, 2, 15, 16, 0),
EndTime: new Date(2018, 2, 15, 18, 0),
CategoryColor: '#ea7a57'
}
];
});Explore the live demo at Vue Scheduler example to see Scheduler view customizations in action.