Getting Started with Vue using TypeScript and Composition API
25 Jun 20269 minutes to read
This article provides a step-by-step guide for setting up a Vite project with a TypeScript environment and integrating the Syncfusion® Vue components using the Composition API.
The Composition API is a new feature introduced in Vue.js 3 that provides an alternative way to organize and reuse component logic. It allows developers to write components as functions that use smaller, reusable functions called composition functions to manage their properties and behavior.
Prerequisites
System requirements for Syncfusion® Vue UI components
Set up the Vite project
A recommended approach for beginning with Vue is to scaffold a project using Vite. To create a new Vite project, use one of the commands that are specific to either NPM or Yarn.
npm create vite@latestyarn create viteUsing one of the above commands will lead you to set up additional configurations for the project as below:
-
Project name - Type:
my-project(or any name you want) -
Select framework - Choose: Vue
-
Select variant - Choose: TypeScript
-
Install with npm and start now? - Choose: No
-
Go to your project and install packages:
cd my-project
npm install
cd my-project
yarn installNow that my-project is ready to run with default settings, let’s add Syncfusion® components to the project.
Add Syncfusion® Vue packages
Syncfusion® Vue component packages are available at npmjs.com. To use Syncfusion® Vue components in the project, install the corresponding npm package.
This article uses the Vue Schedule component as an example. To use the Vue Schedule component in the project, the @syncfusion/ej2-vue-schedule package needs to be installed using the following command:
npm install @syncfusion/ej2-vue-schedule --saveyarn add @syncfusion/ej2-vue-scheduleImport Syncfusion® CSS styles
Syncfusion® Vue component themes can be applied using CSS or SASS from the npm theme packages. Additionally, CDN, CRG, or Theme Studio.
This example uses the Material 3 theme for the Schedule component from the theme package. To install the Material 3 theme package, use the following command:
npm install @syncfusion/ej2-material3-theme --saveyarn add @syncfusion/@syncfusion/ej2-material3-themeThe necessary CSS styles for the Schedule component were imported into the <style> section of src/App.vue file. Vite app generates a default styles.css file which we do not need for this example. Before running the sample, delete the content of src/style.css or remove the file if it’s unused.
<style>
  @import "../node_modules/@syncfusion/ej2-material3-theme/styles/schedule/index.css";
</style>
Add Syncfusion® Vue component
Follow the below steps to add the Vue Schedule component using Composition API:
1.First, add the setup attribute to the script tag to indicate that Vue will be using the Composition API. And import the Schedule component in the script section of the src/App.vue file.
<script setup lang="ts">
  import { ScheduleComponent as EjsSchedule, ViewsDirective as EViews, ViewDirective as EView, ResourcesDirective as EResources, ResourceDirective as EResource, EventSettingsModel, Day, Week, WorkWeek, Month, Agenda, DragAndDrop, Resize } from "@syncfusion/ej2-vue-schedule";
</script>
2.To generate a Schedule with particular views, need to inject the relevant modules into the Schedule. This can be accomplished by utilizing the provide method within the src/App.vue file.
<script setup lang="ts">
  import { provide } from "vue";
  provide('schedule', [Day, Week, WorkWeek, Month, Agenda, DragAndDrop, Resize]);
</script>
3.Define the Schedule component with the dataSource property and column definitions. Declare the values for the dataSource property.
<template>
<div id='app'>
<ejs-schedule height='550px' width='100%' :selectedDate='selectedDate' :eventSettings='eventSettings'>
<e-views>
<e-view option='Day'></e-view>
<e-view option='Week' startHour='07:00' endHour='15:00'></e-view>
<e-view option='WorkWeek' startHour='10:00' endHour='18:00'></e-view>
<e-view option='Month' showWeekend=false></e-view>
<e-view option='Agenda'></e-view>
</e-views>
<e-resources>
<e-resource field="OwnerId" title="Owner" name="Owners" :dataSource="ownerDataSource" textField="OwnerText"
idField="Id" colorField="OwnerColor">
</e-resource>
</e-resources>
</ejs-schedule>
</div>
</template>
<script setup lang="ts">
import { ScheduleComponent as EjsSchedule, Day, Week, WorkWeek, Month, Agenda, DragAndDrop, Resize, ViewsDirective as EViews, ViewDirective as EView, ResourcesDirective as EResources, ResourceDirective as EResource } from "@syncfusion/ej2-vue-schedule";
import { provide } from "vue";
provide('schedule', [Day, Week, WorkWeek, Month, Agenda, DragAndDrop, Resize]);
const selectedDate: Date = new Date(2021, 7, 12);
const allowMultiple: boolean = true;
const ownerDataSource: Record<string, any>[] = [
{ OwnerText: 'Nancy', Id: 1, OwnerColor: '#ffaa00' },
{ OwnerText: 'Steven', Id: 2, OwnerColor: '#f8a398' },
{ OwnerText: 'Michael', Id: 3, OwnerColor: '#7499e1' }];
const eventSettings: EventSettingsModel = {
dataSource: [
{
Id: 1,
Subject: 'Surgery - Andrew',
EventType: 'Confirmed',
StartTime: new Date(2021, 7, 10, 9, 0),
EndTime: new Date(2021, 7, 10, 10, 0),
OwnerId: 2
},
{
Id: 2,
Subject: 'Consulting - John',
EventType: 'Confirmed',
StartTime: new Date(2021, 7, 11, 10, 0),
EndTime: new Date(2021, 7, 11, 11, 30),
OwnerId: 3
},
{
Id: 3,
Subject: 'Therapy - Robert',
EventType: 'Requested',
StartTime: new Date(2021, 7, 12, 11, 30),
EndTime: new Date(2021, 7, 12, 12, 30),
OwnerId: 1
}
]
};
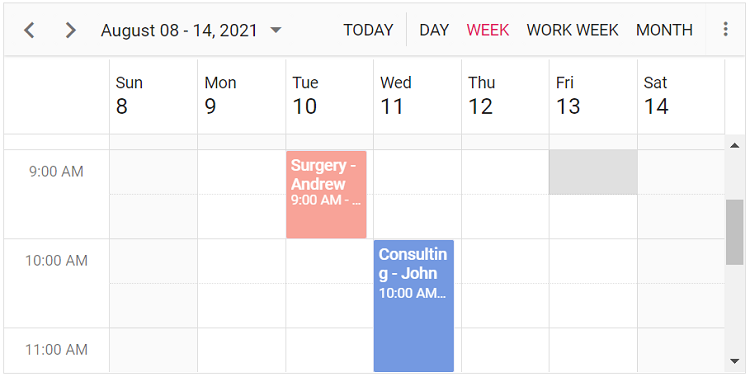
</script>Run the project
To run the project, use the following command:
npm run devyarn run devThe output will appear as follows: