Getting Started: Syncfusion® Vue Components with JS & Options API
17 Aug 20267 minutes to read
This article provides a step-by-step guide for setting up a Vite project with a JavaScript environment and integrating the Syncfusion® Vue components using the Options API.
The Options API is the traditional way of writing Vue.js components, where the component logic is organized into a series of options that define the component’s properties and behavior. These options include data, methods, computed properties, watchers, life cycle hooks, and more.
Prerequisites
System requirements for Syncfusion® Vue UI components
Set up the Vite project
A recommended approach for beginning with Vue is to scaffold a project using Vite. To create a new Vite project, use one of the commands that are specific to either NPM or Yarn.
npm create vite@latestyarn create viteUsing one of the above commands will lead you to set up additional configurations for the project as below:
-
Project name - Type:
my-project(or any name you want) -
Select framework - Choose: Vue
-
Select variant - Choose: JavaScript
-
Install with npm and start now? - Choose: No
-
Go to your project and install packages:
cd my-project
npm install
cd my-project
yarn installNow that my-project is ready to run with default settings, let’s add Syncfusion® components to the project.
Add Syncfusion® Vue packages
Syncfusion® Vue component packages are available at npmjs.com. To use Syncfusion® Vue components in the project, install the corresponding npm package.
This article uses the Vue Grid component as an example. To use the Vue Grid component in the project, the @syncfusion/ej2-vue-grids package needs to be installed using the following command:
npm install @syncfusion/ej2-vue-grids --saveyarn add @syncfusion/ej2-vue-gridsImport Syncfusion® CSS styles
Syncfusion® Vue component themes can be applied using CSS or SASS from the npm theme packages. Additionally, CDN, CRG, or Theme Studio.
This example uses the Material 3 theme for the Grid component from the theme package. To install the Material 3 theme package, use the following command:
npm install @syncfusion/ej2-material3-theme --saveyarn add @syncfusion/@syncfusion/ej2-material3-themeThe necessary CSS styles for the Grid component were imported into the <style> section of src/App.vue file. Vite app generates a default styles.css file which we do not need for this example. Before running the sample, delete the content of src/style.css or remove the file if it’s unused.
<style>
  @import "../node_modules/@syncfusion/ej2-material3-theme/styles/grid/index.css";
</style>
Add Syncfusion® Vue component
Follow the below steps to add the Vue Grid component using Options API:
1.First, import the Grid component in the script section of the src/App.vue file.
<script>
  import { GridComponent, ColumnsDirective, ColumnDirective } from '@syncfusion/ej2-vue-grids';
</script>
2.The next step is to register the Grid component and its child directives in Vue.
import { GridComponent, ColumnsDirective, ColumnDirective } from '@syncfusion/ej2-vue-grids';
//Component registration
export default {
  name: "App",
  components: {
    'ejs-grid': GridComponent,
    'e-columns': ColumnsDirective,
    'e-column': ColumnDirective
  }
}
3.Define the Grid component with the dataSource property and column definitions. Declare the values for the dataSource property.
<template>
  <ejs-grid :dataSource='data'>
    <e-columns>
      <e-column field='OrderID' width='100' textAlign="Right"></e-column>
      <e-column field='CustomerID' width='100'></e-column>
      <e-column field='EmployeeID' width='100' textAlign="Right"></e-column>
      <e-column field='Freight' width='100' format="C2" textAlign="Right"></e-column>
      <e-column field='ShipCountry' width='100'></e-column>
    </e-columns>
  </ejs-grid>
</template>

<script>
  import { GridComponent, ColumnsDirective, ColumnDirective } from '@syncfusion/ej2-vue-grids';
  // Component registration
  export default {
    name: "App",
    // Declaring component and its directives
    components: {
      'ejs-grid': GridComponent,
      'e-columns': ColumnsDirective,
      'e-column': ColumnDirective
    },
    // Bound properties declarations
    data() {
      return {
        data:[
          {
            OrderID: 10248, CustomerID: 'VINET', EmployeeID: 5, ShipCountry: 'France', Freight: 32.38
          },
          {
            OrderID: 10249, CustomerID: 'TOMSP', EmployeeID: 6, ShipCountry: 'Germany', Freight: 11.61
          },
          {
            OrderID: 10250, CustomerID: 'HANAR', EmployeeID: 4, ShipCountry: 'Brazil', Freight: 65.83
          }
        ],
      };
    }
  };
</script>
Run the project
To run the project, use the following command:
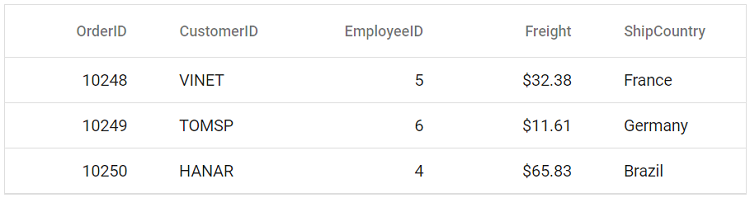
npm run devyarn run devThe output will appear as follows: