How can I help you?
Getting Started with Syncfusion® Vue UI Components and Vue CLI
4 Feb 202610 minutes to read
This section explains how to use Syncfusion® Vue components in Vue 2 application. To get started with Vue 3 application, refer to the getting started with Vue 3 topic.
Prerequisites
System requirements for Syncfusion® Vue UI components
Create the Vue 2 application
The best way to create a Vue 2 application is to use the vue create command.
npm install -g @vue/cli
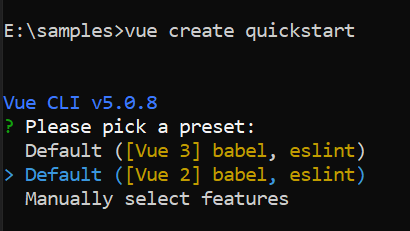
vue create quickstart
cd quickstart
npm run serve
Initiating a new project prompts us to choose the type of project to be used for the current application. Select the option Default ([Vue 2] babel, eslint) from the menu.

Add Syncfusion® packages
Once the Vue 2 application is created, install the required Syncfusion® Vue component package in the application. All the available Syncfusion® Vue packages are published in the npmjs.com registry. Choose the component to be installed. In this article, the Grid component is used as an example.
Check out the installation and upgrade section to learn about the different ways of installing the packages. Here, the Grid component package is installed using the following npm command.
npm install @syncfusion/ej2-vue-grids --saveImport the Syncfusion® CSS styles
After installing the Syncfusion® component packages in the application, add the required theme based on the components used.
Check out the themes section to know more about built-in themes and different ways (npm packages, CDN and CRG) to refer the themes in the Vue application.
Here the themes are referred through the installed npm packages which contains the built-in themes of Syncfusion® Vue component. Let’s import the Material3 theme for the Grid component and its dependencies to the <style> section of the App.vue file as follows.
<style>
  @import "../node_modules/@syncfusion/ej2-base/styles/material3.css";
  @import "../node_modules/@syncfusion/ej2-buttons/styles/material3.css";
  @import "../node_modules/@syncfusion/ej2-calendars/styles/material3.css";
  @import "../node_modules/@syncfusion/ej2-dropdowns/styles/material3.css";
  @import "../node_modules/@syncfusion/ej2-inputs/styles/material3.css";
  @import "../node_modules/@syncfusion/ej2-navigations/styles/material3.css";
  @import "../node_modules/@syncfusion/ej2-popups/styles/material3.css";
  @import "../node_modules/@syncfusion/ej2-splitbuttons/styles/material3.css";
  @import "../node_modules/@syncfusion/ej2-vue-grids/styles/material3.css";
</style>
Grid components use other Syncfusion® components as well, so CSS references for the dependent component must be added in order to use all grid functionalities. Use this same order to display the Syncfusion® Grid component’s predefined appearance.
Register the Syncfusion® Vue component
Vue has two ways to register the Vue components in the Vue 2 application. Use one of the following ways to register the Syncfusion® Vue components:
- Vue.use() - It registers the Vue component and all its child directives globally.
- Vue.component() - It registers the Vue component only. It will not register the child directives automatically. The child directives should be registered separately.
Using Vue.use()
Import the component plugin from the Vue package and register it using Vue.use() with the component plugin as its argument.
Refer to the following code snippet.
import { GridPlugin } from '@syncfusion/ej2-vue-grids';

Vue.use(GridPlugin);
Using Vue.component()
Import the component and component plugin from the Vue package and register them using Vue.component() with the name of the component from the component plugin and the Vue component as its arguments.
Refer to the following the code snippet.
import { GridPlugin, GridComponent, ColumnsDirective, ColumnsPlugin, ColumnDirective, ColumnPlugin} from "@syncfusion/ej2-vue-grids";

Vue.component(GridPlugin.name, GridComponent);
Vue.component(ColumnsPlugin.name, ColumnsDirective);
Vue.component(ColumnPlugin.name, ColumnDirective);
Add Syncfusion® Vue component to the application
Add the Vue Grid to the <template> section of the App.vue file in the src directory. To display the Grid with records, add the Grid component and bind the dataSource to it. Here, the simple data is mapped to the dataSource property.
<template>
  <div id="app">
    <ejs-grid :dataSource="data">
      <e-columns>
        <e-column field="OrderID" headerText="Order ID" textAlign="Right" :isPrimaryKey="true" width="100"></e-column>
        <e-column field="CustomerID" headerText="Customer ID"  width="80"></e-column>
        <e-column field="ShipCountry" headerText="Ship Country" width="90"></e-column>
      </e-columns>
    </ejs-grid>
  </div>
</template>
<script>
import Vue from 'vue';
import { GridPlugin } from '@syncfusion/ej2-vue-grids';

Vue.use(GridPlugin);
export default {
  name: 'app',
  data () {
    return {
      data: [
        {
          OrderID: 10248,
          CustomerID: "VINET",
          ShipCountry: "France",
        },
        {
          OrderID: 10249,
          CustomerID: "TOMSP",
          ShipCountry: "Germany",
        },
      ],
    }
  }
}
</script>
Run the application
Run the application using the following command.
npm run serveThe output will appear as follows:
<template>
  <div id="app">
    <ejs-grid :dataSource="data">
    <e-columns>
      <e-column field="OrderID" headerText="Order ID" textAlign="Right" :isPrimaryKey="true" width="100"></e-column>
      <e-column field="CustomerID" headerText="Customer ID"  width="80"></e-column>
      <e-column field="ShipCountry" headerText="Ship Country" width="90"></e-column>
    </e-columns>
  </ejs-grid>
  </div>
</template>
<script setup>
import { GridComponent as EjsGrid, ColumnDirective as EColumn, ColumnsDirective as EColumns } from '@syncfusion/ej2-vue-grids';
const data = [
        {
          OrderID: 10248,
          CustomerID: "VINET",
          ShipCountry: "France",
        },
        {
          OrderID: 10249,
          CustomerID: "TOMSP",
          ShipCountry: "Germany",
        },
      ];
</script>
<style>
  @import "../node_modules/@syncfusion/ej2-base/styles/material.css";
  @import "../node_modules/@syncfusion/ej2-buttons/styles/material.css";
  @import "../node_modules/@syncfusion/ej2-calendars/styles/material.css";
  @import "../node_modules/@syncfusion/ej2-dropdowns/styles/material.css";
  @import "../node_modules/@syncfusion/ej2-inputs/styles/material.css";
  @import "../node_modules/@syncfusion/ej2-navigations/styles/material.css";
  @import "../node_modules/@syncfusion/ej2-popups/styles/material.css";
  @import "../node_modules/@syncfusion/ej2-splitbuttons/styles/material.css";
  @import "../node_modules/@syncfusion/ej2-vue-grids/styles/material.css";
</style><template>
<div id="app">
<ejs-grid :dataSource="data">
<e-columns>
<e-column field="OrderID" headerText="Order ID" textAlign="Right" :isPrimaryKey="true" width="100"></e-column>
<e-column field="CustomerID" headerText="Customer ID" width="80"></e-column>
<e-column field="ShipCountry" headerText="Ship Country" width="90"></e-column>
</e-columns>
</ejs-grid>
</div>
</template>
<script>
import { GridComponent, ColumnsDirective, ColumnDirective } from '@syncfusion/ej2-vue-grids';
export default {
name: "App",
components: {
"ejs-grid":GridComponent,
"e-columns":ColumnsDirective,
"e-column":ColumnDirective
},
data () {
return {
data: [
{
OrderID: 10248,
CustomerID: "VINET",
ShipCountry: "France",
},
{
OrderID: 10249,
CustomerID: "TOMSP",
ShipCountry: "Germany",
},
],
}
}
}
</script>
<style>
@import "../node_modules/@syncfusion/ej2-base/styles/material.css";
@import "../node_modules/@syncfusion/ej2-buttons/styles/material.css";
@import "../node_modules/@syncfusion/ej2-calendars/styles/material.css";
@import "../node_modules/@syncfusion/ej2-dropdowns/styles/material.css";
@import "../node_modules/@syncfusion/ej2-inputs/styles/material.css";
@import "../node_modules/@syncfusion/ej2-navigations/styles/material.css";
@import "../node_modules/@syncfusion/ej2-popups/styles/material.css";
@import "../node_modules/@syncfusion/ej2-splitbuttons/styles/material.css";
@import "../node_modules/@syncfusion/ej2-vue-grids/styles/material.css";
</style>