Getting Started with the Vue Gantt Chart Component in Vue 2
2 Jul 202612 minutes to read
This article provides a step-by-step guide for setting up a Vue 2 project using Vue-CLI and integrating the Vue Gantt Chart component.
To get started quickly with Vue Gantt Chart, check this video:
The Options API is the traditional way of writing Vue.js components, where the component logic is organized into a series of options that define the component’s properties and behavior. These options include data, methods, computed properties, watchers, lifecycle hooks, and more.
Prerequisites
System requirements for Syncfusion® Vue UI components
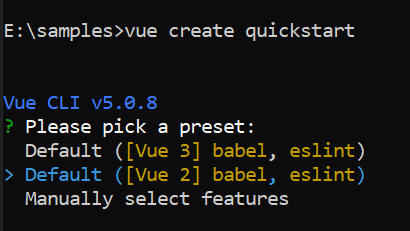
Setup the Vue 2 project
Create a new Vue 2 project using Vue CLI:
npm install -g @vue/cli
vue create quickstart
cd quickstart
or
yarn global add @vue/cli
vue create quickstart
cd quickstart
When creating a new project, choose the option Default ([Vue 2] babel, eslint) from the menu.
Add Syncfusion® Vue packages
Syncfusion® packages are available at npmjs.com. To use Vue components, install the required npm package.
This article uses the Vue Gantt Chart component as an example. Install the @syncfusion/ej2-vue-gantt package by running the following command:
npm install @syncfusion/ej2-vue-gantt --saveor
yarn add @syncfusion/ej2-vue-ganttImport Syncfusion® CSS styles
In this article, the Tailwind3 theme is applied using CSS styles, which are available in installed packages. The necessary Tailwind3 CSS styles for the Gantt Chart component and its dependents were imported into the <style> section of the src/App.vue file.
<style>
@import "../node_modules/@syncfusion/ej2-base/styles/tailwind3.css";
@import "../node_modules/@syncfusion/ej2-gantt/styles/tailwind3.css";
@import "../node_modules/@syncfusion/ej2-grids/styles/tailwind3.css";
@import "../node_modules/@syncfusion/ej2-treegrid/styles/tailwind3.css";
@import "../node_modules/@syncfusion/ej2-layouts/styles/tailwind3.css";
@import "../node_modules/@syncfusion/ej2-popups/styles/tailwind3.css";
</style>
Note: When using features like editing, toolbar, filtering, or dialogs, you need to import additional component styles:
/* For editing, toolbar, and dialog features */
@import "../node_modules/@syncfusion/ej2-calendars/styles/tailwind3.css";
@import "../node_modules/@syncfusion/ej2-dropdowns/styles/tailwind3.css";
@import "../node_modules/@syncfusion/ej2-inputs/styles/tailwind3.css";
@import "../node_modules/@syncfusion/ej2-buttons/styles/tailwind3.css";
@import "../node_modules/@syncfusion/ej2-navigations/styles/tailwind3.css";
@import "../node_modules/@syncfusion/ej2-notifications/styles/tailwind3.css";

/* For rich text editor in dialog notes tab */
@import "../node_modules/@syncfusion/ej2-richtexteditor/styles/tailwind3.css";
Important The order of CSS imports matters. Import base styles first, then component-specific styles. Missing CSS imports can result in misaligned layouts, buttons without styling, or missing visual elements in popups and dialogs.
Create sample data
Define a simple task list with hierarchical relationships. Each task must have a StartDate and either a Duration or EndDate to render properly.
const data = [
  { TaskID: 1, TaskName: 'Project initiation', StartDate: new Date('2024-04-01'), EndDate: new Date('2024-04-15') },
  { TaskID: 2, TaskName: 'Identify site location', StartDate: new Date('2024-04-01'), Duration: 4, Progress: 70, ParentID: 1 },
  { TaskID: 3, TaskName: 'Perform site survey', StartDate: new Date('2024-04-01'), Duration: 4, Progress: 50, ParentID: 1 },
  { TaskID: 4, TaskName: 'Soil testing', StartDate: new Date('2024-04-01'), Duration: 3, Progress: 40, ParentID: 1 },
  { TaskID: 5, TaskName: 'Project estimation', StartDate: new Date('2024-04-08'), EndDate: new Date('2024-04-18') },
  { TaskID: 6, TaskName: 'Develop floor plan', StartDate: new Date('2024-04-08'), Duration: 5, Progress: 30, ParentID: 5 },
  { TaskID: 7, TaskName: 'Estimate project cost', StartDate: new Date('2024-04-08'), Duration: 5, Progress: 20, ParentID: 5 }
]
Configure task fields
const taskFields = {
  id: 'TaskID',
  name: 'TaskName',
  startDate: 'StartDate',
  duration: 'Duration',
  progress: 'Progress',
  parentID: 'ParentID'
};
Field mapping reference
| Property | Description | Required |
|---|---|---|
id |
Unique task identifier | Yes |
name |
Task display name | Yes |
startDate |
Task start date | Yes |
duration |
Task duration in days | Yes |
progress |
Task completion percentage (0-100) | No |
parentID |
Parent task ID for hierarchy | No |
Render the Gantt component
Ensure that the Gantt component is imported and registered in the <script> section of the src/App.vue file so that Vue can recognize and render it within the template.
To display the Gantt Chart, bind your task data using the dataSource property and map the corresponding fields using the taskFields property.
<template>
     <div>
        <ejs-gantt ref='gantt' :dataSource="data" :taskFields="taskFields"></ejs-gantt>
    </div>
</template>
<script>
import { GanttComponent } from "@syncfusion/ej2-vue-gantt";
export default {
name: "App",
  components: {
    'ejs-gantt': GanttComponent // Component registration
  },
  data: function() {
    return{
      data: [
        {TaskID: 1, TaskName: 'Project initiation', StartDate: new Date('2024-04-01'), EndDate: new Date('2024-04-15')},
        {TaskID: 2, TaskName: 'Identify site location', StartDate: new Date('2024-04-01'), Duration: 4, Progress: 70, ParentID: 1},
        {TaskID: 3, TaskName: 'Perform site survey', StartDate: new Date('2024-04-01'), Duration: 4, Progress: 50, ParentID: 1},
        {TaskID: 4, TaskName: 'Soil testing', StartDate: new Date('2024-04-01'), Duration: 3, Progress: 40, ParentID: 1},
        {TaskID: 5, TaskName: 'Project estimation', StartDate: new Date('2024-04-08'), EndDate: new Date('2024-04-18')},
        {TaskID: 6, TaskName: 'Develop floor plan', StartDate: new Date('2024-04-08'), Duration: 5, Progress: 30, ParentID: 5},
        {TaskID: 7, TaskName: 'Estimate project cost', StartDate: new Date('2024-04-08'), Duration: 5, Progress: 20, ParentID: 5}
      ],
      taskFields: {
        id: 'TaskID',
        name: 'TaskName',
        startDate: 'StartDate',
        duration: 'Duration',
        progress: 'Progress',
        parentID: 'ParentID'
      }
    };
  },
};
</script>
<style>
@import "../node_modules/@syncfusion/ej2-base/styles/tailwind3.css";
@import "../node_modules/@syncfusion/ej2-gantt/styles/tailwind3.css";
@import "../node_modules/@syncfusion/ej2-grids/styles/tailwind3.css";
@import "../node_modules/@syncfusion/ej2-treegrid/styles/tailwind3.css";
@import "../node_modules/@syncfusion/ej2-layouts/styles/tailwind3.css";
@import "../node_modules/@syncfusion/ej2-popups/styles/tailwind3.css";
</style>
Run the application
Now run the following command in the console,
npm run serveIt will build your application and open in the web browser.
Output
You will see a Gantt Chart with:
- Task hierarchy with parent-child relationships
- Timeline view showing task bars
- Progress indicators on each task
- Automatically calculated dates based on duration
The chart displays two parent tasks (“Project initiation” and “Project estimation”) with their subtasks shown in a tree structure. Task bars are rendered on the timeline, sized according to their duration and start dates.
You can preview the following sample by clicking the Preview Sample button.
<template>
     <div>
        <ejs-gantt ref='gantt' :dataSource="data" :taskFields="taskFields"></ejs-gantt>
    </div>
</template>

<script>
import { GanttComponent } from "@syncfusion/ej2-vue-gantt";
export default {
name: "App",
  components: {
    'ejs-gantt': GanttComponent
  },
  data: function() {
    return{
      data: [
        {TaskID: 1, TaskName: 'Project initiation', StartDate: new Date('2024-04-01'), EndDate: new Date('2024-04-15')},
        {TaskID: 2, TaskName: 'Identify site location', StartDate: new Date('2024-04-01'), Duration: 4, Progress: 70, ParentID: 1},
        {TaskID: 3, TaskName: 'Perform site survey', StartDate: new Date('2024-04-01'), Duration: 4, Progress: 50, ParentID: 1},
        {TaskID: 4, TaskName: 'Soil testing', StartDate: new Date('2024-04-01'), Duration: 3, Progress: 40, ParentID: 1},
        {TaskID: 5, TaskName: 'Project estimation', StartDate: new Date('2024-04-08'), EndDate: new Date('2024-04-18')},
        {TaskID: 6, TaskName: 'Develop floor plan', StartDate: new Date('2024-04-08'), Duration: 5, Progress: 30, ParentID: 5},
        {TaskID: 7, TaskName: 'Estimate project cost', StartDate: new Date('2024-04-08'), Duration: 5, Progress: 20, ParentID: 5}
      ],
      taskFields: {
        id: 'TaskID',
        name: 'TaskName',
        startDate: 'StartDate',
        duration: 'Duration',
        progress: 'Progress',
        parentID: 'ParentID'
      }
    };
  },
};
</script>

<style>
@import "../node_modules/@syncfusion/ej2-base/styles/tailwind3.css";
@import "../node_modules/@syncfusion/ej2-gantt/styles/tailwind3.css";
@import "../node_modules/@syncfusion/ej2-grids/styles/tailwind3.css";
@import "../node_modules/@syncfusion/ej2-treegrid/styles/tailwind3.css";
@import "../node_modules/@syncfusion/ej2-layouts/styles/tailwind3.css";
@import "../node_modules/@syncfusion/ej2-popups/styles/tailwind3.css";
</style>Next Steps
- Key Elements - Learn about UI components and interactions
- Feature Modules - Enable advanced features with module injection
- Overview - Explore all available features
NOTE
Looking for the full Vue Gantt Chart component overview, features, pricing, and documentation? Visit the Vue Gantt Chart page.