How can I help you?
Getting Started with the Vue Linear Gauge Component in Vue 2
18 Mar 202621 minutes to read
This article provides a step-by-step guide for setting up a Vue 2 project using Vue-CLI and integrating the Syncfusion® Vue Linear Gauge component.
Prerequisites
Before you begin, ensure your development environment meets the following requirements:
System requirements for Syncfusion® Vue UI components
Dependencies
The following dependencies are required to use the Linear Gauge component in your application:
|-- @syncfusion/ej2-vue-lineargauge
    |-- @syncfusion/ej2-base
    |-- @syncfusion/ej2-vue-base
    |-- @syncfusion/ej2-svg-base
    |-- @syncfusion/ej2-lineargauge
Setting up the Vue 2 project
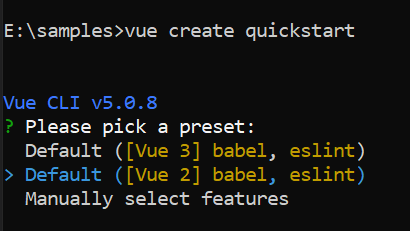
To generate a Vue 2 project using Vue-CLI, use the vue create command. Follow these steps to install Vue CLI and create a new project:
npm install -g @vue/cli
vue create quickstart
cd quickstart
npm run serve
or
yarn global add @vue/cli
vue create quickstart
cd quickstart
yarn run serve
When creating a new project, choose the option Default ([Vue 2] babel, eslint) from the menu.
Once the quickstart project is set up with default settings, proceed to add Syncfusion® components to the project.
Add Syncfusion® Vue packages
Syncfusion® packages are available at npmjs.com. To use Vue components, install the required npm package.
This article uses the Vue Linear Gauge component as an example. Install the package by running the following command:
npm install @syncfusion/ej2-vue-lineargauge --saveor
yarn add @syncfusion/ej2-vue-lineargaugeAdding Syncfusion® Vue Linear Gauge component
Follow the steps below to add the Vue Linear Gauge component:
1. First, import and register the Linear Gauge component in the script section of the src/App.vue file.
<script setup>
import { LinearGaugeComponent as EjsLineargauge } from '@syncfusion/ej2-vue-lineargauge';

</script><script>
import { LinearGaugeComponent } from '@syncfusion/ej2-vue-lineargauge';
export default {
name: "App",
components: {
"ejs-lineargauge":LineargaugeComponent
},
}
</script>2. In the template section, define the Linear Gauge component.
<template>
    <div id="app">
    <ejs-lineargauge></ejs-lineargauge>
  </div>
</template>
Here is the complete code for the above steps in the src/App.vue file:
<template>
    <div>
        <div class="content-wrapper">
            <div align='center'>
                <ejs-lineargauge ></ejs-lineargauge>
            </div>
        </div>
  </div>
</template>
<script setup>
import { LinearGaugeComponent as EjsLineargauge } from '@syncfusion/ej2-vue-lineargauge';

</script>
<style>
#content-wrapper {
    padding: 0px !important;
}
</style><template>
<div>
<div class="content-wrapper">
<div align='center'>
<ejs-lineargauge ></ejs-lineargauge>
</div>
</div>
</div>
</template>
<script>
import { LinearGaugeComponent } from '@syncfusion/ej2-vue-lineargauge';
export default {
name: "App",
components: {
'ejs-lineargauge': LinearGaugeComponent
}
}
</script>
<style>
#content-wrapper {
padding: 0px !important;
}
</style>Run the project
To run the project, use the following command:
npm run serveor
yarn run serveModule Injection
The LinearGauge component uses feature-based modules to reduce file size. Each feature is encapsulated in its own module and must be injected using the provide: {} option to enable it. This approach ensures that only the features you use are included in your bundle.
The following modules are available:
- Annotation – Enables annotation features for displaying custom text or markers on the gauge.
- GaugeTooltip – Enables tooltip functionality for displaying information when interacting with the gauge.
To use these features, import the required modules from the Linear Gauge package and inject them into the component using provide: {}:
import { LinearGaugeComponent, Annotations, GaugeTooltip } from "@syncfusion/ej2-vue-lineargauge";
provide: {
    lineargauge: [Annotations, GaugeTooltip]
},
Adding the Linear Gauge Title
The title can be added to the Linear Gauge component using the title property in the Linear Gauge.
<template>
    <div>
        <div class="content-wrapper">
            <ejs-lineargauge style='display:block' :title ='title' ></ejs-lineargauge>
        </div>
    </div>
</template>
<script setup>
import { LinearGaugeComponent as EjsLineargauge } from "@syncfusion/ej2-vue-lineargauge";

const title = 'linear gauge';

</script>
<style>
#content-wrapper {
    padding: 0px !important;
}
</style><template>
<div>
<div class="content-wrapper">
<ejs-lineargauge style='display:block' :title ='title' ></ejs-lineargauge>
</div>
</div>
</template>
<script>
import { LinearGaugeComponent } from "@syncfusion/ej2-vue-lineargauge";
export default {
name: "App",
components: {
'ejs-lineargauge': LinearGaugeComponent
},
data: function () {
return {
title: 'linear gauge',
}
}
};
</script>
<style>
#content-wrapper {
padding: 0px !important;
}
</style>Axis Range
The range of the axis can be set using the minimum and maximum properties in the Linear Gauge.
<template>
   <div>
    <div class="content-wrapper">
        <ejs-lineargauge >
            <e-axes>
                <e-axis minimum = 0 maximum = 200 ></e-axis>
            </e-axes>
        </ejs-lineargauge>
    </div>
  </div>
</template>
<script setup>
import { LinearGaugeComponent as EjsLineargauge, AxesDirective as EAxes, AxisDirective as EAxis } from "@syncfusion/ej2-vue-lineargauge";

</script>
<style>
#content-wrapper {
    padding: 0px !important;
}
</style><template>
<div>
<div class="content-wrapper">
<ejs-lineargauge >
<e-axes>
<e-axis minimum = 0 maximum = 200 ></e-axis>
</e-axes>
</ejs-lineargauge>
</div>
</div>
</template>
<script>
import { LinearGaugeComponent, AxesDirective, AxisDirective } from "@syncfusion/ej2-vue-lineargauge";
export default {
name: "App",
components: {
'ejs-lineargauge': LinearGaugeComponent,
'e-axes': AxesDirective,
'e-axis': AxisDirective
}
};
</script>
<style>
#content-wrapper {
padding: 0px !important;
}
</style>Customizing the axis labels
To denote the axis labels with temperature units, add the °C as a suffix to each label. This can be achieved by setting {value}°C to the format property in the labelStyle object of the axis. Here, {value} acts as a placeholder for each axis label.
To change the pointer value from its default setting, set the value property in the pointers object of the axis.
<template>
    <div>
        <div class="content-wrapper">
            <div align='center'>
                <ejs-lineargauge>
                    <e-axes>
                        <e-axis minimum = 0 maximum = 200  :ranges='ranges'>
                            <e-pointers>
                                <e-pointer value=140 ></e-pointer>
                            </e-pointers>
                        </e-axis>
                    </e-axes>
                </ejs-lineargauge>
            </div>
        </div>
    </div>
</template>
<script setup>
import { LinearGaugeComponent as EjsLineargauge, AxesDirective as EAxes, AxisDirective as EAxis,
    PointerDirective as EPointer, PointersDirective as EPointers } from "@syncfusion/ej2-vue-lineargauge";

const ranges = [{
    start: 0,
    end: 80,
    startWidth:15,
    endWidth:15
}, {
    start: 80,
    end: 120,
    startWidth:15,
    endWidth:15
}, {
    start: 120,
    end: 140,
    startWidth:15,
    endWidth:15
}, {
    start: 140,
    end: 200,
    startWidth:15,
    endWidth:15
}];

</script>
<style>
#content-wrapper {
    padding: 0px !important;
}
</style><template>
<div>
<div class="content-wrapper">
<div align='center'>
<ejs-lineargauge>
<e-axes>
<e-axis minimum = 0 maximum = 200 :ranges='ranges'>
<e-pointers>
<e-pointer value=140 ></e-pointer>
</e-pointers>
</e-axis>
</e-axes>
</ejs-lineargauge>
</div>
</div>
</div>
</template>
<script>
import { LinearGaugeComponent, AxesDirective, AxisDirective, PointerDirective, PointersDirective } from "@syncfusion/ej2-vue-lineargauge";
export default {
name: "App",
components: {
"ejs-lineargauge":LinearGaugeComponent,
"e-axes":AxesDirective,
"e-axis":AxisDirective,
"e-pointers":PointersDirective,
"e-pointer":PointerDirective
},
data: function () {
return {
labelStyle: {
format: '{value}°C'
},
ranges: [{
start: 0,
end: 80,
startWidth:15,
endWidth:15
}, {
start: 80,
end: 120,
startWidth:15,
endWidth:15
}, {
start: 120,
end: 140,
startWidth:15,
endWidth:15
}, {
start: 140,
end: 200,
startWidth:15,
endWidth:15
}]
}
}
};
</script>
<style>
#content-wrapper {
padding: 0px !important;
}
</style>Set Pointer Value
The pointer value can be customized using the value property in the pointers object of the axis.
<template>
   <div>
    <div class="content-wrapper">
        <div align='center'>
            <ejs-lineargauge>
                <e-axes>
                    <e-axis minimum=0 maximum=200>
                        <e-pointers>
                            <e-pointer value=40 color='green'></e-pointer>
                        </e-pointers>
                    </e-axis>
                </e-axes>
            </ejs-lineargauge>
        </div>
    </div>
  </div>
</template>
<script setup>
import { LinearGaugeComponent as EjsLineargauge, AxesDirective as EAxes, AxisDirective as EAxis,
    PointerDirective as EPointer, PointersDirective as EPointers } from "@syncfusion/ej2-vue-lineargauge";

</script>
<style>
#content-wrapper {
    padding: 0px !important;
}
</style><template>
<div>
<div class="content-wrapper">
<div align='center'>
<ejs-lineargauge>
<e-axes>
<e-axis minimum=0 maximum=200>
<e-pointers>
<e-pointer value=40 color='green'></e-pointer>
</e-pointers>
</e-axis>
</e-axes>
</ejs-lineargauge>
</div>
</div>
</div>
</template>
<script>
import { LinearGaugeComponent, AxesDirective, AxisDirective, PointerDirective, PointersDirective } from "@syncfusion/ej2-vue-lineargauge";
export default {
name: "App",
components: {
"ejs-lineargauge":LinearGaugeComponent,
"e-axes":AxesDirective,
"e-axis":AxisDirective,
"e-pointers":PointersDirective,
"e-pointer":PointerDirective
},
};
</script>
<style>
#content-wrapper {
padding: 0px !important;
}
</style>