Getting Started with the Tree Grid Component in the Preact Framework
16 Jul 20269 minutes to read
This article provides a step-by-step guide for setting up a Preact project and integrating the Syncfusion® React Tree Grid component.
Preact is a fast and lightweight JavaScript library for building user interfaces. It is often used as an alternative to larger frameworks like React. The key difference is that Preact is designed to be smaller in size and faster in performance, making it suitable for projects where file size and load times are critical factors.
Prerequisites
System requirements for Syncfusion® React UI components
Set up the Preact project
To create a new Preact project, use one of the commands specific to NPM or Yarn.
npm init preactor
yarn init preactThe command initializes an interactive setup to configure the project as shown below:
1. Define the project name. Specify the name my-project for this article.
T  Preact - Fast 3kB alternative to React with the same modern API
|
*  Project directory:
|  my-project
—
2. Choose JavaScript as the framework variant to build this Preact project using JavaScript and React.
T  Preact - Fast 3kB alternative to React with the same modern API
|
*  Project language:
|  > JavaScript
|    TypeScript
—
3. Configure the project as shown below for this article.
T  Preact - Fast 3kB alternative to React with the same modern API
|
*  Use router?
|    Yes / > No
—
|
*  Prerender app (SSG)?
|    Yes / > No
—
|
*  Use ESLint?
|    Yes / > No
—
4. After completing the setup, run the following command to navigate to the project directory:
cd my-projectWith my-project ready using default settings, add Syncfusion® components to the project.
Adding Syncfusion® React Tree Grid packages
Syncfusion® React component packages are available at npmjs.com. To use Syncfusion® React components in the project, install the corresponding npm package.
This article uses the React Tree Grid component as an example. To use the React Tree Grid component in the project, install the @syncfusion/ej2-react-treegrid package using one of the following commands:
npm install @syncfusion/ej2-react-treegrid --saveor
yarn add @syncfusion/ej2-react-treegridBefore including Syncfusion styles, make sure to remove the default styles defined in index.css. This helps prevent unintended style overrides and ensures that Syncfusion components render correctly.
Adding CSS reference
Themes for Syncfusion® React Tree Grid component can be applied using CSS files provided through npm theme packages, CDN, CRG, or Theme Studio. For more information, refer to the Themes documentation.
Install the Material 3 theme package using the following command:
npm install @syncfusion/ej2-material3-theme --saveThen add the following CSS reference to the src/style.css file:
@import "../node_modules/@syncfusion/ej2-material3-theme/styles/treegrid/index.css";Adding Tree Grid component
Follow these steps to add the React Tree Grid component to the Preact project:
1. Before adding the Tree Grid component to the markup, import the Tree Grid component in the src/index.jsx file.
import { ColumnDirective, ColumnsDirective, TreeGridComponent } from '@syncfusion/ej2-react-treegrid';2. Define the Tree Grid component with the dataSource property and column definitions. Declare the values for the dataSource property.
import { render } from 'preact';
import { ColumnDirective, ColumnsDirective, TreeGridComponent } from '@syncfusion/ej2-react-treegrid';
import './style.css';
function App() {
let sortData = [
{
orderID: '1',
orderName: 'Order 1',
orderDate: new Date('02/03/2017'),
shippedDate: new Date('02/09/2017'),
units: '1395',
unitPrice: '47.42',
price: 134,
Category: 'Seafoods',
subtasks: [
{ orderID: '1.1', orderName: 'Mackerel', Category: 'Frozen seafood', units: '235',
orderDate: new Date('03/03/2017'), shippedDate: new Date('03/10/2017'), unitPrice: '12.35', price: 28 },
{ orderID: '1.2', orderName: 'Yellowfin Tuna', Category: 'Frozen seafood', units: '324',
orderDate: new Date('04/05/2017'), shippedDate: new Date('04/12/2017'), unitPrice: '18.56', price: 25 },
{ orderID: '1.3', orderName: 'Herrings', Category: 'Frozen seafood', units: '488',
orderDate: new Date('05/08/2017'), shippedDate: new Date('05/15/2017'), unitPrice: '11.45', price: 52 },
{ orderID: '1.4', orderName: 'Preserved Olives', Category: 'Edible', units: '125',
orderDate: new Date('06/10/2017'), shippedDate: new Date('06/17/2017'), unitPrice: '19.26', price: 11 },
{ orderID: '1.5', orderName: 'Sweet corn Frozen', Category: 'Edible', units: '223',
orderDate: new Date('07/12/2017'), shippedDate: new Date('07/19/2019'), unitPrice: '17.54', price: 15 }
]
},
{
orderID: '2',
orderName: 'Order 2',
orderDate: new Date('01/10/2018'),
shippedDate: new Date('01/16/2018'),
units: '1944',
unitPrice: '58.45',
price: 212,
Category: 'products',
subtasks: [
{ orderID: '2.1', orderName: 'Tilapias', Category: 'Frozen seafood',
orderDate: new Date('02/05/2018'), shippedDate: new Date('02/12/2018'), units: '278', unitPrice: '15.26', price: 41 },
{ orderID: '2.2', orderName: 'White Shrimp', Category: 'Frozen seafood', units: '560',
orderDate: new Date('05/22/2018'), shippedDate: new Date('05/29/2018'), unitPrice: '17.26', price: 39 },
{ orderID: '2.3', orderName: 'Fresh Cheese', Category: 'Dairy', units: '323', unitPrice: '12.67',
orderDate: new Date('06/08/2018'), shippedDate: new Date('06/15/2018'), price: 38 },
{ orderID: '2.4', orderName: 'Blue Veined Cheese', Category: 'Dairy', units: '370', unitPrice: '15.25',
orderDate: new Date('07/10/2018'), shippedDate: new Date('07/17/2018'), price: 55 },
{ orderID: '2.5', orderName: 'Butter', Category: 'Dairy', units: '413', unitPrice: '19.25',
orderDate: new Date('09/18/2018'), shippedDate: new Date('09/25/2018'), price: 37.17 }
]
},
{
orderID: '3',
orderName: 'Order 3',
orderDate: new Date('09/10/2018'),
shippedDate: new Date('09/20/2018'),
units: '1120',
unitPrice: '33.45',
price: 109,
Category: 'Crystals',
subtasks: [
{ orderID: '3.1', orderName: 'Lead glassware', Category: 'Solid crystals',
orderDate: new Date('02/07/2018'), shippedDate: new Date('02/14/2018'), units: '542', unitPrice: '16.45', price: 32 },
{ orderID: '3.2', orderName: 'Pharmaceutical Glassware', Category: 'Solid crystals',
orderDate: new Date('04/19/2018'), shippedDate: new Date('04/26/2018'), units: '324', unitPrice: '11.45', price: 35 },
{ orderID: '3.3', orderName: 'Glass beads', Category: 'Solid crystals', units: '254',
orderDate: new Date('05/22/2018'), shippedDate: new Date('03/22/2018'), unitPrice: '16.23', price: 40 }
]
}
];
return <TreeGridComponent dataSource={sortData} treeColumnIndex={1} childMapping= 'subtasks'>
<ColumnsDirective>
<ColumnDirective field='Category' headerText='Category' width='150'/>
<ColumnDirective field='orderName' headerText='Order Name' width='170'/>
<ColumnDirective field='orderDate' headerText='Order Date' width='130' format='yMd' textAlign='Right' type='date' />
<ColumnDirective field='price' headerText='Price' width='100' textAlign='Right' type='number' format='C0' />
</ColumnsDirective>
</TreeGridComponent>
};
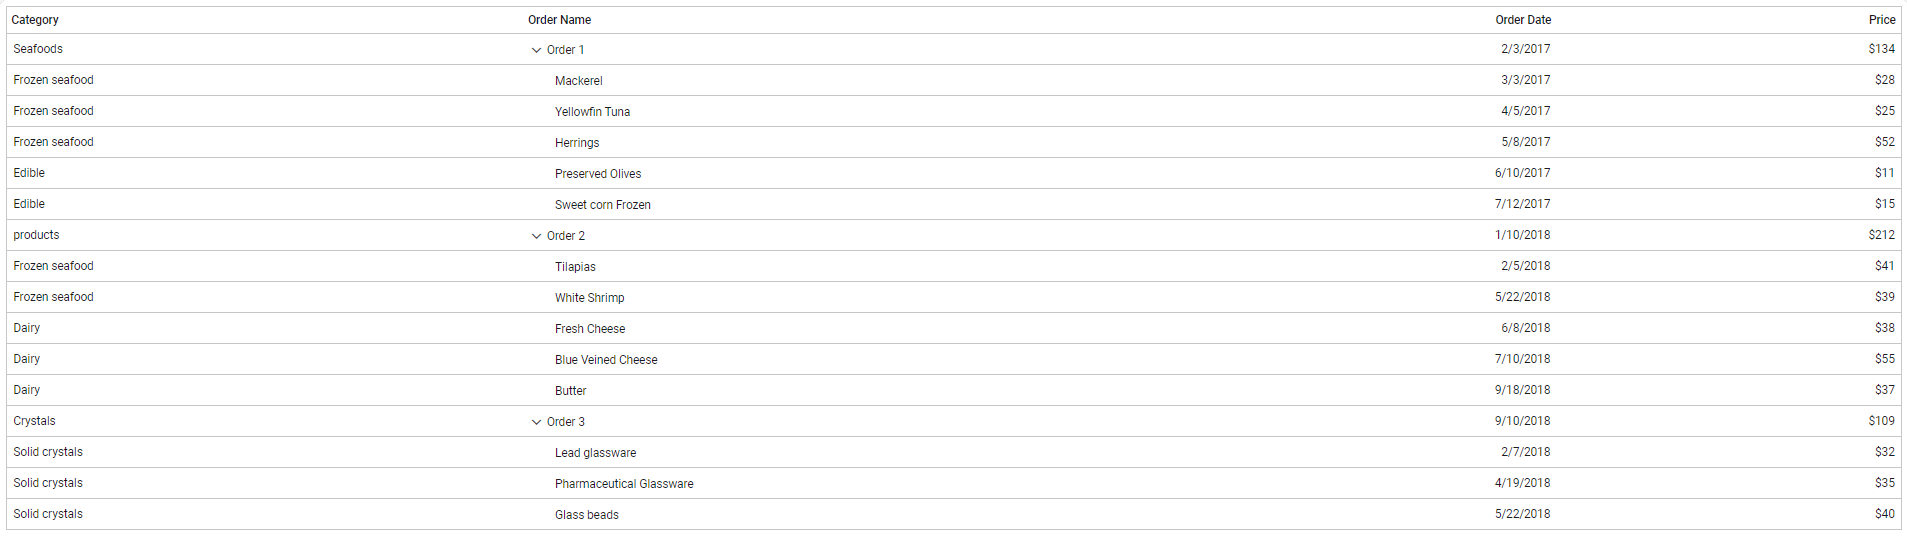
render(<App />, document.querySelector('#app'))Run the project
Run the project using one of the following commands:
npm run devor
yarn run devThe output appears as follows: