Getting Started with Angular Markdown Editor Component
22 May 20264 minutes to read
The Syncfusion Angular Markdown Editor is a web-based editor that enables users to create, edit, and format Markdown content with features such as table support and structured content formatting. This section explains the steps required to create a simple Angular Markdown Editor component and configure its available functionalities.
To enable the quick Markdown editing feature, inject MarkdownEditorService in the provider section of AppComponent.
Ready to streamline your Syncfusion® Angular development? Discover the full potential of Syncfusion® Angular components with Syncfusion® AI Coding Assistant. Effortlessly integrate, configure, and enhance your projects with intelligent, context-aware code suggestions, streamlined setups, and real-time insights—all seamlessly integrated into your preferred AI-powered IDEs like VS Code, Cursor, Syncfusion® CodeStudio and more. Explore Syncfusion® AI Coding Assistant
To get started quickly with the Angular Markdown Editor using CLI and Schematics, refer to this video tutorial:
Prerequisites
This guide uses the Angular CLI to manage Angular applications. It requires Node 24.13.0 or higher. For more information about Angular CLI and its features, refer the Angular CLI.
Setup Angular Environment
You can use Angular CLI to setup your Angular applications. To install Angular CLI use the following command.
npm install -g @angular/cliCreate an Angular Application
Start a new Angular application using below Angular CLI command.
ng new my-appThis command will prompt you for a few settings for the new project, such as which stylesheet format to use.
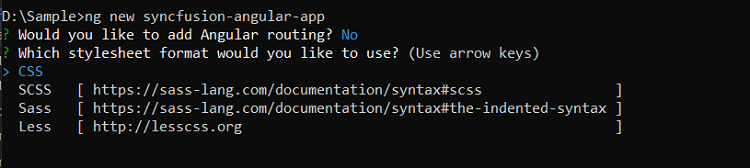
By default, it will create a CSS-based application.
Then the CLI also displays an additional prompt asking whether to enable Server‑Side Rendering (SSR) and Static Site Generation (SSG), as shown below:

For this setup, when prompted for the Server-side rendering (SSR) option, choose the appropriate configuration.
Then the CLI displays another prompt related to AI tooling support, as shown below:
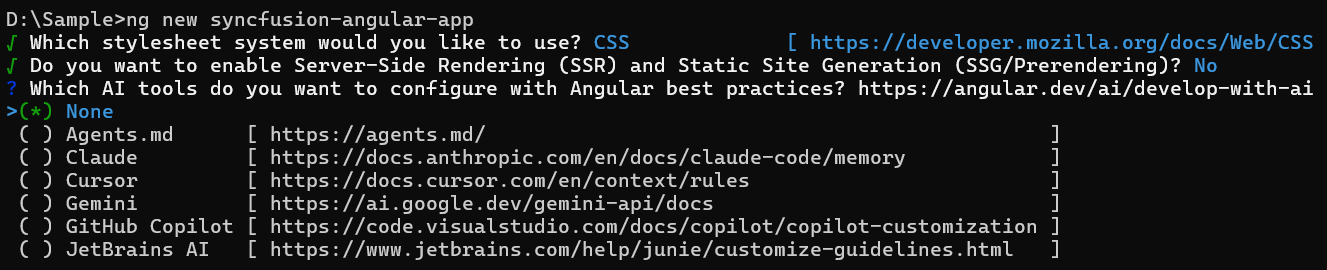
Any preferred option can be selected based on the development workflow or project needs.
Next, navigate to the project folder:
cd my-appAdding Syncfusion Rich Text Editor package
All the available Essential JS 2 packages are published in npmjs.com registry.
To install Rich Text Editor component, use the following command.
npm install @syncfusion/ej2-angular-richtexteditorAdding CSS reference
The following CSS files are available in ../node_modules/@syncfusion package folder.
This can be referenced in [src/styles.css] using the following code.
@import '../node_modules/@syncfusion/ej2-base/styles/material3.css';
@import '../node_modules/@syncfusion/ej2-buttons/styles/material3.css';
@import '../node_modules/@syncfusion/ej2-inputs/styles/material3.css';
@import '../node_modules/@syncfusion/ej2-lists/styles/material3.css';
@import '../node_modules/@syncfusion/ej2-navigations/styles/material3.css';
@import '../node_modules/@syncfusion/ej2-popups/styles/material3.css';
@import '../node_modules/@syncfusion/ej2-splitbuttons/styles/material3.css';
@import '../node_modules/@syncfusion/ej2-richtexteditor/styles/material3.css';
IMPORTANT
You can also refer to the themes section for details about built-in themes and CSS references for individual controls.
Module Injection
The following modules are used to utilize the basic capabilities of the Markdown Editor:
- MarkdownEditor - Inject this module to use Rich Text Editor as markdown editor.
- Image - Inject this module to use image feature in Markdown Editor.
- Link - Inject this module to use link feature in Markdown Editor.
- Toolbar - Inject this module to use Toolbar feature.
Additional feature modules are available here.
Adding Markdown Editor component
Modify the template in the [src/app/app.ts] file to render the Markdown Editor component. Add the Angular Markdown Editor by using the <ejs-richtexteditor> selector in the template section of the app.ts file.
import { Component } from '@angular/core';
import { RichTextEditorModule, ToolbarService, MarkdownEditorService, HtmlEditorService, ImageService, LinkService, TableService, ToolbarSettingsModel } from '@syncfusion/ej2-angular-richtexteditor';

@Component({
  imports: [RichTextEditorModule],
  standalone: true,
  selector: "app-root",
  template: `<ejs-richtexteditor [editorMode]="mode"></ejs-richtexteditor>`,
  providers: [ToolbarService, HtmlEditorService, MarkdownEditorService, ImageService, LinkService, TableService],
})
export class App {
  public mode: string = 'Markdown';
}
import { bootstrapApplication } from '@angular/platform-browser';
import { AppComponent } from './app.component';
import 'zone.js';
bootstrapApplication(AppComponent).catch((err) => console.error(err));@import 'node_modules/@syncfusion/ej2-base/styles/material3.css';
@import 'node_modules/@syncfusion/ej2-buttons/styles/material3.css';
@import 'node_modules/@syncfusion/ej2-inputs/styles/material3.css';
@import 'node_modules/@syncfusion/ej2-lists/styles/material3.css';
@import 'node_modules/@syncfusion/ej2-navigations/styles/material3.css';
@import 'node_modules/@syncfusion/ej2-popups/styles/material3.css';
@import 'node_modules/@syncfusion/ej2-splitbuttons/styles/material3.css';
@import 'node_modules/@syncfusion/ej2-richtexteditor/styles/material3.css';;Run the application
Use the following command to run the application in the browser.
ng serve --open