Getting Started with Vue Data Grid in Vue 3
06 Aug 202614 minutes to read
This article provides a step-by-step guide for setting up a Vite project with a JavaScript environment and integrating the Vue Data Grid component using the Composition API / Options API.
The Composition API is a new feature introduced in Vue.js 3 that provides an alternative way to organize and reuse component logic. It allows developers to write components as functions that use smaller, reusable functions called composition functions to manage their properties and behavior.
The Options API is the traditional way of writing Vue.js components, where the component logic is organized into a series of options that define the component’s properties and behavior. These options include data, methods, computed properties, watchers, lifecycle hooks, and more.
Prerequisites
- Node.js 24+ (LTS recommended).
- Syncfusion CLI.
Install the Syncfusion CLI
Install the Syncfusion CLI globally using the following command:
npm install -g @syncfusion/syncfusion-cliSet up the Vite project using Syncfusion CLI
You can create a Vue application with Vite using the Syncfusion CLI. The CLI provides two ways to create a project:
Non-interactive mode
Non-interactive mode allows you to create a project directly using a single command with the required command-line arguments.
sf new my-project --framework vue --type ts --template gridIn this mode, the project configuration is passed directly in the command. The above command creates a Vue application with Vite and configured it with the Syncfusion® Grid component. The generated project uses the TypeScript and the Composition API.
Interactive mode
Interactive mode guides you through the project creation process with step-by-step prompts.
sfWhen you run the sf command, the CLI prompts you to select the required project configuration options. To create a Vue application with Vite and the Syncfusion® Grid component, select the following options:
√ Project name? ... my-project
√ Choose Framework: » Vue
√ Choose Language: » TypeScript
√ Choose Template: » Grid
√ Choose Theme: » Material3
√ Choose Style Format: » CSS
√ Would you like to integrate the Syncfusion MCP Server (AI Assistant) into this project? ... no
√ Would you like to install Syncfusion Component Skills for AI-powered development? ... no
√ Install dependencies and start app now? ... no
The above selections generate a Vue application with Vite and configure it with the Syncfusion® Grid component. You can choose different values for language, theme, style format, MCP setup, and skills installation based on your project requirements.
The Syncfusion® CLI creates the project with a predefined template. After the project is generated, you can customize or replace the component code based on your application requirements.
Run the project
Once the project is created, navigate to the project directory and run the following commands in your terminal.
cd my-project
npm install
npm run dev
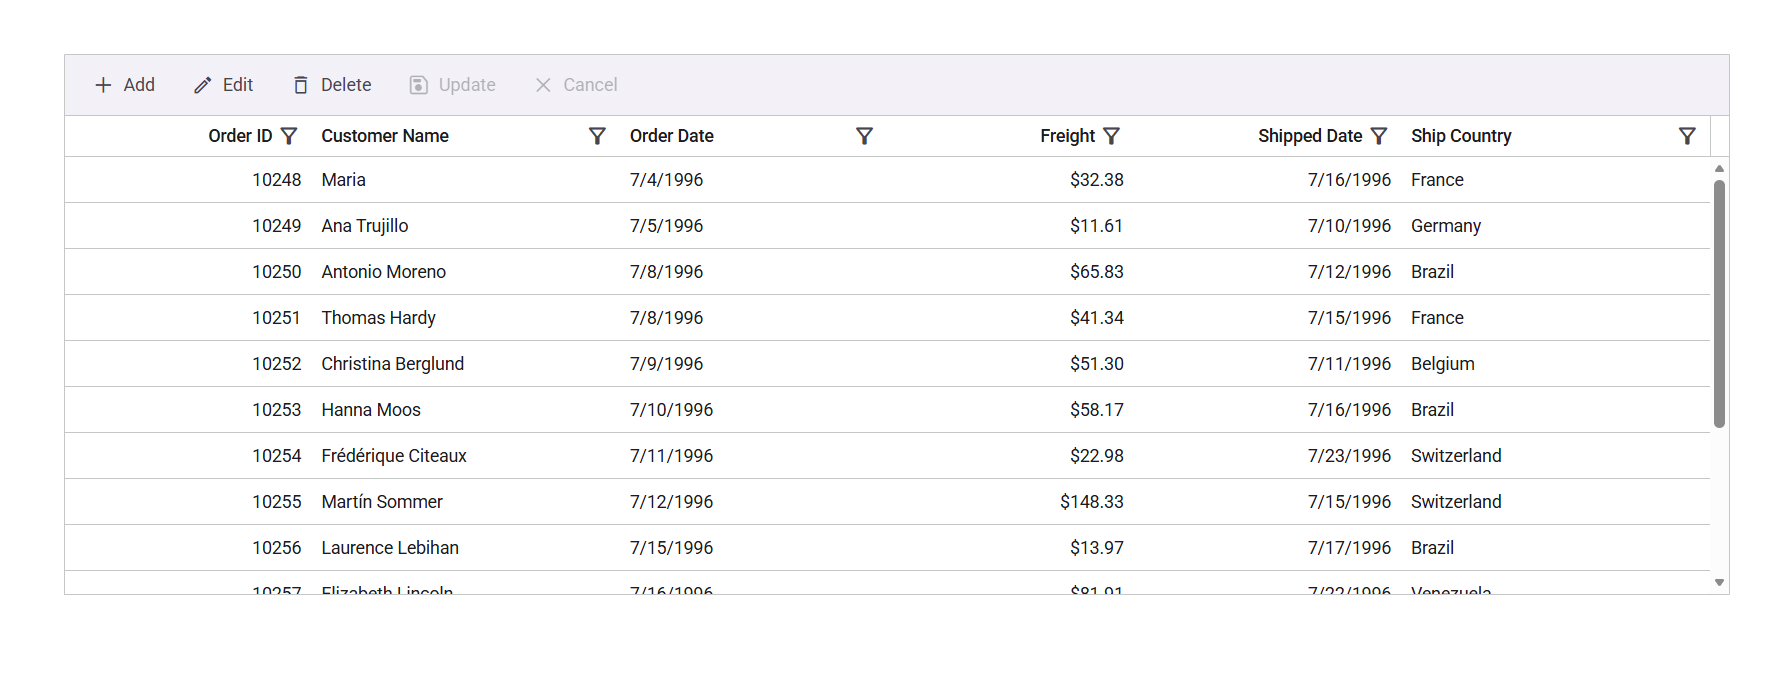
The output will appear as follows:
Prerequisites
| Requirement | Version |
|---|---|
| Vue | 3.0 or higher |
| Node.js | 16.0.0 or above |
Vue supported versions
| Vue version | Minimum Syncfusion Vue Data Grid version |
|---|---|
| Vue v3.0 | 19.2.44 and above |
Browser support
| Browser | Supported versions |
|---|---|
| Chrome | Latest |
| Firefox | Latest |
| Opera | Latest |
| Edge | 13+ |
| Internet Explorer (IE) | 11+ |
| Safari | 9+ |
| iOS Safari | 9+ |
| Android Browser / Chrome for Android | 4.4+ |
| Windows Mobile | IE 11+ |
Setup for local development
Easily set up a Vue 3 application using Vite, which provides a faster development environment, smaller bundle sizes, and optimized builds compared to traditional tools. For detailed steps, refer to the Vite installation instructions. Vite sets up your environment using JavaScript and optimizes your application for production.
Note: To create a Vue application using
create-vue, refer to this documentation for more details.
To create a new Vue 3 application, run one of the following commands based on your preferred language:
Vue with JavaScript
npm create vite@latest my-app -- --template vue
Vue with TypeScript
npm create vite@latest my-app -- --template vue-ts
During the setup process, the CLI will prompt you for a few configuration options. Select the following:
- Which linter to use? → Default ([Vue 3] babel, eslint)
- Install with npm and start now? → Yes
Selecting Yes automatically installs the project dependencies and starts the development server.
After verifying that the application starts successfully, terminate the development server in the terminal and proceed to the next step.
Then, navigate to the project directory:
cd my-app
Add Vue Grid packages
To install the Grid packages, use the following command:
npm install @syncfusion/ej2-vue-grids --save
or
yarn add @syncfusion/ej2-vue-grids
Before including Syncfusion styles, make sure to remove the default styles defined in style.css. This helps prevent unintended style overrides and ensures that Syncfusion components render correctly.
Adding CSS reference
Themes for Syncfusion® Data Grid components can be applied using CSS files provided through npm theme packages. For available themes, refer to the Themes documentation.
Install the Material 3 theme package using the following command:
npm install @syncfusion/ej2-material3-theme --saveThen add the following CSS reference to the src/App.vue file:
<style>
    @import "../node_modules/@syncfusion/ej2-material3-theme/styles/grid/index.css";
</style>
Adding Data Grid component
The Data Grid code should be added in the src/App.vue file.
<template>
    <div id="app">
        <!-- Assigns the dataset to the Grid component -->
        <ejs-grid :dataSource="data">
        <!-- Define the columns to be displayed -->
          <e-columns>
            <e-column field='OrderID' headerText='Order ID' textAlign='Right' width=100></e-column>
            <e-column field='CustomerName' headerText='Customer Name' width=100></e-column>
            <e-column field='OrderDate' headerText='Order Date' width='100' format='yMd' textAlign='Right'></e-column>
            <e-column field='Freight' headerText='Freight' width=100 format='C2' textAlign='Right'></e-column>
            <e-column field='ShipCountry' headerText='Ship Country' width=100></e-column>
          </e-columns>
        </ejs-grid>
    </div>
</template>
<script setup>
import { GridComponent as EjsGrid, ColumnDirective as EColumn, ColumnsDirective as EColumns } from "@syncfusion/ej2-vue-grids";
// Defines the data to be displayed in the Grid
const data = [
    { OrderID: 10248, CustomerName: 'Ana Trujillo', OrderDate: new Date(2025, 0, 12), ShipCountry: 'France', Freight: 32.38 },
    { OrderID: 10249, CustomerName: 'Martin Sommer', OrderDate: new Date(2025, 0, 15), ShipCountry: 'Germany', Freight: 11.61 },
    { OrderID: 10250, CustomerName: 'Thomas Hardy', OrderDate: new Date(2025, 1, 5), ShipCountry: 'Brazil', Freight: 65.83 },
    { OrderID: 10251, CustomerName: 'Elizabeth Lincoln', OrderDate: new Date(2025, 1, 18), ShipCountry: 'France', Freight: 41.34 },
    { OrderID: 10252, CustomerName: 'Victoria Ashworth', OrderDate: new Date(2025, 2, 10), ShipCountry: 'Belgium', Freight: 51.30 },
    { OrderID: 10253, CustomerName: 'Martine Rance', OrderDate: new Date(2025, 2, 22), ShipCountry: 'Brazil', Freight: 58.17 },
];
</script>
<style>
@import "../node_modules/@syncfusion/ej2-material3-theme/styles/grid/index.css";
</style><template>
<div id="app">
<!-- Assigns the dataset to the Grid component -->
<ejs-grid :dataSource="data">
<!-- Define the columns to be displayed -->
<e-columns>
<e-column field='OrderID' headerText='Order ID' textAlign='Right' width=100></e-column>
<e-column field='CustomerName' headerText='Customer Name' width=100></e-column>
<e-column field='OrderDate' headerText='Order Date' width='100' format='yMd' textAlign='Right'></e-column>
<e-column field='Freight' headerText='Freight' width=100 format='C2' textAlign='Right'></e-column>
<e-column field='ShipCountry' headerText='Ship Country' width=100></e-column>
</e-columns>
</ejs-grid>
</div>
</template>
<script>
import { GridComponent, ColumnsDirective, ColumnDirective } from "@syncfusion/ej2-vue-grids";
export default {
name: "App",
components: {
'ejs-grid': GridComponent,
'e-column': ColumnDirective,
'e-columns': ColumnsDirective
},
data() {
return {
// Defines the data to be displayed in the Grid
data: [
{ OrderID: 10248, CustomerName: 'Ana Trujillo', OrderDate: new Date(2025, 0, 12), ShipCountry: 'France', Freight: 32.38 },
{ OrderID: 10249, CustomerName: 'Martin Sommer', OrderDate: new Date(2025, 0, 15), ShipCountry: 'Germany', Freight: 11.61 },
{ OrderID: 10250, CustomerName: 'Thomas Hardy', OrderDate: new Date(2025, 1, 5), ShipCountry: 'Brazil', Freight: 65.83 },
{ OrderID: 10251, CustomerName: 'Elizabeth Lincoln', OrderDate: new Date(2025, 1, 18), ShipCountry: 'France', Freight: 41.34 },
{ OrderID: 10252, CustomerName: 'Victoria Ashworth', OrderDate: new Date(2025, 2, 10), ShipCountry: 'Belgium', Freight: 51.30 },
{ OrderID: 10253, CustomerName: 'Martine Rance', OrderDate: new Date(2025, 2, 22), ShipCountry: 'Brazil', Freight: 58.17 },
],
};
},
}
</script>
<style>
@import "../node_modules/@syncfusion/ej2-material3-theme/styles/grid/index.css";
</style>Run the application
npm run dev
or
yarn run dev
Registering Syncfusion license
The Syncfusion® Vue Data Grid requires a valid license key to be registered in the application. To prevent license validation warnings, refer to the Syncfusion licensing documentation.
Troubleshooting
-
Grid not rendering styles: Ensure the theme CSS is imported in
src/App.vueand that you removed any default Vue CLI starter styles that may override the Grid styles. -
Trial license warning banner: Register a license key via
registerLicense()from@syncfusion/ej2-base.
Looking for the full Vue Data Grid component overview, features, pricing, and documentation? Visit the Vue Data Grid page.
See also
- Data Grid Feature Modules
- Getting Started with Vue UI Components using Composition API and TypeScript
- Getting Started with Vue UI Components using Options API and TypeScript
- Getting Started with Vue UI Components with the Nuxt Framework
- Getting Started with Vue UI Components with Vite and PNPM
- Getting started with testing Vue UI components in the Vitest project
- Getting Started with Syncfusion® Vue UI Components using direct scripts