How can I help you?
Getting Started with the Vue Circular Gauge Component in Vue 3
18 Mar 202611 minutes to read
This article provides a step-by-step guide for setting up a Vite project with a JavaScript environment and integrating the Syncfusion® Vue Circular Gauge component using either the Composition API or Options API.
The Composition API is a modern feature in Vue 3 that organizes component logic into reusable composition functions, allowing developers to write more scalable and maintainable components with better code reusable.
The Options API is the traditional approach for writing Vue components, where logic is organized into predefined options (data, methods, computed properties, watchers, life cycle hooks, and more).
Prerequisites
System requirements for Syncfusion® Vue UI components
Set up the Vite project
A recommended approach for beginning with Vue is to scaffold a project using Vite. To create a new Vite project, use one of the commands that are specific to either NPM or Yarn.
npm create vite@latestor
yarn create viteUsing one of the above commands will lead you to set up additional configurations for the project as below:
1.Define the project name: We can specify the name of the project directly. Let’s specify the name of the project as my-project for this article.
? Project name: » my-project- Select
Vueas the framework to create a Vue 3 project.
? Select a framework: » - Use arrow-keys. Return to submit.
Vanilla
> Vue
  React
  Preact
  Lit
  Svelte
Others- Choose
JavaScriptas the framework variant.
? Select a variant: » - Use arrow-keys. Return to submit.
> JavaScript
  TypeScript
  Customize with create-vue ↗
  Nuxt ↗
4.Upon completing the aforementioned steps to create the my-project, run the following command to install its dependencies:
cd my-project
npm install
or
cd my-project
yarn install
Now that my-project is ready to run with default settings, let’s add Syncfusion® components to the project.
Add Syncfusion® Vue packages
Syncfusion® Vue component packages are available at npmjs.com. To use Syncfusion® Vue components in the project, install the corresponding npm package.
This article uses the Vue Circular Gauge component as an example. To use the Vue Circular Gauge component in the project, the package needs to be installed using the following command:
npm install @syncfusion/ej2-vue-circulargauge --saveor
yarn add @syncfusion/ej2-vue-circulargaugeAdd Syncfusion® Vue component
Follow the steps below to add the Vue Circular Gauge component to your application using either Composition API or Options API:
- Import and register the Circular Gauge component and its child directives in the
scriptsection of the src/App.vue file. For theComposition API, add thesetupattribute to thescripttag.
<script setup>
  import { CircularGaugeComponent as EjsCirculargauge, AxesDirective as EAxes, AxisDirective as EAxis, PointersDirective as EPointers, PointerDirective as EPointer, RangesDirective as ERanges, RangeDirective as ERange } from '@syncfusion/ej2-vue-circulargauge';
</script><script>
import { CircularGaugeComponent, AxesDirective, AxisDirective, PointersDirective, PointerDirective, RangesDirective, RangeDirective } from '@syncfusion/ej2-vue-circulargauge';
//Component registration
export default {
name: "App",
components: {
'ejs-circulargauge' : CircularGaugeComponent,
'e-axes' : AxesDirective,
'e-axis' : AxisDirective,
'e-pointers': PointersDirective,
'e-pointer' : PointerDirective,
'e-ranges' : RangesDirective,
'e-range' : RangeDirective
}
}
</script>- Define the Circular Gauge component in the
templatesection with axis, pointer, and range properties.
<template>
  <ejs-circulargauge :title ='title' orientation='Horizontal'>
        <e-axes>
            <e-axis minimum=0 maximum=200>
                <e-pointers>
                    <e-pointer value=140></e-pointer>
                </e-pointers>
                <e-ranges>
                    <e-range start=0 end=80 startWidth=15 endWidth=15></e-range>
                    <e-range start=80 end=120 startWidth=15 endWidth=15></e-range>
                    <e-range start=120 end=140 startWidth=15 endWidth=15></e-range>
                    <e-range start=140 end=200 startWidth=15 endWidth=15></e-range>
                </e-ranges>
            </e-axis>
        </e-axes>
    </ejs-circulargauge>
</template>
3.In the script section, declare the values for the properties defined in the template section.
<script setup>
    const title = "Circular Gauge";
</script><script>
data() {
return {
title: 'Circular Gauge'
};
}
</script>Here is the summarized code for the above steps in the src/App.vue file:
<template>
    <ejs-circulargauge :title ='title' orientation='Horizontal'>
        <e-axes>
            <e-axis minimum=0 maximum=200>
                <e-pointers>
                    <e-pointer value=140></e-pointer>
                </e-pointers>
                <e-ranges>
                    <e-range start=0 end=80 startWidth=15 endWidth=15></e-range>
                    <e-range start=80 end=120 startWidth=15 endWidth=15></e-range>
                    <e-range start=120 end=140 startWidth=15 endWidth=15></e-range>
                    <e-range start=140 end=200 startWidth=15 endWidth=15></e-range>
                </e-ranges>
            </e-axis>
        </e-axes>
    </ejs-circulargauge>
</template>

<script setup>
import { CircularGaugeComponent as EjsCirculargauge, AxesDirective as EAxes, AxisDirective as EAxis, PointersDirective as EPointers, PointerDirective as EPointer, RangesDirective as ERanges, RangeDirective as ERange } from '@syncfusion/ej2-vue-circulargauge';
const title = "Circular Gauge";
</script><template>
<ejs-circulargauge :title ='title' orientation='Horizontal'>
<e-axes>
<e-axis minimum=0 maximum=200>
<e-pointers>
<e-pointer value=140></e-pointer>
</e-pointers>
<e-ranges>
<e-range start=0 end=80 startWidth=15 endWidth=15></e-range>
<e-range start=80 end=120 startWidth=15 endWidth=15></e-range>
<e-range start=120 end=140 startWidth=15 endWidth=15></e-range>
<e-range start=140 end=200 startWidth=15 endWidth=15></e-range>
</e-ranges>
</e-axis>
</e-axes>
</ejs-circulargauge>
</template>
<script>
import { CircularGaugeComponent, AxesDirective, AxisDirective, PointersDirective, PointerDirective, RangesDirective, RangeDirective } from '@syncfusion/ej2-vue-circulargauge';
// Component registration
export default {
name: "App",
// Declaring component and its directives
components: {
'ejs-circulargauge' : CircularGaugeComponent,
'e-axes' : AxesDirective,
'e-axis' : AxisDirective,
'e-pointers': PointersDirective,
'e-pointer' : PointerDirective,
'e-ranges' : RangesDirective,
'e-range' : RangeDirective
},
// Bound properties declarations
data() {
return {
title: 'Circular Gauge'
};
}
};
</script>Run the project
To run the project, use the following command:
npm run devor
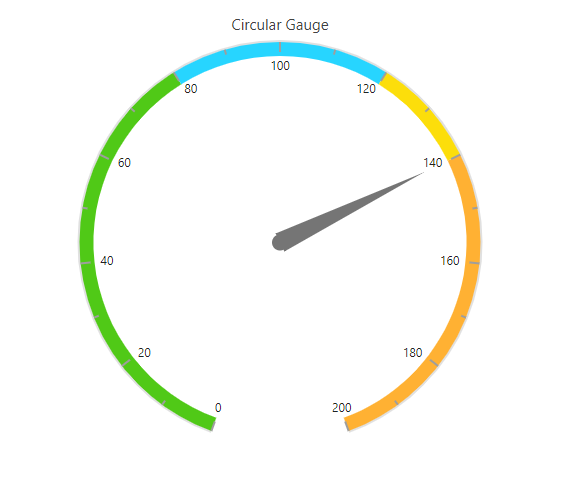
yarn run devThe application displays the following output:
Explore additional features and functionality:
- For TypeScript setup, refer to Getting Started with Composition API and TypeScript and Getting Started with Options API and TypeScript
- For migration from Vue 2 to Vue 3, see the Migration Guide
- Explore Circular Gauge features and user interactions for more advanced use cases