Visual Studio Integration
2 Feb 20261 minute to read
Create project
Syncfusion® provides Visual Studio project templates for creating Syncfusion® React applications. The template generates a new project configured with the required Syncfusion references, packages, and CDN links to accelerate development with Syncfusion components.
The Syncfusion® React project templates are available from v17.1.0.47.
Follow these steps to create a Syncfusion® React application using Visual Studio:
- Open Visual Studio 2022 (or Visual Studio 2017/2019 where supported).
-
To create a Syncfusion React project, choose one of the options below:
Option 1:
Choose Extensions → Syncfusion → Essential Studio® for ASP.NET Core → Create New Syncfusion Project… from the Visual Studio menu.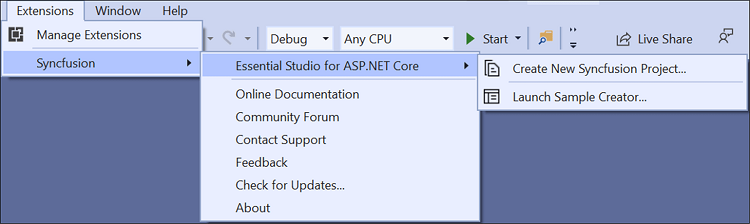
In some Visual Studio versions, the Syncfusion menu may appear directly in the main menu.
Option 2:
Choose File → New → Project. In the Create a new project dialog, filter by “Syncfusion” or search for “Syncfusion” to list the Syncfusion-provided templates for ASP.NET Core.
In Visual Studio 2017, navigate to Syncfusion > .NET Core > Syncfusion ASP.NET Core (Essential JS 2) Web Application.
-
Select the Syncfusion ASP.NET Core Web Application template and click Next.

-
Enter the project name and destination, then click Create. The Syncfusion project configuration wizard appears.

Choose the Syncfusion React.js template, then select the required theme, authentication type, and asset options.
Syncfusion React project templates support .NET 6.0 and .NET 7.0 project types.
-
Click Create to generate the project. The Syncfusion React application is created and configured.
-
The generated project is preconfigured with Syncfusion packages and starter code.
- Verify that the required Syncfusion React NPM packages, scripts, and selected styles are added to the application (check package.json and installed files).