Getting Started with ASP.NET MVC Rich Text Editor Control
17 Jul 20264 minutes to read
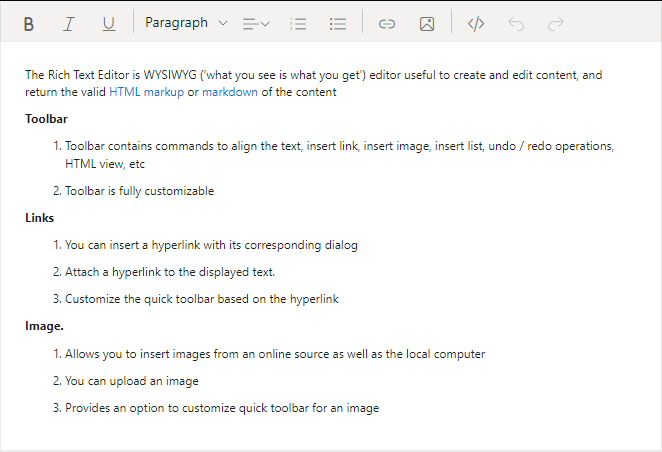
The Syncfusion ASP.NET MVC Rich Text Editor is a WYSIWYG (What You See Is What You Get) editor that enables users to create, edit, and format rich text content with features like multimedia insertion, lists, and links. This section briefly explains how to include ASP.NET MVC Rich Text Editor control in your ASP.NET MVC application using Visual Studio.
Ready to streamline your Syncfusion® ASP.NET MVC development? Discover the full potential of Syncfusion® ASP.NET MVC controls with Syncfusion® AI Coding Assistant. Effortlessly integrate, configure, and enhance your projects with intelligent, context-aware code suggestions, streamlined setups, and real-time insights—all seamlessly integrated into your preferred AI-powered IDEs like Visual Studio, Visual Studio Code, Cursor, Syncfusion® CodeStudio and more. Explore Syncfusion® AI Coding Assistant
Prerequisites
System requirements for ASP.NET MVC controls
Create an ASP.NET MVC Application
You can create an ASP.NET MVC web application using either of the following two methods. Follow the steps in one of these methods to create an ASP.NET MVC project
WARNING
Important: Syncfusion® ASP.NET MVC controls require
System.Web.Mvcversion 5.3.0. Using earlier versions may result in runtime or build errors. For more information, refer to the release notes.
Install Syncfusion ASP.NET MVC package in the application
You can add the Syncfusion Rich Text Editor to your ASP.NET MVC application by installing the Syncfusion ASP.NET MVC package. This can be done in two ways, as mentioned below:
1. Using NuGet Package Manager
Open Visual Studio and navigate to Tools → NuGet Package Manager → Manage NuGet Packages for Solution. Search for Syncfusion.EJ2.MVC5 and install it directly.
2. Using Package Manager Console
Run the following command in the Package Manager Console:
Install-Package Syncfusion.EJ2.MVC5 -Version 34.1.29IMPORTANT
Ensure you’re running the command inside Visual Studio’s Package Manager Console (Tools → NuGet Package Manager → Package Manager Console), not in a terminal like CMD or PowerShell.
NOTE
Syncfusion® ASP.NET MVC controls are available in nuget.org. Refer to NuGet packages topic to learn more about installing NuGet packages in various OS environments. The Syncfusion.EJ2.MVC5 NuGet package has dependencies, Newtonsoft.Json for JSON serialization and Syncfusion.Licensing for validating Syncfusion® license key.
Add namespace
Add the Syncfusion.EJ2 namespace reference to the Web.config file under the Views folder.
<namespaces>
    <add namespace="Syncfusion.EJ2"/>
</namespaces>
Add stylesheet and script resources
Here, the theme and script resources are referenced through a CDN inside the <head> of ~/Views/Shared/_Layout.cshtml file as follows,
<head>
    ...
    <!-- Syncfusion ASP.NET MVC controls styles -->
    <link rel="stylesheet" href="https://cdn.syncfusion.com/ej2/34.1.29/fluent.css" />
    <!-- Syncfusion ASP.NET MVC controls scripts -->
    <script src="https://cdn.syncfusion.com/ej2/34.1.29/dist/ej2.min.js"></script>
</head>
NOTE
Check out the Themes topic to learn different ways (CDN, NPM package, and CRG) to refer styles in an ASP.NET MVC application, and to have the expected appearance for Syncfusion® ASP.NET MVC controls. Check out the Adding Script Reference topic to learn different approaches for adding script references in your ASP.NET MVC application.
Register Syncfusion® Script Manager
Also, register the Script Manager EJS().ScriptManager() at the end of <body> in the ~/Views/Shared/_Layout.cshtml file as follows.
<body>
...
    <!-- Syncfusion ASP.NET MVC Script Manager -->
    @Html.EJS().ScriptManager()
</body>
Add ASP.NET MVC Rich Text Editor control
Now, add the Syncfusion® ASP.NET MVC Rich Text Editor control to the ~/Views/Home/Index.cshtml page.
@Html.EJS().RichTextEditor("editor").Render()IMPORTANT
Replace the existing content in the
Index.cshtmlfile with the above code snippet. Ensure that the Rich Text Editor control is assigned a valid ID (for example,"editor"), as the control will not render without it.
Run the application
Press Ctrl+F5 (Windows) or ⌘+F5 (macOS) to run the app. Then, the Syncfusion® ASP.NET MVC Rich Text Editor control will be rendered in the default web browser.
NOTE
See also
Documentation
- How to change the editor type
- How to render the iframe
- How to render the toolbar in inline mode
- Accessibility in Rich Text Editor
- Keyboard support in Rich Text Editor
- Globalization in Rich Text Editor
Live samples
NOTE
You can refer to our ASP.NET MVC Rich Text Editor feature tour page for its groundbreaking feature representations. You can also explore our ASP.NET MVC Rich Text Editor example that shows how to render the Rich Text Editor tools.