Getting Started with ASP.NET MVC Form Builder Control
23 Sep 20264 minutes to read
The Form Builder is an intuitive, visual form designer that lets you create and customize forms interactively by dragging and dropping fields—no code required. You can visually design forms, configure field properties, and preview the generated form in real time. The Form Builder also allows you to export the form schema for use with the Form Renderer control.
This section explains the steps required to create a simple ASP.NET MVC Form Builder and demonstrate the basic usage of the Form Builder control in a ASP.NET MVC application using Visual Studio.
Prerequisites
System requirements for ASP.NET MVC controls
Create ASP.NET MVC application with HTML helper
Install ASP.NET MVC package in the application
To add ASP.NET MVC controls in the application, open the NuGet package manager in Visual Studio (Tools → NuGet Package Manager → Manage NuGet Packages for Solution), search for Syncfusion.EJ2.MVC5 and then install it.
Install-Package Syncfusion.EJ2.MVC5 -Version 35.1.37Syncfusion® ASP.NET MVC controls are available in nuget.org. Refer to NuGet packages topic to learn more about installing NuGet packages in various OS environments. The Syncfusion.EJ2.MVC5 NuGet package has dependencies, Newtonsoft.Json for JSON serialization and Syncfusion.Licensing for validating Syncfusion® license key.
Update packages.config
To update the packages.config file with the latest ASP.NET MVC and Razor versions, run the following command in the NuGet Package Manager Console:
Update-Package Microsoft.AspNet.Mvc -Source nuget.orgIf you encounter any issues after updating, you may need to update the corresponding
Web.configfiles in your project to reference the new assembly versions. Also, ensure that your project’s target framework is compatible with the updated package versions.
Add namespace
Add Syncfusion.EJ2 namespace reference in Web.config under Views folder.
<namespaces>
    <add namespace="Syncfusion.EJ2"/>
</namespaces>
Add stylesheet and script resources
Here, the theme and script is referred using CDN inside the <head> of ~/Views/Shared/_Layout.cshtml file as follows,
<head>
    ...
    <!-- Syncfusion ASP.NET MVC controls styles -->
    <link rel="stylesheet" href="https://cdn.syncfusion.com/ej2/35.1.37/fluent2.css" />
    <!-- Syncfusion ASP.NET MVC controls scripts -->
    <script src="https://cdn.syncfusion.com/ej2/35.1.37/dist/ej2.min.js"></script>
</head>
Checkout the Themes topic to learn different ways (CDN, NPM package, and CRG) to refer styles in ASP.NET MVC application, and to have the expected appearance for Syncfusion® ASP.NET MVC controls. Checkout the Adding Script Reference topic to learn different approaches for adding script references in your ASP.NET MVC application.
Register Syncfusion® script manager
Also, register the script manager EJS().ScriptManager() at the end of <body> in the ~/Views/Shared/_Layout.cshtml file as follows.
<body>
...
    <!-- Syncfusion ASP.NET MVC Script Manager -->
    @Html.EJS().ScriptManager()
</body>
Add ASP.NET MVC Form Builder control
Now, add the Syncfusion® ASP.NET MVC Form Builder control in ~/Views/Home/Index.cshtml page.
@using Syncfusion.EJ2.FormBuilder

@Html.EJS().FormBuilder("form-builder-control").Render()
public class HomeController : Controller
{
public ActionResult Index()
{
return View();
}
}Press Ctrl+F5 (Windows) or ⌘+F5 (macOS) to run the app. Then, the Syncfusion® ASP.NET MVC Form Builder control will be rendered in the default web browser.
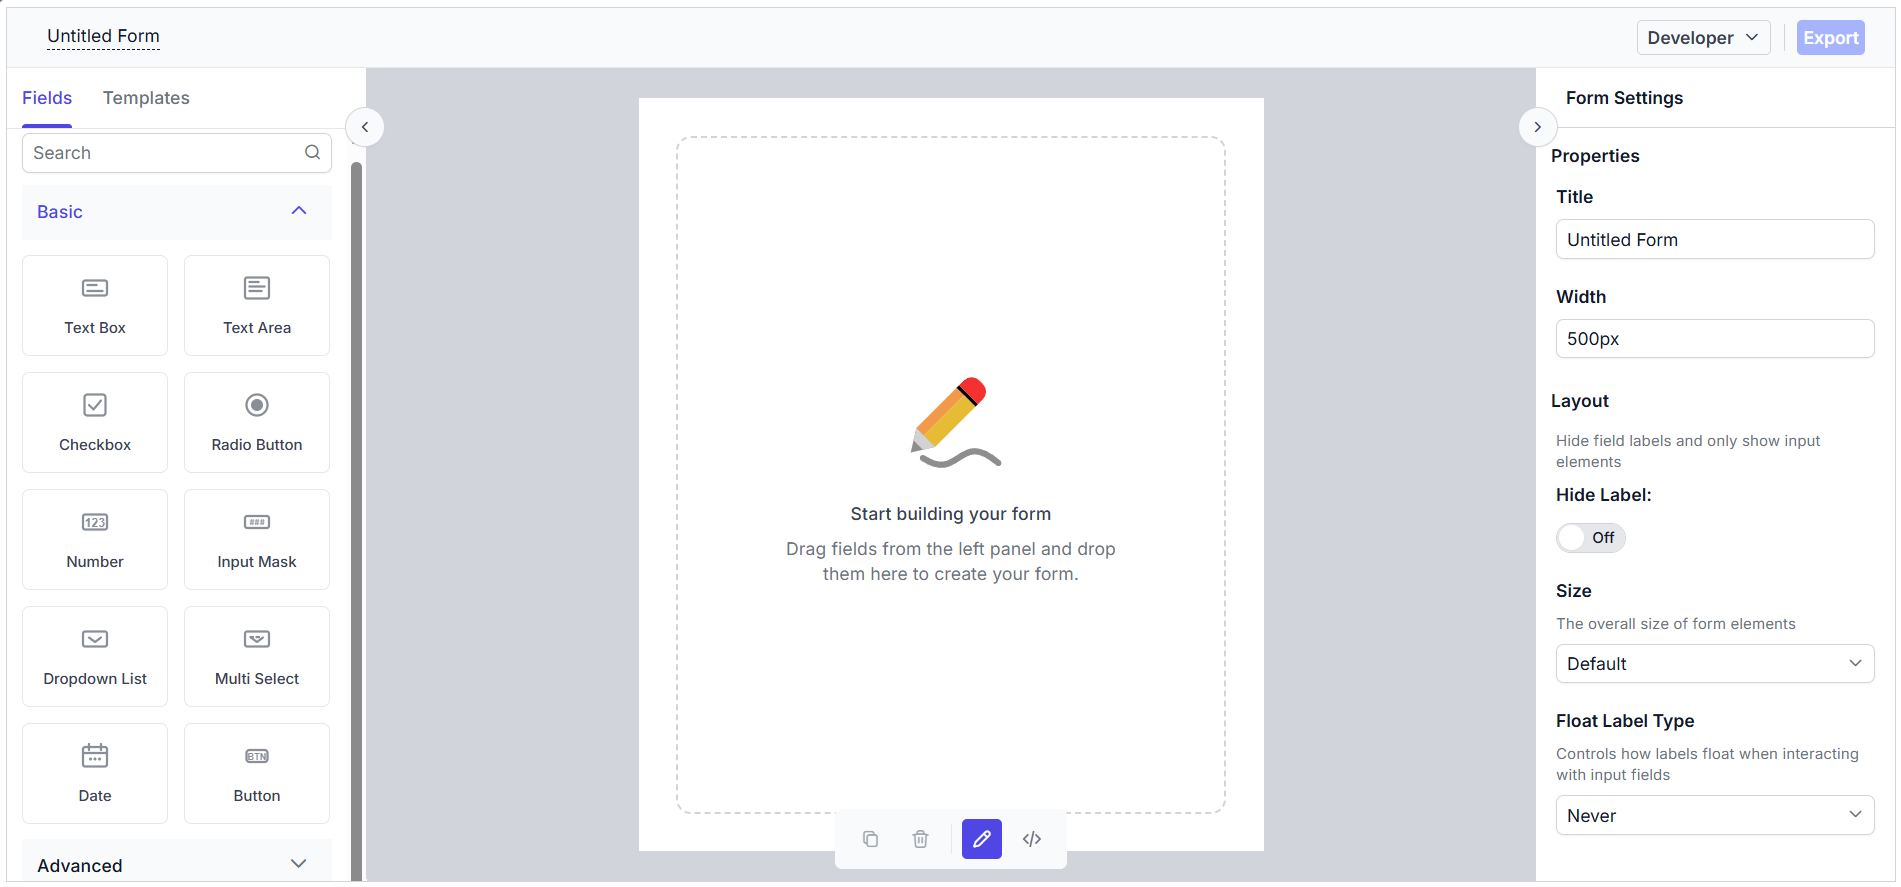
The output looks like below.
Registering Syncfusion license
The Syncfusion® Form Builder requires a valid license key to be registered in the application. To prevent license validation warnings, refer to the Syncfusion licensing documentation.
Basic components of Form Builder
The Form Builder control consists of the following sections:
- Left Pane / Toolbox — Displays all the supported form fields, which can be dragged and dropped.
- Central design canvas — Holds the dropped form fields to construct the form.
- Right Pane — Provides options to customize the form settings as well as the selected form fields.
- Code view — Displays the form schema during the form design process.
- Form Preview — Allows you to preview and interact with the generated form in real time once it is created.
Adding form fields to the design canvas
Form fields can be added to the central design canvas in the following ways:
- Form Components Panel — A toolbox of form fields is available in the left-side pane to drag and drop them onto the design canvas.
- Context Menu in the Design Canvas — After the first form field is dropped, a button at the end of the central canvas can be used to add additional form fields using a context menu that appears when the button is clicked.