Getting Started with ASP.NET MVC Form Renderer Control
09 Aug 20269 minutes to read
The Form Renderer is a powerful, schema-driven component that enables you to build and render complex forms with ease using a structured JSON schema definition. It streamlines form creation, customization, and data capture by letting you define form layouts, fields, and validation declaratively and then render them through a simple component property binding.
This section briefly explains about how to include ASP.NET MVC Form Renderer control in your ASP.NET MVC application using Visual Studio.
Prerequisites
System requirements for ASP.NET MVC controls
Create ASP.NET MVC application with HTML helper
Install ASP.NET MVC package in the application
To add ASP.NET MVC controls in the application, open the NuGet package manager in Visual Studio (Tools → NuGet Package Manager → Manage NuGet Packages for Solution), search for Syncfusion.EJ2.MVC5 and then install it.
Install-Package Syncfusion.EJ2.MVC5 -Version 35.1.37Syncfusion® ASP.NET MVC controls are available in nuget.org. Refer to NuGet packages topic to learn more about installing NuGet packages in various OS environments. The Syncfusion.EJ2.MVC5 NuGet package has dependencies, Newtonsoft.Json for JSON serialization and Syncfusion.Licensing for validating Syncfusion® license key.
Update packages.config
To update the packages.config file with the latest ASP.NET MVC and Razor versions, run the following command in the NuGet Package Manager Console:
Update-Package Microsoft.AspNet.Mvc -Source nuget.orgIf you encounter any issues after updating, you may need to update the corresponding
Web.configfiles in your project to reference the new assembly versions. Also, ensure that your project’s target framework is compatible with the updated package versions.
Add namespace
Add Syncfusion.EJ2 namespace reference in Web.config under Views folder.
<namespaces>
    <add namespace="Syncfusion.EJ2"/>
</namespaces>
Add stylesheet and script resources
Here, the theme and script is referred using CDN inside the <head> of ~/Views/Shared/_Layout.cshtml file as follows,
<head>
    ...
    <!-- Syncfusion ASP.NET MVC controls styles -->
    <link rel="stylesheet" href="https://cdn.syncfusion.com/ej2/35.1.37/fluent2.css" />
    <!-- Syncfusion ASP.NET MVC controls scripts -->
    <script src="https://cdn.syncfusion.com/ej2/35.1.37/dist/ej2.min.js"></script>
</head>
Checkout the Themes topic to learn different ways (CDN, NPM package, and CRG) to refer styles in ASP.NET MVC application, and to have the expected appearance for Syncfusion® ASP.NET MVC controls. Checkout the Adding Script Reference topic to learn different approaches for adding script references in your ASP.NET MVC application.
Register Syncfusion® script manager
Also, register the script manager EJS().ScriptManager() at the end of <body> in the ~/Views/Shared/_Layout.cshtml file as follows.
<body>
...
    <!-- Syncfusion ASP.NET MVC Script Manager -->
    @Html.EJS().ScriptManager()
</body>
Add ASP.NET MVC Form Renderer control
Now, add the Syncfusion® ASP.NET MVC Form Renderer control in ~/Views/Home/Index.cshtml page.
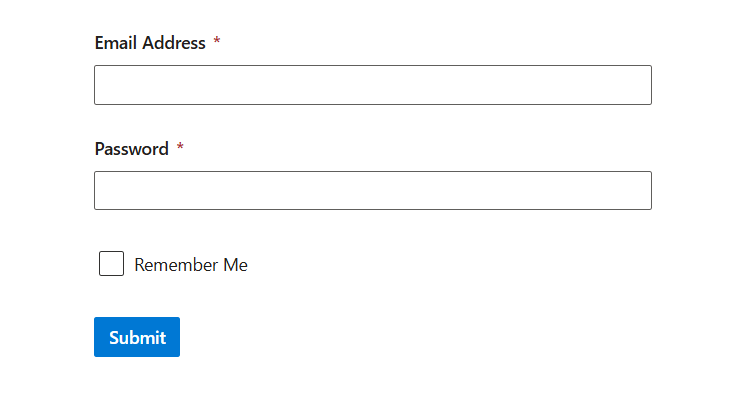
The Form Renderer control allows you to build a form from a JSON schema and renders the corresponding input controls automatically. In the following example, a FormRendererData class is used to build the schema in the controller, and the view binds it to the Form Renderer through ViewData.
Create the model
The schema is described by a set of plain C# classes that use [JsonProperty] attributes to map to the JSON properties consumed by the Form Renderer. Schema is the root, Properties holds the individual form fields, and Settings configures form-level options such as name and width.
// Schema.cs
public class FormRendererData
{
     public Schema GetData() => new Schema
     {
         Version = "0.1.0",
         Properties = new Dictionary<string, BaseProperty>
         {
             ["emailAddress"] = new TextboxProperty { Id = "t1", Name = "emailAddress", Type = "string", Label = "Email Address", TextboxType = "email", Required = true, Widget = "textbox" },
             ["password"] = new TextboxProperty { Id = "t2", Name = "password", Type = "string", Label = "Password", TextboxType = "password", Required = true, MinLength = 6, Widget = "textbox" },
             ["rememberMe"] = new CheckboxProperty { Id = "c1", Name = "rememberMe", Type = "boolean", Label = "Remember Me", Widget = "checkbox" },
             ["submit"] = new SubmitButtonProperty { Id = "s1", Name = "submit", Type = "button", Label = "Submit", ButtonType = "submit", Widget = "button", Style = "primary", Disabled = false }
         },
         Layout = new List<LayoutNode>
         {
             new LayoutNode{Type="field",PropertyId="emailAddress"},
             new LayoutNode{Type="field",PropertyId="password"},
             new LayoutNode{Type="field",PropertyId="rememberMe"},
             new LayoutNode{Type="field",PropertyId="submit"}
         },
         Settings = new SchemaSettings { Name = "Login Form" }
     };
}
public abstract class BaseProperty
{
     [JsonProperty("id")] public string Id { get; set; }
     [JsonProperty("name")] public string Name { get; set; }
     [JsonProperty("type")] public string Type { get; set; }
     [JsonProperty("label")] public string Label { get; set; }
     [JsonProperty("widget")] public string Widget { get; set; }
     [JsonProperty("size")] public string Size { get; set; }
}


public class TextboxProperty : BaseProperty
{
     [JsonProperty("textboxType")] public string TextboxType { get; set; }
     [JsonProperty("required")] public bool Required { get; set; }
     [JsonProperty("minLength")] public int? MinLength { get; set; }
}
public class CheckboxProperty : BaseProperty { }
public class SubmitButtonProperty : BaseProperty
{
     [JsonProperty("buttonType")] public string ButtonType { get; set; }
     [JsonProperty("style")] public string Style { get; set; }
     [JsonProperty("disabled")] public bool Disabled { get; set; }
}
public class Schema
{
     [JsonProperty("version")] public string Version { get; set; }
     [JsonProperty("properties")] public Dictionary<string, BaseProperty> Properties { get; set; }
     [JsonProperty("layout")] public List<LayoutNode> Layout { get; set; }
     [JsonProperty("settings")] public SchemaSettings Settings { get; set; }
}
public class SchemaSettings { [JsonProperty("name")] public string Name { get; set; } }
public class LayoutNode { [JsonProperty("type")] public string Type { get; set; } [JsonProperty("propertyId")] public string PropertyId { get; set; } }
Assign the model to Form Renderer
In the HomeController.cs, populate the schema through FormRendererData and pass it to the view using ViewData. The view then renders the Form Renderer with the @Html.EJS().FormRenderer helper.
@using Syncfusion.EJ2.FormRenderer

@Html.EJS().FormRenderer("form-renderer-control").Schema((ViewData["formSchema"])).Render()
public class HomeController : Controller
{
public ActionResult Index()
{
ViewData["formSchema"] = new FormRendererData().GetData();
return View();
}
}Press Ctrl+F5 (Windows) or ⌘+F5 (macOS) to run the app. Then, the Syncfusion® ASP.NET MVC Form Renderer control will be rendered in the default web browser.
The output looks like below.