Getting Started with ASP.NET Core and Angular using Project Template
25 Jun 20267 minutes to read
This guide demonstrates how to create an ASP.NET Core application with Angular integration and incorporate Syncfusion® Angular UI components. This combination provides a powerful foundation for building modern web applications with a robust backend framework and responsive frontend components.
Prerequisites
Before starting, ensure your development environment meets these requirements:
Understanding ASP.NET Core with Angular
ASP.NET Core with Angular combines Microsoft’s server-side framework with Google’s client-side framework to create full-stack web applications. The template provides:
- ASP.NET Core backend for API endpoints, authentication, and business logic
- Angular frontend for interactive user interfaces
- Seamless integration between both frameworks with proxy configuration
- Webpack for building and bundling client assets
Create an Application
Follow these steps to create an ASP.NET Core application with Angular integration:
- Open the command prompt in your desired directory and run the following command:
dotnet new angular -o Syncfusion-ASP.NET-Core-Angular- Navigate to the application folder:
cd Syncfusion-ASP.NET-Core-Angular- Set the development environment variable:
For Windows:
SET ASPNETCORE_ENVIRONMENT=DevelopmentFor Linux/macOS:
export ASPNETCORE_ENVIRONMENT=Development- Build the application to verify everything works correctly:
dotnet buildNote: The initial build process restores npm dependencies, which may take several minutes. Subsequent builds will be faster.
- After successful build, you’ll have a project with the following structure:
-
ClientApp/: Contains the Angular application -
Controllers/: Houses ASP.NET Core API controllers -
Pages/: Contains Razor pages (if any) -
Program.cs: Configures ASP.NET Core services and middle ware
-
Installing Syncfusion® Grid Package
To add Syncfusion® Angular components to your application:
- Navigate to the ClientApp folder:
cd ClientApp- Install the Syncfusion® Angular DataGrid package:
npm install @syncfusion/ej2-angular-grids --saveAll Syncfusion® Angular packages are available under the
@syncfusionscope. You can find the complete list of packages at npmjs.com.
Adding Grid Module
Now, configure your Angular application to use the Syncfusion® Grid component:
- Open the
~/ClientApp/src/main.tsfile in your preferred code editor. - Import and register the Grid module with standalone bootstrap:
import { bootstrapApplication } from '@angular/platform-browser';
import { appConfig } from './app/app.config';
import { AppComponent } from './app/app';
import { importProvidersFrom } from '@angular/core';
import { GridModule } from '@syncfusion/ej2-angular-grids';
import { provideRouter } from '@angular/router';

bootstrapApplication(AppComponent, {
  providers: [
    importProvidersFrom(GridModule),
    ...appConfig.providers
  ]
}).catch((err) => console.error(err));
Adding Syncfusion® Component
Insert the following grid component code snippet in the ~/ClientApp/src/app/home/home.ts file as follows.
import { Component } from '@angular/core';
import { GridModule } from '@syncfusion/ej2-angular-grids';
import { CommonModule } from '@angular/common';

@Component({
  selector: 'app-home',
  standalone: true,
  imports: [GridModule, CommonModule],
  template: `
  <h1>
    Syncfusion Angular UI Grid!
  </h1>

  <ejs-grid [dataSource]='data'>
    <e-columns>
      <e-column field='OrderID' headerText='Order ID' textAlign='Right' width=90></e-column>
      <e-column field='CustomerID' headerText='Customer ID' width=120></e-column>
      <e-column field='Freight' headerText='Freight' textAlign='Right' format='C2' width=90></e-column>
      <e-column field='OrderDate' headerText='Order Date' textAlign='Right' format='yMd' width=120></e-column>
    </e-columns>
  </ejs-grid>
 `
})

export class HomeComponent {
  public data: Object[] = [
    {
      OrderID: 10248, CustomerID: 'VINET', EmployeeID: 5, OrderDate: new Date(8364186e5),
      ShipName: 'Vins et alcools Chevalier', ShipCity: 'Reims', ShipAddress: '59 rue de l Abbaye',
      ShipRegion: 'CJ', ShipPostalCode: '51100', ShipCountry: 'France', Freight: 32.38, Verified: true
    },
    {
      OrderID: 10249, CustomerID: 'TOMSP', EmployeeID: 6, OrderDate: new Date(836505e6),
      ShipName: 'Toms Spezialitäten', ShipCity: 'Münster', ShipAddress: 'Luisenstr. 48',
      ShipRegion: 'CJ', ShipPostalCode: '44087', ShipCountry: 'Germany', Freight: 11.61, Verified: false
    },
    {
      OrderID: 10250, CustomerID: 'HANAR', EmployeeID: 4, OrderDate: new Date(8367642e5),
      ShipName: 'Hanari Carnes', ShipCity: 'Rio de Janeiro', ShipAddress: 'Rua do Paço, 67',
      ShipRegion: 'RJ', ShipPostalCode: '05454-876', ShipCountry: 'Brazil', Freight: 65.83, Verified: true
    }
  ];
}
This code:
- Creates a standalone component with a Grid element (
<ejs-grid>) - Imports required modules including GridModule and CommonModule
- Defines four columns with various configurations
- Provides sample data for the grid to display
Adding CSS Reference
Add the required CSS files to style your Syncfusion® components:
- First, install the required theme package Material 3 theme using the following command:
npm install @syncfusion/ej2-material3-theme --save- Open the
~/ClientApp/src/styles.cssfile. - Add the following CSS imports:
@import "../node_modules/@syncfusion/ej2-material3-theme/styles/grid/index.css";These imports provide the Material3 theme styling for various UI components that the Grid depends on. The imports should be in this specific order to ensure proper styling.
Run the Application
Return to the root directory and start your application:
cd ..

dotnet run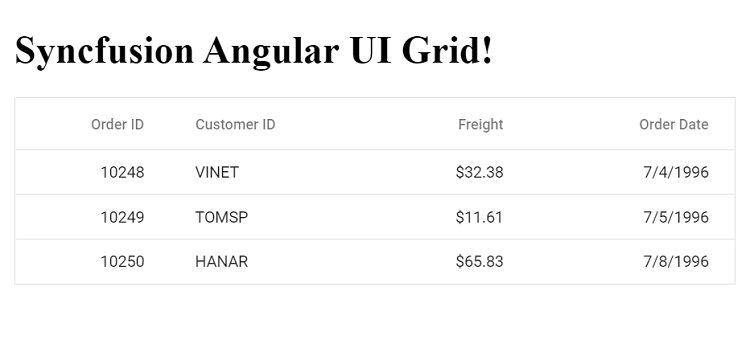
NOTE
Access the Angular sample integrated with ASP.NET Core on GitHub