How can I help you?
Getting Started with the Vue Barcode Component in Vue 2
18 Mar 202616 minutes to read
This article provides a step-by-step guide for setting up a Vue 2 project using Vue-CLI and integrating the Syncfusion® Vue Barcode component using the Composition API / Options API.
Prerequisites
System requirements for Syncfusion® Vue UI components
Dependencies
The following list of dependencies are required to use the Barcode Generator component in your application.
|-- @syncfusion/ej2-vue-barcode-generator
    |-- @syncfusion/ej2-base
    |-- @syncfusion/ej2-data
    |-- @syncfusion/ej2-navigations
    |-- @syncfusion/ej2-inputs
    |-- @syncfusion/ej2-popups
    |-- @syncfusion/ej2-buttons
    |-- @syncfusion/ej2-lists
    |-- @syncfusion/ej2-splitbuttons
    |-- @syncfusion/ej2-barcode-generator
    |-- @syncfusion/ej2-vue-base
Setting up the Vue 2 project
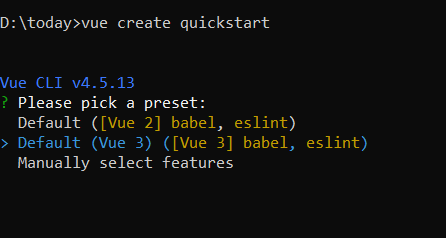
To generate a Vue 2 project using Vue-CLI, use the vue create command. Follow these steps to install Vue CLI and create a new project:
npm install -g @vue/cli
vue create quickstart
cd quickstart
npm run serve
or
yarn global add @vue/cli
vue create quickstart
cd quickstart
yarn run serve
When creating a new project, choose the option Default ([Vue 2] babel, eslint) from the menu.
Once the quickstart project is set up with default settings, proceed to add Syncfusion® components to the project.
Adding Syncfusion® Vue packages
Syncfusion® packages are available at npmjs.com. To use Vue components, install the required npm package.
This article uses the Vue Barcode component as an example. Install the @syncfusion/ej2-vue-barcode-generator package by running the following command:
npm install @syncfusion/ej2-vue-barcode-generator –saveor
yarn add @syncfusion/ej2-vue-barcode-generatorAdd Syncfusion® Vue component
Follow the below steps to add the Vue Barcode component using Composition API or Options API:
1. First, import and register the Barcode component in the script section of the src/App.vue file. If you are using the Composition API, you should add the setup attribute to the script tag to indicate that Vue will be using the Composition API.
<script setup>
    import { QRCodeGeneratorComponent as EjsQrcodegenerator } from '@syncfusion/ej2-vue-barcode-generator';
</script><script>
import { QRCodeGeneratorComponent } from '@syncfusion/ej2-vue-barcode-generator';
export default {
components: {
'ejs-qrcodegenerator': QRCodeGeneratorComponent
}
}
</script>2. In the template section, define the Barcode component with width, height, value, mode property.
<template>
    <div id="app" class="barcodeStyle">
        <ejs-qrcodegenerator
              id="barcode"
              ref="barcodeControl"
              :width="width"
              :height="height"
              :value="value"
              :mode="mode"
            ></ejs-qrcodegenerator>


    </div>
</template>
3. Declare the value for width, height, value, mode property in the script section
<script setup>
const width = "200px";
const height = "150px";
const type = "Codabar";
const value = "123456789";
const mode = "SVG";
</script><script>
data () {
return {
width: "200px",
height: "150px",
type: "Codabar",
value: "123456789",
mode: "SVG",
}
}
</script>Here is the summarized code for the above steps in the src/App.vue file:
<template>
    <div id="app" class="barcodeStyle">
        <ejs-barcodegenerator
              id="barcode"
              ref="barcodeControl"
              :width="width"
              :height="height"
              :type="type"
              :value="value"
              :mode="mode"
            ></ejs-barcodegenerator>

    </div>
</template>
<style>
    .barcodeStyle {
            height: 150px;
            width: 200px;
            padding-left: 40%;
            padding-top: 9%;
        }
</style>
<script setup>
import { BarcodeGeneratorComponent as EjsBarcodegenerator} from '@syncfusion/ej2-vue-barcode-generator';

const width = "200px";
const height = "150px";
const mode = "SVG";
const type = "Codabar";
const value = "123456789";

</script><template>
<div id="app" class="barcodeStyle">
<ejs-barcodegenerator
id="barcode"
ref="barcodeControl"
:width="width"
:height="height"
:type="type"
:value="value"
:mode="mode"
></ejs-barcodegenerator>
</div>
</template>
<style>
.barcodeStyle {
height: 150px;
width: 200px;
padding-left: 40%;
padding-top: 9%;
}
</style>
<script>
import { BarcodeGeneratorComponent } from '@syncfusion/ej2-vue-barcode-generator';
export default {
name: "App",
components: {
"ejs-barcodegenerator":BarcodeGeneratorComponent
},
data () {
return {
width: "200px",
height: "150px",
type: "Codabar",
value: "123456789",
mode: "SVG",
}
}
}
</script>Adding QR Generator control
You can add the QR code in our barcode generator component.
<template>
    <div id="app" class="barcodeStyle">
        <ejs-qrcodegenerator
              id="barcode"
              ref="barcodeControl"
              :width="width"
              :height="height"
              :value="value"
              :mode="mode"
            ></ejs-qrcodegenerator>
    </div>
</template>
<style>
    .barcodeStyle {
            height: 150px;
            width: 200px;
            padding-left: 40%;
            padding-top: 9%;
        }
</style>
<script setup>
import { QRCodeGeneratorComponent as EjsQrcodegenerator } from '@syncfusion/ej2-vue-barcode-generator';

const width = "200px";
const height = "150px";
const mode = "SVG";
const value = "Syncfusion";

</script><template>
<div id="app" class="barcodeStyle">
<ejs-qrcodegenerator
id="barcode"
ref="barcodeControl"
:width="width"
:height="height"
:value="value"
:mode="mode"
></ejs-qrcodegenerator>
</div>
</template>
<style>
.barcodeStyle {
height: 150px;
width: 200px;
padding-left: 40%;
padding-top: 9%;
}
</style>
<script>
import { QRCodeGeneratorComponent } from '@syncfusion/ej2-vue-barcode-generator';
export default {
name: "App",
components: {
"ejs-qrcodegenerator":QRCodeGeneratorComponent
},
data () {
return {
width: "200px",
height: "150px",
mode: "SVG",
value: "Syncfusion",
}
}
}
</script>Adding Datamatrix Generator control
You can add the datamatrix code in our barcode generator component.
<template>
    <div id="app" class="barcodeStyle">
        <ejs-datamatrixgenerator
              id="barcode"
              ref="barcodeControl"
              :width="width"
              :height="height"
              :value="value"
              :mode="mode"
            ></ejs-datamatrixgenerator>
    </div>
</template>
<style>
    .barcodeStyle {
            height: 150px;
            width: 200px;
            padding-left: 40%;
            padding-top: 9%;
        }
</style>
<script setup>
import { DataMatrixGeneratorComponent as EjsDatamatrixgenerator } from '@syncfusion/ej2-vue-barcode-generator';

const width = "200px";
const height = "150px";
const mode = "SVG";
const value = "Syncfusion";

</script><template>
<div id="app" class="barcodeStyle">
<ejs-datamatrixgenerator
id="barcode"
ref="barcodeControl"
:width="width"
:height="height"
:value="value"
:mode="mode"
></ejs-datamatrixgenerator>
</div>
</template>
<style>
.barcodeStyle {
height: 150px;
width: 200px;
padding-left: 40%;
padding-top: 9%;
}
</style>
<script>
import { DataMatrixGeneratorComponent } from '@syncfusion/ej2-vue-barcode-generator';
export default {
name: "App",
components: {
"ejs-datamatrixgenerator":DataMatrixGeneratorComponent
},
data () {
return {
width: "200px",
height: "150px",
mode: "SVG",
value: "Syncfusion",
}
}
}
</script>