URL Adaptor in React Pivot Table
The Syncfusion® React Pivot Table supports binding remote data through the UrlAdaptor of the Syncfusion® React DataManager. The UrlAdaptor connects the Pivot Table with REST API endpoints, manages communication between the Pivot Table and the server and handles requests and responses for remote data operations. It converts Pivot Table actions such as CRUD operations into HTTP POST requests and processes the server’s JSON response. This enables remote data binding without the need to write custom request-handling logic and provides a clean separation between the React UI and backend services.
What is the DataManager?
The DataManager is a data source manager used by Syncfusion® React components to handle data operations. It acts as a bridge between the Pivot Table and the data source (local array, REST API, OData, GraphQL, etc.). The DataManager is responsible for fetching data and performing CRUD operations, while communicating with the appropriate endpoint using the configured adaptor.
What is the UrlAdaptor?
The UrlAdaptor is one of the adaptors available in the DataManager. It is used when the data source is a custom REST API service. The UrlAdaptor sends HTTP requests to user-defined endpoints and parses the JSON response into a format that the Pivot Table understands. It also supports CRUD operations through separate insert, update, and remove endpoints, or a single combined endpoint using the crudUrl property.
Key benefits of the UrlAdaptor approach:
- Custom backend flexibility: Connect to any backend technology (ASP.NET Core, Node.js, Java, Python, etc.) that exposes REST endpoints.
-
Standardized JSON contract: The DataManager expects a specific
{ result, count }response structure, ensuring consistent communication across services. - Built-in CRUD support: Insert, update, and remove operations can be wired with minimal code on both client and server sides.
- Separation of concerns: The React UI focuses on presentation while the backend handles data access, validation, and business logic.
- Scalable architecture: REST APIs can be deployed, scaled, and secured independently of the front-end application.
Prerequisites
Ensure the following software and packages are installed before proceeding:
| Software/Package | Version | Purpose |
|---|---|---|
| Node.js | 18.x or later | Runtime for React development |
| React | 18.x or later | Create and run React applications |
| .NET SDK | 8.0 or later | Build and run ASP.NET Core Web API |
| Visual Studio or Visual Studio Code | Latest | Configure the backend API service |
| @syncfusion/ej2-react-pivotview | 34.1.29 or later | React Pivot Table component |
| Microsoft.AspNetCore.Mvc.NewtonsoftJson | 8.0.x or later | Preserves original property casing during JSON serialization |
Setting up the ASP.NET Core Backend API
The ASP.NET Core Web API is the backend service that supplies data to the React Pivot Table. It listens for HTTP requests from the Pivot Table, returns data in the format the component expects, and accepts CRUD operations from the client. Throughout this section, you will create the project, install the required packages, build the model and controller, configure JSON serialization and CORS, and finally run the API locally.
Step 1: Create the ASP.NET Core Web API project
Create a new ASP.NET Core Web API project in Visual Studio
To create a new ASP.NET Core Web API project named UrlAdaptor in Visual Studio, follow these steps:
- Open Visual Studio.
- Select Create a new project.
- Choose the ASP.NET Core Web API project template.
- Name the project UrlAdaptor.
- Click Create.
Create a new ASP.NET Core Web API project in Visual Studio Code
To create the project using Visual Studio Code, open the integrated terminal by pressing Ctrl+` and run the following commands:
dotnet new webapi -n UrlAdaptor --use-controllers
cd UrlAdaptor
The above command creates a project with a Controllers folder. To create a Models folder, run the following command:
mkdir ModelsNote: The
dotnet new webapitemplate includes aWeatherForecastsample by default. You can delete theWeatherForecast.csmodel andWeatherForecastController.cscontroller files generated by the template before continuing.
Step 2: Install required NuGet package
The Microsoft.AspNetCore.Mvc.NewtonsoftJson package is required for JSON serialization support in the ASP.NET Core application. This package provides the necessary formatters to handle JSON data correctly and to preserve the original property casing of the data source.
Installation options
In Visual Studio:
Navigate to Tools → NuGet Package Manager → Manage NuGet Packages for Solution. Search for Microsoft.AspNetCore.Mvc.NewtonsoftJson, select it, and click Install. Ensure the package is installed in the UrlAdaptor project.
Via package manager console:
Install-Package Microsoft.AspNetCore.Mvc.NewtonsoftJsonVia .NET CLI:
dotnet add package Microsoft.AspNetCore.Mvc.NewtonsoftJsonStep 3: Create a model class
The model class represents the structure of the data displayed in the Pivot Table. Create a model class named OrdersDetails.cs in the Models folder to represent the order data structure. This class also contains a static list of sample order data, which simulates a data source for demonstration purposes. In a real application, this data would typically be fetched from a database.
namespace UrlAdaptor.Models
{
    public class OrdersDetails
    {
        /// <summary>Stores the in-memory list of orders used in the sample.</summary>
        public static List<OrdersDetails> order = new List<OrdersDetails>();

        public OrdersDetails()
        {

        }

        public OrdersDetails(
        int OrderID, string CustomerID, int EmployeeID, double Freight, bool Verified,
        DateTime OrderDate, string ShipCity, string ShipName, string ShipCountry,
        DateTime ShippedDate, string ShipAddress)
        {
            this.OrderID = OrderID;
            this.CustomerID = CustomerID;
            this.EmployeeID = EmployeeID;
            this.Freight = Freight;
            this.ShipCity = ShipCity;
            this.Verified = Verified;
            this.OrderDate = OrderDate;
            this.ShipName = ShipName;
            this.ShipCountry = ShipCountry;
            this.ShippedDate = ShippedDate;
            this.ShipAddress = ShipAddress;
        }

        /// <summary>
        /// Generates a static set of sample order records to populate the Pivot Table.
        /// </summary>
        /// <returns>A list of OrdersDetails records.</returns>
        public static List<OrdersDetails> GetAllRecords()
        {
            if (order.Count() == 0)
            {
                int code = 10000;
                for (int i = 1; i < 10; i++)
                {
                    order.Add(new OrdersDetails(code + 1, "ALFKI", i + 0, 2.3 * i, false, new DateTime(1991, 05, 15), "Berlin", "Simons bistro", "Denmark", new DateTime(1996, 7, 16), "Kirchgasse 6"));
                    order.Add(new OrdersDetails(code + 2, "ANATR", i + 2, 3.3 * i, true, new DateTime(1990, 04, 04), "Madrid", "Queen Cozinha", "Brazil", new DateTime(1996, 9, 11), "Avda. Azteca 123"));
                    order.Add(new OrdersDetails(code + 3, "ANTON", i + 1, 4.3 * i, true, new DateTime(1957, 11, 30), "Cholchester", "Frankenversand", "Germany", new DateTime(1996, 10, 7), "Carrera 52 con Ave. Bolívar #65-98 Llano Largo"));
                    order.Add(new OrdersDetails(code + 4, "BLONP", i + 3, 5.3 * i, false, new DateTime(1930, 10, 22), "Marseille", "Ernst Handel", "Austria", new DateTime(1996, 12, 30), "Magazinweg 7"));
                    order.Add(new OrdersDetails(code + 5, "BOLID", i + 4, 6.3 * i, true, new DateTime(1953, 02, 18), "Tsawassen", "Hanari Carnes", "Switzerland", new DateTime(1997, 12, 3), "1029 - 12th Ave. S."));
                    code += 5;
                }
            }
            return order;
        }

        public int? OrderID { get; set; }
        public string? CustomerID { get; set; }
        public int? EmployeeID { get; set; }
        public double? Freight { get; set; }
        public string? ShipCity { get; set; }
        public bool? Verified { get; set; }
        public DateTime OrderDate { get; set; }
        public string? ShipName { get; set; }
        public string? ShipCountry { get; set; }
        public DateTime ShippedDate { get; set; }
        public string? ShipAddress { get; set; }
    }
}
Table Structure Explanation:
| Column | Data Type | Description |
|---|---|---|
| OrderID | int? | Unique identifier for each order (serves as the primary key) |
| CustomerID | string? | Identifier of the customer who placed the order |
| EmployeeID | int? | Identifier of the employee handling the order |
| Freight | double? | Shipping cost for the order |
| ShipCity | string? | City to which the order is shipped |
| Verified | bool? | Indicates whether the order has been verified |
| OrderDate | DateTime | Date when the order was placed |
| ShipName | string? | Name of the shipping recipient |
| ShipCountry | string? | Country to which the order is shipped |
| ShippedDate | DateTime | Date when the order was shipped |
| ShipAddress | string? | Full shipping address of the order |
Step 4: Create an API controller
Create a file named OrdersController.cs under the Controllers folder to handle data communication between the Pivot Table and the backend. This controller exposes the HTTP endpoints that the Pivot Table uses to retrieve and modify data. The GetOrderData() method returns a list of sample order data, and the Post method is invoked by the Pivot Table to fetch data for the configured report.
using System.Linq; // Required for `.ToList()` and `.Count()`.
using Microsoft.AspNetCore.Mvc;
using UrlAdaptor.Models;

namespace UrlAdaptor.Controllers
{
    [ApiController]
    [Route("api/[controller]")]
    public class OrdersController : ControllerBase
    {
        /// <summary>
        /// Handles GET requests and returns all order records.
        /// Useful for quickly verifying the API endpoint in a browser.
        /// </summary>
        /// <returns>A list of OrdersDetails objects.</returns>
        [HttpGet]
        public List<OrdersDetails> GetOrderData()
        {
            // Retrieve all records and convert to list
            var data = OrdersDetails.GetAllRecords().ToList();
            return data;
        }

        /// <summary>
        /// Handles POST requests from the Pivot Table DataManager.
        /// Returns data in the `{ result, count }` format expected by the UrlAdaptor.
        /// </summary>
        /// <returns>An object containing the result set and total record count.</returns>
        [HttpPost]
        public object Post()
        {
            // Retrieve data source and materialize before serializing.
            // Returning IQueryable can lead to deferred-execution / disposed-context
            // issues once a real database is wired in.
            List<OrdersDetails> DataSource = GetOrderData();

            // Get total record count
            int totalRecordsCount = DataSource.Count;

            // Return result and total record count
            return new { result = DataSource, count = totalRecordsCount };
        }
    }
}
Explanation:
-
GetOrderData(): Returns the complete list of orders. The Pivot Table can call this endpoint to verify the data via a browser or any HTTP client. -
Post(): The primary endpoint used by the Pivot Table’s DataManager. It returns the dataset and the total record count.
The
GetOrderData()method retrieves sample order data. Replace this with custom logic to fetch data from a database or any other data source as needed.
Step 5: Configure Program.cs
Update the Program.cs file to configure JSON serialization and enable CORS so the React frontend can communicate with the API.
Configure JSON serialization
In ASP.NET Core, JSON results are returned in camelCase format by default. To maintain the original property casing of the data source, add DefaultContractResolver in Program.cs. This is important because the Pivot Table’s dataSourceSettings are configured with the original property names (for example, ShipCity, OrderID). If the API returns shipCity or orderID, the field mapping breaks, and the Pivot Table appears empty.
using Newtonsoft.Json.Serialization;

// Add to existing Program.cs (after AddControllers).
// Configure JSON serialization (preserves property casing).
builder.Services.AddControllers().AddNewtonsoftJson(options =>
{
  options.SerializerSettings.ContractResolver = new DefaultContractResolver();
});

...
...
app.Run();
Configure CORS
CORS (Cross-Origin Resource Sharing) is a browser security feature that blocks web pages from making requests to a different domain or port. When the React frontend (for example, https://localhost:5173) and the ASP.NET Core backend (for example, https://localhost:5001) run on different ports, browsers block cross-origin requests by default. Configuring CORS in the backend tells the browser that the API is allowed to accept requests from the frontend origin, enabling the two services to communicate.
// Add to existing Program.cs (after JSON serialization).
// Add CORS policy to allow frontend access.
// WARNING: AllowAnyOrigin() is for development only. In production, restrict to your frontend domain.
builder.Services.AddCors(options =>
{
  options.AddDefaultPolicy(policy =>
  {
    policy.AllowAnyOrigin()      // Allow requests from any origin (development only; restrict in production).
          .AllowAnyMethod()       // Allow GET, POST, PUT, DELETE, etc.
          .AllowAnyHeader();      // Allow any request headers.
  });
});

// ...
// In the pipeline section (after builder.Build()):
// Enable CORS middleware (must be before MapControllers).
app.UseCors();
app.MapControllers();
app.Run();
The following error occurs when CORS is not configured:
Access to XMLHttpRequest at 'https://localhost:<port>/api/Orders' from origin
'https://localhost:5173' has been blocked by CORS policy.
Production CORS configuration: Replace AllowAnyOrigin() with a specific frontend URL:
policy.WithOrigins("https://yourdomain.com") // Restrict to your frontend domainAdditionally, configure the server to serve static files by adding the following lines to Program.cs:
var app = builder.Build();

app.UseDefaultFiles();
app.UseStaticFiles();
Complete Program.cs
The following is the complete Program.cs file with all the configuration applied:
using Newtonsoft.Json.Serialization;

var builder = WebApplication.CreateBuilder(args);

// Configure JSON serialization (preserves property casing).
builder.Services.AddControllers().AddNewtonsoftJson(options =>
{
    options.SerializerSettings.ContractResolver = new DefaultContractResolver();
});

// Configure CORS (development only; restrict to specific origins in production).
builder.Services.AddCors(options =>
{
    options.AddDefaultPolicy(policy =>
    {
        policy.AllowAnyOrigin()
              .AllowAnyMethod()
              .AllowAnyHeader();
    });
});

var app = builder.Build();

app.UseCors();           // Enable CORS before MapControllers.
app.UseDefaultFiles();   // Optional: serves index.html from wwwroot.
app.UseStaticFiles();    // Optional: serves static assets from wwwroot.
app.MapControllers();

app.Run();
Step 6: Understanding the required response format
When using the UrlAdaptor, every backend API endpoint must return data in a specific JSON structure. This ensures that the Syncfusion® React DataManager correctly interprets the response and binds the data to the Pivot Table. The expected format is:
{
  "result": [
    { "OrderID": 10001, "CustomerID": "ALFKI", "ShipCity": "Berlin" },
    { "OrderID": 10002, "CustomerID": "ANATR", "ShipCity": "Madrid" },
    ...
    ...
  ],
  "count": 45
}
Response structure details
-
result: Contains the data records for the current page or request, which are displayed in the Pivot Table. The property names inside each object must match the field names configured in the Pivot Table’s
dataSourceSettings(for example,ShipCity,OrderID). - count: Indicates the total number of records in the complete dataset. This value is required for pagination and virtual scrolling to work correctly.
Step 7: Run the backend API
Open a terminal in the project folder and run:
dotnet runThe application will be accessible at a URL like https://localhost:<port>. The port is shown in the terminal output (commonly 5001 or 7001) and is also configured in Properties/launchSettings.json. Use the same <port> value in the React DataManager URL in the next section.
To verify that the API returns order data correctly, navigate to https://localhost:<port>/api/Orders in a browser. You should see a JSON array of order records.
Setting up the React Pivot Table client
With the backend API configured and running, the next step is to connect the React Pivot Table to it on the client side. This section explains how to integrate the Pivot Table with the backend using the UrlAdaptor.
Step 1: Set up a React project with Pivot Table
Create a new Vite + React + TypeScript project and install the required Syncfusion® EJ2 packages:
npm create vite@latest url-adaptor-client -- --template react-ts
cd url-adaptor-client
npm install
npm install @syncfusion/ej2-react-pivotview @syncfusion/ej2-tailwind3-theme
For a complete walkthrough of the project scaffolding, see the Getting Started documentation.
Step 2: Configure the Pivot Table with UrlAdaptor
The Pivot Table connects to the backend API through the UrlAdaptor. This adaptor handles communication between the Pivot Table and the REST API endpoint. Configure the Pivot Table in the React application as shown in the following code example.
import * as React from 'react';
import { PivotViewComponent } from '@syncfusion/ej2-react-pivotview';
import { DataManager, UrlAdaptor } from '@syncfusion/ej2-data';
import type { DataSourceSettingsModel } from '@syncfusion/ej2-pivotview/src/model/datasourcesettings-model';
import './App.css';

function App(): React.ReactElement {
    // Configure DataManager with UrlAdaptor.
    const data: DataManager = new DataManager({
        url: 'https://localhost:<port>/api/Orders', // Replace <port> with the backend port from dotnet run output.
        adaptor: new UrlAdaptor()                 // Specify UrlAdaptor for custom REST API.
    });
    const dataSourceSettings: DataSourceSettingsModel = {
        dataSource: data,
        expandAll: false,
        rows: [{ name: 'ShipCity' }],
        columns: [{ name: 'ShipName' }],
        values: [{ name: 'Freight' }],
        formatSettings: [{ name: 'Freight', format: 'N0' }],
    };
    const pivotObj = React.useRef<PivotViewComponent>(null);
    return (
        <PivotViewComponent ref={pivotObj} id='PivotView' height={350} width={'100%'} dataSourceSettings={dataSourceSettings}>
        </PivotViewComponent>
    );
}

export default App;
Code Explanation:
-
DataManager: Creates a data source that targets the ASP.NET Core Web API endpoint at
https://localhost:<port>/api/Orders. Replace<port>with the port number shown bydotnet runoutput. - UrlAdaptor: Tells the DataManager to use the URL adaptor, which automatically handles HTTP POST requests and JSON response parsing for the Pivot Table.
-
dataSourceSettings: Defines the Pivot Table layout:
- rows: Displays ShipCity values as row headers.
- columns: Displays ShipName values as column headers.
- values: Aggregates the Freight field based on the row and column combinations.
-
formatSettings: Applies a number format (
N0) so that aggregated values are displayed without decimals.
- PivotViewComponent: Renders the Pivot Table with the configured data and layout.
Step 3: Run and verify the Pivot Table
Start the ASP.NET Core API server:
Open a terminal in the backend project folder and run:
dotnet runThe server will start and listen on https://localhost:<port> by default. The API endpoint will be available at https://localhost:<port>/api/Orders. Note the <port> number from the output (typically 5001 or 7001).
Start the React application:
Open a separate terminal in the client application folder and run:
npm run devThis serves the Vite dev server at http://localhost:5173 by default. If a different port is shown in the terminal, use that value when reviewing CORS errors in the browser console.
Once both the server and client are running:
- The Pivot Table retrieves data from the backend API through the UrlAdaptor and displays it according to the defined report layout.
- The resulting Pivot Table appears as shown in the following image:
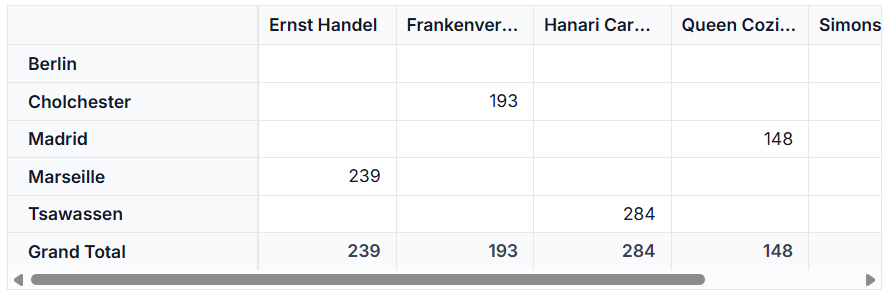
The Pivot Table is now successfully connected to the backend API and displays the data in the configured layout.
Verify data binding
To confirm the API is working correctly:
- Open the browser’s Developer Tools (F12) → Network tab.
- Load the React application. You should see a POST request to
https://localhost:<port>/api/Orderswith a 200 status and a JSON response containingresultandcount. - If the Pivot Table appears empty, check the Network tab for failed requests or the Console tab for JavaScript errors.
CRUD operations with Pivot Table
The Syncfusion® React Pivot Table supports CRUD (Create, Read, Update, Delete) operations. These operations connect to the backend through specific DataManager properties such as insertUrl, removeUrl, updateUrl, and crudUrl. When an edit action (add, update, or delete) is performed through the Pivot Table’s built-in editing pop-up, the DataManager automatically sends an HTTP POST request to the corresponding server endpoint. The server processes the operation and returns the updated data. This enables the following operations:
- Create: Add new records through the Pivot Table editing pop-up.
- Read: Display data from the backend (already configured in the previous section).
- Update: Edit existing records in place.
- Delete: Remove records from the data source.
This section explains how to wire up the server endpoints and configure the React client so that changes made in the Pivot Table’s editing pop-up are persisted to the backend. For more details about editing the Pivot Table, refer to the Editing documentation.
Configure CRUD URL mapping
CRUD operations communicate with the backend through the following DataManager properties:
| Property | Purpose |
|---|---|
insertUrl |
The URL for adding new records. Called when the user adds a row in the Pivot Table editing pop-up. |
updateUrl |
The URL for modifying existing records. Called when the user edits and saves a row. |
removeUrl |
The URL for removing records. Called when the user deletes a row. |
crudUrl |
A single URL that handles all CRUD operations (an alternative to individual URLs). Useful when the backend consolidates all operations into one endpoint. |
You can use either the individual URLs (insertUrl, updateUrl, removeUrl) or the single crudUrl. Choose the individual URLs for clearer separation of concerns, and choose crudUrl when your backend already provides a single endpoint. Do not set both at the same time: when crudUrl is provided, the individual insertUrl, updateUrl, and removeUrl properties are ignored.
Implement backend CRUD methods
Extend the OrdersController.cs file by creating a CRUD model class and adding Insert, Update, and Remove methods. These methods are called automatically when data is edited through the Pivot Table.
CRUD model class
The CRUDModel<T> class defines the data structure sent from the client to the server for CRUD operations. Add this class to the OrdersController.cs file:
/// <summary>
/// Generic model for handling CRUD operations from the Pivot Table.
/// The Pivot Table uses this structure to send data to Insert, Update, and Remove endpoints.
/// </summary>
/// <typeparam name="T">The data type (e.g., OrdersDetails)</typeparam>
public class CRUDModel<T> where T : class
{
    /// <summary>
    /// Indicates the operation type being performed (e.g., 'Add', 'Edit', 'Delete').
    /// </summary>
    public string? action { get; set; }

    /// <summary>
    /// The primary key column name (e.g., 'OrderID').
    /// Identifies which column serves as the unique identifier.
    /// </summary>
    public string? keyColumn { get; set; }

    /// <summary>
    /// The primary key value for the record.
    /// Used to locate the specific record being operated on.
    /// </summary>
    public object? key { get; set; }

    /// <summary>
    /// The record data (for Insert or Update operations).
    /// Contains all field values for the record.
    /// </summary>
    public T? value { get; set; }

    /// <summary>
    /// Additional parameters sent by the client.
    /// May contain extra configuration or metadata such as filter state, custom headers, or application context.
    /// Example: { "userId": "user123", "filterState": "active" }
    /// </summary>
    public IDictionary<string, object>? @params { get; set; }
}
Explanation of properties:
-
action: Tells the server which CRUD operation is being performed. This is especially useful when using a singlecrudUrlendpoint. -
keyColumn: The name of the primary key field configured in the Pivot Table (for example,OrderID). -
key: The actual primary key value of the affected record, used by the server to find the row for update or delete operations. -
value: The full record object for insert and update operations. It contains every field that the Pivot Table binds to the data source. -
@params: A dictionary for any extra information the client wants to send to the server (optional).
Insert operation
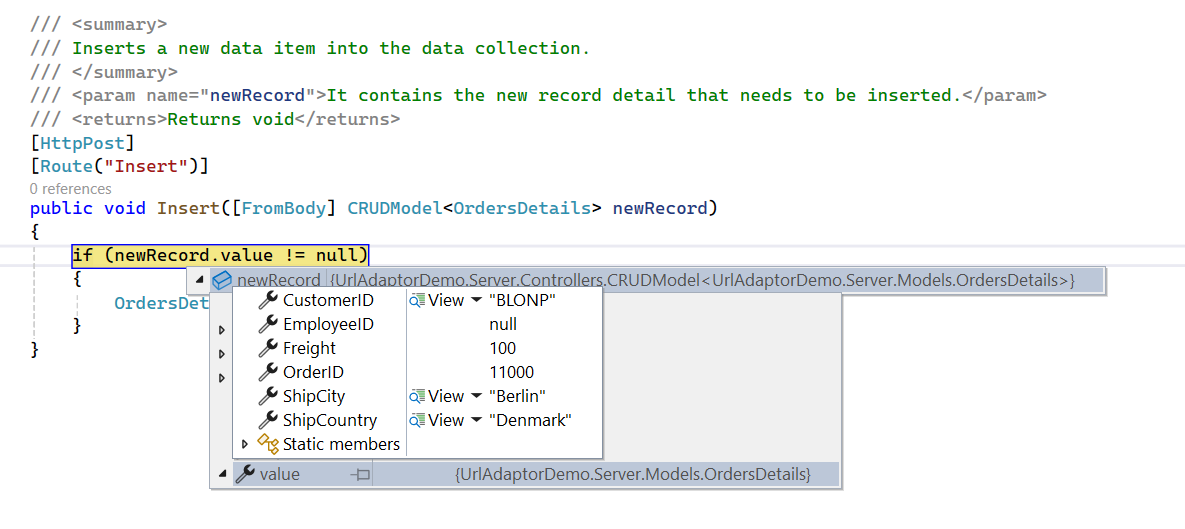
To add a new record, double-click a pivot cell to open the editing pop-up, then click the Add button to create a new empty row. Enter the required data in the row fields and click the Update button to save the record. Use the insertUrl property to map the controller action for the insert operation. The new record details are passed through the newRecord parameter.
Response format: The Insert endpoint should return a 200 OK status (or 204 No Content). The response body is not parsed by the DataManager for insert operations; only the HTTP status code matters. On success, the Pivot Table automatically refreshes from the data source.
        /// <summary>
        /// Adds a new record to the data collection.
        /// </summary>
        /// <param name="newRecord">Contains the details of the new record to be added.</param>
        /// <returns>200 OK on success, 400 on invalid payload.</returns>
        [HttpPost]
        [Route("Insert")]
        public IActionResult Insert([FromBody] CRUDModel<OrdersDetails> newRecord)
        {
            if (newRecord?.value == null)
            {
                return BadRequest("Invalid payload: 'value' is required.");
            }

            OrdersDetails.GetAllRecords().Insert(0, newRecord.value);
            return Ok(); // 200 OK
        }
How it works:
- The
Insertmethod receives the new record through theCRUDModel. - It checks whether the record is valid (not
null). - The record is inserted at the beginning of the in-memory data collection. In a real application, you would persist the record to a database here.
Update operation
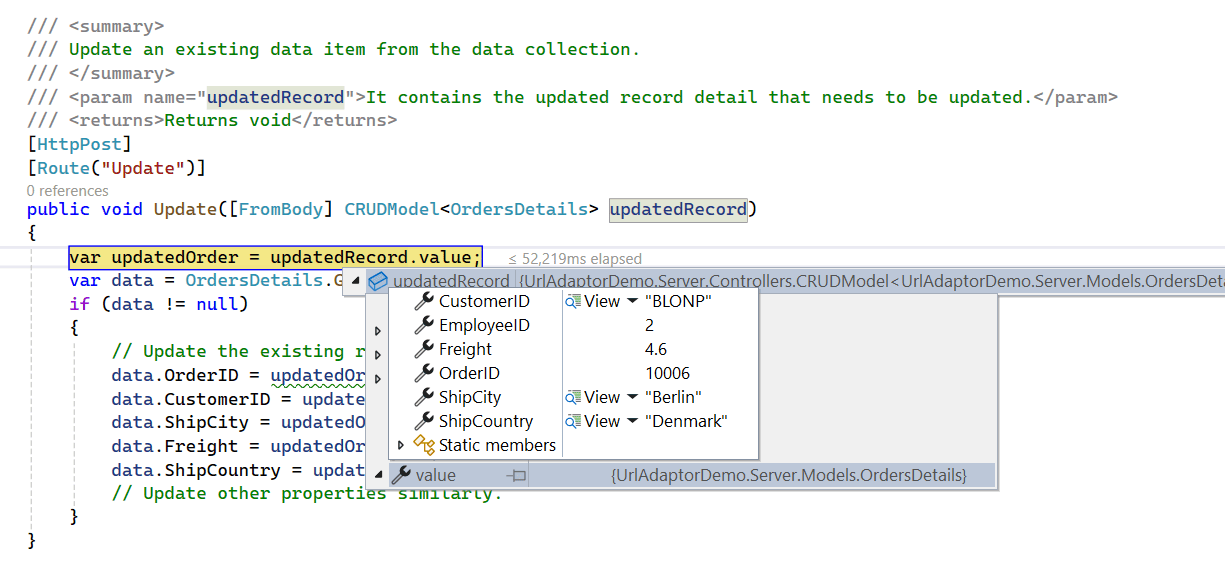
To modify an existing record, double-click a pivot cell to open the editing pop-up, select the row to edit, and click the Edit button. After making the required changes, click Update to save them. Use the updateUrl property to map the controller action for the update operation. The updated record details are passed through the updatedRecord parameter.
Response format: The Update endpoint should return a 200 OK status (or 204 No Content). Similar to Insert, the response body is not parsed; only the HTTP status code is used. On success, the Pivot Table refreshes automatically.
        /// <summary>
        /// Modifies an existing record in the data collection.
        /// </summary>
        /// <param name="updatedRecord">Contains the updated record details.</param>
        /// <returns>200 OK on success, 404 when no record matches, 400 on invalid payload.</returns>
        [HttpPost]
        [Route("Update")]
        public IActionResult Update([FromBody] CRUDModel<OrdersDetails> updatedRecord)
        {
            var updatedOrder = updatedRecord?.value;
            if (updatedOrder == null)
            {
                return BadRequest("Invalid payload: 'value' is required.");
            }

            var data = OrdersDetails.GetAllRecords().FirstOrDefault(existingOrder => existingOrder.OrderID == updatedOrder.OrderID);
            if (data == null)
            {
                return NotFound(); // 404 — no record matched the supplied key.
            }

            // Update the existing record.
            data.OrderID = updatedOrder.OrderID;
            data.CustomerID = updatedOrder.CustomerID;
            data.EmployeeID = updatedOrder.EmployeeID;
            data.Freight = updatedOrder.Freight;
            data.ShipCity = updatedOrder.ShipCity;
            data.ShipCountry = updatedOrder.ShipCountry;
            data.ShipName = updatedOrder.ShipName;
            data.ShipAddress = updatedOrder.ShipAddress;
            data.OrderDate = updatedOrder.OrderDate;
            data.ShippedDate = updatedOrder.ShippedDate;
            data.Verified = updatedOrder.Verified;

            return Ok(); // 200 OK
        }
How it works:
- The
Updatemethod locates the existing record by matching the OrderID with the primary key sent in the request. - If a matching record is found, its properties are updated with the new values received from the Pivot Table.
Delete operation
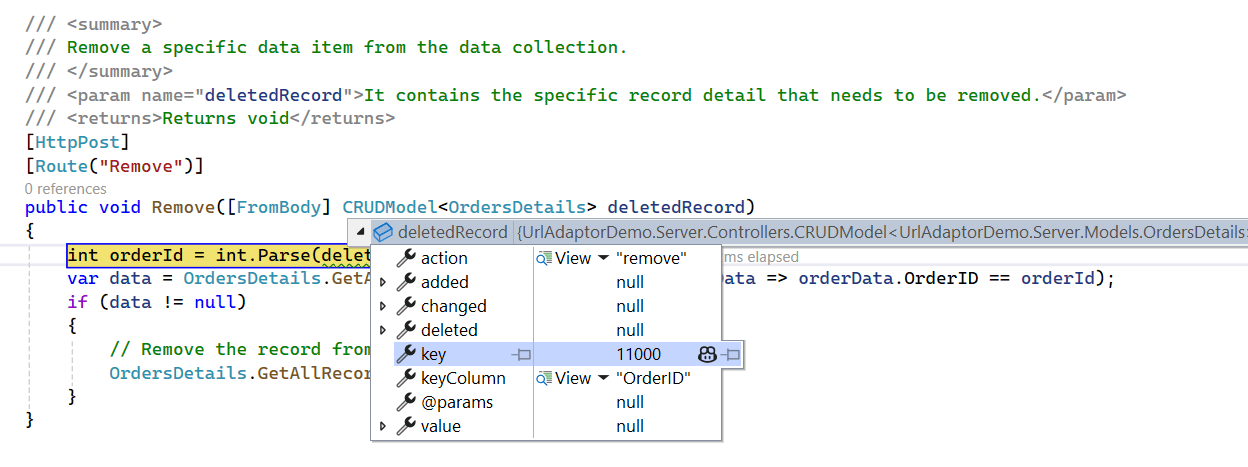
To remove a record, double-click a pivot cell to open the editing pop-up, select the row to delete, and click the Delete button. Use the removeUrl property to map the controller action for the remove operation. The primary key value of the record to be removed is passed through the deletedRecord parameter.
Response format: The Remove endpoint should return a 200 OK status (or 204 No Content). The response body is not parsed; only the HTTP status code matters. On success, the Pivot Table automatically refreshes.
        /// <summary>
        /// Removes a specific record from the data collection.
        /// </summary>
        /// <param name="deletedRecord">Contains the record details to be removed.</param>
        /// <returns>200 OK on success, 404 when no record matches, 400 on invalid payload.</returns>
        [HttpPost]
        [Route("Remove")]
        public IActionResult Remove([FromBody] CRUDModel<OrdersDetails> deletedRecord)
        {
            if (deletedRecord?.key == null)
            {
                return BadRequest("Invalid payload: 'key' is required.");
            }

            int orderId = int.Parse(deletedRecord.key.ToString());
            var data = OrdersDetails.GetAllRecords().FirstOrDefault(orderData => orderData.OrderID == orderId);
            if (data == null)
            {
                return NotFound(); // 404 — no record matched the supplied key.
            }

            OrdersDetails.GetAllRecords().Remove(data);
            return Ok(); // 200 OK
        }
How it works:
- The
Removemethod extracts the OrderID from thekeyproperty of the request payload. - It searches the in-memory data collection for a matching record and removes it if found.
Error handling in CRUD operations
If a CRUD endpoint returns a non-200 HTTP status code (e.g., 500, 400) or returns invalid JSON, the DataManager will:
- Log the error to the browser console for debugging.
- Close the edit dialog without applying changes.
- Keep the Pivot Table in its current state.
Best practice: Always include try-catch blocks in backend CRUD methods and return appropriate HTTP status codes:
try {
    // CRUD logic here
    return Ok();  // 200 OK
} catch (Exception ex) {
    return BadRequest(ex.Message);  // 400 Bad Request
}
Configure client-side CRUD endpoints
Update src/App.tsx in the Vite project to configure the DataManager with CRUD endpoints, enable edit settings, and configure the beginDrillThrough event to set the primary key. The following consolidated example combines all three changes into a single file.
What is drill-through editing?
Drill-through editing opens a detailed data grid showing all source records when you click a pivot cell. This grid is where users add, edit, or delete individual records that feed into the pivot summary. Double-click a value cell to open the drill-through view, then use the Add, Edit, and Delete toolbar buttons to modify records. The beginDrillThrough event is triggered just before this edit grid opens. This is where the primary key column is configured.
Why is the primary key important?
The primary key (OrderID) uniquely identifies each record. When the DataManager performs update or delete operations, it uses the primary key to locate the exact record to modify. Without a correctly configured primary key, the DataManager cannot identify which record to update or delete, and the request will fail.
import * as React from 'react';
import { PivotViewComponent, CellEditSettings } from '@syncfusion/ej2-react-pivotview';
import { DataManager, UrlAdaptor } from '@syncfusion/ej2-data';
import type { DataSourceSettingsModel } from '@syncfusion/ej2-pivotview/src/model/datasourcesettings-model';
import type { BeginDrillThroughEventArgs } from '@syncfusion/ej2-pivotview';
import './App.css';

function App(): React.ReactElement {
    // Configure DataManager with CRUD URLs.
    // Replace <port> with the backend port from `dotnet run` output.
    const data: DataManager = new DataManager({
        url: 'https://localhost:<port>/api/Orders',
        insertUrl: 'https://localhost:<port>/api/Orders/Insert',
        updateUrl: 'https://localhost:<port>/api/Orders/Update',
        removeUrl: 'https://localhost:<port>/api/Orders/Remove',
        adaptor: new UrlAdaptor()
    });

    const dataSourceSettings: DataSourceSettingsModel = {
        dataSource: data,
        expandAll: false,
        rows: [{ name: 'ShipCity' }],
        columns: [{ name: 'ShipName' }],
        values: [{ name: 'Freight' }],
        formatSettings: [{ name: 'Freight', format: 'N0' }],
    };

    // Enable CRUD operations in the Pivot Table.
    // See the Editing documentation for the full list of supported modes
    // (Normal, Dialog, Batch, CommandColumn).
    const editSettings: CellEditSettings = {
        allowEditing: true,    // Enables the Edit button and allows users to modify existing records.
        allowAdding: true,     // Enables the Add button and allows users to create new records.
        allowDeleting: true,   // Enables the Delete button and allows users to remove records.
        mode: 'Normal'         // Uses Normal mode (popup dialog) for editing; other options: 'Dialog', 'Batch', 'CommandColumn'.
    };

    // Configure the primary key on the drill-through edit grid and
    // enable a datetime picker for date columns.
    function beginDrillThrough(args: BeginDrillThroughEventArgs) {
        for (let i = 0; i < args.gridObj.columns.length; i++) {
            if (args.gridObj.columns[i].field === 'OrderID') {
                args.gridObj.columns[i].isPrimaryKey = true;
            } else {
                args.gridObj.columns[i].visible = true;
                if (
                    args.gridObj.columns[i].field === 'OrderDate' ||
                    args.gridObj.columns[i].field === 'ShippedDate'
                ) {
                    args.gridObj.columns[i].editType = 'datetimepickeredit';
                }
            }
        }
    }

    const pivotObj = React.useRef<PivotViewComponent>(null);

    return (
        <PivotViewComponent
            ref={pivotObj}
            id='PivotView'
            height={350}
            width={'100%'}
            dataSourceSettings={dataSourceSettings}
            editSettings={editSettings}
            beginDrillThrough={beginDrillThrough}
        />
    );
}

export default App;
How it works:
-
url/insertUrl/updateUrl/removeUrl: Endpoints the DataManager calls for read, create, update, and delete operations. -
adaptor: new UrlAdaptor: Tells the DataManager to use the URL adaptor, which handles HTTP communication and JSON parsing automatically. -
editSettings: Enables the Add, Edit, and Delete buttons on the Pivot Table toolbar. The mode property selects the editing UI. For details on each mode, refer to the Editing documentation. -
beginDrillThrough: Iterates the columns of the drill-through edit grid. The column whosefieldmatches the primary key (OrderID) is flagged withisPrimaryKey = true; date columns are switched to adatetimepickerediteditor for a better user experience.
Single endpoint for all CRUD actions
The crudUrl property provides an alternative approach by routing all CRUD operations through a single endpoint instead of separate URLs. This simplifies the backend configuration when all operations are handled in one place. Choose this option when you want to consolidate CRUD logic in a single method.
Backend configuration
[HttpPost]
[Route("CrudUpdate")]
public void CrudUpdate([FromBody] CRUDModel<OrdersDetails> request)
{
  if (request.action == "update")
  {
    var orderValue = request.value;
    if (orderValue != null)
    {
      OrdersDetails existingRecord = OrdersDetails.GetAllRecords().FirstOrDefault(or => or.OrderID == orderValue.OrderID);
      if (existingRecord != null)
      {
          existingRecord.OrderID = orderValue.OrderID;
          existingRecord.CustomerID = orderValue.CustomerID;
          existingRecord.EmployeeID = orderValue.EmployeeID;
          existingRecord.Freight = orderValue.Freight;
          existingRecord.ShipCity = orderValue.ShipCity;
          existingRecord.ShipCountry = orderValue.ShipCountry;
          existingRecord.ShipName = orderValue.ShipName;
          existingRecord.ShipAddress = orderValue.ShipAddress;
          existingRecord.OrderDate = orderValue.OrderDate;
          existingRecord.ShippedDate = orderValue.ShippedDate;
          existingRecord.Verified = orderValue.Verified;
      }
    }
  }
  else if (request.action == "insert")
  {
    if (request.value != null)
    {
      OrdersDetails.GetAllRecords().Insert(0, request.value);
    }
  }
  else if (request.action == "remove")
  {
    OrdersDetails.GetAllRecords().Remove(OrdersDetails.GetAllRecords().FirstOrDefault(or => or.OrderID == int.Parse(request.key.ToString())));
  }
}
How it works:
The CrudUpdate method checks the action value in the request (update, insert, or remove) and performs the appropriate operation on the data collection. This is a convenient pattern when your backend prefers a single endpoint that dispatches based on the action type.
Client-side configuration
Configure the React client to use the single CRUD endpoint. Replace the insertUrl, updateUrl, and removeUrl properties with crudUrl (do not set both at the same time):
import * as React from 'react';
import { PivotViewComponent, CellEditSettings } from '@syncfusion/ej2-react-pivotview';
import { DataManager, UrlAdaptor } from '@syncfusion/ej2-data';
import type { DataSourceSettingsModel } from '@syncfusion/ej2-pivotview/src/model/datasourcesettings-model';
import type { BeginDrillThroughEventArgs } from '@syncfusion/ej2-pivotview';
import './App.css';

function App(): React.ReactElement {
  // Configure DataManager with single CRUD URL.
  // Do not set insertUrl/updateUrl/removeUrl alongside crudUrl.
  const data: DataManager = new DataManager({
    url: 'https://localhost:<port>/api/Orders',
    crudUrl: 'https://localhost:<port>/api/Orders/CrudUpdate',
    adaptor: new UrlAdaptor()
  });

  const dataSourceSettings: DataSourceSettingsModel = {
    dataSource: data,
    expandAll: false,
    rows: [{ name: 'ShipCity' }],
    columns: [{ name: 'ShipName' }],
    values: [{ name: 'Freight' }],
    formatSettings: [{ name: 'Freight', format: 'N0' }],
  };

  const editSettings: CellEditSettings = {
    allowEditing: true,
    allowAdding: true,
    allowDeleting: true,
    mode: 'Normal',
  };

  function beginDrillThrough(args: BeginDrillThroughEventArgs) {
    for (let i = 0; i < args.gridObj.columns.length; i++) {
      if (args.gridObj.columns[i].field === 'OrderID') {
        args.gridObj.columns[i].isPrimaryKey = true;
      } else {
        args.gridObj.columns[i].visible = true;
        if (
          args.gridObj.columns[i].field === 'OrderDate' ||
          args.gridObj.columns[i].field === 'ShippedDate'
        ) {
          args.gridObj.columns[i].editType = 'datetimepickeredit';
        }
      }
    }
  }

  const pivotObj = React.useRef<PivotViewComponent>(null);

  return (
    <PivotViewComponent
      ref={pivotObj}
      id='PivotView'
      height={350}
      width={'100%'}
      dataSourceSettings={dataSourceSettings}
      editSettings={editSettings}
      beginDrillThrough={beginDrillThrough}
    />
  );
}

export default App;
Important:
crudUrlis mutually exclusive with the individualinsertUrl,updateUrl, andremoveUrlproperties. WhencrudUrlis set, the DataManager ignores the other three and dispatches every CRUD action to the single endpoint, where the server-side handler branches onrequest.action("insert","update", or"remove").
The crudUrl replaces the separate insert, update, and remove URLs. All CRUD operations are routed through this single endpoint.
Important notes
- Primary key field: The primary key field (OrderID) cannot be modified during editing. Changing it causes data inconsistency because it uniquely identifies each record.
- Real-time updates: After each CRUD operation, the Pivot Table automatically refreshes to display the updated data from the backend.
- Edit modes: The Pivot Table supports different editing modes (Normal, Dialog, Batch, and Command Column) that can be configured using the mode property. For details, refer to the Editing documentation.
Test CRUD operations
To verify that CRUD operations work end-to-end:
-
Test Insert: Click a pivot cell to open drill-through. Click the Add button, fill in the fields, and click Update. Check the Network tab for a POST to the Insert endpoint. Verify the new row appears in the drill-through grid.
-
Test Update: In the drill-through grid, click the Edit button on an existing row, modify a field, and click Update. Confirm the Network tab shows a POST to the Update endpoint and the change persists.
-
Test Delete: In the drill-through grid, click the Delete button on a row. Verify the Network tab shows a POST to the Remove endpoint and the row is removed from the grid.
-
Verify backend state: If the backend stores data in memory or a database, confirm the changes are persisted on the server side as well.
Best Practices for UrlAdaptor Integration
1. API Design
-
Consistent response shape: Always return the
{ result, count }structure from data endpoints. -
RESTful routes: Use descriptive route templates such as
api/orders/insert,api/orders/update, andapi/orders/removeso that the client-side URLs are easy to read and maintain. -
Validate payloads: Always check that
CRUDModel.valueandCRUDModel.keyare notnullbefore performing any operation.
2. Property Casing
-
Preserve original casing: Use
DefaultContractResolverin Program.cs so the API response uses the same casing as your model classes. Mismatched casing leads to empty Pivot Table layouts because field bindings become case-sensitive.
3. Security
-
Restrict CORS in production: The
AllowAnyOriginpolicy is intended for development. In production, restrict allowed origins to the specific domain of your React application by usingpolicy.WithOrigins("https://yourdomain.com"). - Use HTTPS: Always expose the API over HTTPS in production to protect data in transit.
4. Error Handling
- Wrap operations in try-catch: Catch database or serialization exceptions in the controller methods and return a meaningful HTTP status code (for example, 400 for bad requests, 500 for server errors).
- Log failures: Use the built-in ASP.NET Core logging to capture request and error details. The logs make it easier to diagnose issues when running the API in a production environment.
5. Performance
-
Asynchronous endpoints: For large data sources, consider making the controller methods
asyncand using asynchronous database calls to free up server threads.
Troubleshooting
The following table lists common issues and their resolutions when working with the UrlAdaptor and the Pivot Table. Each scenario includes the symptom you might observe and a step-by-step resolution.
| Issue | Symptom | Resolution |
|---|---|---|
| Empty Pivot Table | The Pivot Table loads without errors, but no rows or values are shown. | Verify that GetAllRecords() returns data correctly and the response follows the { result, count } format. Also confirm that the property names returned by the API match the field names used in dataSourceSettings. |
| 404 error | Network tab shows a 404 response when the Pivot Table tries to load data. | Ensure the controller route is configured as [Route("api/[controller]")] and the API server is running. Verify the URL in the React DataManager matches the actual API port. |
| 500 error | The Pivot Table fails to load, and the browser shows a server error. | Check the Visual Studio Output window or the terminal for server logs and error details. Common causes include null reference exceptions and serialization errors. |
| CORS error | Browser console shows: Access to XMLHttpRequest at 'https://localhost:5001/api/Orders' from origin 'https://localhost:5173' has been blocked by CORS policy.
|
Verify that CORS is properly configured in Program.cs and app.UseCors() is called before app.MapControllers(). |
| CRUD operations not saving | The Pivot Table editing pop-up closes, but the changes are not reflected in the data source. | Ensure the primary key is correctly configured in the beginDrillThrough event and the CRUD URLs match the backend routes exactly. |
| Property casing mismatch | The Pivot Table appears empty or shows a “field not found” warning, even though the API returns data. | Confirm that DefaultContractResolver is added in Program.cs to preserve original property casing. Without it, the API returns camelCase property names that do not match the field names configured in the Pivot Table. |
| SSL/TLS certificate error | Browser console shows: net::ERR_CERT_AUTHORITY_INVALID or browser warning about untrusted certificate. |
ASP.NET Core uses a self-signed certificate for localhost HTTPS by default. In development, the certificate is usually auto-generated. If the error persists, run dotnet dev-certs https --clean followed by dotnet dev-certs https --trust to regenerate and trust the certificate. (Windows/macOS only; on Linux, manually trust the certificate or use HTTP for local testing.) |
Complete sample repository
For a complete working implementation, refer to the GitHub repository.