Syncfusion React Grid with HotChocolate GraphQL Backend
11 Jun 202624 minutes to read
GraphQL is a query language that allows applications to request exactly the data needed, nothing more and nothing less. Unlike traditional REST APIs that return fixed data structures, GraphQL enables the client to specify the shape and content of the response.
Traditional REST APIs and GraphQL differ mainly in the way data is requested and returned: REST APIs expose multiple endpoints that return fixed data structures, often including unnecessary fields and requiring several requests to fetch related data, while GraphQL uses a single endpoint where queries define the exact fields needed, enabling precise responses and allowing related data to be retrieved efficiently in one request. This makes GraphQL especially useful for React Grid integration, the reason is data‑centric UI components require well‑structured and selective datasets to support efficient filtering, reduce network calls, and improve overall performance.
Key GraphQL concepts:
- Queries: A query is a request to read data. Queries do not modify data; they only retrieve it.
- Mutations: A mutation is a request to modify data. Mutations create, update, or delete records.
- Resolvers: Each query or mutation is handled by a resolver, which is a function responsible for fetching data or executing an operation. Query resolvers handle read operations, while mutation resolvers handle write operations.
- Schema: Defines the structure of the API. The schema describes available data types, the fields within those types, and the operations that can be executed. Query definitions specify the way data can be retrieved, and mutation definitions specify the way data can be modified.
HotChocolate is a popular open-source GraphQL server for ASP.NET Core that provides a modern, code-first approach to building GraphQL APIs. It seamlessly integrates with .NET’s dependency injection, middleware pipeline, and type system, enabling developers to create efficient and type-safe GraphQL services with minimal boilerplate code.
ASP.NET Core is a cross-platform, high-performance framework for building modern, cloud-enabled, and internet-connected applications. It provides the foundation for creating web APIs, web applications, and micro services using C# and the .NET platform.
Prerequisites
| Software / Package | Recommended version | Purpose |
|---|---|---|
| .NET SDK | 8.0 or later | Runtime for ASP.NET Core |
| HotChocolate.AspNetCore | 13.0 or later | GraphQL server implementation |
| HotChocolate.Data | 13.0 or later | GraphQL data filtering and sorting |
| Node.js | 20.x LTS or later | Runtime for React client |
| npm / yarn / pnpm | 11.x or later | Package manager |
| Vite | 7.3.1 or later | React build tool |
Key topics
| # | Topics | Link |
|---|---|---|
| 1 | Set up and configure the HotChocolate GraphQL backend using ASP.NET Core | View |
| 2 | Integrate the React Data Grid with HotChocolate GraphQL API | View |
| 3 | Implement data operations including filtering, searching, sorting, and paging | View |
| 4 | Perform CRUD operations | View |
| 5 | Run the HotChocolate GraphQL application | View |
| 6 | Explore a complete working sample available on GitHub | View |
Setting up the HotChocolate GraphQL backend using ASP.NET Core
The HotChocolate GraphQL backend acts as the central data service, handling queries and mutations that power the Syncfusion® React Grid.
Step 1: Create the ASP.NET Core project with React template
ASP.NET Core provides a built-in template for creating React applications with a .NET backend. This template creates a solution with two projects: a React frontend and an ASP.NET Core backend.
Create project using Visual Studio:
- Open Visual Studio and select Create a new project.
- Search for React and ASP.NET Core template.
- Select the template and click Next.
- Enter the project name (e.g., ReactApp1) and location.
- Configure the framework version (.NET 8.0 or later).
- Click Create.
Create project using .NET CLI:
Open a terminal and run the following commands:
dotnet new react -n ReactApp1
cd ReactApp1
This creates a solution with the following structure:
ReactApp1/
├── ReactApp1.sln
├── reactapp1.client/          # React frontend
└── ReactApp1.Server/          # ASP.NET Core backend
Step 2: Install HotChocolate packages
HotChocolate is installed via NuGet packages. Two key packages are required:
- HotChocolate.AspNetCore: Core GraphQL server implementation for ASP.NET Core.
- HotChocolate.Data: Provides filtering, sorting, and projection capabilities for GraphQL queries.
Install using Package Manager Console:
Open the Package Manager Console in Visual Studio and run:
Install-Package HotChocolate.AspNetCore -Version 13.0.0
Install-Package HotChocolate.Data -Version 13.0.0
Install using .NET CLI:
Navigate to the ReactApp1.Server folder in the terminal and run:
cd ReactApp1.Server
dotnet add package HotChocolate.AspNetCore --version 13.0.0
dotnet add package HotChocolate.Data --version 13.0.0
Verify installation:
Open the ReactApp1.Server.csproj file and verify the package references:
<ItemGroup>
  <PackageReference Include="HotChocolate.AspNetCore" Version="13.0.0" />
  <PackageReference Include="HotChocolate.Data" Version="13.0.0" />
</ItemGroup>
Step 3: Create the data model
The data model represents the structure of the data that will be served by the GraphQL API. For this guide, an Orders Management System is created with order details including OrderID, CustomerID, EmployeeID, and ShipCountry.
Create Models folder:
Create a new folder named Models in the ReactApp1.Server project.
Create OrdersDetails model:
Create a new file Models/OrdersDetails.cs with the following content:
using System.ComponentModel.DataAnnotations;
using System.Collections.Generic;
using System.Linq;

namespace ReactApp1.Server.Models
{
    public class OrdersDetails
    {
        public static List<OrdersDetails> order = new List<OrdersDetails>();

        public OrdersDetails()
        {
        }

        public OrdersDetails(int OrderID, string CustomerId, int EmployeeId, string ShipCountry)
        {
            this.OrderID = OrderID;
            this.CustomerID = CustomerId;
            this.EmployeeID = EmployeeId;
            this.ShipCountry = ShipCountry;
        }

        public static List<OrdersDetails> GetAllRecords()
        {
            if (order.Count() == 0)
            {
                int code = 10000;
                for (int i = 1; i < 10; i++)
                {
                    order.Add(new OrdersDetails(code + 1, "ALFKI", i + 0, "Denmark"));
                    order.Add(new OrdersDetails(code + 2, "ANATR", i + 2, "Brazil"));
                    order.Add(new OrdersDetails(code + 3, "ANTON", i + 1, "Germany"));
                    order.Add(new OrdersDetails(code + 4, "BLONP", i + 3, "Austria"));
                    order.Add(new OrdersDetails(code + 5, "BOLID", i + 4, "Switzerland"));
                    code += 5;
                }
            }
            return order;
        }

        [Key]
        public int? OrderID { get; set; }
        public string? CustomerID { get; set; }
        public int? EmployeeID { get; set; }
        public string? ShipCountry { get; set; }
    }
}Purpose: This model class defines the structure of order records and provides an in-memory data source through the “GetAllRecords()” method. This eliminates the need for a database during development and testing.
Step 4: Configure HotChocolate GraphQL in Program.cs
The Program.cs file is the entry point of the ASP.NET Core application. This is where HotChocolate GraphQL server is registered and configured.
Update Program.cs:
Open the Program.cs file and add the following configuration:
using HotChocolate;
using HotChocolate.AspNetCore;

var builder = WebApplication.CreateBuilder(args);

// Add services to the container
builder.Services.AddControllers();
builder.Services.AddEndpointsApiExplorer();
builder.Services.AddSwaggerGen();

// Add CORS for Vite dev server
builder.Services.AddCors(options =>
{
    options.AddPolicy("AllowVite", policy =>
    {
        policy.WithOrigins("http://localhost:****", "https://localhost:****")
              .AllowAnyHeader()
              .AllowAnyMethod()
              .AllowCredentials();
    });
});

// Register HotChocolate GraphQL server
builder.Services
    .AddGraphQLServer()
    .AddQueryType<ReactApp1.Server.GraphQL.Query>()
    .AddMutationType<ReactApp1.Server.GraphQL.Mutation>()
    .AddFiltering()
    .AddSorting()
    .AddProjections();

var app = builder.Build();

app.UseDefaultFiles();
app.UseStaticFiles();

// Configure the HTTP request pipeline
if (app.Environment.IsDevelopment())
{
    app.UseSwagger();
    app.UseSwaggerUI();
}

app.UseHttpsRedirection();

// Enable CORS
app.UseCors("AllowVite");

app.UseAuthorization();

app.MapControllers();

// Map GraphQL endpoint
app.MapGraphQL("/graphql");

app.MapFallbackToFile("/index.html");

app.Run();
Configuration details:
-
AddGraphQLServer(): Registers the HotChocolate GraphQL server with dependency injection. -
AddQueryType<Query>(): Registers the Query type that handles all read operations. -
AddMutationType<Mutation>(): Registers the Mutation type that handles all write operations (create, update, delete). -
AddFiltering(),AddSorting(),AddProjections(): Adds support for filtering, sorting, and field selection capabilities. -
MapGraphQL("/graphql"): Maps the GraphQL endpoint to/graphql. -
AddCors: Enables cross-origin requests from the React client running on Vite dev server.
Step 5: Configure Syncfusion DataManagerInput types
Syncfusion® Grid sends all operation details (paging, sorting, filtering, and searching) as a single request object. HotChocolate GraphQL requires a clear, typed structure to understand these values.
Create a new folder named GraphQL in the ReactApp1.Server project and create a new file (GraphQL/DataManagerInput.cs) with the following content:
using System.Collections.Generic;

namespace ReactApp1.Server.GraphQL
{
    // Input types for Syncfusion DataManager GraphQL queries
    public class DataManagerInput
    {
        public int? Skip { get; set; }
        public int? Take { get; set; }
        public List<SortInput>? Sorted { get; set; }
        public string? Table { get; set; }
        public List<string>? Select { get; set; }
        public string? Where { get; set; }
        public string? Search { get; set; }
        public bool? RequiresCounts { get; set; }
        public string? Params { get; set; }
    }

    public class SortInput
    {
        public string? Name { get; set; }
        public string? Direction { get; set; }
    }
}
Purpose:
The DataManagerInput class provides a standard format for delivering Grid operation parameters to the GraphQL server. This structure allows the backend to return only the required records, improving performance, reducing payload size, and enabling efficient data handling.
Here are the details of DataManagerInput parameter type:
| Parameters | Description |
|---|---|
RequiresCounts |
If it is true then the total count of records will be included in response. |
Skip |
Holds the number of records to skip. |
Take |
Holds the number of records to take. |
Sorted |
Contains details about current sorted column and its direction. |
Where |
Contains details about current filter column name and its constraints. |
Search |
Contains details about current search data. |
Step 6: Create the return type for GraphQL queries
Syncfusion® Grid expects the server response to follow a specific structure that includes both the data array and the total count of records. This structure is essential for enabling features like paging, filtering, and data binding.
Create OrdersReturnType.cs:
Create a new file GraphQL/OrdersReturnType.cs with the following content:
using System.Collections.Generic;
using ReactApp1.Server.Models;

namespace ReactApp1.Server.GraphQL
{
    // Return type for Syncfusion GraphQLAdaptor
    // Must have 'result' and 'count' properties
    public class OrdersReturnType
    {
        public List<OrdersDetails> Result { get; set; } = new List<OrdersDetails>();
        public int Count { get; set; }
    }
}
Required response format:
The response must follow this structure to work with Syncfusion® Grid:
- Result: The list of data displayed in the current view, supporting on-demand loading for large datasets.
- Count: The total count of records in the dataset before paging is applied.
This format ensures the Grid can properly handle paging, display total record counts, and manage data operations efficiently.
Perform data operations in server
The HotChocolate GraphQL backend handles all data operations such as filtering, searching, sorting, and paging. These operations are applied to the dataset based on the grid state received from the client through the DataManagerInput parameter.
Create GraphQL Query resolver
A query resolver in HotChocolate is a method that handles data retrieval requests. The query resolver receives the DataManagerInput parameter, applies the requested operations, and returns data in the format expected by Syncfusion® Grid.
Create Query.cs:
Create a new file GraphQL/Query.cs with the following basic structure:
using System.Linq;
using System.Collections.Generic;
using System.Text.Json;
using ReactApp1.Server.Models;

namespace ReactApp1.Server.GraphQL
{
    public class Query
    {
        public OrdersReturnType GetOrders(DataManagerInput? datamanager)
        {
            var allOrders = OrdersDetails.GetAllRecords();
            var query = allOrders.AsQueryable();

            // Apply filtering if provided
            if (!string.IsNullOrEmpty(datamanager?.Where))
            {
                query = ApplyFiltering(query, datamanager.Where);
            }

            // Apply searching if provided
            if (!string.IsNullOrEmpty(datamanager?.Search))
            {
                query = ApplySearching(query, datamanager.Search);
            }

            // Get total count after filtering but before paging
            var totalCount = query.Count();

            // Apply sorting if provided
            if (datamanager?.Sorted != null && datamanager.Sorted.Count > 0)
            {
                query = ApplySorting(query, datamanager.Sorted);
            }

            // Apply paging if provided
            if (datamanager?.Skip.HasValue == true)
            {
                query = query.Skip(datamanager.Skip.Value);
            }

            if (datamanager?.Take.HasValue == true)
            {
                query = query.Take(datamanager.Take.Value);
            }

            return new OrdersReturnType
            {
                Result = query.ToList(),
                Count = totalCount
            };
        }
    }
}
Query execution flow:
- Load data: Retrieve all records from the data source.
- Apply filtering: Filter records based on where clause predicates.
- Apply searching: Search across multiple fields using search keywords.
- Count records: Calculate total count after filtering but before paging.
- Apply sorting: Sort records by specified columns and directions.
- Apply paging: Extract specific page using skip and take parameters.
- Return result: Return data with total count in the required format.
The following sections provide detailed implementations of each operation.
Filtering
Filtering allows to narrow down the data based on certain conditions. It is done by applying specific rules or criteria to include only the records that match those rules while excluding all others.
The HotChocolate backend evaluates filter predicates received from the Grid. Predicates support comparison operators like equal, notequal, greaterthan, lessthan, startswith, endswith, and contains.
Add filtering methods to Query.cs:
// Helper method to apply filtering
private IQueryable<OrdersDetails> ApplyFiltering(IQueryable<OrdersDetails> query, string whereClause)
{
    try
    {
        // Parse the where clause JSON with case-insensitive property matching
        var options = new JsonSerializerOptions
        {
            PropertyNameCaseInsensitive = true
        };
        var filters = JsonSerializer.Deserialize<List<FilterCondition>>(whereClause, options);
        if (filters == null || filters.Count == 0) return query;

        foreach (var filter in filters)
        {
            // Handle predicates (nested filters)
            if (filter.Predicates != null && filter.Predicates.Count > 0)
            {
                // Apply all predicates
                foreach (var predicate in filter.Predicates)
                {
                    query = ApplyFilterCondition(query, predicate);
                }
            }
            else
            {
                query = ApplyFilterCondition(query, filter);
            }
        }
    }
    catch (Exception ex)
    {
        // Log exception if needed - for now, just return original query
        System.Diagnostics.Debug.WriteLine($"Filter error: {ex.Message}");
    }

    return query;
}

// Helper method to apply individual filter condition
private IQueryable<OrdersDetails> ApplyFilterCondition(IQueryable<OrdersDetails> query, FilterCondition condition)
{
    var field = condition.Field?.ToLower();
    var op = condition.Operator?.ToLower();
    var value = condition.Value?.ToString() ?? "";

    if (string.IsNullOrEmpty(field) || string.IsNullOrEmpty(op) || string.IsNullOrEmpty(value))
        return query;

    switch (field)
    {
        case "orderid":
            if (int.TryParse(value, out int orderId))
            {
                query = op switch
                {
                    "equal" => query.Where(o => o.OrderID == orderId),
                    "notequal" => query.Where(o => o.OrderID != orderId),
                    "greaterthan" => query.Where(o => o.OrderID > orderId),
                    "lessthan" => query.Where(o => o.OrderID < orderId),
                    "greaterthanorequal" => query.Where(o => o.OrderID >= orderId),
                    "lessthanorequal" => query.Where(o => o.OrderID <= orderId),
                    _ => query
                };
            }
            break;

        case "customerid":
            query = op switch
            {
                "equal" => query.Where(o => o.CustomerID == value),
                "notequal" => query.Where(o => o.CustomerID != value),
                "startswith" => query.Where(o => o.CustomerID != null && o.CustomerID.StartsWith(value)),
                "endswith" => query.Where(o => o.CustomerID != null && o.CustomerID.EndsWith(value)),
                "contains" => query.Where(o => o.CustomerID != null && o.CustomerID.Contains(value)),
                _ => query
            };
            break;

        case "employeeid":
            if (int.TryParse(value, out int empId))
            {
                query = op switch
                {
                    "equal" => query.Where(o => o.EmployeeID == empId),
                    "notequal" => query.Where(o => o.EmployeeID != empId),
                    "greaterthan" => query.Where(o => o.EmployeeID > empId),
                    "lessthan" => query.Where(o => o.EmployeeID < empId),
                    "greaterthanorequal" => query.Where(o => o.EmployeeID >= empId),
                    "lessthanorequal" => query.Where(o => o.EmployeeID <= empId),
                    _ => query
                };
            }
            break;

        case "shipcountry":
            query = op switch
            {
                "equal" => query.Where(o => o.ShipCountry == value),
                "notequal" => query.Where(o => o.ShipCountry != value),
                "startswith" => query.Where(o => o.ShipCountry != null && o.ShipCountry.StartsWith(value)),
                "endswith" => query.Where(o => o.ShipCountry != null && o.ShipCountry.EndsWith(value)),
                "contains" => query.Where(o => o.ShipCountry != null && o.ShipCountry.Contains(value)),
                _ => query
            };
            break;
    }

    return query;
}
Add filter helper classes at the end of Query.cs:
// Helper classes for parsing filter conditions
public class FilterCondition
{
    public string? Field { get; set; }
    public string? Operator { get; set; }
    public object? Value { get; set; }
    public List<FilterCondition>? Predicates { get; set; }
}
Searching
Searching allows to find records that contain specific keywords. It scans across specified fields and displays only the matching rows, making it easier to locate specific information within large datasets.
Add searching method to Query.cs:
// Helper method to apply searching
private IQueryable<OrdersDetails> ApplySearching(IQueryable<OrdersDetails> query, string searchClause)
{
    try
    {
        var options = new JsonSerializerOptions
        {
            PropertyNameCaseInsensitive = true
        };
        var searches = JsonSerializer.Deserialize<List<SearchCondition>>(searchClause, options);
        if (searches == null || searches.Count == 0) return query;

        var search = searches[0];
        var key = search.Key?.ToLower();

        if (!string.IsNullOrEmpty(key))
        {
            query = query.Where(o =>
                (o.OrderID.HasValue && o.OrderID.Value.ToString().Contains(key)) ||
                (o.CustomerID != null && o.CustomerID.ToLower().Contains(key)) ||
                (o.EmployeeID.HasValue && o.EmployeeID.Value.ToString().Contains(key)) ||
                (o.ShipCountry != null && o.ShipCountry.ToLower().Contains(key))
            );
        }
    }
    catch
    {
        // If parsing fails, return original query
    }

    return query;
}
Add search helper class at the end of Query.cs:
public class SearchCondition
{
    public List<string>? Fields { get; set; }
    public string? Key { get; set; }
    public string? Operator { get; set; }
}
Sorting
Sorting allows to arrange records by one or more columns in ascending or descending order. Multi-column sorting is supported, where records are first sorted by the primary column, then by secondary columns for equal values.
Add sorting method to Query.cs:
// Helper method to apply sorting
private IQueryable<OrdersDetails> ApplySorting(IQueryable<OrdersDetails> query, List<SortInput> sortList)
{
    IOrderedQueryable<OrdersDetails>? orderedQuery = null;

    foreach (var (sort, index) in sortList.Select((s, i) => (s, i)))
    {
        var fieldName = sort.Name?.ToLower();
        var isDesc = sort.Direction?.ToLower() == "descending";
        if (string.IsNullOrEmpty(fieldName)) continue;

        var sortFunc = (fieldName, isDesc) switch
        {
            ("orderid", false) => index == 0
                ? query.OrderBy(o => o.OrderID)
                : orderedQuery?.ThenBy(o => o.OrderID),
            ("orderid", true) => index == 0
                ? query.OrderByDescending(o => o.OrderID)
                : orderedQuery?.ThenByDescending(o => o.OrderID),
            ("customerid", false) => index == 0
                ? query.OrderBy(o => o.CustomerID)
                : orderedQuery?.ThenBy(o => o.CustomerID),
            ("customerid", true) => index == 0
                ? query.OrderByDescending(o => o.CustomerID)
                : orderedQuery?.ThenByDescending(o => o.CustomerID),
            ("employeeid", false) => index == 0
                ? query.OrderBy(o => o.EmployeeID)
                : orderedQuery?.ThenBy(o => o.EmployeeID),
            ("employeeid", true) => index == 0
                ? query.OrderByDescending(o => o.EmployeeID)
                : orderedQuery?.ThenByDescending(o => o.EmployeeID),
            ("shipcountry", false) => index == 0
                ? query.OrderBy(o => o.ShipCountry)
                : orderedQuery?.ThenBy(o => o.ShipCountry),
            ("shipcountry", true) => index == 0
                ? query.OrderByDescending(o => o.ShipCountry)
                : orderedQuery?.ThenByDescending(o => o.ShipCountry),
            _ => index == 0 ? query.OrderBy(o => o.OrderID) : orderedQuery
        };

        orderedQuery = sortFunc;
    }

    return orderedQuery ?? query;
}
To apply multiple sorting conditions in sequence, press and hold the Ctrl key while clicking on the desired column headers.
Paging
Paging divides large datasets into smaller, manageable pages based on offset and page size. This allows to display data efficiently without loading all records at once, significantly improving performance when handling large datasets.
Paging is already implemented in the main GetOrders query method:
// Apply paging if provided
if (datamanager?.Skip.HasValue == true)
{
    query = query.Skip(datamanager.Skip.Value);
}

if (datamanager?.Take.HasValue == true)
{
    query = query.Take(datamanager.Take.Value);
}
Paging parameters:
- Skip: Number of records to skip from the beginning.
- Take: Number of records to retrieve after skipping.
Perform CRUD operations in server
CRUD operations are handled by GraphQL mutations. Mutations are special GraphQL operations that modify data on the server, such as creating, updating, or deleting records.
Create GraphQL Mutation resolver
A mutation resolver in HotChocolate is a method that handles data modification requests. Each CRUD operation (Create, Update, Delete) is implemented as a separate mutation method.
Create Mutation.cs:
Create a new file GraphQL/Mutation.cs with the following content:
using System.Linq;
using ReactApp1.Server.Models;

namespace ReactApp1.Server.GraphQL
{
    public class OrdersDetailsInput
    {
        public int? OrderID { get; set; }
        public string? CustomerID { get; set; }
        public int? EmployeeID { get; set; }
        public string? ShipCountry { get; set; }
    }

    public class Mutation
    {
        public OrdersDetails AddOrder(OrdersDetailsInput input)
        {
            var newOrder = new OrdersDetails
            {
                OrderID = input.OrderID,
                CustomerID = input.CustomerID,
                EmployeeID = input.EmployeeID,
                ShipCountry = input.ShipCountry
            };
            OrdersDetails.GetAllRecords().Insert(0, newOrder);
            return newOrder;
        }

        public OrdersDetails? UpdateOrder(int key, string? keyColumn, OrdersDetailsInput input)
        {
            // Find the order by the key (OrderID)
            var existing = OrdersDetails.GetAllRecords().FirstOrDefault(o => o.OrderID == key);
            if (existing == null) return null;

            // Update only the fields that are provided
            if (input.CustomerID != null)
                existing.CustomerID = input.CustomerID;
            if (input.EmployeeID.HasValue)
                existing.EmployeeID = input.EmployeeID;
            if (input.ShipCountry != null)
                existing.ShipCountry = input.ShipCountry;

            return existing;
        }

        public bool DeleteOrder(int orderID)
        {
            var existing = OrdersDetails.GetAllRecords().FirstOrDefault(o => o.OrderID == orderID);
            if (existing == null) return false;
            OrdersDetails.GetAllRecords().Remove(existing);
            return true;
        }
    }
}
Insert
Insert operation creates a new order record in the dataset. When the Add button is clicked and submits the new record, this mutation receives the data and persists it.
The “AddOrder” mutation method:
- Receives the new order data through the
OrdersDetailsInputparameter. - Creates a new
OrdersDetailsinstance with the provided values. - Inserts the new record at the beginning of the list.
- Returns the created order back to the client.
public OrdersDetails AddOrder(OrdersDetailsInput input)
{
    var newOrder = new OrdersDetails
    {
        OrderID = input.OrderID,
        CustomerID = input.CustomerID,
        EmployeeID = input.EmployeeID,
        ShipCountry = input.ShipCountry
    };
    OrdersDetails.GetAllRecords().Insert(0, newOrder);
    return newOrder;
}
Update
Update operation modifies an existing order record. When a row is edited and changes are saved, this mutation receives the modified data and updates the record.
The “UpdateOrder” mutation method:
- Receives the primary key (
key), key column name, and updated values (input). - Finds the existing record using the primary key.
- Updates only the fields that are provided in the input.
- Returns the updated order back to the client.
public OrdersDetails? UpdateOrder(int key, string? keyColumn, OrdersDetailsInput input)
{
    var existing = OrdersDetails.GetAllRecords().FirstOrDefault(o => o.OrderID == key);
    if (existing == null) return null;

    if (input.CustomerID != null)
        existing.CustomerID = input.CustomerID;
    if (input.EmployeeID.HasValue)
        existing.EmployeeID = input.EmployeeID;
    if (input.ShipCountry != null)
        existing.ShipCountry = input.ShipCountry;

    return existing;
}
Delete
Delete operation removes an order record from the dataset. When the delete button is clicked and confirmed, this mutation removes the record from the data source.
The “DeleteOrder” mutation method:
- Receives the primary key (
orderID) of the record to delete. - Finds the existing record using the primary key.
- Removes the record from the list.
- Returns
trueif successful,falseif the record was not found.
public bool DeleteOrder(int orderID)
{
    var existing = OrdersDetails.GetAllRecords().FirstOrDefault(o => o.OrderID == orderID);
    if (existing == null) return false;
    OrdersDetails.GetAllRecords().Remove(existing);
    return true;
}
The backend configuration is now complete. The next step is to create the React frontend and integrate it with the HotChocolate GraphQL API.
Integrating Syncfusion React Grid with HotChocolate GraphQL
After configuring the HotChocolate GraphQL backend, the next step is to set up the React frontend and integrate it with the Syncfusion® Grid component using the GraphQLAdaptor.
Step 1: Install Syncfusion packages in React project
Navigate to the React client project and install the required Syncfusion® packages.
Navigate to client folder:
cd reactapp1.clientInstall Syncfusion packages:
npm install @syncfusion/ej2-react-grids @syncfusion/ej2-data --savePackage descriptions:
-
@syncfusion/ej2-react-grids: Provides the Grid component with all features including editing, filtering, sorting, and paging. -
@syncfusion/ej2-data: Provides data management utilities and adaptors includingGraphQLAdaptor.
Step 2: Add Syncfusion CSS references
Syncfusion® components require specific CSS files to render properly. Add the CSS references to the main entry file.
Update main.jsx:
Open (src/main.jsx) and add the following CSS imports at the top:
import { StrictMode } from 'react'
import { createRoot } from 'react-dom/client'
import './index.css'
import App from './App.jsx'

// Add Syncfusion CSS
import '@syncfusion/ej2-base/styles/tailwind3.css';
import '@syncfusion/ej2-buttons/styles/tailwind3.css';
import '@syncfusion/ej2-calendars/styles/tailwind3.css';
import '@syncfusion/ej2-dropdowns/styles/tailwind3.css';
import '@syncfusion/ej2-inputs/styles/tailwind3.css';
import '@syncfusion/ej2-navigations/styles/tailwind3.css';
import '@syncfusion/ej2-popups/styles/tailwind3.css';
import '@syncfusion/ej2-splitbuttons/styles/tailwind3.css';
import '@syncfusion/ej2-grids/styles/tailwind3.css';

createRoot(document.getElementById('root')).render(
  <StrictMode>
    <App />
  </StrictMode>,
)
For this project, the “tailwind3” theme is used. A different theme can be selected or the existing theme can be customized based on project requirements. Refer to the Syncfusion® React Components Appearance documentation to learn more about theming and customization options.
Step 3: Configure GraphQLAdaptor with DataManager
The GraphQLAdaptor is a built-in Syncfusion® adaptor specifically designed for GraphQL APIs. It handles data operations by generating appropriate GraphQL queries and mutations based on Grid actions.
Update App.jsx:
Replace the content of src/App.jsx with the following code:
import { DataManager, GraphQLAdaptor } from '@syncfusion/ej2-data';
import {
    ColumnDirective,
    ColumnsDirective,
    GridComponent,
    Sort,
    Toolbar,
    Inject,
    Filter,
    Page,
    Edit
} from '@syncfusion/ej2-react-grids';
import './App.css';

function App() {
    // Create DataManager with Syncfusion's built-in GraphQLAdaptor
    const data = new DataManager({
      url: '/graphql',
      adaptor: new GraphQLAdaptor({
        response: {
          result: 'orders.result',  // Path to the result data
          count: 'orders.count'     // Path to the count
        },
        query: `query GetOrders($datamanager: DataManagerInput) {
          orders(datamanager: $datamanager) {
            result {
              orderID
              customerID
              employeeID
              shipCountry
            }
            count
          }
        }`,
        getMutation: function (action) {
          if (action === 'insert') {
            return `mutation CreateOrder($value: OrdersDetailsInput!) {
              addOrder(input: $value) {
                orderID
                customerID
                employeeID
                shipCountry
              }
            }`;
          }
          if (action === 'update') {
            return `mutation UpdateOrder($key: Int!, $keyColumn: String, $value: OrdersDetailsInput!) {
              updateOrder(key: $key, keyColumn: $keyColumn, input: $value) {
                orderID
                customerID
                employeeID
                shipCountry
              }
            }`;
          }
          if (action === 'remove') {
            return `mutation DeleteOrder($key: Int!) {
              deleteOrder(orderID: $key)
            }`;
          }
          return '';
        }
      }),
      crossDomain: true
    });

    const pageSettings = { pageSize: 10, pageSizes: true };

    // Configure editing options
    const editSettings = {
      allowEditing: true,
      allowAdding: true,
      allowDeleting: true,
      mode: 'Normal',
      showDeleteConfirmDialog: true
    };

    // Configure toolbar buttons
    const toolbar = ['Add', 'Edit', 'Delete', 'Update', 'Cancel', 'Search'];

    // Validation rules
    const orderIDRules = { required: true };
    const customerIDRules = { required: true, minLength: 3 };

    return (
      <div style=>
        <h2>Orders Grid (GraphQL + HotChocolate)</h2>
        <GridComponent
          dataSource={data}
          editSettings={editSettings}
          allowFiltering={true}
          toolbar={toolbar}
          allowSorting={true}
          allowPaging={true}
          pageSettings={pageSettings}
        >
          <ColumnsDirective>
            <ColumnDirective
              field='orderID'
              headerText='Order ID'
              isPrimaryKey={true}
              width='150'
              textAlign='Right'
              validationRules={orderIDRules}
            />
            <ColumnDirective
              field='customerID'
              headerText='Customer ID'
              width='150'
              validationRules={customerIDRules}
            />
            <ColumnDirective
              field='employeeID'
              headerText='Employee ID'
              width='150'
            />
            <ColumnDirective
              field='shipCountry'
              headerText='Ship Country'
              width='150'
            />
          </ColumnsDirective>
          <Inject services={[Toolbar, Sort, Filter, Page, Edit]} />
        </GridComponent>
      </div>
    );
}

export default App;
Step 4: Understanding GraphQLAdaptor configuration
The GraphQLAdaptor configuration consists of three main parts:
1. Response mapping:
Specifies the way to extract data from the GraphQL response:
response: {
  result: 'orders.result',  // Path to the data array
  count: 'orders.count'     // Path to the total count
}
This tells the adaptor where to find the result data and count in the GraphQL response structure.
2. Query definition:
Defines the GraphQL query for fetching data with all data operations:
query GetOrders($datamanager: DataManagerInput) {
  orders(datamanager: $datamanager) {
    result {
      orderID
      customerID
      employeeID
      shipCountry
    }
    count
  }
}
The $datamanager variable contains all operation details (paging, sorting, filtering, searching) sent by the Grid.
3. Mutation definitions:
Defines GraphQL mutations for CRUD operations using the “getMutation” function:
- Insert mutation: Creates new records
- Update mutation: Modifies existing records
- Delete mutation: Removes records
Each mutation is returned based on the action type (insert, update, remove).
Step 5: Configure Grid features
The Grid component is configured with various features to enable data operations:
Editing configuration:
const editSettings = {
  allowEditing: true,
  allowAdding: true,
  allowDeleting: true,
  mode: 'Normal',
  showDeleteConfirmDialog: true
};
Toolbar buttons:
const toolbar = ['Add', 'Edit', 'Delete', 'Update', 'Cancel', 'Search'];Column configuration:
<ColumnDirective
  field='orderID'
  headerText='Order ID'
  isPrimaryKey={true}
  width='150'
  textAlign='Right'
  validationRules={orderIDRules}
/>
Inject services:
<Inject services={[Toolbar, Sort, Filter, Page, Edit]} />This injects the required services for toolbar, sorting, filtering, paging, and editing functionality.
Step 6: Enable paging feature
Paging divides large datasets into smaller, manageable pages based on offset and page size. When paging is performed in the Grid, the skip and take values are sent to the server through the DataManagerInput parameter.
Enable paging in the Grid:
Set the allowPaging property to true and configure page size using pageSettings.
import { DataManager, GraphQLAdaptor } from '@syncfusion/ej2-data';
import {
ColumnDirective,
ColumnsDirective,
GridComponent,
Page,
Inject
} from '@syncfusion/ej2-react-grids';
function App() {
const data = new DataManager({
url: '/graphql',
adaptor: new GraphQLAdaptor({
// adaptor configuration
}),
crossDomain: true
});
const pageSettings = { pageSize: 10, pageSizes: true };
return (
<GridComponent
dataSource={data}
allowPaging={true}
pageSettings={pageSettings}>
<ColumnsDirective>
<ColumnDirective
field='orderID'
headerText='Order ID'
width='150'
textAlign='Right'
isPrimaryKey={true}/>
{/* Include additional columns here */}
</ColumnsDirective>
<Inject services={[Page]} />
</GridComponent>
);
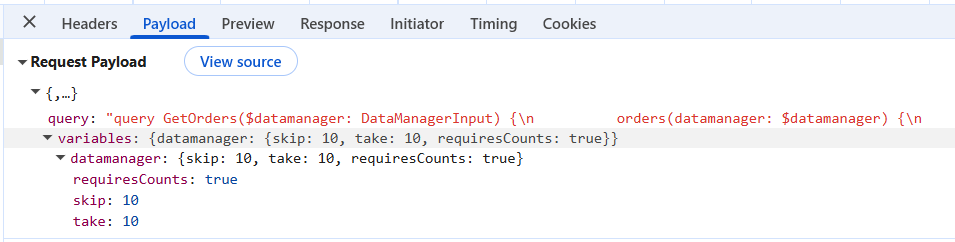
}Paging details included in request payload:
The image illustrates the paging details (skip and take) included in the server request payload.
Step 7: Enable searching feature
Searching provides the capability to find specific records by entering keywords into the search box. When a search action is performed in the Grid, the GraphQLAdaptor sends the search key and the target fields through the search parameter of the DataManagerInput.
Enable searching in the Grid:
Add the Search item to the toolbar property and inject the Toolbar service.
import { DataManager, GraphQLAdaptor } from '@syncfusion/ej2-data';
import {
    ColumnDirective,
    ColumnsDirective,
    GridComponent,
    Toolbar,
    Inject
} from '@syncfusion/ej2-react-grids';

function App() {
    const data = new DataManager({
        url: '/graphql',
        adaptor: new GraphQLAdaptor({
            // adaptor configuration
        }),
        crossDomain: true
    });

    return (
        <GridComponent
            dataSource={data}
            toolbar={['Search']}>
            <ColumnsDirective>
                <ColumnDirective
                    field='orderID'
                    headerText='Order ID'
                    width='150'
                    textAlign='Right'
                    isPrimaryKey={true}/>
                {/* Include additional columns here */}
            </ColumnsDirective>
            <Inject services={[Toolbar]} />
        </GridComponent>
    );
}
Searching details included in request payload:
The image below displays the search parameter values.

Step 8: Enable sorting feature
The sorting feature in the Grid allows records to be organized in ascending or descending order based on one or more columns. The GraphQLAdaptor automatically passes the sorting details to the server through the sorted parameter of the DataManagerInput.
Enable sorting in the Grid:
Set the allowSorting property to true.
import { DataManager, GraphQLAdaptor } from '@syncfusion/ej2-data';
import {
    ColumnDirective,
    ColumnsDirective,
    GridComponent,
    Sort,
    Inject
} from '@syncfusion/ej2-react-grids';

function App() {
    const data = new DataManager({
        url: '/graphql',
        adaptor: new GraphQLAdaptor({
            // adaptor configuration
        }),
        crossDomain: true
    });

    return (
        <GridComponent
            dataSource={data}
            allowSorting={true}>
            <ColumnsDirective>
                <ColumnDirective
                    field='orderID'
                    headerText='Order ID'
                    width='150'
                    textAlign='Right'
                    isPrimaryKey={true}/>
                {/* Include additional columns here */}
            </ColumnsDirective>
            <Inject services={[Sort]} />
        </GridComponent>
    );
}
To apply multiple sorting conditions in sequence, press and hold the Ctrl key while clicking on the desired column headers.
Sorting details included in request payload:
The image below shows the values passed to the sorted parameter.

Step 9: Enable filtering feature
Filtering narrows down records by specifying conditions on column values. Records can be filtered by selecting checkbox filters or using comparison operators such as equals, greater than, or less than. The GraphQLAdaptor automatically passes the filter conditions to the server through the where parameter of the DataManagerInput.
Enable filtering in the Grid:
Set the allowFiltering property to true. Optionally configure the filter type using filterSettings.
import { DataManager, GraphQLAdaptor } from '@syncfusion/ej2-data';
import {
ColumnDirective,
ColumnsDirective,
GridComponent,
Filter,
Inject
} from '@syncfusion/ej2-react-grids';
function App() {
const data = new DataManager({
url: '/graphql',
adaptor: new GraphQLAdaptor({
// adaptor configuration
}),
crossDomain: true
});
const filterSettings = { type: 'Excel' };
return (
<GridComponent
dataSource={data}
allowFiltering={true}
filterSettings={filterSettings}>
<ColumnsDirective>
<ColumnDirective
field='orderID'
headerText='Order ID'
width='150'
textAlign='Right'
isPrimaryKey={true}/>
{/* Include additional columns here */}
</ColumnsDirective>
<Inject services={[Filter]} />
</GridComponent>
);
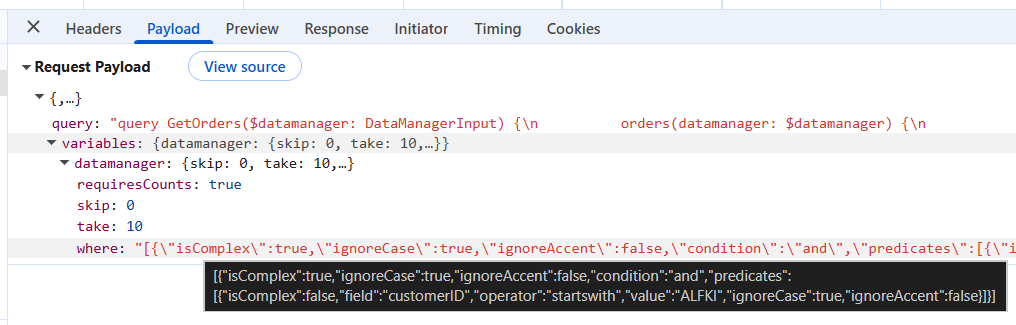
}Filtering details included in request payload:
The image illustrates the serialized where condition passed from the DataManager.
Step 10: Enable CRUD operations with getMutation
CRUD operations (Create, Read, Update, Delete) are supported in the Grid for managing data. The “getMutation” function in the GraphQLAdaptor handles the Grid CRUD actions by sending the appropriate mutation for each action (insert, update, or delete) to the GraphQL server.
Enable insert operation:
Configure the editSettings with allowAdding: true. Add the Add button to the toolbar and configure the GraphQL insert mutation using “getMutation”.
import { DataManager, GraphQLAdaptor } from '@syncfusion/ej2-data';
import {
ColumnDirective,
ColumnsDirective,
GridComponent,
Edit,
Toolbar,
Inject
} from '@syncfusion/ej2-react-grids';
function App() {
const data = new DataManager({
url: '/graphql',
adaptor: new GraphQLAdaptor({
response: {
result: 'orders.result',
count: 'orders.count'
},
query: `query GetOrders($datamanager: DataManagerInput) {
orders(datamanager: $datamanager) {
result {
orderID
customerID
employeeID
shipCountry
}
count
}
}`,
getMutation: function (action) {
if (action === 'insert') {
return `mutation CreateOrder($value: OrdersDetailsInput!) {
addOrder(input: $value) {
orderID
customerID
employeeID
shipCountry
}
}`;
}
return '';
}
}),
crossDomain: true
});
const editSettings = {
allowAdding: true,
mode: 'Normal'
};
return (
<GridComponent
dataSource={data}
editSettings={editSettings}
toolbar={['Add']}>
<ColumnsDirective>
<ColumnDirective
field='orderID'
headerText='Order ID'
width='150'
textAlign='Right'
isPrimaryKey={true}/>
{/* Include additional columns here */}
</ColumnsDirective>
<Inject services={[Edit, Toolbar]} />
</GridComponent>
);
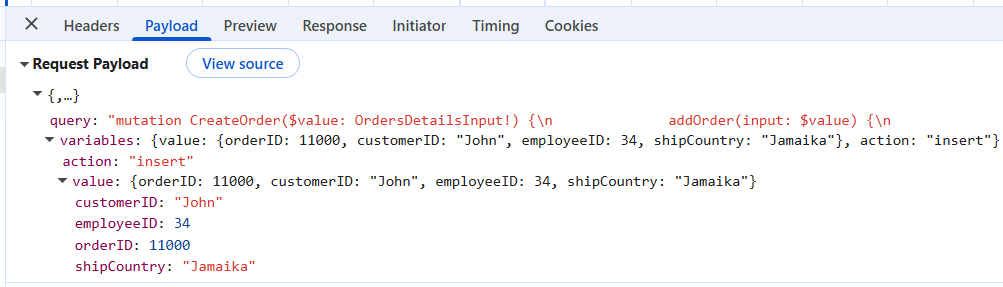
}Insert details included in request payload:
The image illustrates the added record passed from the DataManager.
Enable update operation:
Configure the editSettings with allowEditing: true. Add the Edit, Update, and Cancel buttons to the toolbar and configure the GraphQL update mutation.
const data = new DataManager({
url: '/graphql',
adaptor: new GraphQLAdaptor({
response: {
result: 'orders.result',
count: 'orders.count'
},
query: `query GetOrders($datamanager: DataManagerInput) {
orders(datamanager: $datamanager) {
result {
orderID
customerID
employeeID
shipCountry
}
count
}
}`,
getMutation: function (action) {
if (action === 'update') {
return `mutation UpdateOrder($key: Int!, $keyColumn: String, $value: OrdersDetailsInput!) {
updateOrder(key: $key, keyColumn: $keyColumn, input: $value) {
orderID
customerID
employeeID
shipCountry
}
}`;
}
return '';
}
}),
crossDomain: true
});
const editSettings = {
allowEditing: true,
mode: 'Normal'
};
return (
<GridComponent
dataSource={data}
editSettings={editSettings}
toolbar={['Edit', 'Update', 'Cancel']}>
<ColumnsDirective>
<ColumnDirective
field='orderID'
headerText='Order ID'
width='150'
textAlign='Right'
isPrimaryKey={true}/>
{/* Include additional columns here */}
</ColumnsDirective>
<Inject services={[Edit, Toolbar]} />
</GridComponent>
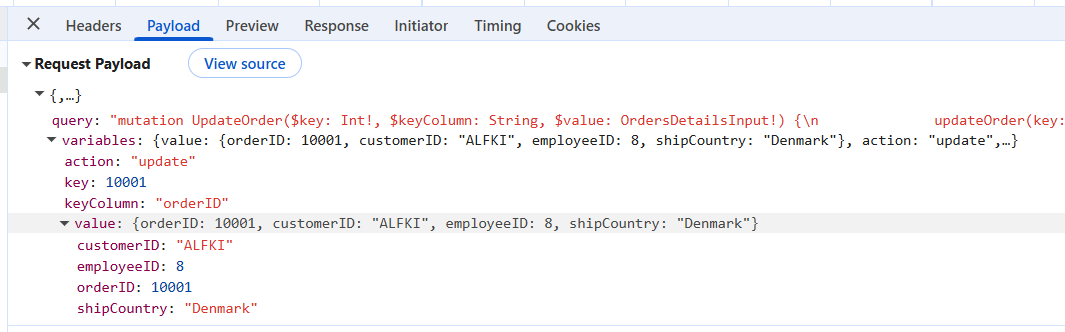
);Update details included in request payload:
The image illustrates the edited record passed from the DataManager.
Enable delete operation:
Configure the editSettings with allowDeleting: true. Add the Delete button to the toolbar and configure the GraphQL delete mutation.
const data = new DataManager({
url: '/graphql',
adaptor: new GraphQLAdaptor({
// response and query configuration
getMutation: function (action) {
if (action === 'remove') {
return `mutation DeleteOrder($key: Int!) {
deleteOrder(orderID: $key)
}`;
}
return '';
}
}),
crossDomain: true
});
const editSettings = {
allowDeleting: true,
showDeleteConfirmDialog: true
};
const toolbar = ['Delete'];
return (
<GridComponent
dataSource={data}
editSettings={editSettings}
toolbar={toolbar}>
<ColumnsDirective>
<ColumnDirective
field='orderID'
headerText='Order ID'
width='150'
textAlign='Right'
isPrimaryKey={true}/>
{/* Include additional columns here */}
</ColumnsDirective>
<Inject services={[Toolbar, Edit]} />
</GridComponent>
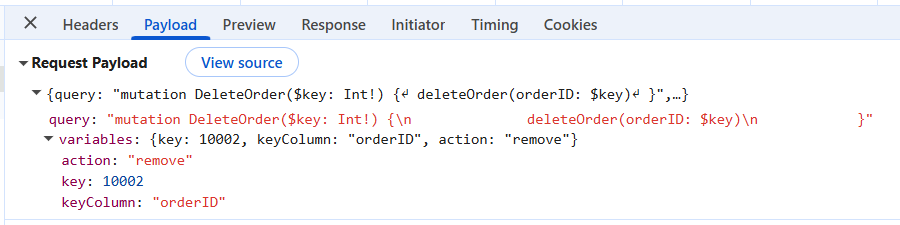
);Delete details included in request payload:
The image illustrates the deleted record key passed from the DataManager.
Note: Ensure that the isPrimaryKey property is set to
truefor a specific Grid column which has unique values. This is required for update and delete operations to identify the correct record.
Running the application
After completing the backend and frontend configuration, the application is ready to run.
Step 1: Build and run the ASP.NET Core backend
Using Visual Studio:
- Open the ReactApp1.sln solution file in Visual Studio.
- Press F5 or click the Run button to start the application.
- Visual Studio will automatically build and launch both the backend server and frontend client.
Using .NET CLI:
Navigate to the solution folder and run:
cd ReactApp1
dotnet run --project ReactApp1.Server
The backend server will start on https://localhost:**** (or the port specified in launchSettings.json).
Step 2: Access the application
Once the application starts:
- The browser will automatically open at
https://localhost:****(Vite dev server). - The React application will load with the Syncfusion® Grid component.
- The Grid will automatically fetch data from the HotChocolate GraphQL API.
Step 3: Test GraphQL endpoint
The HotChocolate GraphQL server includes a built-in GraphQL IDE called Banana Cake Pop.
Access Banana Cake Pop:
Navigate to https://localhost:****/graphql in your browser.
Test queries:
Try executing the following query in the GraphQL IDE:
query GetOrders {
  orders(datamanager: { skip: 0, take: 10 }) {
    result {
      orderID
      customerID
      employeeID
      shipCountry
    }
    count
  }
}
Test mutations:
Try creating a new order:
mutation CreateOrder {
  addOrder(input: {
    orderID: 10999
    customerID: "TESTC"
    employeeID: 5
    shipCountry: "USA"
  }) {
    orderID
    customerID
    employeeID
    shipCountry
  }
}
Step 4: Verify Grid operations
Test the following Grid operations in the React application:
Paging:
- Click on page numbers or use page size dropdown.
- Verify that data loads correctly for each page.
Sorting:
- Click on column headers to sort.
- Verify ascending and descending sort orders.
Filtering:
- Click the filter icon in any column header.
- Apply filter conditions and verify results.
Searching:
- Use the search box in the toolbar.
- Verify that search works across all columns.
CRUD operations:
- Click Add to create new records.
- Click Edit to modify existing records.
- Click Delete to remove records.
- Verify that changes are reflected immediately.
Complete sample repository
A complete working sample of the React Grid with HotChocolate GraphQL backend is available on GitHub for reference and experimentation.
GitHub repository:
React Data Grid with HotChocolate GraphQL Sample
Repository contents:
- Complete ASP.NET Core backend with HotChocolate GraphQL configuration.
- React frontend with Syncfusion® Grid and
GraphQLAdaptorsetup. - Sample data models and in-memory data source.
- GraphQL queries and mutations for all CRUD operations.
- Data operation implementations (filtering, sorting, paging, searching).
- Ready-to-run Visual Studio solution.
Clone and run:
git clone https://github.com/SyncfusionExamples/syncfusion-react-grid-component-with-hotchocolate-graphql-server.git
cd syncfusion-react-grid-component-with-hotchocolate-graphql-server
dotnet run --project ReactApp1.Server