WebApiAdaptor in Syncfusion® EJ2 TypeScript Grid Control
7 May 202524 minutes to read
The WebApiAdaptor is an extension of the ODataAdaptor, designed to interact with Web APIs created with OData endpoints. This adaptor ensures seamless communication between Syncfusion® Grid and OData-endpoint based Web APIs, enabling efficient data retrieval and manipulation. For successful integration, the endpoint must be capable of understanding OData-formatted queries sent along with the request.
To enable the OData query option for a Web API, please refer to the corresponding documentation, which provides detailed instructions on configuring the endpoint to understand OData-formatted queries.
This section describes a step-by-step process for retrieving data using WebApiAdaptor, then binding it to the EJ2 TypeScript Grid control to facilitate data and CRUD operations.
Creating an api service
Step 1: Set Up Your Development Environment
Before you start, make sure you have the following installed:
- .NET Core SDK
- Node.js
- Visual Studio or any other preferred code editor
Step 2: Create a New ASP.NET Core Project
Open Visual Studio and create an ASP.NET Core Web API project named WebApiAdaptor.
Step 3: Add the Microsoft.TypeScript.MSBuild NuGet package to the project:
In Solution Explorer, right-click the project node and select Manage NuGet Packages. In the Browse tab, search for Microsoft.TypeScript.MSBuild and then select Install on the right to install the package.
Step 4: Configure the server
In Program.cs, call UseDefaultFiles and UseStaticFiles.
var app = builder.Build();

app.UseDefaultFiles();
app.UseStaticFiles();
Comment out the below line in launchSettings.json:
    "https": {
      "commandName": "Project",
      "dotnetRunMessages": true,
      "launchBrowser": true,
     // "launchUrl": "swagger",
      "applicationUrl": "https://localhost:xxxx;http://localhost:xxxx",
      "environmentVariables": {
        "ASPNETCORE_ENVIRONMENT": "Development"
      }
    },
This configuration enables the server to locate and serve the index.html file.
Step 5: Model Class Creation
Create a model class named OrdersDetails.cs in the Models folder to represent the order data.
namespace WebApiAdaptor.Models
 {
 public class OrdersDetails
 {
    public static List<OrdersDetails> order = new List<OrdersDetails>();
    public OrdersDetails()
    {

    }
    public OrdersDetails(
    int OrderID, string CustomerId, int EmployeeId, double Freight, bool Verified,
    DateTime OrderDate, string ShipCity, string ShipName, string ShipCountry,
    DateTime ShippedDate, string ShipAddress)
    {
    this.OrderID = OrderID;
    this.CustomerID = CustomerId;
    this.EmployeeID = EmployeeId;
    this.Freight = Freight;
    this.ShipCity = ShipCity;
    this.Verified = Verified;
    this.OrderDate = OrderDate;
    this.ShipName = ShipName;
    this.ShipCountry = ShipCountry;
    this.ShippedDate = ShippedDate;
    this.ShipAddress = ShipAddress;
    }

    public static List<OrdersDetails> GetAllRecords()
    {
    if (order.Count() == 0)
    {
        int code = 10000;
        for (int i = 1; i < 10; i++)
        {
        order.Add(new OrdersDetails(code + 1, "ALFKI", i + 0, 2.3 * i, false, new DateTime(1991, 05, 15), "Berlin", "Simons bistro", "Denmark", new DateTime(1996, 7, 16), "Kirchgasse 6"));
        order.Add(new OrdersDetails(code + 2, "ANATR", i + 2, 3.3 * i, true, new DateTime(1990, 04, 04), "Madrid", "Queen Cozinha", "Brazil", new DateTime(1996, 9, 11), "Avda. Azteca 123"));
        order.Add(new OrdersDetails(code + 3, "ANTON", i + 1, 4.3 * i, true, new DateTime(1957, 11, 30), "Cholchester", "Frankenversand", "Germany", new DateTime(1996, 10, 7), "Carrera 52 con Ave. Bolívar #65-98 Llano Largo"));
        order.Add(new OrdersDetails(code + 4, "BLONP", i + 3, 5.3 * i, false, new DateTime(1930, 10, 22), "Marseille", "Ernst Handel", "Austria", new DateTime(1996, 12, 30), "Magazinweg 7"));
        order.Add(new OrdersDetails(code + 5, "BOLID", i + 4, 6.3 * i, true, new DateTime(1953, 02, 18), "Tsawassen", "Hanari Carnes", "Switzerland", new DateTime(1997, 12, 3), "1029 - 12th Ave. S."));
        code += 5;
        }
    }
    return order;
    }

    public int? OrderID { get; set; }
    public string? CustomerID { get; set; }
    public int? EmployeeID { get; set; }
    public double? Freight { get; set; }
    public string? ShipCity { get; set; }
    public bool? Verified { get; set; }
    public DateTime OrderDate { get; set; }
    public string? ShipName { get; set; }
    public string? ShipCountry { get; set; }
    public DateTime ShippedDate { get; set; }
    public string? ShipAddress { get; set; }
 }
}
Step 6: API Controller Creation
Create a file named OrdersController.cs under the Controllers folder. This controller will handle data communication with the Typescript Grid component. Implement the Get method in the controller to return the data in JSON format, including the Items and Count properties as required by WebApiAdaptor.
using Microsoft.AspNetCore.Http;
using Microsoft.AspNetCore.Mvc;
using WebApiAdaptor.Models;

namespace WebApiAdaptor.Controllers
{
  [Route("api/[controller]")]
  [ApiController]
  public class GridController : ControllerBase
  {
    [HttpGet]
    public object Get()
    {
    var data = OrdersDetails.GetAllRecords().ToList();
    return  new { Items = data, Count = data.Count() };
    }
  }
}
Connecting syncfusion® grid to an api service
To integrate the Syncfusion® Grid control into your EJ2 TypeScript and ASP.NET Core project using Visual Studio, follow these steps:
Step 1: Create a package.json file:
Run the following command in the project root to create a package.json file:
npm init -yStep 2: Install Webpack and Other Dependencies
npm i -D -E clean-webpack-plugin css-loader html-webpack-plugin mini-css-extract-plugin ts-loader typescript webpack webpack-cliStep 3: Configure package.json Scripts
Replace the scripts property of package.json file with the following code:
"scripts": {
  "build": "webpack --mode=development --watch",
  "release": "webpack --mode=production",
  "publish": "npm run release && dotnet publish -c Release"
},
Step 4: Create wwwroot Folder
Create a folder named wwwroot in the project root directory. This folder will contain static files served by the web server.
Step 5: Create webpack.config.js
Create a file named webpack.config.js in the project root, with the following code to configure the Webpack compilation process:
const path = require("path");
const HtmlWebpackPlugin = require("html-webpack-plugin");
const { CleanWebpackPlugin } = require("clean-webpack-plugin");
const MiniCssExtractPlugin = require("mini-css-extract-plugin");

module.exports = {
    entry: "./src/index.ts",
    output: {
        path: path.resolve(__dirname, "wwwroot"),
        filename: "[name].[chunkhash].js",
        publicPath: "/",
    },
    resolve: {
        extensions: [".js", ".ts"],
    },
    module: {
        rules: [
            {
                test: /\.ts$/,
                use: "ts-loader",
            },
            {
                test: /\.css$/,
                use: [MiniCssExtractPlugin.loader, "css-loader"],
            },
        ],
    },
    plugins: [
        new CleanWebpackPlugin(),
        new HtmlWebpackPlugin({
            template: "./src/index.html",
        }),
        new MiniCssExtractPlugin({
            filename: "css/[name].[chunkhash].css",
        }),
    ],
};
Step 6: Create a new directory named src in the project root for the client code.
Step 7: Install Syncfusion® Packages
Open your terminal in the project’s root folder and install the required Syncfusion® packages using npm:
npm install @syncfusion/ej2-grids --save
npm install @syncfusion/ej2-data --save
Step 8: Create src/index.html and add the following code:
<!DOCTYPE html>
<html lang="en">
<head>
    <title>EJ2 Grid</title>
    <meta charset="utf-8" />
    <meta name="viewport" content="width=device-width, initial-scale=1.0" />
    <meta name="description" content="Typescript Grid Control" />
    <meta name="author" content="Syncfusion" />
    <link href="https://cdn.syncfusion.com/ej2/26.1.35/ej2-base/styles/material.css" rel="stylesheet" />
    <link href="https://cdn.syncfusion.com/ej2/26.1.35/ej2-grids/styles/material.css" rel="stylesheet" />
    <link href="https://cdn.syncfusion.com/ej2/26.1.35/ej2-buttons/styles/material.css" rel="stylesheet" />
    <link href="https://cdn.syncfusion.com/ej2/26.1.35/ej2-popups/styles/material.css" rel="stylesheet" />
    <link href="https://cdn.syncfusion.com/ej2/26.1.35/ej2-richtexteditor/styles/material.css" rel="stylesheet" />
    <link href="https://cdn.syncfusion.com/ej2/26.1.35/ej2-navigations/styles/material.css" rel="stylesheet" />
    <link href="https://cdn.syncfusion.com/ej2/26.1.35/ej2-dropdowns/styles/material.css" rel="stylesheet" />
    <link href="https://cdn.syncfusion.com/ej2/26.1.35/ej2-lists/styles/material.css" rel="stylesheet" />
    <link href="https://cdn.syncfusion.com/ej2/26.1.35/ej2-inputs/styles/material.css" rel="stylesheet" />
    <link href="https://cdn.syncfusion.com/ej2/26.1.35/ej2-calendars/styles/material.css" rel="stylesheet" />
    <link href="https://cdn.syncfusion.com/ej2/26.1.35/ej2-notifications/styles/material.css" rel="stylesheet" />
    <link href="https://cdn.syncfusion.com/ej2/26.1.35/ej2-splitbuttons/styles/material.css" rel="stylesheet" />

    <script src="https://cdnjs.cloudflare.com/ajax/libs/systemjs/0.19.38/system.js"></script>

    <script src="https://cdn.syncfusion.com/ej2/syncfusion-helper.js" type="text/javascript"></script>
</head>
<body>
    <div id='container'>
        <div id='Grid'></div>
    </div>
</body>
</html>
Step 9: Create src/index.ts and add the following code:
import { Grid } from '@syncfusion/ej2-grids';
import { DataManager, WebApiAdaptor } from '@syncfusion/ej2-data';

let data: DataManager = new DataManager({
    url: 'https://localhost:xxxx/api/Grid',
    adaptor: new WebApiAdaptor()
});

let grid: Grid = new Grid({
    dataSource: data,
    columns: [
        { field: 'OrderID', headerText: 'Order ID', textAlign: 'Right', width: 120, isPrimaryKey: true, type: 'number' },
        { field: 'CustomerID', width: 140, headerText: 'Customer ID', type: 'string' },
        { field: 'ShipCity', headerText: 'ShipCity', width: 140 },
        { field: 'ShipCountry', headerText: 'ShipCountry', width: 140 }
    ]
});

grid.appendTo('#Grid');
Step 10: Create src/tsconfig.json in the project and add the following content:
{
  "compilerOptions": {
    "noImplicitAny": true,
    "noEmitOnError": true,
    "removeComments": false,
    "sourceMap": true,
    "target": "es5"
  },
  "exclude": [
    "node_modules",
    "wwwroot"
  ]
}
Step 11: Install additional packages and build the project
npm i @types/node
npm run build
Step 12: Run the project
Run the project in Visual Studio.
The wwwroot/index.html file is served at https://localhost:xxxx.
With these steps, you have integrated the Syncfusion® Grid control with your ASP.NET Core project and set up the necessary client-side configuration using Webpack and EJ2 TypeScript. This will allow the Syncfusion® Grid to fetch data from your API and display it accordingly.
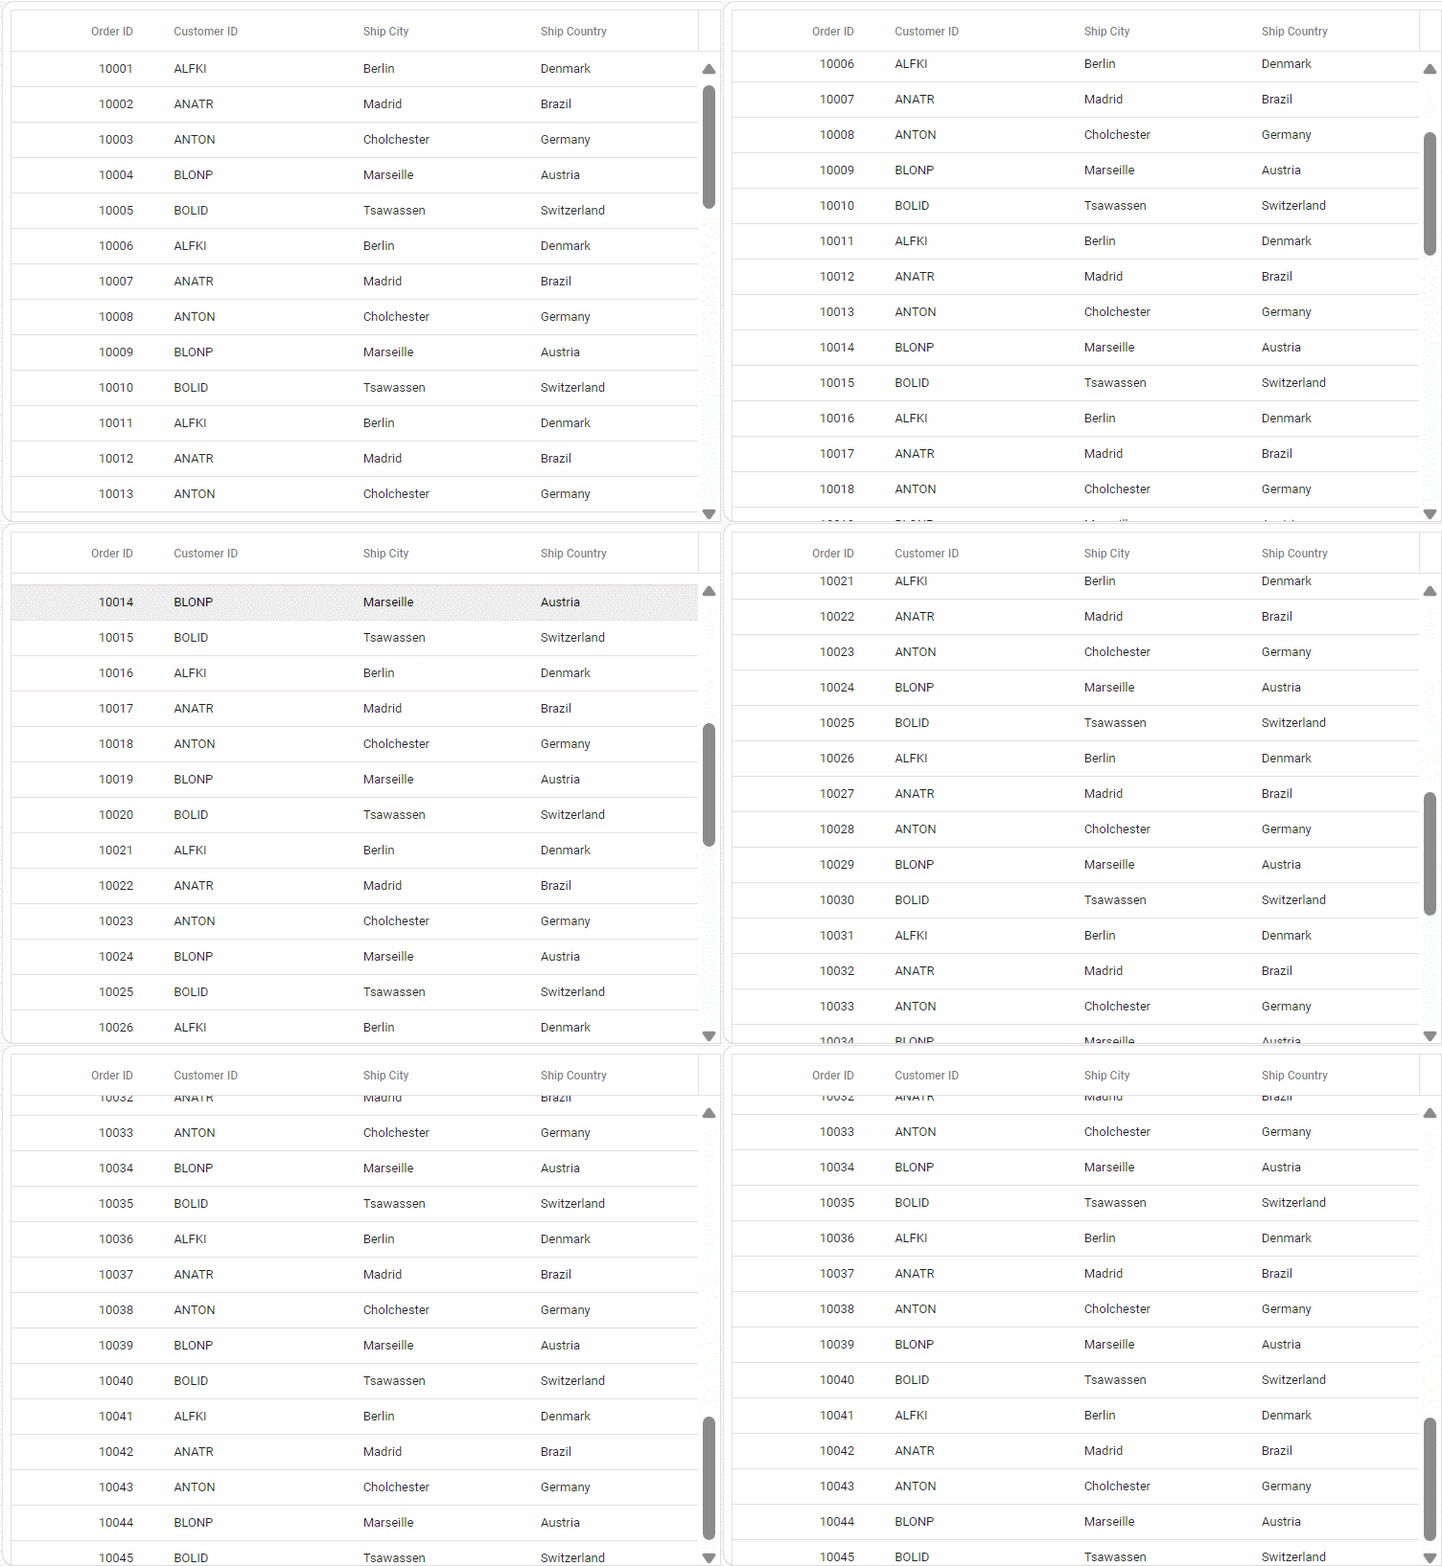
Handling searching operation
To handle search operation, implement search logic on the server side according to the received OData-formatted query.

// GET: api/Orders
[HttpGet]

public object Get()
{
  var queryString = Request.Query;
  var data = OrdersDetails.GetAllRecords().ToList();
  string filter = queryString["$filter"];

  if (filter != null)
  {
    var filters = filter.Split(new string[] { " and " }, StringSplitOptions.RemoveEmptyEntries);
    foreach (var filterItem in filters)
    {
      if (filterItem.Contains("substringof"))
      {
        // Perform Searching
        var searchParts = filterItem.Split('(', ')', '\'');
        var searchValue = searchParts[3];

        // Apply the search value to all searchable fields
        data = data.Where(cust =>
          cust.OrderID.ToString().Contains(searchValue) ||
          cust.CustomerID.ToLower().Contains(searchValue) ||
          cust.ShipCity.ToLower().Contains(searchValue)
        // Add conditions for other searchable fields as needed
        ).ToList();
      }
      else
      {
        // Perform filtering
      }
    }
  }
  return new { Items = data, Count = data.Count() };
}
import { Grid, Toolbar } from '@syncfusion/ej2-grids';
import { DataManager, WebApiAdaptor } from '@syncfusion/ej2-data';
Grid.Inject(Toolbar);
let data: DataManager = new DataManager({
url: 'https://localhost:xxxx/api/Grid',
adaptor: new WebApiAdaptor()
});
let grid: Grid = new Grid({
dataSource: data,
toolbar: ['Search'],
columns: [
{ field: 'OrderID', headerText: 'Order ID', textAlign: 'Right', width: 120, isPrimaryKey: true, type: 'number' },
{ field: 'CustomerID', width: 140, headerText: 'Customer ID', type: 'string' },
{ field: 'ShipCity', headerText: 'ShipCity', width: 140 },
{ field: 'ShipCountry', headerText: 'ShipCountry', width: 140 }
]
});
grid.appendTo('#Grid');Handling filtering operation
To handle filter operations, ensure that your Web API endpoint supports filtering based on OData-formatted queries. Implement the filtering logic on the server-side as shown in the provided code snippet.
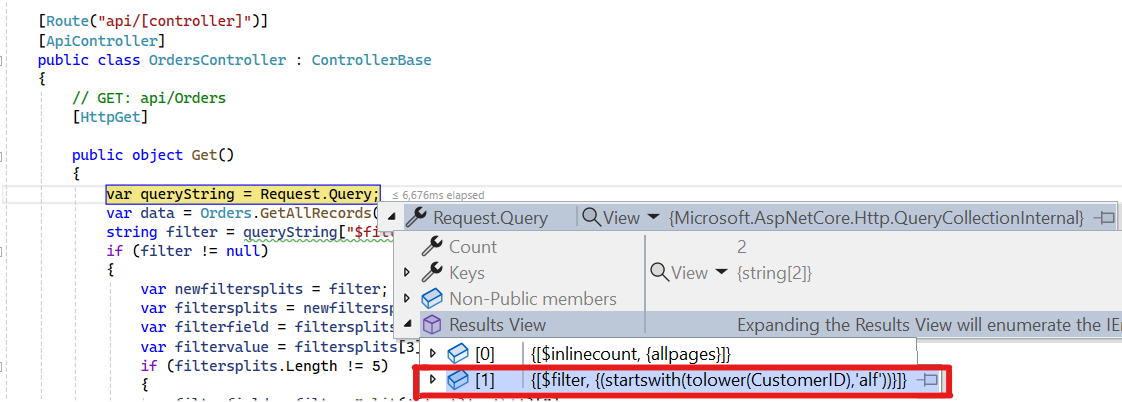
// GET: api/Orders
[HttpGet]
public object Get()
{
  var queryString = Request.Query;
  var data = Orders.GetAllRecords().ToList();
  string filter = queryString["$filter"];

  if (filter != null)
  {
    var filters = filter.Split(new string[] { " and " }, StringSplitOptions.RemoveEmptyEntries);
    foreach (var filterItem in filters)
    {
      var filterfield = "";
      var filtervalue = "";
      var filterParts = filterItem.Split('(', ')', '\'');
      if (filterParts.Length != 9)
      {
        var filterValueParts = filterParts[1].Split();
        filterfield = filterValueParts[0];
        filtervalue = filterValueParts[2];
      }
      else
      {
        filterfield = filterParts[3];
        filtervalue = filterParts[5];
      }
      switch (filterfield)
      {
        case "OrderID":
          data = (from cust in data
                where cust.OrderID.ToString() == filtervalue.ToString()
                select cust).ToList();
        break;
        case "CustomerID":
          data = (from cust in data
                where cust.CustomerID.ToLower().StartsWith(filtervalue.ToString())
                select cust).ToList();
        break;
        case "ShipCity":
          data = (from cust in data
                where cust.ShipCity.ToLower().StartsWith(filtervalue.ToString())
                select cust).ToList();
        break;
      }
    }
    return new { Items = data, Count = data.Count() };
  }
}
import { Grid, Filter } from '@syncfusion/ej2-grids';
import { DataManager, WebApiAdaptor } from '@syncfusion/ej2-data';
Grid.Inject(Filter);
let data: DataManager = new DataManager({
url: 'https://localhost:xxxx/api/Grid',
adaptor: new WebApiAdaptor()
});
let grid: Grid = new Grid({
dataSource: data,
allowFiltering: true,
columns: [
{ field: 'OrderID', headerText: 'Order ID', textAlign: 'Right', width: 120, isPrimaryKey: true, type: 'number' },
{ field: 'CustomerID', width: 140, headerText: 'Customer ID', type: 'string' },
{ field: 'ShipCity', headerText: 'ShipCity', width: 140 },
{ field: 'ShipCountry', headerText: 'ShipCountry', width: 140 }
]
});
grid.appendTo('#Grid');Handling sorting operation
To handle sorting action, implement sorting logic on the server-side according to the received OData-formatted query.
Ascending Sorting

Descending Sorting

// GET: api/Orders
[HttpGet]

public object Get()
{
    var queryString = Request.Query;
    var data = OrdersDetails.GetAllRecords().ToList();
    string sort = queryString["$orderby"];   //sorting
    if (!string.IsNullOrEmpty(sort))
    {
        var sortConditions = sort.Split(',');
        var orderedData = data.OrderBy(x => 0); // Start with a stable sort
        foreach (var sortCondition in sortConditions)
        {
            var sortParts = sortCondition.Trim().Split(' ');
            var sortBy = sortParts[0];
            var sortOrder = sortParts.Length > 1 && sortParts[1].ToLower() == "desc";
            switch (sortBy)
            {
                case "OrderID":
                    orderedData = sortOrder ? orderedData.ThenByDescending(x => x.OrderID) : orderedData.ThenBy(x => x.OrderID);
                    break;
                case "CustomerID":
                    orderedData = sortOrder ? orderedData.ThenByDescending(x => x.CustomerID) : orderedData.ThenBy(x => x.CustomerID);
                    break;
                case "ShipCity":
                    orderedData = sortOrder ? orderedData.ThenByDescending(x => x.ShipCity) : orderedData.ThenBy(x => x.ShipCity);
                    break;
            }
        }
        data = orderedData.ToList();
    }
    return new { Items = data, Count = data.Count() };
}
import { Grid, Sort } from '@syncfusion/ej2-grids';
import { DataManager, WebApiAdaptor } from '@syncfusion/ej2-data';
Grid.Inject(Sort);
let data: DataManager = new DataManager({
url: 'https://localhost:xxxx/api/Grid',
adaptor: new WebApiAdaptor()
});
let grid: Grid = new Grid({
dataSource: data,
allowSorting: true,
columns: [
{ field: 'OrderID', headerText: 'Order ID', textAlign: 'Right', width: 120, isPrimaryKey: true, type: 'number' },
{ field: 'CustomerID', width: 140, headerText: 'Customer ID', type: 'string' },
{ field: 'ShipCity', headerText: 'ShipCity', width: 140 },
{ field: 'ShipCountry', headerText: 'ShipCountry', width: 140 }
]
});
grid.appendTo('#Grid');Handling paging operation
Implement paging logic on the server-side according to the received OData-formatted query. Ensure that the endpoint supports paging based on the specified criteria.

[HttpPost]
public object Post([FromBody] DataManager DataManagerRequest)
{
    // Retrieve data from the data source (e.g., database)
    IQueryable<OrdersDetails> DataSource = GetOrderData().AsQueryable();

    // Get the total records count
    int totalRecordsCount = DataSource.Count();

    QueryableOperation queryableOperation = new QueryableOperation(); // Initialize QueryableOperation instance

    // Retrieve data manager value
    DataManagerRequest DataManagerParams = DataManagerRequest.Value;

    // Handling paging operation.
    if (DataManagerParams.Skip != 0)
    {
        // Paging
        DataSource = queryableOperation.PerformSkip(DataSource, DataManagerParams.Skip);
    }
    if (DataManagerParams.Take != 0)
    {
        DataSource = queryableOperation.PerformTake(DataSource, DataManagerParams.Take);
    }

    // Return data based on the request
    return new { result = DataSource, count = totalRecordsCount };
}

// Model for handling data manager requests
public class DataManager
{
    public required DataManagerRequest Value { get; set; }
}
import { Grid, Page } from '@syncfusion/ej2-grids';
import { DataManager, WebApiAdaptor } from '@syncfusion/ej2-data';
Grid.Inject(Page);
let data: DataManager = new DataManager({
url: 'https://localhost:xxxx/api/Grid',
adaptor: new WebApiAdaptor()
});
let grid: Grid = new Grid({
dataSource: data,
allowPaging: true,
columns: [
{ field: 'OrderID', headerText: 'Order ID', textAlign: 'Right', width: 120, isPrimaryKey: true, type: 'number' },
{ field: 'CustomerID', width: 140, headerText: 'Customer ID', type: 'string' },
{ field: 'ShipCity', headerText: 'ShipCity', width: 140 },
{ field: 'ShipCountry', headerText: 'ShipCountry', width: 140 }
]
});
grid.appendTo('#Grid');You can find the complete sample for the WebApiAdaptor in GitHub link.
Handling CRUD operations
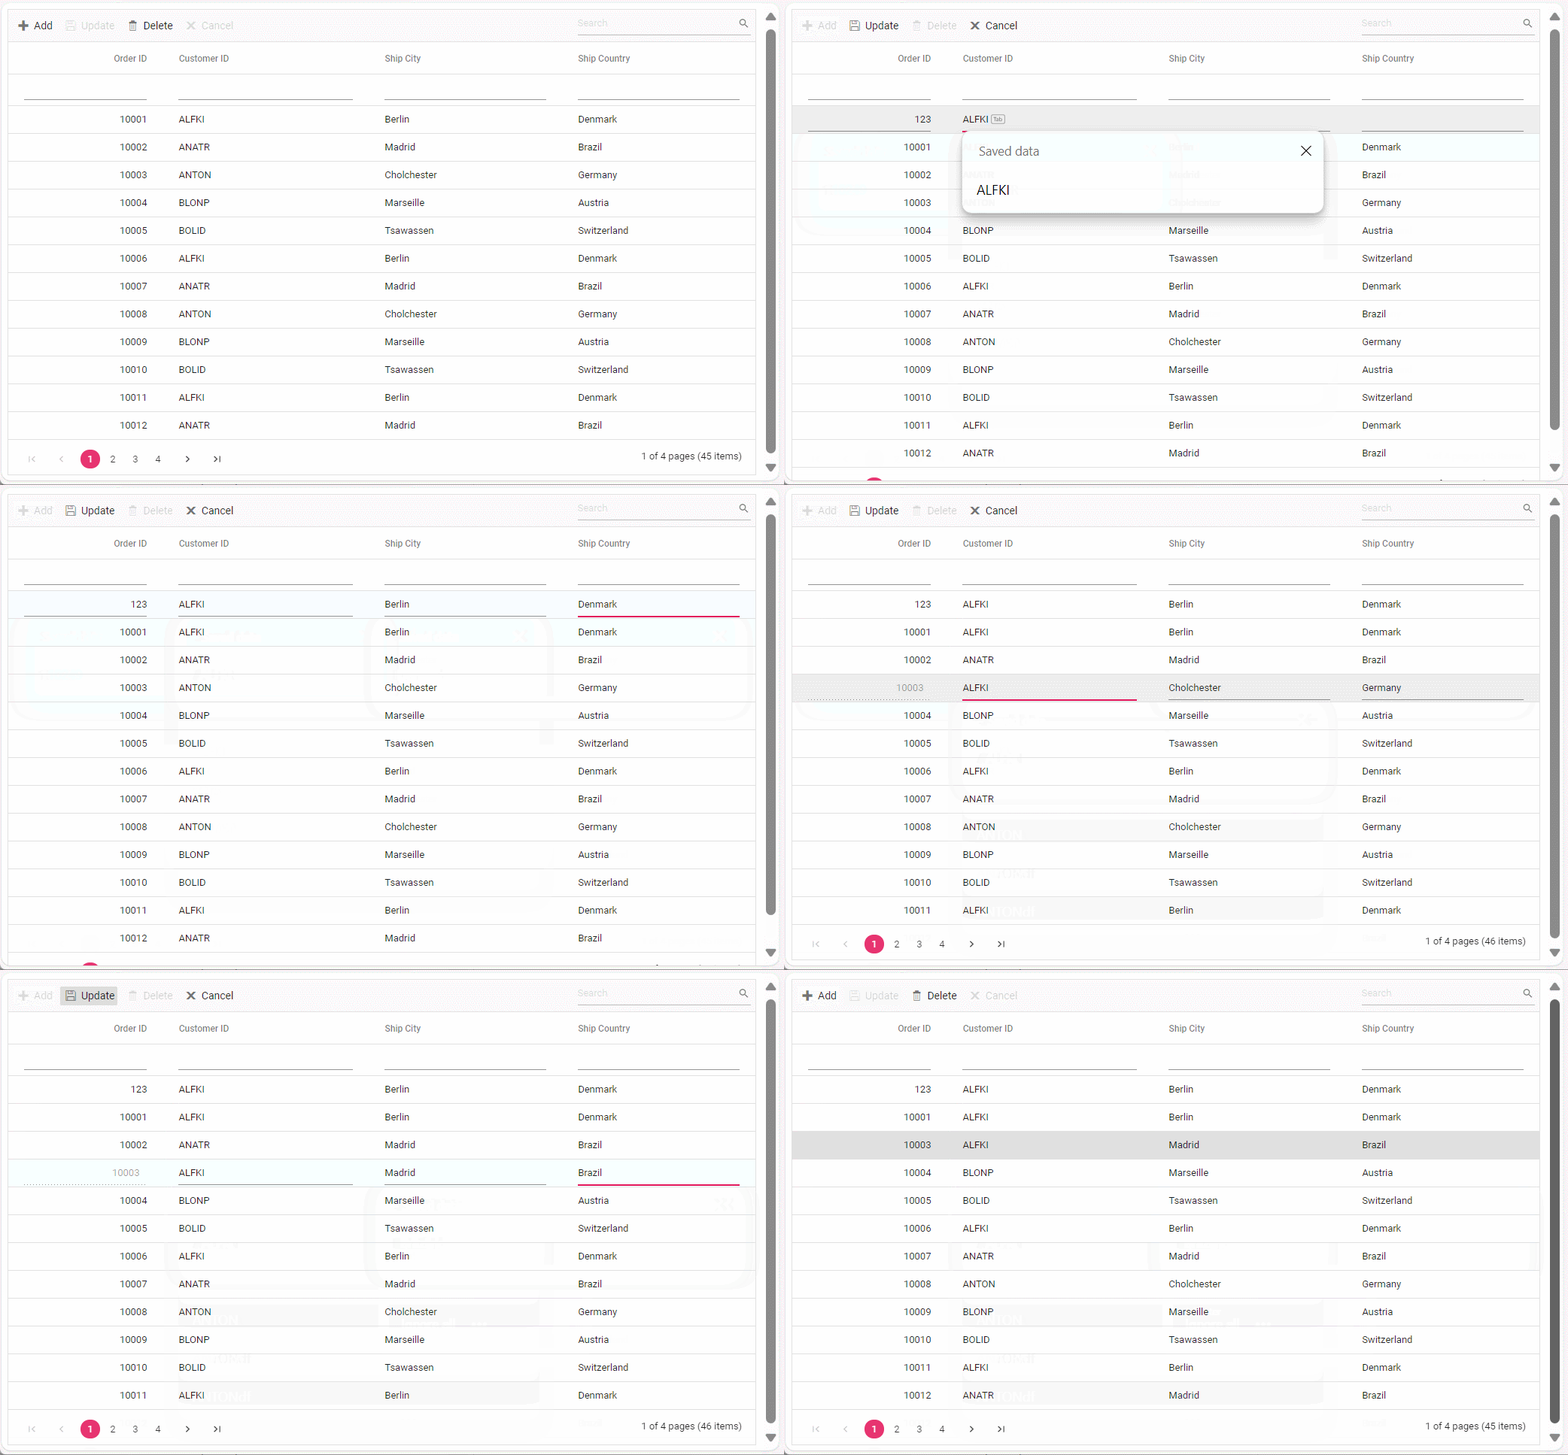
The Syncfusion® EJ2 TypeScript Grid Control seamlessly integrates CRUD (Create, Read, Update, Delete) operations with server-side controller actions through specific properties: insertUrl, removeUrl, updateUrl, crudUrl, and batchUrl. These properties enable the grid to communicate with the data service for every grid action, facilitating server-side operations.
To enable editing in EJ2 TypeScript Grid control, refer to the editing documentation. In the below example, the inline edit mode is enabled and toolbar property is configured to display toolbar items for editing purposes.
import { Grid, Edit, Toolbar } from '@syncfusion/ej2-grids';
import { DataManager, WebApiAdaptor } from '@syncfusion/ej2-data';

Grid.Inject(Edit, Toolbar);

let data: DataManager = new DataManager({
    url: 'https://localhost:xxxx/api/Grid',
    adaptor: new WebApiAdaptor()
});

let grid: Grid = new Grid({
    dataSource: data,
    toolbar: ['Add', 'Edit', 'Delete', 'Update', 'Cancel'],
    editSettings: { allowEditing: true, allowAdding: true, allowDeleting: true, mode: 'Normal' },
    columns: [
        { field: 'OrderID', headerText: 'Order ID', textAlign: 'Right', width: 120, isPrimaryKey: true, type: 'number' },
        { field: 'CustomerID', width: 140, headerText: 'Customer ID', type: 'string' },
        { field: 'ShipCity', headerText: 'ShipCity', width: 140 },
        { field: 'ShipCountry', headerText: 'ShipCountry', width: 140 }
    ]
});

grid.appendTo('#Grid');
Normal/Inline editing is the default edit mode for the Grid control. To enable CRUD operations, ensure that the isPrimaryKey property is set to true for a specific Grid column, ensuring that its value is unique.
Insert operation:
To insert a new record, utilize the insertUrl property to specify the controller action mapping URL for the insert operation. The newly added record details are bound to the newRecord parameter.
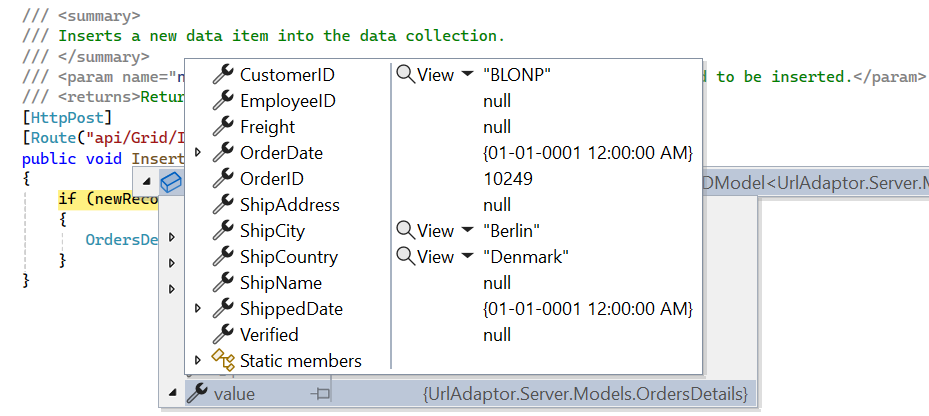
// POST: api/Orders
[HttpPost]
/// <summary>
/// Inserts a new data item into the data collection.
/// </summary>
/// <param name="newRecord">It holds new record detail which is need to be inserted.</param>
/// <returns>Returns void</returns>
public void Post([FromBody] OrdersDetails newRecord)
{
  // Insert a new record into the OrdersDetails model
  OrdersDetails.GetAllRecords().Insert(0, newRecord);
}
Update operation:
For updating existing records, utilize the updateUrl property to specify the controller action mapping URL for the update operation. The updated record details are bound to the updatedRecord parameter.
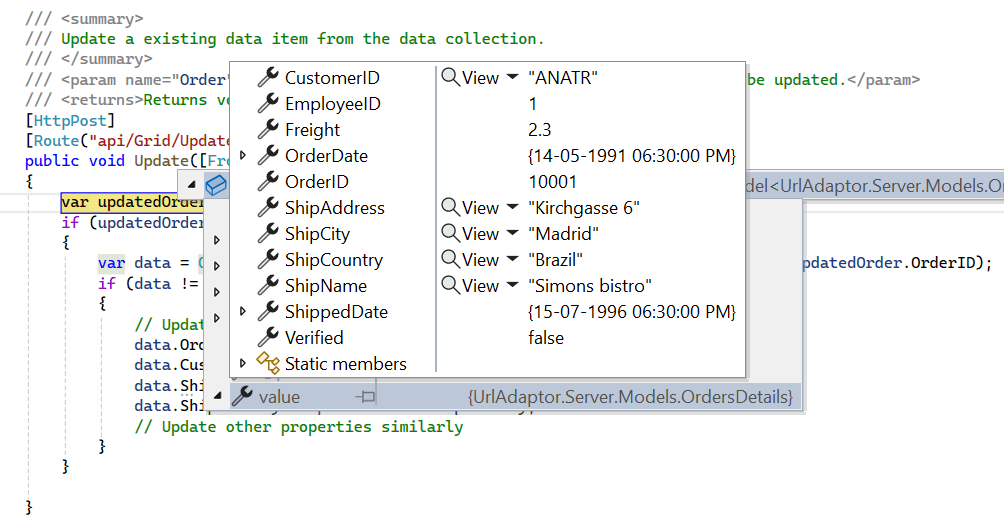
// PUT: api/Orders/5
[HttpPut]
/// <summary>
/// Update a existing data item from the data collection.
/// </summary>
/// <param name="updatedOrder">It holds updated record detail which is need to be updated.</param>
/// <returns>Returns void</returns>
public void Put(int id, [FromBody] OrdersDetails updatedOrder)
{
  // Find the existing order by ID
  var existingOrder = OrdersDetails.GetAllRecords().FirstOrDefault(o => o.OrderID == id);
  if (existingOrder != null)
  {
    // If the order exists, update its properties
    existingOrder.OrderID = updatedOrder.OrderID;
    existingOrder.CustomerID = updatedOrder.CustomerID;
    existingOrder.ShipCity = updatedOrder.ShipCity;
    existingOrder.ShipCountry = updatedOrder.ShipCountry;
  }
}
Delete operation
To delete existing records, use the removeUrl property to specify the controller action mapping URL for the delete operation. The primary key value of the deleted record is bound to the deletedRecord parameter.

// DELETE: api/5

[HttpDelete("{id}")]
/// <summary>
/// Remove a specific data item from the data collection.
/// </summary>
/// <param name="key">It holds specific record detail id which is need to be removed.</param>
/// <returns>Returns void</returns>
public void Delete(int key)
{
  // Find the order to remove by ID
  var orderToRemove = OrdersDetails.GetAllRecords().FirstOrDefault(order => order.OrderID == key);
  // If the order exists, remove it
  if (orderToRemove != null)
  {
    OrdersDetails.GetAllRecords().Remove(orderToRemove);
  }
}
You can find the complete sample for the WebApiAdaptor in GitHub link.