Getting Started with ASP.NET MVC Pivot Table
9 Sep 20267 minutes to read
This section guides you through the steps to create a simple ASP.NET MVC Pivot Table using the Syncfusion PivotView component in an ASP.NET MVC application. It demonstrates how to set up and use the component to display and analyze data effectively.
Ready to streamline your Syncfusion® ASP.NET MVC development? Discover the full potential of Syncfusion® ASP.NET MVC controls with Syncfusion® AI Coding Assistant. Effortlessly integrate, configure, and enhance your projects with intelligent, context-aware code suggestions, streamlined setups, and real-time insights—all seamlessly integrated into your preferred AI-powered IDEs like Visual Studio, Visual Studio Code, Cursor, Syncfusion® Code Studio and more. Explore Syncfusion® AI Coding Assistant
Prerequisites
Before you begin, ensure your system meets the requirements for using Syncfusion® ASP.NET MVC UI components. You need a compatible browser and a supported ASP.NET MVC version (MVC5 or later) to work with the Pivot Table control. For details on supported browsers and ASP.NET MVC versions, refer to the System requirements for ASP.NET MVC controls.
Create ASP.NET MVC application with HTML helper
Install ASP.NET MVC package in the application
To add ASP.NET MVC controls in the application, open the NuGet package manager in Visual Studio (Tools → NuGet Package Manager → Manage NuGet Packages for Solution), search for Syncfusion.EJ2.MVC5 and then install it.
Install-Package Syncfusion.EJ2.MVC5 -Version 34.2.2Syncfusion® ASP.NET MVC controls are available in nuget.org. Refer to the NuGet packages topic to learn more about installing NuGet packages in various OS environments. The Syncfusion.EJ2.MVC5 NuGet package has dependencies on Newtonsoft.Json for JSON serialization and Syncfusion.Licensing for validating the Syncfusion® license key. To register a license key in your application, refer to the Licensing topic.
Adding namespace
Add the Syncfusion.EJ2 namespace reference in the Web.config file under the Views folder so that the Syncfusion HTML helpers are available in all Razor views.
<namespaces>
    <add namespace="Syncfusion.EJ2"/>
</namespaces>
Adding stylesheet and script resources
Here, the theme and script are referred using CDN inside the <head> of the ~/Views/Shared/_Layout.cshtml file as follows,
<head>
    ...
    <!-- Syncfusion ASP.NET MVC controls styles -->
    <link rel="stylesheet" href="https://cdn.syncfusion.com/ej2/34.2.2/tailwind3.css" />
    <!-- Syncfusion ASP.NET MVC controls scripts -->
    <script src="https://cdn.syncfusion.com/ej2/34.2.2/dist/ej2.min.js"></script>
</head>
Checkout the Themes topic to learn different ways (CDN, NPM package, and CRG) to refer styles in ASP.NET MVC application, and to have the expected appearance for Syncfusion® ASP.NET MVC controls. Checkout the Adding Script Reference topic to learn different approaches for adding script references in your ASP.NET MVC application.
Register Syncfusion® script manager
Also, register the script manager EJS().ScriptManager() at the end of <body> in the ~/Views/Shared/_Layout.cshtml file as follows. The script manager must be placed after all Syncfusion controls on the page to function correctly.
<body>
...
    <!-- Syncfusion ASP.NET MVC Script Manager -->
    @Html.EJS().ScriptManager()
</body>
Adding ASP.NET MVC Pivot Table control
-
Now, add the Syncfusion® ASP.NET MVC Pivot Table control using the
@Html.EJS().PivotView()HTML helper in the~/Views/Home/Index.cshtmlpage. -
The Pivot Table control further needs to be populated with an appropriate data source. For illustration purposes, a collection of objects describing the sales details of certain products over a period and region has been prepared. This sample data is assigned to the Pivot Table control through the DataSource property of the PivotViewDataSourceSettings class, along with
Rows,Columns,Values, andFiltersfields that define how the data is summarized.
@Html.EJS().PivotView("PivotGrid").Height("350").DataSourceSettings(dataSourceSettings => dataSourceSettings.DataSource((IEnumerable<object>)ViewBag.DataSource).ExpandAll(true)
    .FormatSettings(formatsettings =>
    {
        formatsettings.Name("Amount").Format("C0").Add();
    }).Rows(rows =>
    {
        rows.Name("Country").Add(); rows.Name("Products").Add();
    }).Columns(columns =>
    {
        columns.Name("Year").Add(); columns.Name("Quarter").Add();
    }).Values(values =>
    {
        values.Name("Amount").Caption("Sold Amount").Add(); values.Name("Sold").Caption("Units Sold").Add();
    })).ShowFieldList(true).Render()
public class HomeController : Controller
{
public ActionResult Index()
{
var data = PivotDataSource.GetPivotData();
ViewBag.DataSource = data;
return View();
}
public class PivotData
{
public int Sold { get; set; }
public double Amount { get; set; }
public string Country { get; set; }
public string Products { get; set; }
public string Year { get; set; }
public string Quarter { get; set; }
}
public static class PivotDataSource
{
public static List<PivotData> GetPivotData()
{
return new List<PivotData>
{
new PivotData { Sold = 31, Amount = 52824, Country = "France", Products = "Mountain Bikes", Year = "FY 2025", Quarter = "Q1" },
new PivotData { Sold = 51, Amount = 86904, Country = "France", Products = "Mountain Bikes", Year = "FY 2025", Quarter = "Q2" },
new PivotData { Sold = 90, Amount = 153360, Country = "France", Products = "Mountain Bikes", Year = "FY 2025", Quarter = "Q3" },
new PivotData { Sold = 25, Amount = 42600, Country = "France", Products = "Mountain Bikes", Year = "FY 2025", Quarter = "Q4" }
};
}
}
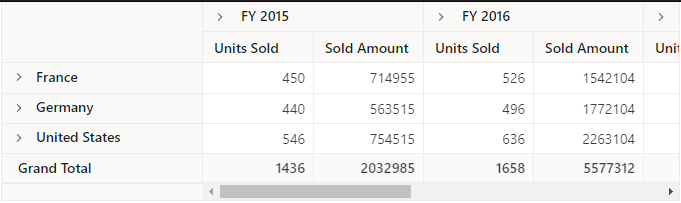
}Press Ctrl+F5 (Windows) or ⌘+F5 (macOS) to run the app. Then, the Syncfusion® ASP.NET MVC Pivot Table control will be rendered in the default web browser.
The output is shown below.