How can I help you?
Row and Column in ASP.NET CORE Pivot Table Component
21 Dec 202224 minutes to read
Width and Height
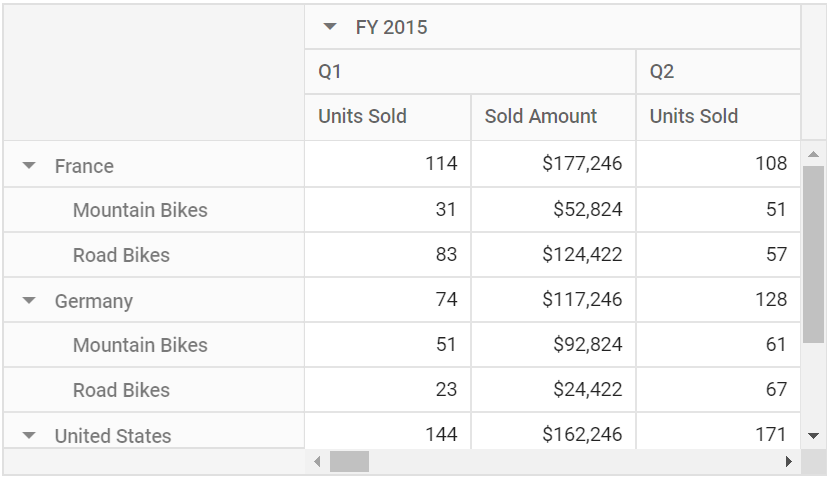
Allows end user to set the pivot table’s height and width by using height and width properties in ejs-pivotview tag respectively. The supported formats to set height and width properties are,
- Pixel: For example - 100, 200, “100px”, “200px”.
- Percentage: For example - “100%”, “200%”.
- Auto: It is applicable for
heightproperty alone in-order to render the pivot table beyond its parent container height without vertical scrollbar. The parent container here would show its vertical scrollbar as soon as the component reaches beyond its dimension.
NOTE
The pivot table will not be displayed less than 400px, since it’s the minimum width of the component.
<ejs-pivotview id="PivotView" width="550" height="315px">
    <e-datasourcesettings dataSource="@ViewBag.DataSource" expandAll="true">
        <e-formatsettings>
            <e-field name="Amount" format="C0" maximumSignificantDigits="10" minimumSignificantDigits="1" useGrouping="true"></e-field>
        </e-formatsettings>
        <e-rows>
            <e-field name="Country"></e-field>
            <e-field name="Products"></e-field>
        </e-rows>
        <e-columns>
            <e-field name="Year" caption="Year"></e-field>
            <e-field name="Quarter"></e-field>
        </e-columns>
        <e-values>
            <e-field name="Sold" caption="Units Sold"></e-field>
            <e-field name="Amount" caption="Sold Amount"></e-field>
        </e-values>
    </e-datasourcesettings>
</ejs-pivotview>
public ActionResult Index()
{
var data = GetPivotData();
ViewBag.DataSource = data;
return View();
}
Row Height
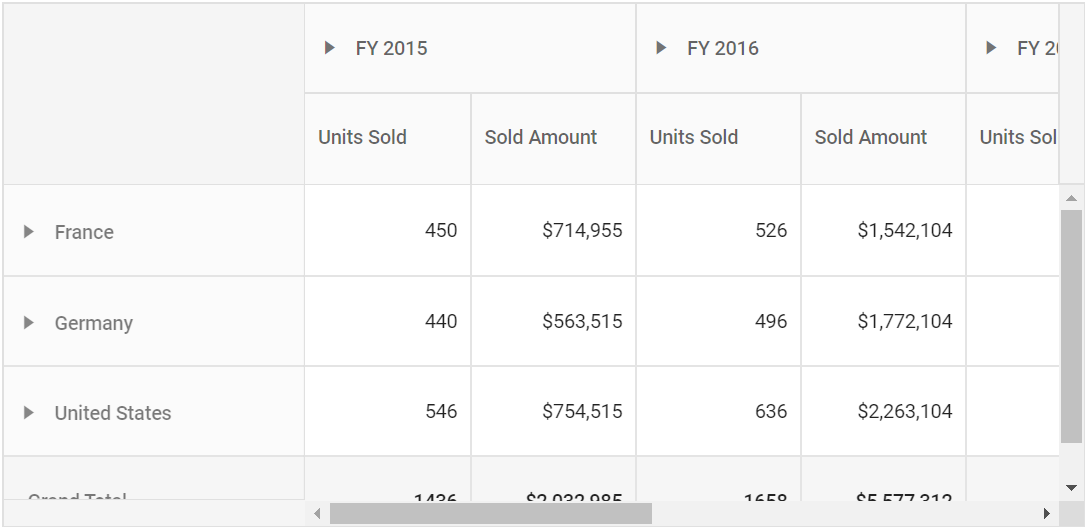
Allows end user to set the height of each pivot table rows commonly using the rowHeight property in e-gridSettings tag.
NOTE
By default, the
rowHeightproperty is set as 36 pixels for desktop layout and 48 pixels for mobile layout.
The height of the column headers alone may vary when grouping bar feature is enabled.
In the below code sample, the rowHeight property is set as 60 pixels.
<ejs-pivotview id="PivotView" height="300">
    <e-datasourcesettings dataSource="@ViewBag.DataSource" expandAll="false">
        <e-formatsettings>
            <e-field name="Amount" format="C0" maximumSignificantDigits="10" minimumSignificantDigits="1" useGrouping="true"></e-field>
        </e-formatsettings>
        <e-rows>
            <e-field name="Country"></e-field>
            <e-field name="Products"></e-field>
        </e-rows>
        <e-columns>
            <e-field name="Year" caption="Year"></e-field>
            <e-field name="Quarter"></e-field>
        </e-columns>
        <e-values>
            <e-field name="Sold" caption="Units Sold"></e-field>
            <e-field name="Amount" caption="Sold Amount"></e-field>
        </e-values>
    </e-datasourcesettings>
    <e-gridSettings rowHeight=60></e-gridSettings>
</ejs-pivotview>
public ActionResult Index()
{
var data = GetPivotData();
ViewBag.DataSource = data;
return View();
}
Column Width
Allows end user to set the width of each pivot table columns commonly using the columnWidth property in e-gridSettings tag.
NOTE
By default, the
columnWidthproperty is set as 110 pixels to each columns except the first column. For first column, 250 pixels and 200 pixels are set respectively with and without grouping bar.
In the below example, the columnWidth property is set as 200 pixels.
<ejs-pivotview id="PivotView" height="300">
    <e-datasourcesettings dataSource="@ViewBag.DataSource" expandAll="false">
        <e-formatsettings>
            <e-field name="Amount" format="C0" maximumSignificantDigits="10" minimumSignificantDigits="1" useGrouping="true"></e-field>
        </e-formatsettings>
        <e-rows>
            <e-field name="Country"></e-field>
            <e-field name="Products"></e-field>
        </e-rows>
        <e-columns>
            <e-field name="Year" caption="Year"></e-field>
            <e-field name="Quarter"></e-field>
        </e-columns>
        <e-values>
            <e-field name="Sold" caption="Units Sold"></e-field>
            <e-field name="Amount" caption="Sold Amount"></e-field>
        </e-values>
    </e-datasourcesettings>
    <e-gridSettings columnWidth=120></e-gridSettings>
</ejs-pivotview>
public ActionResult Index()
{
var data = GetPivotData();
ViewBag.DataSource = data;
return View();
}
Adjust width based on columns
By default, if the component width set in code-behind is more than the width of the total columns, then the columns will be stretched to make it fit. To avoid the stretching, set the allowAutoResizing property in the e-gridSettings to false. By doing so, the component will be adjusted (shrinked) based on the width of total columns.
<ejs-pivotview id="PivotView" height="300">
    <e-datasourcesettings dataSource="@ViewBag.DataSource" expandAll="false">
        <e-filtersettings>
            <e-field name="Year" type="Exclude" items="@ViewBag.filterMembers"></e-field>
        </e-filtersettings>
        <e-rows>
            <e-field name="Country"></e-field>
            <e-field name="Products"></e-field>
        </e-rows>
        <e-columns>
            <e-field name="Year" caption="Year"></e-field>
            <e-field name="Quarter"></e-field>
        </e-columns>
        <e-values>
            <e-field name="Sold" caption="Units Sold"></e-field>
        </e-values>
    </e-datasourcesettings>
    <e-gridSettings allowAutoResizing="false"></e-gridSettings>
</ejs-pivotview>
public ActionResult Index()
{
var data = GetPivotData();
ViewBag.DataSource = data;
ViewBag.filterMembers = new string[] { "FY 2017", "FY 2015" };
return View();
}
Reorder
Allows end user to reorder a particular column header from one index to another index within the pivot table through drag-and-drop option. It can be enabled by setting the allowReordering property in e-gridSettings tag to true.
<ejs-pivotview id="PivotView" height="300">
    <e-datasourcesettings dataSource="@ViewBag.DataSource" expandAll="false">
        <e-formatsettings>
            <e-field name="Amount" format="C0" maximumSignificantDigits="10" minimumSignificantDigits="1" useGrouping="true"></e-field>
        </e-formatsettings>
        <e-rows>
            <e-field name="Country"></e-field>
            <e-field name="Products"></e-field>
        </e-rows>
        <e-columns>
            <e-field name="Year" caption="Year"></e-field>
            <e-field name="Quarter"></e-field>
        </e-columns>
        <e-values>
            <e-field name="Sold" caption="Units Sold"></e-field>
            <e-field name="Amount" caption="Sold Amount"></e-field>
        </e-values>
    </e-datasourcesettings>
    <e-gridSettings allowReordering="true"></e-gridSettings>
</ejs-pivotview>
public ActionResult Index()
{
var data = GetPivotData();
ViewBag.DataSource = data;
return View();
}
Column Resizing
Allows end user to resize the columns by clicking and dragging the right edge of the column header. While dragging, the width of the respective column will be resized immediately. To enable column resizing option, set the allowResizing property in e-gridSettings tag to true.
NOTE
By default, the column resizing option is enabled.
In RTL mode, user can click and drag the left edge of the header cell to resize the column.
<ejs-pivotview id="PivotView" height="300">
    <e-datasourcesettings dataSource="@ViewBag.DataSource" expandAll="false">
        <e-formatsettings>
            <e-field name="Amount" format="C0" maximumSignificantDigits="10" minimumSignificantDigits="1" useGrouping="true"></e-field>
        </e-formatsettings>
        <e-rows>
            <e-field name="Country"></e-field>
            <e-field name="Products"></e-field>
        </e-rows>
        <e-columns>
            <e-field name="Year" caption="Year"></e-field>
            <e-field name="Quarter"></e-field>
        </e-columns>
        <e-values>
            <e-field name="Sold" caption="Units Sold"></e-field>
            <e-field name="Amount" caption="Sold Amount"></e-field>
        </e-values>
    </e-datasourcesettings>
    <e-gridSettings allowResizing="true"></e-gridSettings>
</ejs-pivotview>
public ActionResult Index()
{
var data = GetPivotData();
ViewBag.DataSource = data;
return View();
}
Text Wrap
Allows end user to wrap the cell content to the next line when it exceeds the boundary of the cell width. To enable text wrap, set the allowTextWrap property in e-gridSettings tag to true.
<ejs-pivotview id="PivotView" height="300">
    <e-datasourcesettings dataSource="@ViewBag.DataSource" expandAll="false">
        <e-formatsettings>
            <e-field name="Amount" format="C0" maximumSignificantDigits="10" minimumSignificantDigits="1" useGrouping="true"></e-field>
        </e-formatsettings>
        <e-rows>
            <e-field name="Country"></e-field>
            <e-field name="Products"></e-field>
        </e-rows>
        <e-columns>
            <e-field name="Year" caption="Year"></e-field>
            <e-field name="Quarter"></e-field>
        </e-columns>
        <e-values>
            <e-field name="Sold" caption="Units Sold"></e-field>
            <e-field name="Amount" caption="Sold Amount"></e-field>
        </e-values>
    </e-datasourcesettings>
    <e-gridSettings allowTextWrap="true"></e-gridSettings>
</ejs-pivotview>
public ActionResult Index()
{
var data = GetPivotData();
ViewBag.DataSource = data;
return View();
}
Text Align
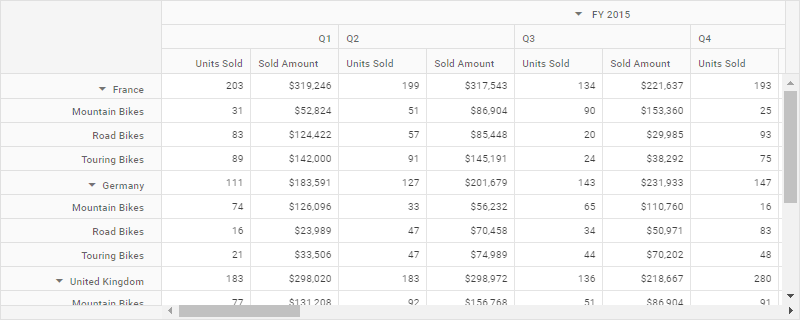
Allows end user to align the content of the pivot table’s row and column headers and value cells by using the textAlign and headerTextAlign properties in the columnRender event under e-gridSettings. The following alignments are:
-
Left- It allows the content to be positioned on the left. -
Right- It allows the content to be positioned on the right. -
Center- It allows the content to be positioned in the middle. -
Justify- It allows the content to be as flexible as possible, when the cell does not occupy the entire available area.
<ejs-pivotview id="PivotView" height="300" showFieldList="true" width="650">
    <e-datasourcesettings dataSource="@ViewBag.DataSource" expandAll="true">
        <e-formatsettings>
            <e-field name="Amount" format="C0" maximumSignificantDigits="10" minimumSignificantDigits="1" useGrouping="true"></e-field>
        </e-formatsettings>
        <e-rows>
            <e-field name="Country"></e-field>
            <e-field name="Products"></e-field>
        </e-rows>
        <e-columns>
            <e-field name="Year" caption="Year"></e-field>
            <e-field name="Quarter"></e-field>
        </e-columns>
        <e-values>
            <e-field name="Sold" caption="Units Sold"></e-field>
            <e-field name="Amount" caption="Sold Amount"></e-field>
        </e-values>
    </e-datasourcesettings>
    <e-gridSettings columnRender="columnRender"></e-gridSettings>
</ejs-pivotview>

<script>
    function columnRender(args) {
        if(args.stackedColumns[0]){
            // Content for the row headers is right-aligned here.
            args.stackedColumns[0].textAlign="Right";
        }
        if(args.stackedColumns[1]){
            // Content for the column header "FY 2015" is center-aligned here.
            args.stackedColumns[1].textAlign = 'Center';
        }
        if(args.stackedColumns[1] && args.stackedColumns[1].columns[0]){
            // Content for the column header "Q1" is right-aligned here.
            args.stackedColumns[1].columns[0].textAlign = 'Right';
        }
        if(args.stackedColumns[1] && args.stackedColumns[1].columns[0] && args.stackedColumns[1].columns[0].columns[0]){
            // Content for the value header "Units Sold" is right-aligned here.
            args.stackedColumns[1].columns[0].columns[0].headerTextAlign = 'Right';
        }
        if(args.stackedColumns[1] && args.stackedColumns[1].columns[0] && args.stackedColumns[1].columns[0].columns[0]){
            // Content for the values are left-aligned here.
            args.stackedColumns[1].columns[0].columns[0].textAlign = 'Left';
        }
    }
</script>
public ActionResult Index()
{
var data = GetPivotData();
ViewBag.DataSource = data;
return View();
}
AutoFit
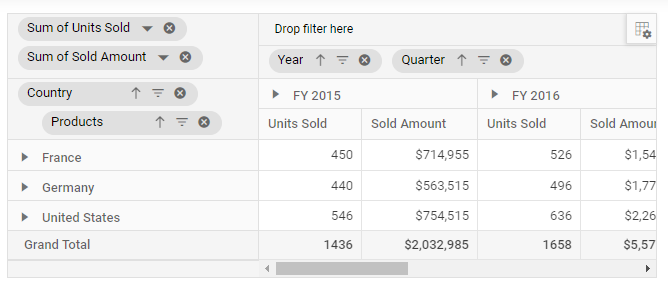
Allows the user to fit the Pivot Table columns as wide as the content of the cell without wrapping. It auto fits all of the Pivot Table columns by invoking the autoFitColumns method from the grid instance.
<ejs-pivotview id="PivotView" height="300" showFieldList="true" dataBound="ondataBound" width="650">
    <e-datasourcesettings dataSource="@ViewBag.DataSource" expandAll="false">
        <e-formatsettings>
            <e-field name="Amount" format="C0" maximumSignificantDigits="10" minimumSignificantDigits="1" useGrouping="true"></e-field>
        </e-formatsettings>
        <e-rows>
            <e-field name="Country"></e-field>
            <e-field name="Products"></e-field>
        </e-rows>
        <e-columns>
            <e-field name="Year" caption="Year"></e-field>
            <e-field name="Quarter"></e-field>
        </e-columns>
        <e-values>
            <e-field name="Sold" caption="Units Sold"></e-field>
            <e-field name="Amount" caption="Sold Amount"></e-field>
        </e-values>
    </e-datasourcesettings>
</ejs-pivotview>

<script>
    function ondataBound(args) {
        var pivotTableObj = document.getElementById('PivotView').ej2_instances[0];
        pivotTableObj.grid.autoFitColumns();
    }
</script>
public ActionResult Index()
{
var data = GetPivotData();
ViewBag.DataSource = data;
return View();
}
NOTE
The minimum width of 250 pixels is set by default with the grouping bar UI for the first column and cannot be reduced further. So, when the grouping bar is enabled, one can auto fit the Pivot Table columns by calling the
autoFitColumnsmethod from the grid instance with the parameter contained pivot table columns field name excluding first column.
<ejs-pivotview id="PivotView" height="300" showFieldList="true" dataBound="ondataBound" showGroupingBar="true" width="650">
    <e-datasourcesettings dataSource="@ViewBag.DataSource" expandAll="false">
        <e-formatsettings>
            <e-field name="Amount" format="C0" maximumSignificantDigits="10" minimumSignificantDigits="1" useGrouping="true"></e-field>
        </e-formatsettings>
        <e-rows>
            <e-field name="Country"></e-field>
            <e-field name="Products"></e-field>
        </e-rows>
        <e-columns>
            <e-field name="Year" caption="Year"></e-field>
            <e-field name="Quarter"></e-field>
        </e-columns>
        <e-values>
            <e-field name="Sold" caption="Units Sold"></e-field>
            <e-field name="Amount" caption="Sold Amount"></e-field>
        </e-values>
    </e-datasourcesettings>
</ejs-pivotview>

<script>
    function ondataBound(args) {
        var pivotTableObj = document.getElementById('PivotView').ej2_instances[0];
        var columns = [];
        for (var i = 1; i < pivotTableObj.grid.columnModel.length; i++) {
            columns.push(pivotTableObj.grid.columnModel[i].field);
        }
        pivotTableObj.grid.autoFitColumns(columns);
    }
</script>
public ActionResult Index()
{
var data = GetPivotData();
ViewBag.DataSource = data;
return View();
}
Autofit specific columns
During initial rendering, the parameter autoFit in the columnRender event under e-gridSettings can be set to true to auto fit specific columns.
<ejs-pivotview id="PivotView" height="300" showFieldList="true" width="650">
    <e-datasourcesettings dataSource="@ViewBag.DataSource" expandAll="false">
        <e-formatsettings>
            <e-field name="Amount" format="C0" maximumSignificantDigits="10" minimumSignificantDigits="1" useGrouping="true"></e-field>
        </e-formatsettings>
        <e-rows>
            <e-field name="Country"></e-field>
            <e-field name="Products"></e-field>
        </e-rows>
        <e-columns>
            <e-field name="Year" caption="Year"></e-field>
            <e-field name="Quarter"></e-field>
        </e-columns>
        <e-values>
            <e-field name="Sold" caption="Units Sold"></e-field>
            <e-field name="Amount" caption="Sold Amount"></e-field>
        </e-values>
    </e-datasourcesettings>
    <e-gridSettings columnRender="columnRender"></e-gridSettings>
</ejs-pivotview>

<script>
    function columnRender(args) {
        for (var i = 0; i < args.columns.length; i++) {
            args.columns[i].autoFit = true;
        }
    }
</script>
public ActionResult Index()
{
var data = GetPivotData();
ViewBag.DataSource = data;
return View();
}
Grid Lines
Allows end user to display cell border for each cells using gridLines property in e-gridSettings tag.
Available mode of grid lines are:
| Modes | Actions |
|---|---|
| Both | Displays both the horizontal and vertical grid lines. |
| None | No grid lines are displayed. |
| Horizontal | Displays the horizontal grid lines only. |
| Vertical | Displays the vertical grid lines only. |
| Default | Displays grid lines based on the theme. |
NOTE
By default, pivot table renders grid lines in Both mode.
<ejs-pivotview id="PivotView" height="300" load="onLoad">
    <e-datasourcesettings dataSource="@ViewBag.DataSource" expandAll="false">
        <e-formatsettings>
            <e-field name="Amount" format="C0" maximumSignificantDigits="10" minimumSignificantDigits="1" useGrouping="true"></e-field>
        </e-formatsettings>
        <e-rows>
            <e-field name="Country"></e-field>
            <e-field name="Products"></e-field>
        </e-rows>
        <e-columns>
            <e-field name="Year" caption="Year"></e-field>
            <e-field name="Quarter"></e-field>
        </e-columns>
        <e-values>
            <e-field name="Sold" caption="Units Sold"></e-field>
            <e-field name="Amount" caption="Sold Amount"></e-field>
        </e-values>
    </e-datasourcesettings>
</ejs-pivotview>

<script>
    var pivotObj;
    function onLoad(args) {
        pivotObj = document.getElementById('PivotView').ej2_instances[0];
        pivotObj.gridSettings.gridLines = "Vertical";
    }
</script>
public ActionResult Index()
{
var data = GetPivotData();
ViewBag.DataSource = data;
return View();
}
Selection
Selection provides an option to highlight a row or a column or a cell. It can be done through simple mouse down or arrow keys. To enable selection in the pivot table, set the allowSelection property in e-gridSettings tag to true.
The pivot table supports two types of selection that can be set using type property in e-selectionSettings tag. The selection types are:
-
Single: It is set by default, and it only allows selection of a single row or a column or a cell. -
Multiple: Allows you to select multiple rows or columns or cells.
To perform multi-selection, press and hold “CTRL” key and click the desired rows or cells. To select range of rows or cells, press and hold the “SHIFT” key and click the rows or columns or cells.
<ejs-pivotview id="PivotView" height="300" load="onLoad">
    <e-datasourcesettings dataSource="@ViewBag.DataSource" expandAll="false">
        <e-formatsettings>
            <e-field name="Amount" format="C0" maximumSignificantDigits="10" minimumSignificantDigits="1" useGrouping="true"></e-field>
        </e-formatsettings>
        <e-rows>
            <e-field name="Country"></e-field>
            <e-field name="Products"></e-field>
        </e-rows>
        <e-columns>
            <e-field name="Year" caption="Year"></e-field>
            <e-field name="Quarter"></e-field>
        </e-columns>
        <e-values>
            <e-field name="Sold" caption="Units Sold"></e-field>
            <e-field name="Amount" caption="Sold Amount"></e-field>
        </e-values>
    </e-datasourcesettings>
    <e-gridSettings allowSelection="true"></e-gridSettings>
</ejs-pivotview>

<script>
    var pivotObj;
    function onLoad(args) {
        pivotObj = document.getElementById('PivotView').ej2_instances[0];
        pivotObj.gridSettings.selectionSettings = {
            type: "Multiple"
        };
    }
</script>
public ActionResult Index()
{
var data = GetPivotData();
ViewBag.DataSource = data;
return View();
}
Selection Mode
The pivot table supports four types of selection mode that can be set using mode property in e-selectionSettings tag.. The selection modes are:
- Row: It is set by default, and allows user to select only rows.
- Column: Allows user to select only columns.
- Cell: Allows user to select only cells.
- Both: Allows user to select rows and columns at the same time.
<ejs-pivotview id="PivotView" height="300">
    <e-datasourcesettings dataSource="@ViewBag.DataSource" expandAll="false">
        <e-formatsettings>
            <e-field name="Amount" format="C0" maximumSignificantDigits="10" minimumSignificantDigits="1" useGrouping="true"></e-field>
        </e-formatsettings>
        <e-rows>
            <e-field name="Country"></e-field>
            <e-field name="Products"></e-field>
        </e-rows>
        <e-columns>
            <e-field name="Year" caption="Year"></e-field>
            <e-field name="Quarter"></e-field>
        </e-columns>
        <e-values>
            <e-field name="Sold" caption="Units Sold"></e-field>
            <e-field name="Amount" caption="Sold Amount"></e-field>
        </e-values>
    </e-datasourcesettings>
    <e-gridSettings allowSelection="true">
        <e-selectionSettings mode="Both"></e-selectionSettings>
    </e-gridSettings>
</ejs-pivotview>
public ActionResult Index()
{
var data = GetPivotData();
ViewBag.DataSource = data;
return View();
}
Cell Selection Mode
The pivot table supports two types of cell selection mode that can be set using cellSelectionMode in e-selectionSettings tag. The cell selection modes are:
- PivotCellSelectionMode.Flow: It is set by default. The range of cells are selected between the start index and end index that includes in-between cells of rows.
- PivotCellSelectionMode.Box: Range of cells are selected from the start and end column indexes that includes in-between cells of rows within the range.
<ejs-pivotview id="PivotView" height="300" load="onLoad">
    <e-datasourcesettings dataSource="@ViewBag.DataSource" expandAll="false">
        <e-formatsettings>
            <e-field name="Amount" format="C0" maximumSignificantDigits="10" minimumSignificantDigits="1" useGrouping="true"></e-field>
        </e-formatsettings>
        <e-rows>
            <e-field name="Country"></e-field>
            <e-field name="Products"></e-field>
        </e-rows>
        <e-columns>
            <e-field name="Year" caption="Year"></e-field>
            <e-field name="Quarter"></e-field>
        </e-columns>
        <e-values>
            <e-field name="Sold" caption="Units Sold"></e-field>
            <e-field name="Amount" caption="Sold Amount"></e-field>
        </e-values>
    </e-datasourcesettings>
    <e-gridSettings allowSelection="true">
           <e-selectionSettings mode="Cell" cellSelectionMode="Box" type="Multiple"></e-selectionSettings>
    </e-gridSettings>
</ejs-pivotview>
public ActionResult Index()
{
var data = GetPivotData();
ViewBag.DataSource = data;
return View();
}NOTE
Cell selection requires
modeproperty inPivotViewSelectionSettingstag to be Cell or Both, andtypeproperty should beMultiple.

Changing background color of the selected cell
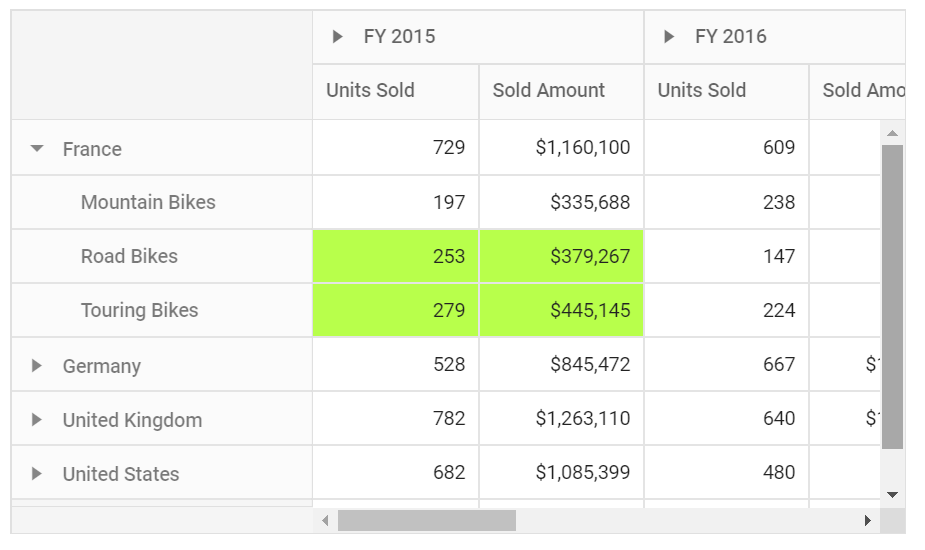
The background-color of the selected cell can be changed using built-in CSS names. To do so, refer to the code sample below, which shows that the selected cells are changed to a green yellow color.
<ejs-pivotview id="PivotView" height="300" load="onLoad">
    <e-datasourcesettings dataSource="@ViewBag.DataSource" expandAll="false">
        <e-formatsettings>
            <e-field name="Amount" format="C0" maximumSignificantDigits="10" minimumSignificantDigits="1" useGrouping="true"></e-field>
        </e-formatsettings>
        <e-rows>
            <e-field name="Country"></e-field>
            <e-field name="Products"></e-field>
        </e-rows>
        <e-columns>
            <e-field name="Year" caption="Year"></e-field>
            <e-field name="Quarter"></e-field>
        </e-columns>
        <e-values>
            <e-field name="Sold" caption="Units Sold"></e-field>
            <e-field name="Amount" caption="Sold Amount"></e-field>
        </e-values>
    </e-datasourcesettings>
    <e-gridSettings allowSelection="true">
           <e-selectionSettings mode="Cell" cellSelectionMode="Box" type="Multiple"></e-selectionSettings>
    </e-gridSettings>
</ejs-pivotview>

<style>

    .e-pivotview .e-cellselectionbackground,
    .e-pivotview .e-selectionbackground,
    .e-pivotview .e-grid .e-rowsheader.e-selectionbackground,
    .e-pivotview .e-grid .e-columnsheader.e-selectionbackground {
        background-color: greenYellow !important;
    }

 </style>
public ActionResult Index()
{
var data = GetPivotData();
ViewBag.DataSource = data;
return View();
}
Event
CellSelected
The event cellSelected is triggered when cell selection gets completed. It provides selected cells information with its corresponding column and row headers. It has following parameters - selectedCellsInfo, currentCell and target. This event allows user to view selected cells information and user can pass those selected cells information to any external component for data binding.
<div>
<div class="column-8">
    <ejs-pivotview id="PivotView" height="300" load="onLoad" cellSelected="onCellSelected")>
    <e-datasourcesettings dataSource="@ViewBag.DataSource" expandAll="false">
        <e-formatsettings>
            <e-field name="Amount" format="C0" maximumSignificantDigits="10" minimumSignificantDigits="1" useGrouping="true"></e-field>
        </e-formatsettings>
        <e-rows>
            <e-field name="Country"></e-field>
            <e-field name="Products"></e-field>
        </e-rows>
        <e-columns>
            <e-field name="Year" caption="Year"></e-field>
            <e-field name="Quarter"></e-field>
        </e-columns>
        <e-values>
            <e-field name="Sold" caption="Units Sold"></e-field>
            <e-field name="Amount" caption="Sold Amount"></e-field>
        </e-values>
    </e-datasourcesettings>
    <e-gridSettings allowSelection="true">
           <e-selectionSettings mode="Cell" cellSelectionMode="Box" type="Multiple"></e-selectionSettings>
    </e-gridSettings>
</ejs-pivotview>
</div>
<div class="column-3">
     <div class="eventarea" style="height: 230px;overflow: auto">
         <span class="EventLog" id="selection-EventLog" style="word-break: normal;"></span>
     </div>
</div>
</div>
<script>
    function onCellSelected(args) {
        document.getElementById('selection-EventLog').innerHTML = '';
        if (args.selectedCellsInfo.length > 0) {
            for (var cnt = 0; cnt < args.selectedCellsInfo.length; cnt++) {
                var cell = args.selectedCellsInfo[cnt];
                var summMeasure = this.engineModule.fieldList[cell.measure] ? this.engineModule.fieldList[cell.measure].aggregateType + ' of ' +
                    this.engineModule.fieldList[cell.measure].caption : '';
                appendElement(
                    (cell.columnHeaders == '' ? '' : 'Column Headers: ' + '<b>' + cell.columnHeaders.split('.').join(' - ') + '</b></br>') +
                    (cell.rowHeaders == '' ? '' : 'Row Headers: ' + '<b>' + cell.rowHeaders.split('.').join(' - ') + '</b></br>') +
                    (summMeasure == '' ? '' : 'Measure: ' + '<b>' + summMeasure + '</b></br>') +
                    'Value: ' + '<b>' + cell.currentCell.formattedText + '</b><hr></br>');
            }
        }
    }
    function appendElement(html) {
        var span = document.createElement('span');
        span.innerHTML = html;
        var log = document.getElementById('selection-EventLog');
        log.appendChild(span);
    }
    var modeddl = new ej.dropdowns.DropDownList({
        floatLabelType: 'Auto',
        width: 150,
        change: function (args) {
            var pivotObj = document.getElementById('pivotview').ej2_instances[0];
            pivotObj.gridSettings.selectionSettings.mode = args.value;
            pivotObj.renderModule.updateGridSettings();
        }
    });
    modeddl.appendTo('#mode');
    var typeddl = new ej.dropdowns.DropDownList({
        floatLabelType: 'Auto',
        width: 150,
        change: function (args) {
            var pivotObj = document.getElementById('pivotview').ej2_instances[0];
            pivotObj.gridSettings.selectionSettings.type = args.value;
            pivotObj.renderModule.updateGridSettings();
        }
    });
    typeddl.appendTo('#type');
</script>
public ActionResult Index()
{
var data = GetPivotData();
ViewBag.DataSource = data;
return View();
}
CellSelecting
The event cellSelecting triggers before cell gets selected gets completed. It provides selected cells information with its corresponding column and row headers. It has following parameters - currentCell, data and cancel.
<ejs-pivotview id="PivotView" height="300" cellSelecting="cellSelecting")>
    <e-datasourcesettings dataSource="@ViewBag.DataSource" expandAll="false">
        <e-formatsettings>
            <e-field name="Amount" format="C0" maximumSignificantDigits="10" minimumSignificantDigits="1" useGrouping="true"></e-field>
        </e-formatsettings>
        <e-rows>
            <e-field name="Country"></e-field>
            <e-field name="Products"></e-field>
        </e-rows>
        <e-columns>
            <e-field name="Year" caption="Year"></e-field>
            <e-field name="Quarter"></e-field>
        </e-columns>
        <e-values>
            <e-field name="Sold" caption="Units Sold"></e-field>
            <e-field name="Amount" caption="Sold Amount"></e-field>
        </e-values>
    </e-datasourcesettings>
    <e-gridSettings allowSelection="true">
           <e-selectionSettings mode="Cell" cellSelectionMode="Box" type="Multiple"></e-selectionSettings>
    </e-gridSettings>
</ejs-pivotview>

<script>
    function cellSelecting(args) {

    }
</script>
public ActionResult Index()
{
var data = GetPivotData();
ViewBag.DataSource = data;
return View();
}Clip Mode
The clip mode provides options to display its overflow cell content in the pivot table. It can be configured using the clipMode property in PivotViewGridSettings tag. The pivot table supports three types of clip modes which are:
-
Clip: Truncates the cell content when it overflows its area. -
Ellipsis: Displays ellipsis when the cell content overflows its area. -
EllipsisWithTooltip: Displays ellipsis when the cell content overflows its area, also it will display the tooltip while hover on ellipsis is applied.
NOTE
By default,
ClipModevalue is set toEllipsis.
<ejs-pivotview id="PivotView" height="300" load="onLoad">
    <e-datasourcesettings dataSource="@ViewBag.DataSource" expandAll="false">
        <e-formatsettings>
            <e-field name="Amount" format="C0" maximumSignificantDigits="10" minimumSignificantDigits="1" useGrouping="true"></e-field>
        </e-formatsettings>
        <e-rows>
            <e-field name="Country"></e-field>
            <e-field name="Products"></e-field>
        </e-rows>
        <e-columns>
            <e-field name="Year" caption="Year"></e-field>
            <e-field name="Quarter"></e-field>
        </e-columns>
        <e-values>
            <e-field name="Sold" caption="Units Sold"></e-field>
            <e-field name="Amount" caption="Sold Amount"></e-field>
        </e-values>
    </e-datasourcesettings>
    <e-gridSettings clipMode="Clip"></e-gridSettings>
</ejs-pivotview>
public ActionResult Index()
{
var data = GetPivotData();
ViewBag.DataSource = data;
return View();
}
Cell Template
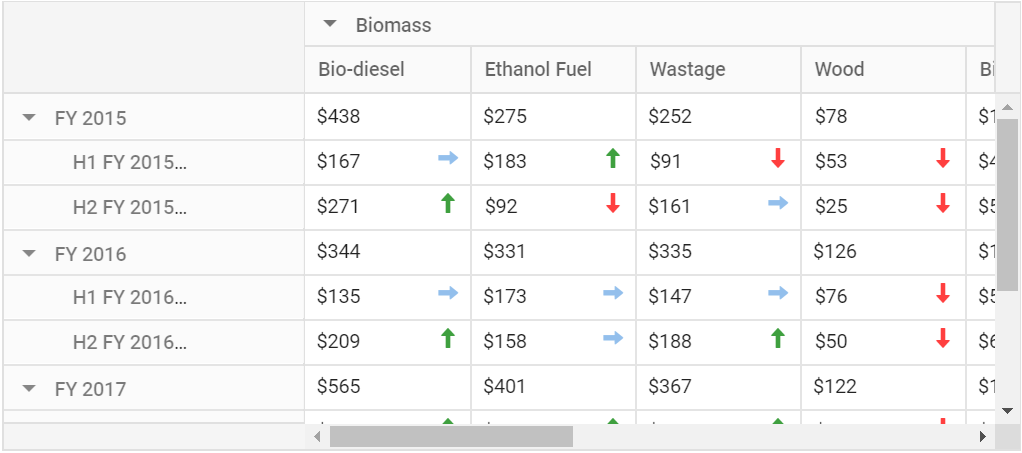
User can customize the pivot table cell element by using the cellTemplate property in ejs-pivotview tag. The cellTemplate property accepts either an HTML string or the element’s ID, which can be used to append additional HTML elements to showcase each cell with custom format.
In this demo, the revenue cost for each year is represented with trend icons.
<ejs-pivotview id="pivotview" width="100%" height="300" dataBound="trend" cellTemplate="${getCellContent(data)}">
    <e-datasourcesettings dataSource="@ViewBag.DataSource" expandAll="true" enableSorting="true">
        <e-formatsettings>
            <e-field name="ProCost" format="C0"></e-field>
        </e-formatsettings>
        <e-drilledmembers>
            <e-field name="Year" items="@ViewBag.drilledMembers"></e-field>
        </e-drilledmembers>
        <e-rows>
            <e-field name="Year" caption="Year"></e-field>
            <e-field name="HalfYear" caption="Half Year"></e-field>
        </e-rows>
        <e-columns>
            <e-field name="EnerType" caption="Energy Type"></e-field>
            <e-field name="EneSource" caption="Energy Source"></e-field>
        </e-columns>
        <e-values>
            <e-field name="ProCost" caption="Revenue Growth"></e-field>
        </e-values>
    </e-datasourcesettings>
    <e-gridSettings columnWidth="140"></e-gridSettings>
</ejs-pivotview>

<script>
        window.getCellContent = function (e) {
            var template;
            if (e && e.targetCell.className.indexOf('e-valuescontent') > -1) {
                template = '<span class="tempwrap sb-icon-neutral pv-icons"></span>';
            } else {
                template = '';
            }
            return template;
        };

        /* jshint ignore:start */
        function trend() {
            var pivotObj = document.getElementById('pivotview').ej2_instances[0];
            var cTable = document.getElementsByClassName("e-table");
            var colLen = pivotObj.pivotValues[3].length;
            var cLen = cTable[3].children[0].children.length;
            var rLen = cTable[3].children[1].children.length;

            for (let k = 0; k < rLen; k++) {
                if (pivotObj.pivotValues[k] && pivotObj.pivotValues[k][0] !== undefined) {
                    rowIndx = (pivotObj.pivotValues[k][0]).rowIndex;
                    break;
                }
            }
            var rowHeaders = [].slice.call(cTable[2].children[1].querySelectorAll('td'));
            var rows = pivotObj.dataSourceSettings.rows;
            if (rowHeaders.length > 1) {
                for (var i = 0, Cnt = rows; i < Cnt.length; i++) {
                    var fields = {};
                    var fieldHeaders = [];
                    for (var j = 0, Lnt = rowHeaders; j < Lnt.length; j++) {
                        var header = rowHeaders[j];
                        if (header.className.indexOf('e-gtot') === -1 && header.className.indexOf('e-rowsheader') > -1 && header.getAttribute('fieldname') === rows[i].name) {
                            var headerName = rowHeaders[j].getAttribute('fieldname') + '_' + rowHeaders[j].textContent;
                            fields[rowHeaders[j].textContent] = j;
                            fieldHeaders.push(rowHeaders[j].textContent);
                        }
                    }
                    if (i === 0) {
                        for (var rnt = 0, Lnt = fieldHeaders; rnt < Lnt.length; rnt++) {
                            if (rnt !== 0) {
                                var row = fields[fieldHeaders[rnt]];
                                var prevRow = fields[fieldHeaders[rnt - 1]];
                                for (var j = 0, ci = 1; j < cLen && ci < colLen; j++ , ci++) {
                                    if (!cTable[3].children[1].children[row]) {
                                        break;
                                    }
                                    var node = cTable[3].children[1].children[row].childNodes[j];
                                    var prevNode = cTable[3].children[1].children[prevRow].childNodes[j];
                                    var ri = undefined;
                                    var prevRi = undefined;
                                    if (node) {
                                        ri = node.getAttribute('index');
                                    }
                                    if (prevNode) {
                                        prevRi = prevNode.getAttribute('index');
                                    }
                                    if (ri && ri < pivotObj.pivotValues.length) {
                                        if ((pivotObj.pivotValues[prevRi][ci]).value > (pivotObj.pivotValues[ri][ci]).value && node.querySelector('.tempwrap')) {
                                            var trendElement = node.querySelector('.tempwrap');
                                            trendElement.className = trendElement.className.replace('sb-icon-neutral', 'sb-icon-loss');
                                        } else if ((pivotObj.pivotValues[prevRi][ci]).value < (pivotObj.pivotValues[ri][ci]).value && node.querySelector('.tempwrap')) {
                                            var trendElement = node.querySelector('.tempwrap');
                                            trendElement.className = trendElement.className.replace('sb-icon-neutral', 'sb-icon-profit');
                                        }
                                    }
                                }
                            }
                        }
                    } else {
                        for (var rnt = 0, Lnt = fieldHeaders; rnt < Lnt.length; rnt++) {
                            var row = fields[fieldHeaders[rnt]];
                            for (var j = 0, ci = 1; j < cLen && ci < colLen; j++ , ci++) {
                                if (!cTable[3].children[1].children[row]) {
                                    break;
                                }
                                var node = cTable[3].children[1].children[row].childNodes[j];
                                var prevNode = cTable[3].children[1].children[row - 1].childNodes[j];
                                var ri = undefined;
                                var prevRi = undefined;
                                if (node) {
                                    ri = node.getAttribute('index');
                                }
                                if (prevNode) {
                                    prevRi = prevNode.getAttribute('index');
                                }
                                if (ri && ri < pivotObj.pivotValues.length) {
                                    var cRowFieldName = cTable[2].children[1].children[row].childNodes[0].getAttribute('fieldname');
                                    var prevRowFieldName = cTable[2].children[1].children[row - 1].childNodes[0].getAttribute('fieldname');
                                    if ((pivotObj.pivotValues[prevRi][ci]).value > (pivotObj.pivotValues[ri][ci]).value && node.querySelector('.tempwrap') &&
                                        cRowFieldName === prevRowFieldName) {
                                        var trendElement = node.querySelector('.tempwrap');
                                        trendElement.className = trendElement.className.replace('sb-icon-neutral', 'sb-icon-loss');
                                    } else if ((pivotObj.pivotValues[prevRi][ci]).value < (pivotObj.pivotValues[ri][ci]).value && node.querySelector('.tempwrap') &&
                                        cRowFieldName === prevRowFieldName) {
                                        var trendElement = node.querySelector('.tempwrap');
                                        trendElement.className = trendElement.className.replace('sb-icon-neutral', 'sb-icon-profit');
                                    }
                                }
                            }
                        }
                    }
                }
            }
        }
        /* jshint ignore:end */
    </script>
public ActionResult Index()
{
var data = GetPivotData();
ViewBag.DataSource = data;
ViewBag.drilledMembers = new string[] { "FY 2015", "FY 2016" };
return View();
}
public class PivotData
{
public string Year { get; set; }
public string HalfYear { get; set; }
public string EnerType { get; set; } // "Biomass"
public string EneSource { get; set; } // "Bio-diesel", "Ethanol Fuel", etc.
public decimal ProCost { get; set; }
private static List<PivotData> pivotDataList = new List<PivotData>();
public static List<PivotData> GetPivotData()
{
List<PivotData> pivotData = new List<PivotData>();
pivotData.Add(new PivotData { Year = "FY 2015", HalfYear = "H1 FY 2015", EnerType = "Biomass", EneSource = "Bio-diesel", ProCost = 438 });
pivotData.Add(new PivotData { Year = "FY 2015", HalfYear = "H1 FY 2015", EnerType = "Biomass", EneSource = "Ethanol Fuel", ProCost = 275 });
pivotData.Add(new PivotData { Year = "FY 2015", HalfYear = "H1 FY 2015", EnerType = "Biomass", EneSource = "Wastage", ProCost = 252 });
pivotData.Add(new PivotData { Year = "FY 2015", HalfYear = "H1 FY 2015", EnerType = "Biomass", EneSource = "Wood", ProCost = 78 });
pivotData.Add(new PivotData { Year = "FY 2015", HalfYear = "H1 FY 2015", EnerType = "Biomass", EneSource = "Bio-diesel", ProCost = 167 });
pivotData.Add(new PivotData { Year = "FY 2015", HalfYear = "H1 FY 2015", EnerType = "Biomass", EneSource = "Ethanol Fuel", ProCost = 183 });
pivotData.Add(new PivotData { Year = "FY 2015", HalfYear = "H1 FY 2015", EnerType = "Biomass", EneSource = "Ethanol Fuel", ProCost = 183 });
pivotData.Add(new PivotData { Year = "FY 2015", HalfYear = "H1 FY 2015", EnerType = "Biomass", EneSource = "Wastage", ProCost = 91 });
pivotData.Add(new PivotData { Year = "FY 2015", HalfYear = "H1 FY 2015", EnerType = "Biomass", EneSource = "Wood", ProCost = 53 });
pivotData.Add(new PivotData { Year = "FY 2015", HalfYear = "H2 FY 2015", EnerType = "Biomass", EneSource = "Bio-diesel", ProCost = 271 });
pivotData.Add(new PivotData { Year = "FY 2015", HalfYear = "H2 FY 2015", EnerType = "Biomass", EneSource = "Ethanol Fuel", ProCost = 92 });
pivotData.Add(new PivotData { Year = "FY 2015", HalfYear = "H2 FY 2015", EnerType = "Biomass", EneSource = "Wastage", ProCost = 161 });
pivotData.Add(new PivotData { Year = "FY 2015", HalfYear = "H2 FY 2015", EnerType = "Biomass", EneSource = "Wood", ProCost = 25 });
pivotData.Add(new PivotData { Year = "FY 2016", HalfYear = "H1 FY 2016", EnerType = "Biomass", EneSource = "Bio-diesel", ProCost = 344 });
pivotData.Add(new PivotData { Year = "FY 2016", HalfYear = "H1 FY 2016", EnerType = "Biomass", EneSource = "Ethanol Fuel", ProCost = 331 });
pivotData.Add(new PivotData { Year = "FY 2016", HalfYear = "H1 FY 2016", EnerType = "Biomass", EneSource = "Wastage", ProCost = 335 });
pivotData.Add(new PivotData { Year = "FY 2016", HalfYear = "H1 FY 2016", EnerType = "Biomass", EneSource = "Wood", ProCost = 126 });
pivotData.Add(new PivotData { Year = "FY 2016", HalfYear = "H1 FY 2016", EnerType = "Biomass", EneSource = "Bio-diesel", ProCost = 135 });
pivotData.Add(new PivotData { Year = "FY 2016", HalfYear = "H1 FY 2016", EnerType = "Biomass", EneSource = "Ethanol Fuel", ProCost = 153 });
pivotData.Add(new PivotData { Year = "FY 2016", HalfYear = "H1 FY 2016", EnerType = "Biomass", EneSource = "Wastage", ProCost = 147 });
pivotData.Add(new PivotData { Year = "FY 2016", HalfYear = "H1 FY 2016", EnerType = "Biomass", EneSource = "Wood", ProCost = 76 });
pivotData.Add(new PivotData { Year = "FY 2016", HalfYear = "H2 FY 2016", EnerType = "Biomass", EneSource = "Bio-diesel", ProCost = 209 });
pivotData.Add(new PivotData { Year = "FY 2016", HalfYear = "H2 FY 2016", EnerType = "Biomass", EneSource = "Ethanol Fuel", ProCost = 158 });
pivotData.Add(new PivotData { Year = "FY 2016", HalfYear = "H2 FY 2016", EnerType = "Biomass", EneSource = "Wastage", ProCost = 188 });
pivotData.Add(new PivotData { Year = "FY 2016", HalfYear = "H2 FY 2016", EnerType = "Biomass", EneSource = "Wood", ProCost = 50 });
pivotData.Add(new PivotData { Year = "FY 2017", HalfYear = "H1 FY 2017", EnerType = "Biomass", EneSource = "Bio-diesel", ProCost = 565 });
pivotData.Add(new PivotData { Year = "FY 2017", HalfYear = "H1 FY 2017", EnerType = "Biomass", EneSource = "Ethanol Fuel", ProCost = 401 });
pivotData.Add(new PivotData { Year = "FY 2017", HalfYear = "H2 FY 2017", EnerType = "Biomass", EneSource = "Wastage", ProCost = 367 });
pivotData.Add(new PivotData { Year = "FY 2017", HalfYear = "H2 FY 2017", EnerType = "Biomass", EneSource = "Wood", ProCost = 122 });
pivotData.Add(new PivotData { Year = "FY 2016", HalfYear = "H1 FY 2016", EnerType = "Free energy", EneSource = "Geo-thermal", ProCost = 230 });
pivotData.Add(new PivotData { Year = "FY 2016", HalfYear = "H1 FY 2016", EnerType = "Free energy", EneSource = "Hydro-electric", ProCost = 200 });
pivotData.Add(new PivotData { Year = "FY 2016", HalfYear = "H1 FY 2016", EnerType = "Free energy", EneSource = "Solar", ProCost = 170 });
pivotData.Add(new PivotData { Year = "FY 2016", HalfYear = "H1 FY 2016", EnerType = "Free energy", EneSource = "Wind", ProCost = 150 });
pivotData.Add(new PivotData { Year = "FY 2016", HalfYear = "H2 FY 2016", EnerType = "Free energy", EneSource = "Geo-thermal", ProCost = 240 });
pivotData.Add(new PivotData { Year = "FY 2016", HalfYear = "H2 FY 2016", EnerType = "Free energy", EneSource = "Hydro-electric", ProCost = 210 });
pivotData.Add(new PivotData { Year = "FY 2016", HalfYear = "H2 FY 2016", EnerType = "Free energy", EneSource = "Solar", ProCost = 180 });
pivotData.Add(new PivotData { Year = "FY 2016", HalfYear = "H2 FY 2016", EnerType = "Free energy", EneSource = "Wind", ProCost = 160 });
pivotData.Add(new PivotData { Year = "FY 2017", HalfYear = "H1 FY 2017", EnerType = "Free energy", EneSource = "Geo-thermal", ProCost = 260 });
pivotData.Add(new PivotData { Year = "FY 2017", HalfYear = "H1 FY 2017", EnerType = "Free energy", EneSource = "Hydro-electric", ProCost = 220 });
pivotData.Add(new PivotData { Year = "FY 2017", HalfYear = "H1 FY 2017", EnerType = "Free energy", EneSource = "Solar", ProCost = 190 });
pivotData.Add(new PivotData { Year = "FY 2017", HalfYear = "H1 FY 2017", EnerType = "Free energy", EneSource = "Wind", ProCost = 170 });
pivotData.Add(new PivotData { Year = "FY 2017", HalfYear = "H2 FY 2017", EnerType = "Free energy", EneSource = "Geo-thermal", ProCost = 270 });
pivotData.Add(new PivotData { Year = "FY 2017", HalfYear = "H2 FY 2017", EnerType = "Free energy", EneSource = "Hydro-electric", ProCost = 230 });
pivotData.Add(new PivotData { Year = "FY 2017", HalfYear = "H2 FY 2017", EnerType = "Free energy", EneSource = "Solar", ProCost = 200 });
pivotData.Add(new PivotData { Year = "FY 2017", HalfYear = "H2 FY 2017", EnerType = "Free energy", EneSource = "Wind", ProCost = 180 });
return pivotData;
}
}
Events
QueryCellInfo
The event queryCellInfo triggers while rendering each row and value cells in the pivot table. It allows the user to customize the current cell like adding or removing styles, editing value, etc. It has the following parameters:
-
cell- It holds the current cell information. -
data- It holds the entire row data besides the current cell. -
column- It holds the entire column data besides the current cell. -
pivotview- It holds pivot table instance.
<ejs-pivotview id="PivotView" height="300">
    <e-datasourcesettings dataSource="@ViewBag.DataSource" expandAll="false">
        <e-formatsettings>
            <e-field name="Amount" format="C0" maximumSignificantDigits="10" minimumSignificantDigits="1" useGrouping="true"></e-field>
        </e-formatsettings>
        <e-rows>
            <e-field name="Country"></e-field>
            <e-field name="Products"></e-field>
        </e-rows>
        <e-columns>
            <e-field name="Year" caption="Year"></e-field>
            <e-field name="Quarter"></e-field>
        </e-columns>
        <e-values>
            <e-field name="Sold" caption="Units Sold"></e-field>
            <e-field name="Amount" caption="Sold Amount"></e-field>
        </e-values>
    </e-datasourcesettings>
    <e-gridSettings columnWidth=120 queryCellInfo="queryCell"></e-gridSettings>
</ejs-pivotview>
<script>
    function queryCell(args) {

    }
</script>
public ActionResult Index()
{
var data = GetPivotData();
ViewBag.DataSource = data;
return View();
}HeaderCellInfo
The event headerCellInfo triggers while rendering each column header cell in the pivot table. It allows the user to customize the element of the current header cell like adding or removing styles, editing value, etc. It has the following parameters:
-
node- It holds the current header cell information.
<ejs-pivotview id="PivotView" height="300">
    <e-datasourcesettings dataSource="@ViewBag.DataSource" expandAll="false">
        <e-formatsettings>
            <e-field name="Amount" format="C0" maximumSignificantDigits="10" minimumSignificantDigits="1" useGrouping="true"></e-field>
        </e-formatsettings>
        <e-rows>
            <e-field name="Country"></e-field>
            <e-field name="Products"></e-field>
        </e-rows>
        <e-columns>
            <e-field name="Year" caption="Year"></e-field>
            <e-field name="Quarter"></e-field>
        </e-columns>
        <e-values>
            <e-field name="Sold" caption="Units Sold"></e-field>
            <e-field name="Amount" caption="Sold Amount"></e-field>
        </e-values>
    </e-datasourcesettings>
    <e-gridSettings columnWidth=120 headerCellInfo="headerCellInfo"></e-gridSettings>
</ejs-pivotview>
<script>
    function headerCellInfo(args) {

    }
</script>
public ActionResult Index()
{
var data = GetPivotData();
ViewBag.DataSource = data;
return View();
}ColumnRender
The event columnRender triggers while framing each columns for rendering in the pivot table. It allows the user to customize the text alignment, column visibility, autofit, re-ordering, minimum and maximum width for a specific column. It has the following parameters:
-
columns- It holds the leaf level columns (i.e., value headers) information. -
dataSourceSettings- It holds the current data source settings such as input data source, rows, columns, values, filters, format settings and so on. -
name- It holds the name of the event. -
stackedColumns- It holds the drilled columns (i.e., including column and value headers) information.
<ejs-pivotview id="PivotView" height="300" showFieldList="true" width="650">
    <e-datasourcesettings dataSource="@ViewBag.DataSource" expandAll="false">
        <e-formatsettings>
            <e-field name="Amount" format="C0" maximumSignificantDigits="10" minimumSignificantDigits="1" useGrouping="true"></e-field>
        </e-formatsettings>
        <e-rows>
            <e-field name="Country"></e-field>
            <e-field name="Products"></e-field>
        </e-rows>
        <e-columns>
            <e-field name="Year" caption="Year"></e-field>
            <e-field name="Quarter"></e-field>
        </e-columns>
        <e-values>
            <e-field name="Sold" caption="Units Sold"></e-field>
            <e-field name="Amount" caption="Sold Amount"></e-field>
        </e-values>
    </e-datasourcesettings>
    <e-gridSettings columnRender="columnRender"></e-gridSettings>
</ejs-pivotview>

<script>
    function columnRender(args) {
        for (var i = 0; i < args.columns.length; i++) {
            args.columns[i].autoFit = true;
            args.columns[i].textAlign="Right";
        }
    }
</script>
public ActionResult Index()
{
var data = GetPivotData();
ViewBag.DataSource = data;
return View();
}CellClick
The event cellClick triggers while clicking a cell in the pivot table. For instance, using this event end-user can either add or remove styles, edit value and also perform any other DOM manipulations. It has the following parameters:
-
currentCell- It holds the current cell information. -
data- It holds the clicked cell’s data like axis, formatted text, actual text, row header, column header and value informations.
<ejs-pivotview id="PivotView" height="300" showGroupingBar="true" cellClick="cellClick">
    <e-datasourcesettings dataSource="@ViewBag.DataSource">
        <e-rows>
            <e-field name="Country"></e-field>
            <e-field name="Products"></e-field>
        </e-rows>
        <e-columns>
            <e-field name="Year" caption="Year"></e-field>
            <e-field name="Quarter"></e-field>
        </e-columns>
        <e-values>
            <e-field name="Sold" caption="Units Sold"></e-field>
            <e-field name="Amount" caption="Sold Amount"></e-field>
        </e-values>
    </e-datasourcesettings>
</ejs-pivotview>

 <script>
    function cellClick(args){
        args.currentCell.setAttribute("style", "background-color: red;");
    }
 <script>
public ActionResult Index()
{
var data = GetPivotData();
ViewBag.DataSource = data;
return View();
}