Grouping in ASP.NET CORE Pivot Table Control
24 Apr 202621 minutes to read
This feature is applicable only for the relational data source.
Grouping is one of the most useful features in the Pivot Table component, automatically organizing date, time, number, and string data types into meaningful categories. For example, date fields can be formatted and displayed based on year, quarter, month, and other time periods. Similarly, number fields can be grouped into ranges, such as 1-5, 6-10, and so on. These grouped fields function as individual fields, allowing users to drag them between different axes including columns, rows, values, and filters to create dynamic Pivot Tables at runtime.
The grouping feature can be enabled by setting the allowGrouping property to true in the Pivot Table component.
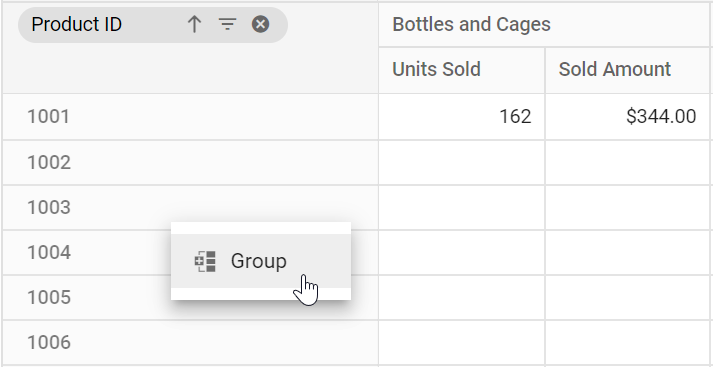
To perform grouping actions through the user interface, right-click on the Pivot Table’s row or column header and select Group. A dialog will appear where you can configure the appropriate options to group the data. To ungroup data, right-click on the Pivot Table’s row or column header and select Ungroup.
To use the grouping feature, you need to inject the Grouping module in the Pivot Table component. The component supports three different types of grouping:
- Number Grouping
- Date Grouping
- Custom Grouping
Similar to Excel, only one type of grouping can be applied to a field at a time.
<ejs-pivotview id="PivotView" width="100%" height="350" showGroupingBar="true" allowGrouping="true">
    <e-datasourcesettings dataSource="@ViewBag.DataSource" expandAll="false" enableSorting="true">
        <e-formatsettings>
            <e-field name="Amount" format="C"></e-field>
            <e-field name="Product_ID" format="N0"></e-field>
            <e-field name="Date" type="date" format="dd/MM/yyyy-hh:mm a"></e-field>
        </e-formatsettings>
        <e-rows>
            <e-field name="Date"></e-field>
        </e-rows>
        <e-columns>
            <e-field name="Product_ID" caption="Product ID"></e-field>
        </e-columns>
        <e-values>
            <e-field name="Sold" caption="Unit Sold"></e-field>
            <e-field name="Amount" caption="Sold Amount"></e-field>
        </e-values>
    </e-datasourcesettings>
</ejs-pivotview>
public ActionResult Index()
{
var data = GetGroupData();
ViewBag.DataSource = data;
return View();
}Number Grouping
Number grouping allows users to organize numerical data into different ranges, such as 1–5, 6–10, and so on. This can be configured via the UI by right-clicking a number-based header in the Pivot Table and selecting the Group option from the context menu.
<ejs-pivotview id="PivotView" width="100%" height="350" showGroupingBar="true" allowGrouping="true">
    <e-datasourcesettings dataSource="@ViewBag.DataSource" expandAll="false" enableSorting="true">
        <e-formatsettings>
            <e-field name="Amount" format="C"></e-field>
            <e-field name="Product_ID" format="N0"></e-field>
        </e-formatsettings>
        <e-rows>
            <e-field name="Product_ID" caption="Product ID"></e-field>
        </e-rows>
        <e-columns>
            <e-field name="Products"></e-field>
        </e-columns>
        <e-values>
            <e-field name="Sold" caption="Unit Sold"></e-field>
            <e-field name="Amount" caption="Sold Amount"></e-field>
        </e-values>
    </e-datasourcesettings>
</ejs-pivotview>
public ActionResult Index()
{
var data = GetGroupData();
ViewBag.DataSource = data;
return View();
}
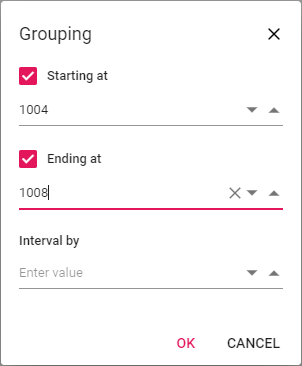
Range selection
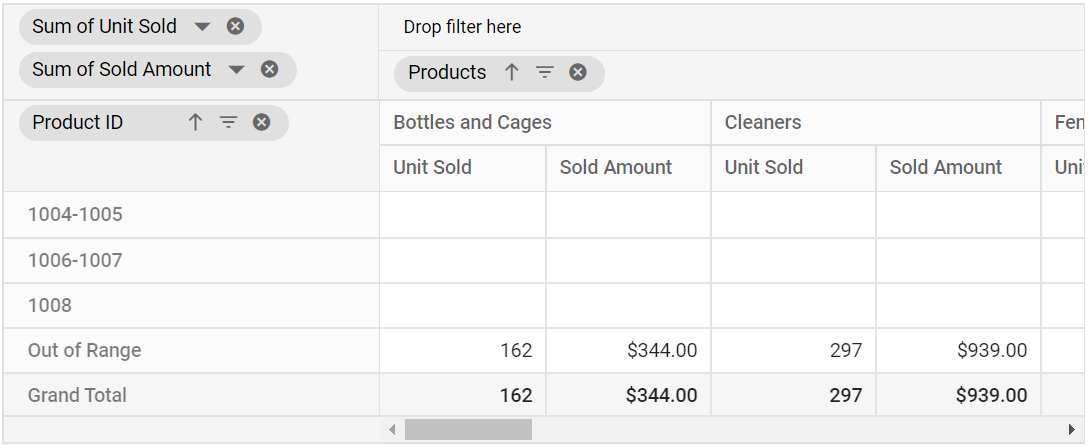
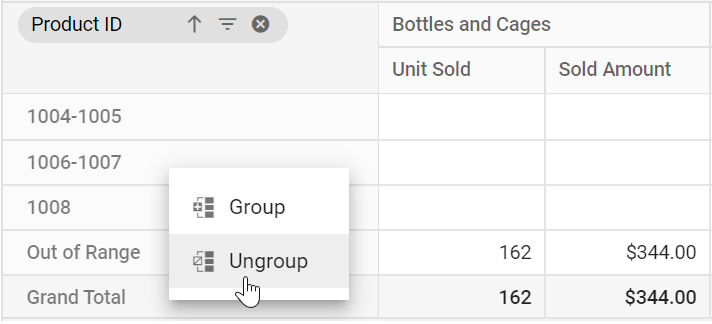
The “Starting at” and “Ending at” options are used to set the number range depending on which the headers will be grouped. For example, if the “Product_ID” field holds the number from “1001” to “1010” and the user chooses to group the number range by setting “1004” to “Starting at” and “1008” to “Ending at” options on their own. Then the specified number range will be used for number grouping and the rest will be grouped as “Out of Range”.
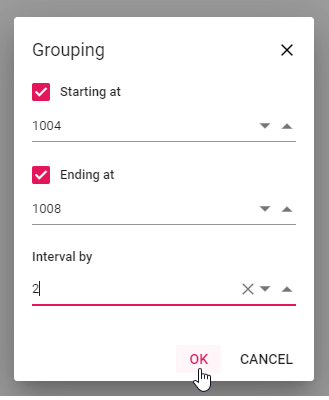
Range interval
The “Interval by” option is used to separate the selected number data type field into range-wise such as 1-5, 6-10, etc. For example, if the user wants to display the “Product_ID” data field with a group interval of “2” by setting the “Interval by” option on their own. The “Product_ID” field will then be grouped by the specified range of intervals, such as “1004-1005”, “1006-1007”, etc.
Configuring Number Grouping Programmatically
You can configure number grouping through code-behind using the e-groupsettings property. This allows you to define how numbers are grouped without relying on the UI. Below are the key settings you need:
-
name: Allows user to set the field name. -
rangeInterval: Allows user to set the interval between two numbers. -
startingAt: Allows user to set the starting number. -
endingAt: Allows user to set the ending number. -
type: Allows user to set the group type. For number grouping, Number is set.
If starting and ending numbers specified in
startingAtandendingAtproperties are in-between the number range, then rest of the numbers will be grouped and placed in “Out of Range” section introduced specific to this feature.
<ejs-pivotview id="PivotView" width="100%" height="350" showGroupingBar="true" allowGrouping="true">
    <e-datasourcesettings dataSource="@ViewBag.DataSource" expandAll="false" enableSorting="true">
        <e-formatsettings>
            <e-field name="Amount" format="C"></e-field>
            <e-field name="Product_ID" format="N0"></e-field>
        </e-formatsettings>
        <e-rows>
            <e-field name="Product_ID" caption="Product ID"></e-field>
        </e-rows>
        <e-columns>
            <e-field name="Products"></e-field>
        </e-columns>
        <e-values>
            <e-field name="Sold" caption="Unit Sold"></e-field>
            <e-field name="Amount" caption="Sold Amount"></e-field>
        </e-values>
        <e-groupsettings>
            <e-field name="Product_ID" type="Number" rangeInterval=2 startingAt=1004, endingAt=1008></e-field>
        </e-groupsettings>
    </e-datasourcesettings>
</ejs-pivotview>
public ActionResult Index()
{
var data = GetGroupData();
ViewBag.DataSource = data;
return View();
}
Ungrouping the existing number groups
To remove an applied number grouping, simply right-click on the grouped header in the Pivot Table and select Ungroup option from the context menu. This action will break apart the grouped ranges and display the original, ungrouped values in the table.
Date Grouping
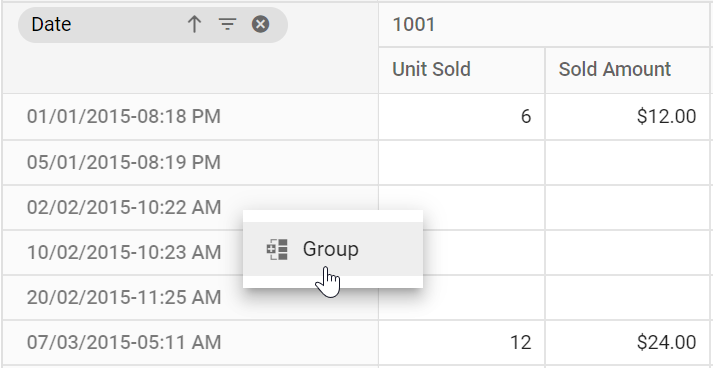
Date grouping organizes date and time data into hierarchical segments, such as years, quarters, months, days, hours, minutes, or seconds. Users can configure date grouping through the UI by right-clicking a date or time-based header in the Pivot Table and selecting Group option from the context menu. A dialog will appear, allowing users to choose the desired grouping intervals.
<ejs-pivotview id="PivotView" width="100%" height="350" showGroupingBar="true" allowGrouping="true">
    <e-datasourcesettings dataSource="@ViewBag.DataSource" expandAll="false" enableSorting="true">
        <e-formatsettings>
            <e-field name="Amount" format="C"></e-field>
            <e-field name="Date" type="date" format="dd/MM/yyyy-hh:mm a"></e-field>
        </e-formatsettings>
        <e-rows>
            <e-field name="Date"></e-field>
        </e-rows>
        <e-columns>
            <e-field name="Product_Categories" caption="Product Categories"></e-field>
        </e-columns>
        <e-values>
            <e-field name="Sold" caption="Unit Sold"></e-field>
            <e-field name="Amount" caption="Sold Amount"></e-field>
        </e-values>
    </e-datasourcesettings>
</ejs-pivotview>
public ActionResult Index()
{
var data = GetGroupData();
ViewBag.DataSource = data;
return View();
}
Range Selection
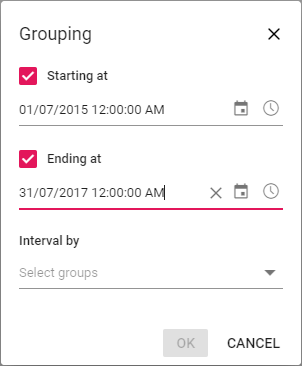
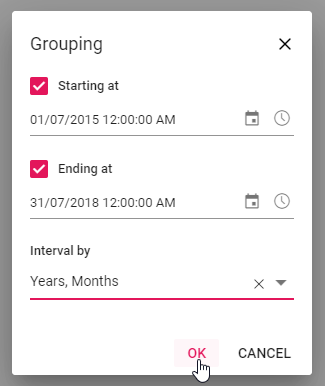
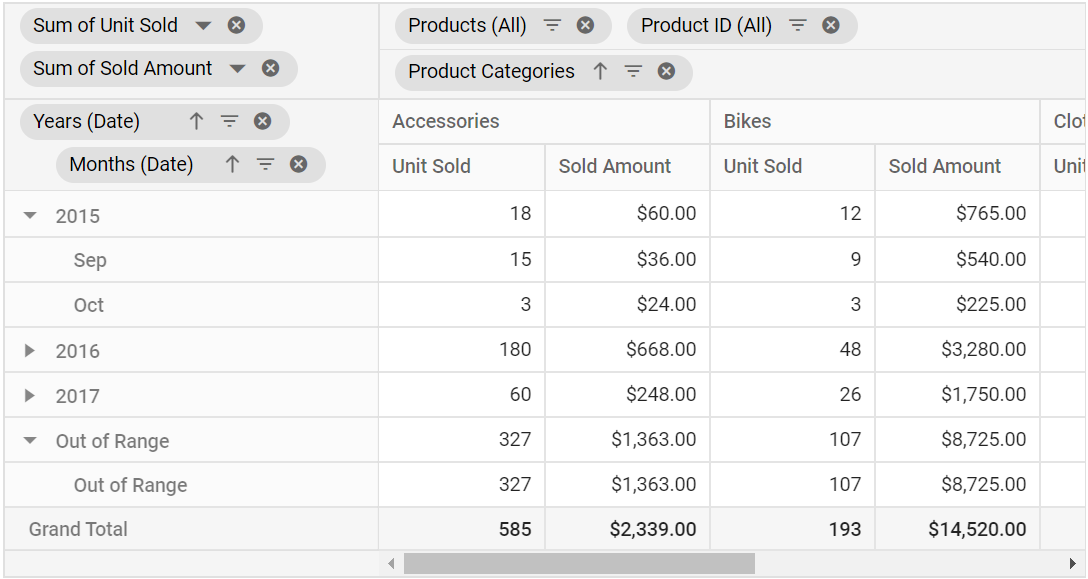
The Starting at and Ending at options allow users to define the date range for grouping headers. For example, if the “Date” field contains data from “01/01/2015” to “02/12/2018” and the user sets Starting at to “01/07/2015” and Ending at to “31/07/2017”, only records within this range will be grouped according to the selected settings. Dates outside this range are labeled as Out of Range.
Group Interval
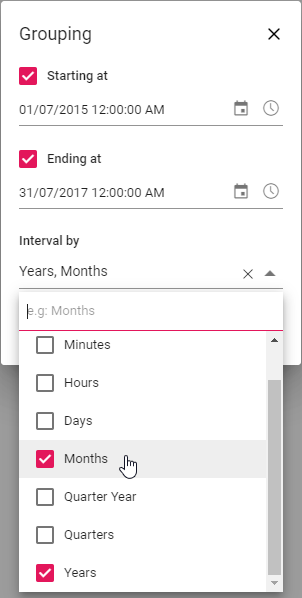
The Interval by option allows users to split date fields into years, quarters, months, days, hours, minutes, or seconds. For example, selecting Years and Months as intervals for the “Date” field results in two new fields: Years (Date), containing the year values, and Months (Date), containing the month values. These grouped fields can be used for report manipulations in the Pivot Table at runtime.
If no options are selected in the Interval by section, the OK button in the dialog remains disabled. At least one interval must be chosen to enable date grouping.
Configuring Date Grouping Programmatically
You can configure date grouping programmatically using the e-groupsettings property. This allows you to define how dates are grouped without using the UI. The key settings are:
-
name: Allows user to set the field name. -
type: Allows user to set the group type. For date grouping, Date is set. -
startingAt: Allows user to set starting date. -
endingAt: Allows user to set ending date. -
groupInterval: Allows user to set interval in year, quarter, month, day, hour, minute, or second pattern.
For example, if your date format is “YYYY-DD-MM HH:MM:SS” and you want to group only by year and month, set the
groupIntervalproperty with just Years and Months. You can also rearrange the order of the intervals (Year, Quarter, Month, Day, etc.) as needed—this order will reflect in the Pivot Table display.
<ejs-pivotview id="PivotView" width="100%" height="350" showGroupingBar="true" allowGrouping="true">
    <e-datasourcesettings dataSource="@ViewBag.DataSource" expandAll="false" enableSorting="true">
        <e-formatsettings>
            <e-field name="Amount" format="C"></e-field>
            <e-field name="Date" type="date" format="dd/MM/yyyy-hh:mm a"></e-field>
        </e-formatsettings>
        <e-rows>
            <e-field name="Date"></e-field>
        </e-rows>
        <e-columns>
            <e-field name="Product_Categories" caption="Product Categories"></e-field>
        </e-columns>
        <e-values>
            <e-field name="Sold" caption="Unit Sold"></e-field>
            <e-field name="Amount" caption="Sold Amount"></e-field>
        </e-values>
        <e-groupsettings>
            <e-field name="Date" type="Date" groupInterval="@(new string[]{ "Years", "Months"})" startingAt="2015-07-01" endingAt="2017-07-31"></e-field>
        </e-groupsettings>
    </e-datasourcesettings>
</ejs-pivotview>
public ActionResult Index()
{
var data = GetGroupData();
ViewBag.DataSource = data;
return View();
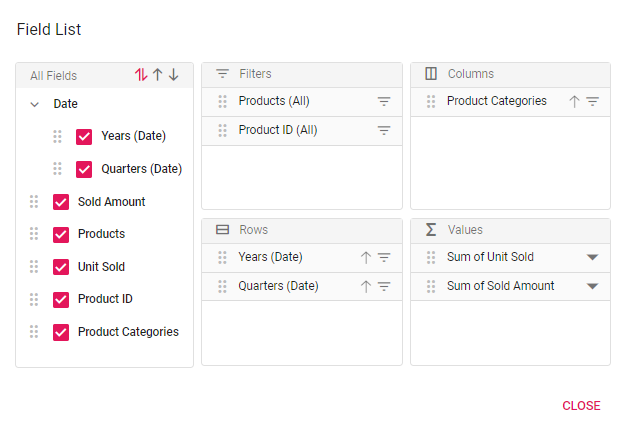
}Furthermore, in the field list UI, these date group fields Years (Date), Quarters (Date), Months (Date), etc… will be automatically grouped and displayed under the Date folder name.
Ungrouping the existing date groups
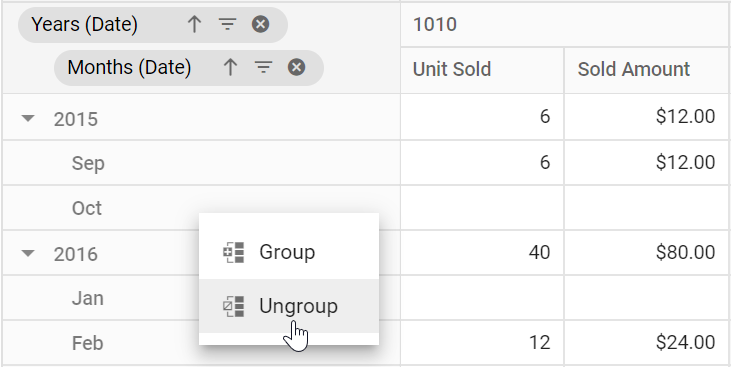
To remove a previously applied date grouping, simply right-click the relevant date-based header within the Pivot Table and select the Ungroup option from the context menu. This action will revert the grouped dates back to their original, ungrouped state, allowing you to view and analyze the raw date values in the Pivot Table component.
Custom Grouping
Custom grouping is an option that enables users to group data types (date, time, number, or string) into custom fields based on specific requirements. This functionality can be accessed through the user interface by right-clicking a header in the Pivot Table.
<ejs-pivotview id="PivotView" width="100%" height="350" showGroupingBar="true" allowGrouping="true">
    <e-datasourcesettings dataSource="@ViewBag.DataSource" expandAll="false" enableSorting="true">
        <e-formatsettings>
            <e-field name="Amount" format="C"></e-field>
            <e-field name="Product_ID" format="N0"></e-field>
            <e-field name="Date" type="date" format="dd/MM/yyyy-hh:mm a"></e-field>
        </e-formatsettings>
        <e-rows>
            <e-field name="Date"></e-field>
        </e-rows>
        <e-columns>
            <e-field name="Product_ID" caption="Product ID"></e-field>
        </e-columns>
        <e-values>
            <e-field name="Sold" caption="Unit Sold"></e-field>
            <e-field name="Amount" caption="Sold Amount"></e-field>
        </e-values>
    </e-datasourcesettings>
</ejs-pivotview>
public ActionResult Index()
{
var data = GetGroupData();
ViewBag.DataSource = data;
return View();
}Creating a Custom Group
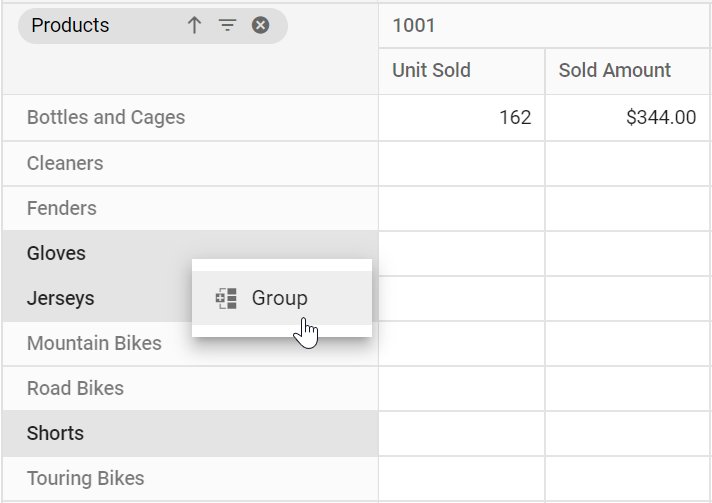
To create a custom group in the Pivot Table, select at least two headers from the same field. Hold the CTRL key to select multiple headers individually or the SHIFT key to select a range of headers. Then, right-click and choose Group from the context menu.
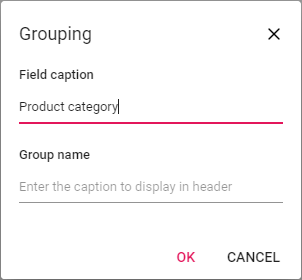
In the dialog box:
- Field Caption: Set an alias name for the new custom field, which will appear in the Pivot Table.
- Group Name: Define the top-level name for the group that will contain the selected headers.
For example, to group the headers “Gloves,” “Jerseys,” and “Shorts” in the “Products” field under a single group, set the Group Name to “Clothings.” The selected headers will then appear under “Clothings” in the Pivot Table.

Nested Custom Grouping
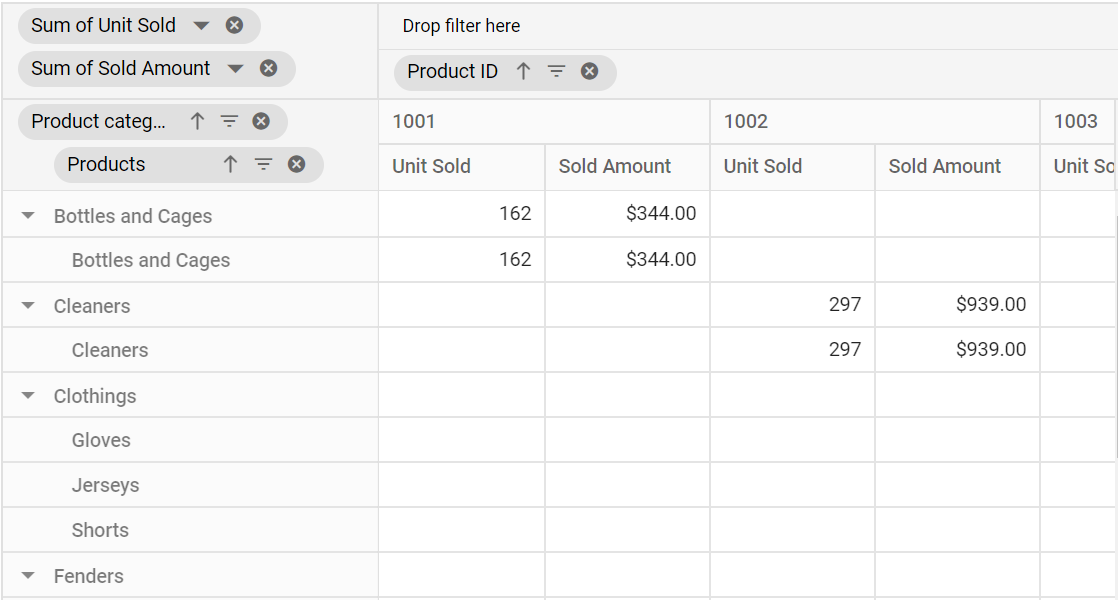
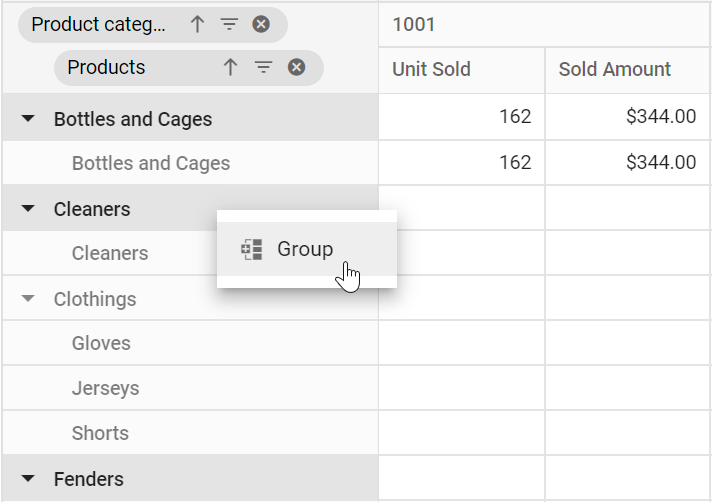
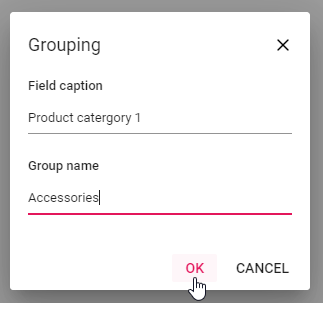
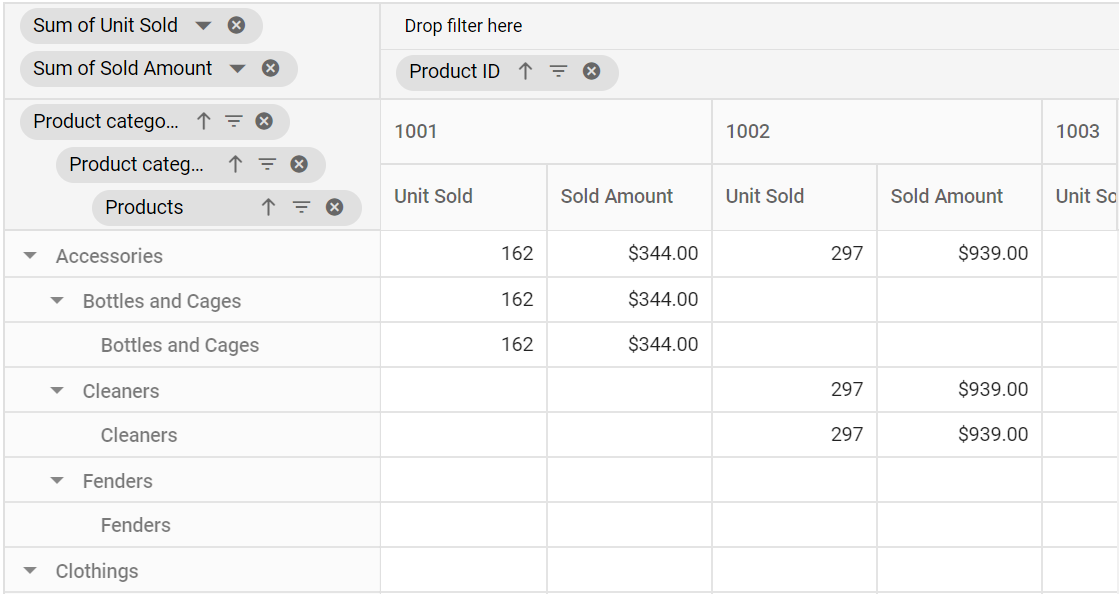
User can also apply new custom grouping options to an existing custom field by right-clicking on the custom group header in the Pivot Table. For example, if the user wants to create a new custom group for the current custom group headers such as “Bottles and Cages”, “Cleaners” and “Fenders” by setting the top level name as “Accessories” to “Group Name” on their own. The selected headers will then be grouped in the Pivot Table under the name “Accessories” with a new custom field called “Product category 1”.
Configuring Custom Grouping Programmatically
You can configure custom grouping programmatically using the e-groupsettings property in the Pivot Table component. This property allows you to define how fields are grouped in the Pivot Table without using the UI. The available properties are:
-
name: Allows user to set the field name. -
caption: Allows user to set the caption name for custom grouping field. -
e-customGroups: Allows user to set the custom groups. -
type: Allows user to set the group type. For custom grouping, Custom is set.
The e-customGroups property includes:
*groupName: Allows user to set the group name (or title) for selected headers.
-
items: It allows to set the headers which needs to be grouped from display.
Headers listed in
itemsare grouped under the specifiedgroupNamein the Pivot Table. Headers not included initemsare displayed under their original names.
Here’s an example of configuring custom grouping programmatically:
<ejs-pivotview id="PivotView" width="100%" height="350" showGroupingBar="true" allowGrouping="true">
    <e-datasourcesettings dataSource="@ViewBag.DataSource" expandAll="false" enableSorting="true">
        <e-formatsettings>
            <e-field name="Amount" format="C"></e-field>
            <e-field name="Product_ID" format="N0"></e-field>
        </e-formatsettings>
        <e-rows>
            <e-field name="Products"></e-field>
        </e-rows>
        <e-columns>
            <e-field name="Product_ID" caption="Product ID"></e-field>
        </e-columns>
        <e-values>
            <e-field name="Sold" caption="Unit Sold"></e-field>
            <e-field name="Amount" caption="Sold Amount"></e-field>
        </e-values>
        <e-groupsettings>
            <e-field name="Products" type="Custom" caption="Product catergory">
                <e-customgroups>
                    <e-group groupName="Clothings" items="@(new string[] { "Gloves", "Jerseys", "Shorts" })"></e-group>
                </e-customgroups>
            </e-field>
        </e-groupsettings>
    </e-datasourcesettings>
</ejs-pivotview>
public ActionResult Index()
{
var data = GetGroupData();
ViewBag.DataSource = data;
return View();
}
Ungrouping Existing Custom Groups
To remove a custom group in the Pivot Table, simply right-click on the grouped header and select the “Ungroup” option from the context menu. This action will separate the grouped items back into their individual headers within the Pivot Table.
After ungrouping, if you remove the related field from the report, any custom group fields associated with it will also be removed from the Pivot Table.

Limitations
The grouping feature is applied based on the selected row or column headers using the following selectionSettings: selection mode set to Cell, selection type set to Multiple, and cellSelectionMode set to Box by default. When using the selection and grouping features together, cell selection is limited to row or column headers with these settings. Other settings, such as selection mode set to Row or Column, selection type set to Single, or cellSelectionMode set to Flow, are incompatible with grouping in the pivot table.