Selection
3 Jan 202411 minutes to read
Selection provides an option to highlight a row or a cell. It can be done using arrow keys or by scrolling down the mouse. To disable selection in the Gantt control, set the AllowSelection to false.
The Gantt control supports two types of selection that can be set by using the SelectionSettings.Type property. They are:
-
Single: Sets a single value by default and allows only selection of a single row or a cell. -
Multiple: Allows you to select multiple rows or cells. To perform the multi-selection, press and hold the CTRL key and click the desired rows or cells.
Selection mode
The Gantt control supports three types of selection modes that can be set by using the SelectionSettings.Mode. They are:
-
Row: Allows you to select only rows, and the row value is set by default. -
Cell: Allows you to select only cells. -
Both: Allows you to select rows and cells at the same time.
<ejs-gantt id='Gantt' dataSource="ViewBag.dataSource" height="450px">
                    <e-gantt-taskfields id="TaskId" name="TaskName" startDate="StartDate"
                         endDate="EndDate" duration="Duration" progress="Progress" child="SubTasks">
                    </e-gantt-taskfields>
                    <e-gantt-selectionsettings mode="Both"></e-gantt-selectionsettings>
                </ejs-gantt>
public IActionResult Index()
{
ViewBag.DataSource = GanttData.ProjectNewData();
return View();
}Toggle selection
The toggle selection allows you to select and deselect a specific row or cell. To enable toggle selection, set the enableToggle property of the selectionSettings to true. If you click the selected row or cell, then it will be deselected and vice versa. By default, the enableToggle property is set to false.
<ejs-button id="toggle" content="Disable Toggle" cssClass="e-primary"></ejs-button>

                <ejs-gantt id='Gantt' dataSource="ViewBag.dataSource" height="450px" allowSelection="true">
                    <e-gantt-taskfields id="TaskId" name="TaskName" startDate="StartDate"
                           endDate="EndDate" duration="Duration" progress="Progress" child="SubTasks">
                    </e-gantt-taskfields>
                    <e-gantt-selectionsettings mode="Row" type="Multiple" enableToggle="true"></e-gantt-selectionsettings>
            </ejs-gantt>

	<script>
        document.getElementById('toggle').addEventListener('click', function (args) {
            var ganttObj = document.getElementById('Gantt').ej2_instances[0];
            ganttObj.selectionsettings.enableToggle = false;
        });
	</script>
public IActionResult Index()
{
ViewBag.DataSource = GanttData.ProjectNewData();
return View();
}Clear selection
You can clear the selected cells and selected rows by using a method called clearSelection. The following code example demonstrates how to clear the selected rows in Gantt Chart.
<ejs-button id="selectRows" content="Select Rows" cssClass="e-primary"></ejs-button>
            <ejs-button id="clearSelection" content="Clear Selection" cssClass="e-primary"></ejs-button>

                <ejs-gantt id='Gantt' dataSource="ViewBag.dataSource" height="450px" allowSelection="true">
                    <e-gantt-taskfields id="TaskId" name="TaskName" startDate="StartDate"
                           endDate="EndDate" duration="Duration" progress="Progress" child="SubTasks">
                    </e-gantt-taskfields>
                    <e-gantt-selectionsettings mode="Row" type="Multiple"></e-gantt-selectionsettings>
            </ejs-gantt>

	<script>
        document.getElementById('selectRows').addEventListener('click', function (args) {
            var ganttObj = document.getElementById('Gantt').ej2_instances[0];
            ganttObj.selectionModule.selectRows([1, 2, 3]); // passing the record index to select the row
        });

        document.getElementById('clearSelection').addEventListener('click', function (args) {
            var ganttObj = document.getElementById('Gantt').ej2_instances[0];
            ganttObj.clearSelection(); // Clear the selected rows
        });
	</script>
public IActionResult Index()
{
ViewBag.DataSource = GanttData.ProjectNewData();
return View();
}Get selected row indexes and records
You can get the selected row indexes by using the getSelectedRowIndexes method. And by using getSelectedRecords method, you can get the selected record details.
<ejs-gantt id='Gantt' dataSource="ViewBag.dataSource" height="450px" allowSelection="true"  rowSelected="rowSelected">
                    <e-gantt-taskfields id="TaskId" name="TaskName" startDate="StartDate"
                         endDate="EndDate" duration="Duration" progress="Progress" child="SubTasks">
                    </e-gantt-taskfields>
                    <e-gantt-selectionSettings mode="Row" type="Multiple"></e-gantt-selectionSettings>
                </ejs-gantt>

    <script>
        function rowSelected(args) {
            var ganttObj = document.getElementById("Gantt").ej2_instances[0];
            var selectedrowindex = ganttObj.selectionModule.getSelectedRowIndexes();  // get the selected row indexes.
            alert(selectedrowindex); // to alert the selected row indexes.
            var selectedrecords = ganttObj.selectionModule.getSelectedRecords();  // get the selected records.
            console.log(selectedrecords); // to print the selected records in console window.
        }

</script>
public IActionResult Index()
{
ViewBag.DataSource = GanttData.ProjectNewData();
return View();
}Multiple selection based on condition
You can select multiple rows based on condition by using the selectRows method.
In the following code, the rows which contains TaskId value as 3 and 4 are selected at initial rendering.
<ejs-gantt id='Gantt' dataSource="ViewBag.dataSource" height="450px" allowSelection="true"  dataBound="dataBound">
                    <e-gantt-taskfields id="TaskId" name="TaskName" startDate="StartDate"
                         endDate="EndDate" duration="Duration" progress="Progress" child="SubTasks">
                    </e-gantt-taskfields>
                    <e-gantt-selectionSettings mode="Row" type="Multiple"></e-gantt-selectionSettings>
                </ejs-gantt>

    <script>
        function dataBound(args) {
            var ganttObj = document.getElementById("Gantt").ej2_instances[0];
            var rowIndexes = [];
            ganttObj.treeGrid.grid.dataSource.forEach((data, index) => {
                if (data.TaskId === 3 || data.TaskId === 4) {
                    rowIndexes.push(index);
                }
            });
            ganttObj.selectionModule.selectRows(rowIndexes);
        }

</script>
public IActionResult Index()
{
ViewBag.DataSource = GanttData.ProjectNewData();
return View();
}
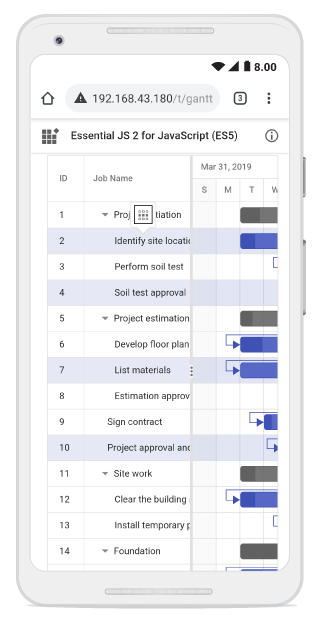
Touch interaction
When you tap gantt row, tapped row will be selected.
Single selection : To select a single row or cell, perform single tap on it.
Multiple selection : To perform multiple selection, tap on the multiple selection popup, and then tap the desired rows or cells.