Getting Started with Angular Speech To Text
11 Aug 20268 minutes to read
This section explains how to create a simple SpeechToText component and configure its available functionalities in Angular.
Prerequisites
| Requirement | Version |
|---|---|
| Angular | 12 and above |
| Node.js | 14.0.0 or above, Recommended: Latest Version |
Note: This guide supports recent Angular versions including Angular 21 and standalone components. For detailed compatibility, refer to the Angular version support matrix in the Syncfusion docs.
Angular supported versions
| Angular Version | Minimum Syncfusion® Angular SpeechToText / Inputs Version |
|---|---|
| Angular v20 | 29.2.8 |
| Angular v19 | 26.1.35 |
| Angular v18 | 25.2.3 |
| Angular v17 | 23.2.4 |
| Angular v16 | 21.1.39 |
| Angular v15 | 20.4.38 |
| Angular v14 | 20.2.36 |
| Angular v13 | 19.4.38 and above |
| Angular v12 | 19.3.43 |
Browser support
| Browser | Supported Versions |
|---|---|
| Google Chrome, including Android & iOS | Latest 2 versions |
| Mozilla Firefox | Latest version |
| Microsoft Edge | Latest 2 versions |
| Apple Safari, including iOS | Latest 2 versions |
Setup the Angular application
A straightforward approach to beginning with Angular is to create a new application using the Angular CLI. Install Angular CLI globally with the following command:
npm install -g @angular/cliAngular 21 Standalone Architecture: Standalone components are the default in Angular 21. This guide uses the modern standalone architecture. If you need more information about the standalone architecture, refer to the Standalone Guide.
Create a new application
With Angular CLI installed, execute this command to generate a new application:
ng new syncfusion-angular-app- This command will prompt you to configure settings like enabling Angular routing and choosing a stylesheet format.
? Which stylesheet format would you like to use? (Use arrow keys)
> CSS             [ https://developer.mozilla.org/docs/Web/CSS                     ]
  Sass (SCSS)     [ https://sass-lang.com/documentation/syntax#scss                ]
  Sass (Indented) [ https://sass-lang.com/documentation/syntax#the-indented-syntax ]
Less [ http://lesscss.org ]- By default, a CSS-based application is created. Use SCSS if required:
ng new syncfusion-angular-app --style=scss- During project setup, when prompted for the Server-side rendering (SSR) option, choose the appropriate configuration.

- Select the required AI tool or ‘none’ if you do not need any AI tool.
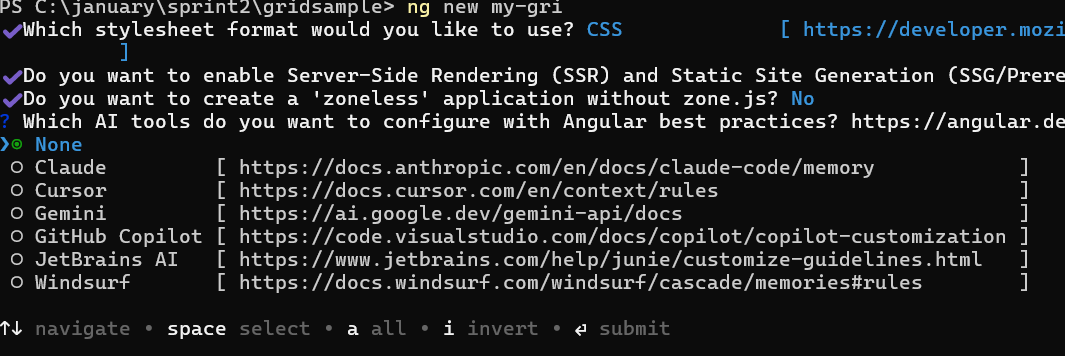
- Navigate to your newly created application directory:
cd syncfusion-angular-appNote: In Angular 19 and below, it uses
app.ts,app.component.html,app.component.cssetc. In Angular 20+, the CLI generates a simpler structure withsrc/app/app.ts,app.html, andapp.css(no.component.suffixes).
Adding Syncfusion Angular SpeechToText package
To install the SpeechToText package, use the following command:
npm install @syncfusion/ej2-angular-inputsAdding CSS reference
Themes for Syncfusion SpeechToText components can be applied using CSS files provided through npm theme packages. For available themes, refer to the Themes documentation.
Install the Material 3 theme package using the following command:
npm install @syncfusion/ej2-material3-theme --saveThen add the following CSS reference to the src/styles.css file:
@import "../node_modules/@syncfusion/ej2-material3-theme/styles/speech-to-text/index.css";Adding SpeechToText component
Modify the template in the src/app/app.ts file to render the SpeechToText component. Add the Angular SpeechToText by using the <button ejs-speechtotext> directive in the template section of the app.ts file.
import { Component, ViewChild } from '@angular/core';

import { SpeechToTextModule, TextAreaComponent, TextAreaModule, TranscriptChangedEventArgs } from '@syncfusion/ej2-angular-inputs';

@Component({
    imports: [
        SpeechToTextModule, TextAreaModule
    ],
    standalone: true,
    selector: 'app-root',
    template: `<!-- To Render SpeechToText component. -->
    <div class="speechText-container">
        <button ejs-speechtotext (transcriptChanged)="onTranscriptChange($event)"></button>
        <ejs-textarea #outputTextarea id="textareaInst" value="" rows="5" cols="50" resizeMode="None" placeholder="Transcribed text will be shown here..."></ejs-textarea>
    </div>`
})

export class App {
    @ViewChild('outputTextarea') outputTextarea!: TextAreaComponent;
    onTranscriptChange(args: TranscriptChangedEventArgs): void {
        this.outputTextarea.value = args.transcript;
     }
}
/* You can add global styles to this file, and also import other style files */
@import "../node_modules/@syncfusion/ej2-material3-theme/styles/speech-to-text/index.css";<!DOCTYPE html>
<html lang="en">
<head>
<title>EJ2 Angular Speech To Text</title>
<meta charset="utf-8" />
<meta name="viewport" content="width=device-width, initial-scale=1.0" />
<meta name="description" content="Angular Speech To Text Component" />
<meta name="author" content="Syncfusion" />
<style>
.speechText-container {
margin: 50px auto;
gap: 20px;
display: flex;
flex-direction: column;
align-items: center;
}
</style>
</head>
<body>
<div id="wrapper">
<app-root>
<div id='loader'>LOADING....</div>
</app-root>
</div>
</body>
</html>Run the application
After completing the configuration required to render a basic SpeechToText component, run the following command to display the output in your default browser.
ng serveThe SpeechToText component requires an active internet connection and must be used in a browser that supports the SpeechRecognition Web Speech API.
Registering your Syncfusion license
Before using Syncfusion components, generate a license key from the Syncfusion License Dashboard and register it.
Open the main.ts file and add the following code:
import { registerLicense } from '@syncfusion/ej2-base';
registerLicense('YOUR_LICENSE_KEY');
Note: A valid Syncfusion license is required for production use. If a valid license is not registered, a trial license warning message will be displayed when the application runs.
Production build
To create an optimized production build, run:
ng buildThis command compiles the application and generates the production-ready files in the dist/ directory.
To preview the production build locally, run:
npx http-server distThen open the URL displayed in the terminal.
Troubleshooting
-
SpeechToText styles are not applied: Ensure the required Syncfusion theme CSS is imported in
src/styles.css. -
Trial license warning message: Register a valid Syncfusion license key using the
registerLicense()method from@syncfusion/ej2-base. -
Port 4200 is already in use: Stop the conflicting process or run the application on a different port:
ng serve --port 3000