By default, the Pivot Table processes and displays data using its built-in engine with the given data source. Alternatively, you can use a server-side pivot engine to connect external data to the Pivot Table, which is especially useful when working with large datasets. This option is applicable only for relational data sources.
Server side pivot engine in Angular Pivotview component
26 Apr 202624 minutes to read
This section explains how to use the Syncfusion® assembly Syncfusion.Pivot.Engine in a server-side application. The server-side engine performs operations such as aggregation, filtering, sorting, and grouping on the server. Only the information required for the Pivot Table viewport is sent to the client through a web service (Web API), instead of transferring the entire data source. This approach helps reduce network traffic and improves Pivot Table rendering performance when working with large data sets. It works efficiently with the virtual scrolling option and supports all existing features in the Pivot Table.
Quick steps to render the Pivot Table by using the server-side Pivot Engine
Download and installing Server-side Pivot Engine
-
Download the ASP.NET Core-based standalone Pivot Table application from the GitHub repository. This application includes all necessary files to set up and use the server-side Pivot Engine.
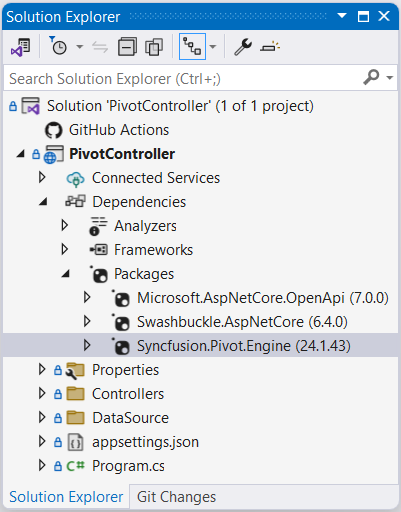
- The downloaded PivotController application contains the following files to support data communication and processing:
- PivotController.cs in the Controllers folder: Handles data communication between the server and the Pivot Table.
- DataSource.cs in the DataSource folder: Defines the structure of the data sources using model classes.
- Sample data source files, sales.csv and sales-analysis.json, in the DataSource folder: Provide example data for testing the Pivot Table.
- Open the PivotController application in Visual Studio. The Syncfusion Syncfusion.Pivot.Engine library will automatically download from nuget.org, enabling server-side calculations such as aggregation, filtering, and sorting for the Pivot Table.
Connecting Pivot Table to Server-side Pivot Engine
This section explains how to connect the Pivot Table to the server-side Pivot Engine to display data efficiently. Follow these steps to set up the connection and configure the Pivot Table using the server-side application created in the previous section.
-
Start the server-side application
Run the PivotController application (downloaded and installed in the previous section) in Visual Studio. This hosts the server-side Pivot Engine on a local server, typically at a URL likehttps://localhost:44350/api/pivot/post. Ensure the application is running before proceeding. -
Configure the Pivot Table for server-side mode
In your Angular application, update the Pivot Table’s settings to connect to the server-side Pivot Engine. Set themodeproperty in thedataSourceSettingstoServer. Then, specify the URL of the running PivotController application in theurlproperty.
import { Component, OnInit } from '@angular/core';
import { DataSourceSettingsModel } from '@syncfusion/ej2-pivotview/src/model/datasourcesettings-model';

@Component({
    selector: 'app-container',
    template: `<ejs-pivotview #pivotview id='PivotView' height='350' [dataSourceSettings]=dataSourceSettings ></ejs-pivotview>`
})

export class AppComponent implements OnInit {
  public dataSourceSettings: DataSourceSettingsModel;

  ngOnInit(): void {
    this.width = '100%';
    this.dataSourceSettings = {
      url: 'https://localhost:44350/api/pivot/post',
      mode: 'Server',
    };
  }
}-
Set up the Pivot Table report
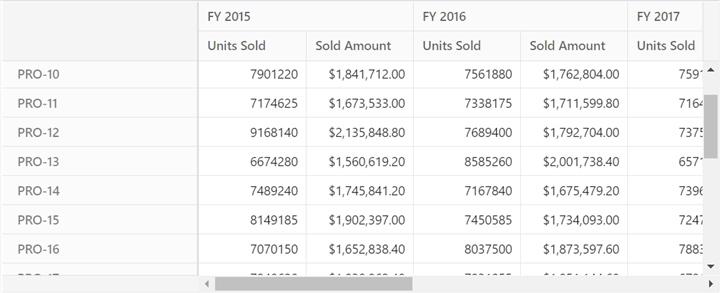
Define the report to organize and display data from the server-side Pivot Engine. Use thedataSourceSettingsproperties to specify rows, columns, values, and formatting based on the data source in the PivotController application (e.g.,sales.csvorsales-analysis.json). For example, you can configure the report to show product details, sales amounts, and production years.
import { Component, OnInit } from '@angular/core';
import { DataSourceSettingsModel } from '@syncfusion/ej2-pivotview/src/model/datasourcesettings-model';

@Component({
    selector: 'app-container',
    template: `<ejs-pivotview #pivotview id='PivotView' height='350' [dataSourceSettings]=dataSourceSettings ></ejs-pivotview>`
})

export class AppComponent implements OnInit {
  public dataSourceSettings: DataSourceSettingsModel;

  ngOnInit(): void {
    this.width = '100%';
    this.dataSourceSettings = {
      url: 'https://localhost:44350/api/pivot/post',
      mode: 'Server',
      rows: [{
        name: 'ProductID', caption: 'Product ID'
      }],
      formatSettings: [{
        name: 'Price', format: 'C'
      }],
      columns: [{
        name: 'Year', caption: 'Production Year'
      }],
      values: [
        { name: 'Sold', caption: 'Units Sold' },
        { name: 'Price', caption: 'Sold Amount' }
      ],
    };
  }
}-
Run the Angular application
Launch your Angular application to view the Pivot Table. The Pivot Table will connect to the server-side Pivot Engine, retrieve the processed data, and display the results based on the configured report.

Available configurations in Server-side application
This section explains how to set up and use different data sources with the server-side Pivot Engine in the Angular Pivot Table.
Supportive Data Sources
The server-side Pivot Engine supports the following data sources:
- Collection
- JSON
- CSV
- DataTable
- Dynamic
Collection
The server-side pivot engine supports collection-based data sources, such as List or IEnumerable. You can bind these data sources using the GetData method in the server-side controller. In the Pivot Table, set the type property in the dataSourceSettings to JSON, which is the default value.
In the server-side application, define the collection data source in the DataSource.cs file, as shown below:
public class PivotViewData
{
    public string ProductID { get; set; }
    public string Country { get; set; }
    public string Product { get; set; }
    public double Sold { get; set; }
    public double Price { get; set; }
    public string Year { get; set; }

    public List<PivotViewData> GetVirtualData()
    {
        List<PivotViewData> VirtualData = new List<PivotViewData>();

        for (int i = 1; i <= 100; i++)
        {
            PivotViewData p = new PivotViewData
            {
                ProductID = "PRO-" + (100 + i),
                Year = (new string[] { "FY 2015", "FY 2016", "FY 2017", "FY 2018", "FY 2019" })[new Random().Next(5)],
                Country = (new string[] { "Canada", "France", "Australia", "Germany", "France" })[new Random().Next(5)],
                Product = (new string[] { "Car", "Van", "Bike", "Flight", "Bus" })[new Random().Next(5)],
                Price = (3.4 * i) + 500,
                Sold = (i * 15) + 10
            };
            VirtualData.Add(p);
        }
        return VirtualData;
    }
}
To bind this data source, set the model type PivotViewData to the TValue parameter of the PivotEngine class, as shown below:
private PivotEngine<DataSource.PivotViewData> PivotEngine = new PivotEngine<DataSource.PivotViewData>();Next, call the data source in the GetData method within the PivotController.cs file:
public async Task<object> GetData(FetchData param)
{
    return await _cache.GetOrCreateAsync("dataSource" + param.Hash,
        async (cacheEntry) =>
        {
            cacheEntry.SetSize(1);
            cacheEntry.AbsoluteExpiration = DateTimeOffset.UtcNow.AddMinutes(60);

            // Bind the collection-based data source here.
            return new DataSource.PivotViewData().GetVirtualData();
        });
}
Finally, configure the Pivot Table by setting the appropriate report in the dataSourceSettings to match the data source, as shown below:
this.dataSourceSettings = {
    url: 'https://localhost:44350/api/pivot/post',
    mode: 'Server',
    rows: [{ name: 'ProductID', caption: 'Product ID' }],
    formatSettings: [{ name: 'Price', format: 'C' }],
    columns: [{ name: 'Year', caption: 'Production Year' }],
    values: [
        { name: 'Sold', caption: 'Units Sold' },
        { name: 'Price', caption: 'Sold Amount' }
    ]
};
JSON
You can use JSON data from a local *.json file to connect to the Pivot Table. The file can be read using the StreamReader, which returns the content as a string. This string should then be converted into a collection that can be used with the server-side pivot engine.
In your server-side application, the sales-analysis.json file is located in the DataSource folder, and its model type is defined in the DataSource.cs file:
public class PivotJSONData
{
    public string Date { get; set; }
    public string Sector { get; set; }
    public string EnerType { get; set; }
    public string EneSource { get; set; }
    public int PowUnits { get; set; }
    public int ProCost { get; set; }

    public List<PivotJSONData> ReadJSONData(string url)
    {
        WebClient myWebClient = new WebClient();
        Stream myStream = myWebClient.OpenRead(url);
        StreamReader stream = new StreamReader(myStream);
        string result = stream.ReadToEnd();
        stream.Close();
        return Newtonsoft.Json.JsonConvert.DeserializeObject<List<PivotJSONData>>(result);
    }
}
To use this data with the Pivot Table, assign the model type PivotJSONData to the TValue parameter of the PivotEngine class.
private PivotEngine<DataSource.PivotJSONData> PivotEngine = new PivotEngine<DataSource.PivotJSONData>();Next, retrieve the JSON data in the GetData method of the PivotController.cs file. This example shows how to load the sales-analysis.json file from the local server:
public async Task<object> GetData(FetchData param)
{
    return await _cache.GetOrCreateAsync("dataSource" + param.Hash,
        async (cacheEntry) =>
        {
            cacheEntry.SetSize(1);
            cacheEntry.AbsoluteExpiration = DateTimeOffset.UtcNow.AddMinutes(60);

            // Bind JSON data source from the sales-analysis.json file.
            return new DataSource.PivotJSONData().ReadJSONData(_hostingEnvironment.ContentRootPath + "//DataSource//sales-analysis.json");
        });
}
Then, configure the dataSourceSettings property in the Pivot Table to use the JSON data source:
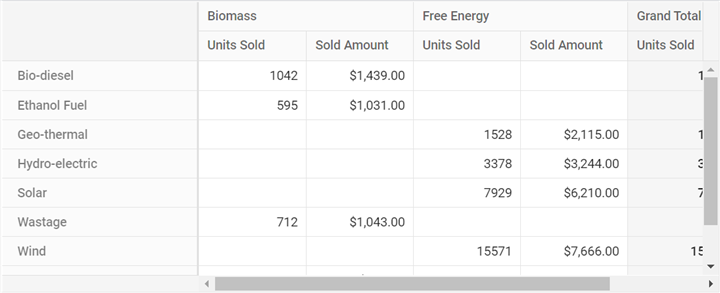
this.dataSourceSettings = {
  url: 'https://localhost:44350/api/pivot/post',
  mode: 'Server',
  type: 'JSON',
  rows: [{
    name: 'EneSource', caption: 'Energy Source'
  }],
  formatSettings: [{
    name: 'ProCost', format: 'C'
  }],
  columns: [{
    name: 'EnerType', caption: 'Energy Type'
  }],
  values: [
    { name: 'PowUnits', caption: 'Units Sold' },
    { name: 'ProCost', caption: 'Sold Amount' }
  ],
}
You can also use JSON data from a remote server in the same way as a local JSON file. Both directly downloadable *.json files and web service URLs are supported. To do this, specify the URL of the remote *.json file in the GetData method. The remaining configurations stay the same.
In the server-side application, the CDN link is used to connect the same sales-analysis.json file which is already hosted in the Syncfusion® server.
public async Task<object> GetData(FetchData param)
{
    return await _cache.GetOrCreateAsync("dataSource" + param.Hash,
    async (cacheEntry) =>
    {
        cacheEntry.SetSize(1);
        cacheEntry.AbsoluteExpiration = DateTimeOffset.UtcNow.AddMinutes(60);

        // Bind JSON data source from a remote server.
        return new DataSource.PivotJSONData().ReadJSONData("http://cdn.syncfusion.com/data/sales-analysis.json");
    });
}
CSV
The server-side Pivot Engine supports CSV data from a local *.csv file or a remote server. To use a local CSV file, read the file using the StreamReader class, which converts the file content into a string. This string is then split into a collection that can be bound to the server-side Pivot Engine. In the Pivot Table, set the type property in the dataSourceSettings to CSV.
In the server application, the sales.csv file is located in the DataSource folder, and its data model is defined in the DataSource.cs file as shown below:
public class PivotCSVData
{
    public string Region { get; set; }
    public string Country { get; set; }
    public string ItemType { get; set; }
    public string SalesChannel { get; set; }
    public string OrderPriority { get; set; }
    public string OrderDate { get; set; }
    public int OrderID { get; set; }
    public string ShipDate { get; set; }
    public int UnitsSold { get; set; }
    public double UnitPrice { get; set; }
    public double UnitCost { get; set; }
    public double TotalRevenue { get; set; }
    public double TotalCost { get; set; }
    public double TotalProfit { get; set; }

    public List<string[]> ReadCSVData(string url)
    {
        List<string[]> data = new List<string[]>();
        using (StreamReader reader = new StreamReader(new WebClient().OpenRead(url)))
        {
            string line;
            while ((line = reader.ReadLine()) != null)
            {
                line = line.Trim();
                if (!string.IsNullOrWhiteSpace(line))
                {
                    data.Add(line.Split(','));
                }
            }
            return data;
        }
    }
}
To bind the CSV data, set the PivotCSVData model as the TValue type for the PivotEngine class:
private PivotEngine<DataSource.PivotCSVData> PivotEngine = new PivotEngine<DataSource.PivotCSVData>();Next, retrieve the CSV data in the GetData method of the PivotController.cs file:
public async Task<object> GetData(FetchData param)
{
    return await _cache.GetOrCreateAsync("dataSource" + param.Hash,
        async (cacheEntry) =>
        {
            cacheEntry.SetSize(1);
            cacheEntry.AbsoluteExpiration = DateTimeOffset.UtcNow.AddMinutes(60);
            // Bind CSV data from the local sales.csv file.
            return new DataSource.PivotCSVData().ReadCSVData(_hostingEnvironment.ContentRootPath + "//DataSource//sales.csv");
        });
}
Finally, configure the Pivot Table with the appropriate report settings based on the CSV data source:
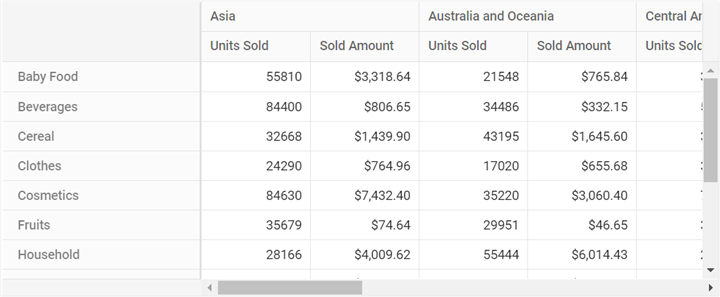
this.dataSourceSettings = {
    url: 'https://localhost:44350/api/pivot/post',
    mode: 'Server',
    type: 'CSV',
    rows: [{
        name: 'ItemType',
        caption: 'Item Type'
    }],
    formatSettings: [{
        name: 'UnitPrice',
        format: 'C'
    }],
    columns: [{
        name: 'Region'
    }],
    values: [{
        name: 'UnitsSold',
        caption: 'Units Sold'
    }, {
        name: 'UnitPrice',
        caption: 'Sold Amount'
    }],
}
You can also use CSV data from a remote server, such as a downloadable file or a web service URL. To do this, provide the CSV file URL in the GetData method. The process for setting up the Pivot Table remains the same as described above.
Here is an example of using a remote CSV file hosted on the Syncfusion server:
public async Task<object> GetData(FetchData param)
{
    return await _cache.GetOrCreateAsync("dataSource" + param.Hash,
        async (cacheEntry) =>
        {
            cacheEntry.SetSize(1);
            cacheEntry.AbsoluteExpiration = DateTimeOffset.UtcNow.AddMinutes(60);

            // Bind the CSV-type data source from remote server.
            return new DataSource.PivotCSVData().ReadCSVData("http://cdn.syncfusion.com/data/sales-analysis.csv");
        });
}
DataTable
In a server-side application, you can create a DataTable named BusinessObjectsDataView by mapping it to the PivotViewData model type defined in the DataSource.cs file. The following code demonstrates how to generate this DataTable from a collection of PivotViewData objects:
public class BusinessObjectsDataView
{
    public DataTable GetDataTable()
    {
        DataTable dt = new DataTable("BusinessObjectsDataTable");
        PropertyDescriptorCollection pdc = TypeDescriptor.GetProperties(typeof(PivotViewData));
        foreach (PropertyDescriptor pd in pdc)
        {
            dt.Columns.Add(new DataColumn(pd.Name, pd.PropertyType));
        }
        List<PivotViewData> list = new PivotViewData().GetVirtualData();
        foreach (PivotViewData bo in list)
        {
            DataRow dr = dt.NewRow();
            foreach (PropertyDescriptor pd in pdc)
            {
                dr[pd.Name] = pd.GetValue(bo);
            }
            dt.Rows.Add(dr);
        }
        return dt;
    }
}
To bind the data source, set the model type PivotViewData to the TValue property of the PivotEngine class, as shown below:
private PivotEngine<DataSource.PivotViewData> PivotEngine = new PivotEngine<DataSource.PivotViewData>();Next, retrieve the data source by calling the GetData method in the PivotController.cs file. This method uses caching to improve performance:
public async Task<object> GetData(FetchData param)
{
    return await _cache.GetOrCreateAsync("dataSource" + param.Hash,
        async (cacheEntry) =>
        {
            cacheEntry.SetSize(1);
            cacheEntry.AbsoluteExpiration = DateTimeOffset.UtcNow.AddMinutes(60);

            // Bind the DataTable here.
            return new DataSource.BusinessObjectsDataView().GetDataTable();
        });
}
Finally, configure the Pivot Table by setting the appropriate report using the dataSourceSettings property. Below is an example configuration that connects to the server-side data source:
this.dataSourceSettings = {
    url: 'https://localhost:44350/api/pivot/post',
    mode: 'Server',
    rows: [{
        name: 'ProductID', caption: 'Product ID'
    }],
    formatSettings: [{
        name: 'Price', format: 'C'
    }],
    columns: [{
        name: 'Year', caption: 'Production Year'
    }],
    values: [
        { name: 'Sold', caption: 'Units Sold' },
        { name: 'Price', caption: 'Sold Amount' }
    ]
};
This configuration connects the Pivot Table to the server-side DataTable, enabling efficient data rendering with reduced network traffic.

Dynamic
Usually, the model type must be defined for most data sources in the server-side pivot engine. However, when using certain data sources, such as dynamic types, it is not necessary to define a model type. The server-side pivot engine supports these data sources as well.
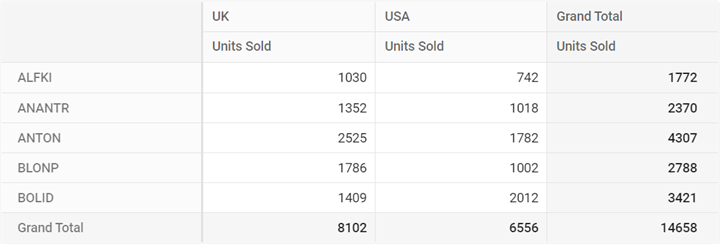
ExpandoObject
In a server-side application, users can use an ExpandoObject as a data source. This type of data source is managed by the PivotExpandoData class found in the DataSource.cs file. The following code shows how to create a list of ExpandoObject items:
public class PivotExpandoData
{
    public List<ExpandoObject> Orders { get; set; } = new List<ExpandoObject>();
    public List<ExpandoObject> GetExpandoData()
    {
        Orders = Enumerable.Range(1, 75).Select((x) =>
        {
            dynamic d = new ExpandoObject();
            d.OrderID = 1000 + (x % 100);
            d.CustomerID = (new string[] { "ALFKI", "ANANTR", "ANTON", "BLONP", "BOLID" })[new Random().Next(5)];
            d.Freight = (new double[] { 2, 1, 4, 5, 3 })[new Random().Next(5)] * x;
            d.OrderDate = (new DateTime[] { new DateTime(2010, 11, 5), new DateTime(2018, 10, 3), new DateTime(1995, 9, 9), new DateTime(2012, 8, 2), new DateTime(2015, 4, 11) })[new Random().Next(5)];
            d.ShipCountry = (new string[] { "USA", "UK" })[new Random().Next(2)];
            d.Verified = (new bool[] { true, false })[new Random().Next(2)];

            return d;
        }).Cast<ExpandoObject>().ToList<ExpandoObject>();
        return Orders;
    }
}
To use this data source with the server-side pivot engine, specify ExpandoObject as the model type for TValue in the PivotEngine class:
private PivotEngine<ExpandoObject> PivotEngine = new PivotEngine<ExpandoObject>();Next, in the GetData method of the PivotController.cs file, return the ExpandoObject data source:
public async Task<object> GetData(FetchData param)
{
    return await _cache.GetOrCreateAsync("dataSource" + param.Hash,
        async (cacheEntry) =>
        {
            cacheEntry.SetSize(1);
            cacheEntry.AbsoluteExpiration = DateTimeOffset.UtcNow.AddMinutes(60);

            // Returns ExpandoObject type data source.
            return new DataSource.PivotExpandoData().GetExpandoData();
        });
}
Finally, configure the dataSourceSettings property for the Pivot Table on the client side. Set the appropriate fields for rows, columns, and values to match the ExpandoObject properties:
this.dataSourceSettings = {
  url: 'https://localhost:44350/api/pivot/post',
  mode: 'Server',
  rows: [{
    name: 'CustomerID', caption: 'Customer ID'
  }],
  columns: [{
    name: 'ShipCountry', caption: 'Ship Country'
  }],
  values: [
    { name: 'Freight', caption: 'Units Sold' }
  ],
}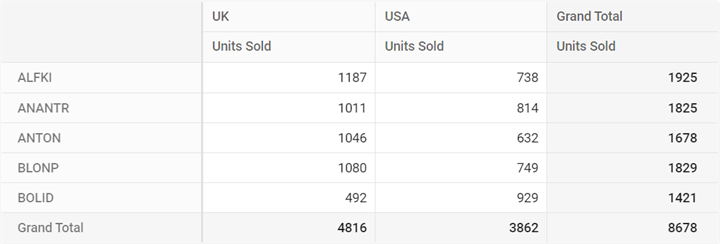
Dynamic Objects
A dynamic object allows users to bind data to the Pivot Table without having to define a fixed model type. In a server-side application, a data source is created using dynamic objects which are available under the PivotDynamicData class in the DataSource.cs file.
public class PivotDynamicData
{
    public List<DynamicDictionary> Orders = new List<DynamicDictionary>() { };
    public List<DynamicDictionary> GetDynamicData()
    {
        Orders = Enumerable.Range(1, 100).Select((x) =>
        {
            dynamic d = new DynamicDictionary();
            d.OrderID = 100 + x;
            d.CustomerID = (new string[] { "ALFKI", "ANANTR", "ANTON", "BLONP", "BOLID" })[new Random().Next(5)];
            d.Freight = (new double[] { 2, 1, 4, 5, 3 })[new Random().Next(5)] * x;
            d.OrderDate = (new DateTime[] { new DateTime(2010, 11, 5), new DateTime(2018, 10, 3), new DateTime(1995, 9, 9), new DateTime(2012, 8, 2), new DateTime(2015, 4, 11) })[new Random().Next(5)];
            d.ShipCountry = (new string[] { "USA", "UK" })[new Random().Next(2)];
            d.Verified = (new bool[] { true, false })[new Random().Next(2)];
            return d;
        }).Cast<DynamicDictionary>().ToList<DynamicDictionary>();
        return Orders;
    }

    public class DynamicDictionary : System.Dynamic.DynamicObject
    {
        Dictionary<string, object> dictionary = new Dictionary<string, object>();
        public override bool TryGetMember(GetMemberBinder binder, out object result)
        {
            string name = binder.Name;
            return dictionary.TryGetValue(name, out result);
        }
        public override bool TrySetMember(SetMemberBinder binder, object value)
        {
            dictionary[binder.Name] = value;
            return true;
        }
        //The "GetDynamicMemberNames" method of the "DynamicDictionary" class must be overridden and return the property names to perform data operation and editing while using dynamic objects.
        public override System.Collections.Generic.IEnumerable<string> GetDynamicMemberNames()
        {
            return this.dictionary?.Keys;
        }
    }
}
To use this data source in the server-side code, assign the PivotDynamicData class to the TValue of the PivotEngine class:
private PivotEngine<DataSource.PivotDynamicData> PivotEngine = new PivotEngine<DataSource.PivotDynamicData>();When loading data in the GetData method of the PivotController.cs file, return the dynamic data source as shown below:
public async Task<object> GetData(FetchData param)
{
    return await _cache.GetOrCreateAsync("dataSource" + param.Hash,
        async (cacheEntry) =>
        {
            cacheEntry.SetSize(1);
            cacheEntry.AbsoluteExpiration = DateTimeOffset.UtcNow.AddMinutes(60);

            // Here bind data source with dynamic objects.
            return new DataSource.PivotDynamicData().GetDynamicData();
        });
}
Finally, configure the dataSourceSettings property for the Pivot Table on the client side.
this.dataSourceSettings = {
  url: 'https://localhost:44350/api/pivot/post',
  mode: 'Server',
  rows: [{
    name: 'CustomerID', caption: 'Customer ID'
  }],
  columns: [{
    name: 'ShipCountry', caption: 'Ship Country'
  }],
  values: [
    { name: 'Freight', caption: 'Units Sold' }
  ],
}
Controller Configuration
Memory Cache
In a server-side application, the Memory Cache option helps store the data source and engine properties in RAM for use during UI actions in the Pivot Table. This approach improves performance by preventing the need to recalculate aggregated values every time the user interacts with the Pivot Table. The following example shows how the memory cache is used in the GetEngine method to store engine properties:
public async Task<EngineProperties> GetEngine(FetchData param)
{
    isRendered = false;
    // Engine properties are stored in memory cache with GUID "parem.Hash".
    return await _cache.GetOrCreateAsync("engine" + param.Hash,
        async (cacheEntry) =>
        {
            isRendered = true;
            cacheEntry.SetSize(1);
            // Memory cache expiration time can be set here.
            cacheEntry.AbsoluteExpiration = DateTimeOffset.UtcNow.AddMinutes(60);
            PivotEngine.Data = await GetData(param);
            return await PivotEngine.GetEngine(param);
        });
}
Engine properties are saved in RAM using a unique ID (GUID) that is received from the client-side source code. This GUID is randomly generated and changes if the user refreshes the page or opens the Pivot Table in a new browser tab or window. Because of this, each GUID in the memory cache holds information unique to that session, allowing each Pivot Table instance to work independently.
The memory cache is configured to expire after 60 minutes to help free up RAM. If the user is still working with the Pivot Table after this period, the required data will be generated and cached for another 60 minutes.
Methods and its needs
- Post: This method receives requests from the client side of the Pivot Table and forwards them to the appropriate server-side method for processing.
- GetEngine: Stores engine properties in RAM as a cache. This method is triggered during the initial rendering of the Pivot Table or when the memory cache expires.
- GetData: This method stores the Pivot Table’s data source in a cache on the server. Like GetEngine, it is triggered on the first load or after the memory cache is cleared. This enables faster retrieval of the Pivot Table’s data and allows the table to respond quickly to changes.
- GetMembers: Allows retrieval of the members of a field. This method is triggered when the member editor is opened for a filtering operation.
- GetRawData: Fetches the raw, unaggregated data behind a value cell. This method is used when the user opens the drill-through dialog or starts editing a value in the Pivot Table.
- GetPivotValues: Updates the stored engine properties in the in-memory cache and returns the aggregated values to the browser to render the Pivot Table. The return value can be modified, and the Pivot Table will be rendered in the browser based on this.
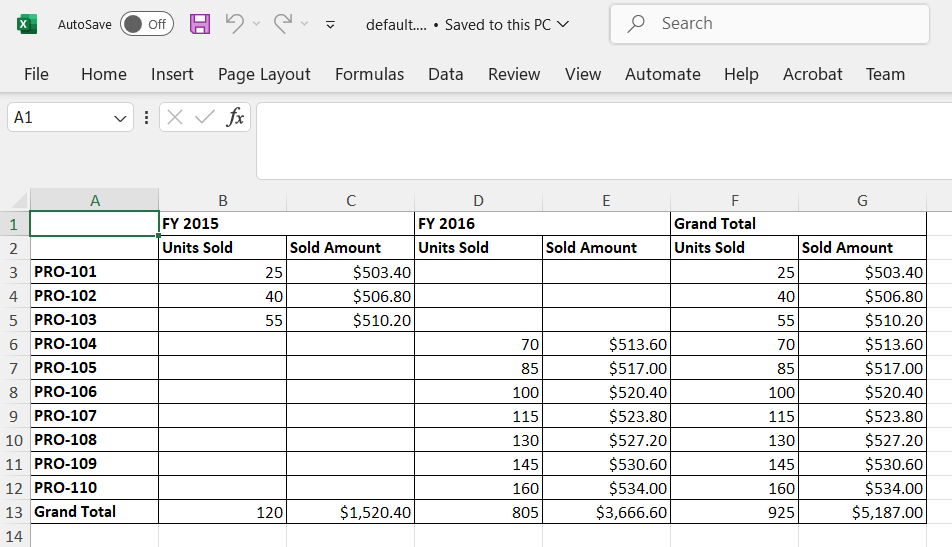
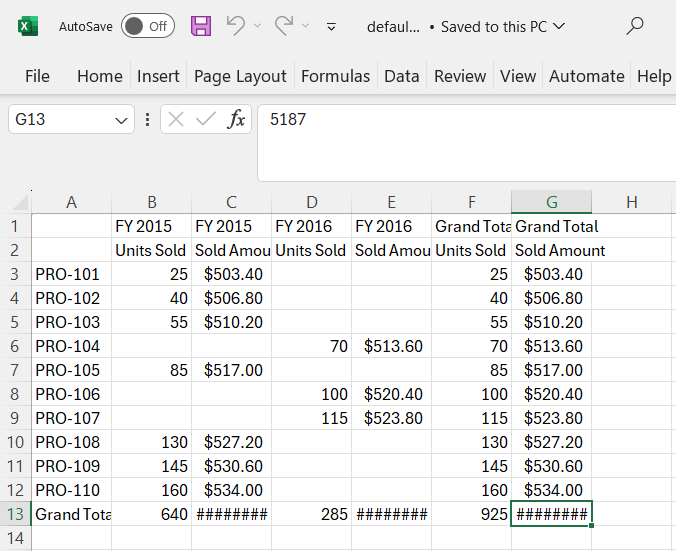
Excel Export
The server-side engine seamlessly supports Excel export functionality, enabling users to efficiently generate and download pivot table reports in Excel format directly from the server. To enable Excel export in the pivot table, set the allowExcelExport as true. Once the API is set, the user needs to call the excelExport method to export the pivot table to Excel by clicking an external button.
The pivot table component can be exported to Excel format using options available in the toolbar. For more details refer here.
import { PivotViewAllModule, PivotFieldListAllModule } from '@syncfusion/ej2-angular-pivotview'
import { Component, OnInit, ViewChild } from '@angular/core';
import { PivotView } from '@syncfusion/ej2-angular-pivotview';
import { Button } from '@syncfusion/ej2-buttons';
import { DataSourceSettingsModel } from '@syncfusion/ej2-pivotview/src/model/datasourcesettings-model';

@Component({
    imports: [
        PivotViewAllModule,
        PivotFieldListAllModule
    ],
    standalone: true,
    selector: 'app-container',
    template: `<div class="col-md-8">
    <ejs-pivotview #pivotview id='PivotView' height='350' [dataSourceSettings]=dataSourceSettings allowExcelExport='true' [width]=width></ejs-pivotview></div>
    <div class="col-md-2"><button ej-button id='export'>Export</button></div>`
})
export class AppComponent implements OnInit {
  public width?: string;
  public dataSourceSettings?: DataSourceSettingsModel;
  public button?: Button;

    @ViewChild('pivotview', {static: false})
    public pivotGridObj?: PivotView;

    ngOnInit(): void {

        this.dataSourceSettings = {
            url: 'https://services.syncfusion.com/angular/production/api/pivot/post',
            mode: 'Server',
            columns: [ { name: 'Year', caption: 'Production Year' }],
            values: [
                { name: 'Sold', caption: 'Units Sold' },
                { name: 'Amount', caption: 'Sold Amount' }
            ],
            rows: [{ name: 'Country' }, {name: 'Products'}],
            formatSettings: [{ name: 'Amount', format: 'C0' }, { name: 'Sold', format: 'N0' }]
        };
        this.width = '100%';

        this.button = new Button({ isPrimary: true });
        this.button.appendTo('#export');

        this.button.element.onclick = (): void => {
            this.pivotGridObj?.excelExport();
        };
    }
}
To enable export functionality in a server-side controller, initialize the ExcelExport class to handle export file generation.
private ExcelExport excelExport = new ExcelExport();Then, based on the Action parameter (onExcelExport or onCsvExport), invoke the ExportToExcel method in the Post method of the PivotController.cs file.
    public async Task<object> Post([FromBody]object args)
    {
        FetchData param = JsonConvert.DeserializeObject<FetchData>(args.ToString());
        if (param.Action == "fetchFieldMembers")
        {
            return await GetMembers(param);
        }
        else if (param.Action == "fetchRawData")
        {
            return await GetRawData(param);
        }
        else if (param.Action == "onExcelExport" || param.Action == "onCsvExport" ||
                  param.Action == "onPivotExcelExport" || param.Action == "onPivotCsvExport")
        {
            EngineProperties engine = await GetEngine(param);
            if (param.InternalProperties.EnableVirtualization && param.ExportAllPages)
            {
                engine = await PivotEngine.PerformAction(engine, param);
            }
            if (param.Action == "onExcelExport")
            {
                return excelExport.ExportToExcel("Excel", engine, null, param.ExcelExportProperties);
            }
            else if (param.Action == "onPivotExcelExport" || param.Action == "onPivotCsvExport")
            {
                return pivotExport.ExportAsPivot(param.Action == "onPivotExcelExport" ? ExportType.Excel : ExportType.CSV, engine, param);
            }
            else
            {
                return excelExport.ExportToExcel("CSV", engine, null, param.ExcelExportProperties);
            }
        }
        else
        {
            return await GetPivotValues(param);
        }
    }
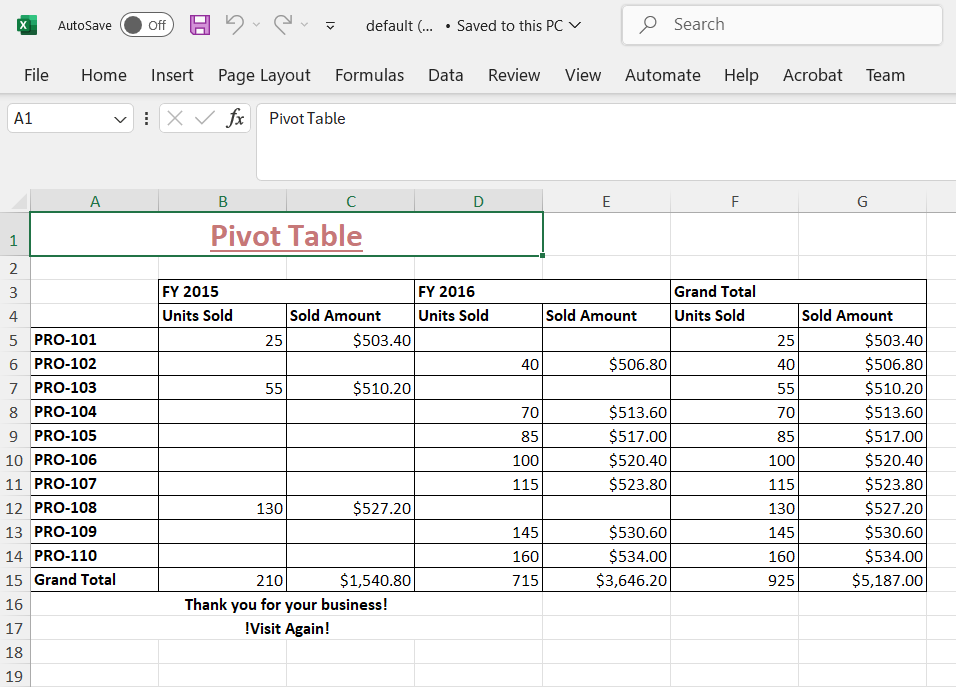
Add header and footer while exporting
The Excel export provides an option to include header and footer content for the excel document before exporting. In-order to add header and footer, define header and footer properties in ExcelExportProperties and pass it as a parameter to the excelExport method.
import { PivotViewAllModule, PivotFieldListAllModule } from '@syncfusion/ej2-angular-pivotview'
import { Component, OnInit, ViewChild } from '@angular/core';
import { PivotView } from '@syncfusion/ej2-angular-pivotview';
import { Button } from '@syncfusion/ej2-buttons';
import { DataSourceSettingsModel } from '@syncfusion/ej2-pivotview/src/model/datasourcesettings-model';
import { ExcelExportProperties } from '@syncfusion/ej2-grids';

@Component({
    imports: [
        PivotViewAllModule,
        PivotFieldListAllModule
    ],
    standalone: true,
    selector: 'app-container',
    template: `<div class="col-md-8">
    <ejs-pivotview #pivotview id='PivotView' height='350' [dataSourceSettings]=dataSourceSettings allowExcelExport='true' [width]=width></ejs-pivotview></div>
    <div class="col-md-2"><button ej-button id='export'>Export</button></div>`
})
export class AppComponent implements OnInit {
  public width?: string;
  public dataSourceSettings?: DataSourceSettingsModel;
  public button?: Button;

    @ViewChild('pivotview', {static: false})
    public pivotGridObj?: PivotView;

    ngOnInit(): void {

        this.dataSourceSettings = {
            url: 'https://services.syncfusion.com/angular/production/api/pivot/post',
            mode: 'Server',
            columns: [ { name: 'Year', caption: 'Production Year' }],
            values: [
                { name: 'Sold', caption: 'Units Sold' },
                { name: 'Amount', caption: 'Sold Amount' }
            ],
            rows: [{ name: 'Country' }, {name: 'Products'}],
            formatSettings: [{ name: 'Amount', format: 'C0' }, { name: 'Sold', format: 'N0' }]
        };
        this.width = '100%';

        this.button = new Button({ isPrimary: true });
        this.button.appendTo('#export');

        this.button.element.onclick = (): void => {
            let excelExportProperties: ExcelExportProperties = {
                header: {
                    headerRows: 2,
                    rows: [
                        { cells: [{ colSpan: 13, value: "Pivot Table", style: { fontColor: '#C67878', fontSize: 20, hAlign: 'Center', bold: true, underline: true } }] }
                    ]
                },
                footer: {
                    footerRows: 4,
                    rows: [
                        { cells: [{ colSpan: 13, value: "Thank you for your business!", style: { hAlign: 'Center', bold: true } }] },
                        { cells: [{ colSpan: 13, value: "!Visit Again!", style: { hAlign: 'Center', bold: true } }] }
                    ]
                }
              };
            this.pivotGridObj?.excelExport(excelExportProperties);
        };
    }
}
CSV Export
The Excel export allows pivot table data to be exported in CSV file format as well. To enable CSV export in the pivot table, set the allowExcelExport as true. Once the API is set, the user needs to call the csvExport method to export the pivot table to CSV by clicking an external button.
The pivot table component can be exported to CSV format using options available in the toolbar. For more details refer here.
import { PivotViewAllModule, PivotFieldListAllModule } from '@syncfusion/ej2-angular-pivotview'
import { Component, OnInit, ViewChild } from '@angular/core';
import { PivotView } from '@syncfusion/ej2-angular-pivotview';
import { Button } from '@syncfusion/ej2-buttons';
import { DataSourceSettingsModel } from '@syncfusion/ej2-pivotview/src/model/datasourcesettings-model';

@Component({
    imports: [
        PivotViewAllModule,
        PivotFieldListAllModule
    ],
    standalone: true,
    selector: 'app-container',
    template: `<div class="col-md-8">
    <ejs-pivotview #pivotview id='PivotView' height='350' [dataSourceSettings]=dataSourceSettings allowExcelExport='true' [width]=width></ejs-pivotview></div>
    <div class="col-md-2"><button ej-button id='export'>Export</button></div>`
})
export class AppComponent implements OnInit {
  public width?: string;
  public dataSourceSettings?: DataSourceSettingsModel;
  public button?: Button;

    @ViewChild('pivotview', {static: false})
    public pivotGridObj?: PivotView;

    ngOnInit(): void {

        this.dataSourceSettings = {
            url: 'https://services.syncfusion.com/angular/production/api/pivot/post',
            mode: 'Server',
            columns: [ { name: 'Year', caption: 'Production Year' }],
            values: [
                { name: 'Sold', caption: 'Units Sold' },
                { name: 'Amount', caption: 'Sold Amount' }
            ],
            rows: [{ name: 'Country' }, {name: 'Products'}],
            formatSettings: [{ name: 'Amount', format: 'C0' }, { name: 'Sold', format: 'N0' }]
        };
        this.width = '100%';

        this.button = new Button({ isPrimary: true });
        this.button.appendTo('#export');

        this.button.element.onclick = (): void => {
            this.pivotGridObj?.csvExport();
        };
    }
}
To enable export functionality in a server-side controller, initialize the ExcelExport class to handle export file generation.
private ExcelExport excelExport = new ExcelExport();Then, based on the Action parameter (onExcelExport or onCsvExport), invoke the ExportToExcel method in the Post method of the PivotController.cs file.
    [Route("/api/pivot/post")]
    [HttpPost]
    public async Task<object> Post([FromBody] object args)
    {
        FetchData param = JsonConvert.DeserializeObject<FetchData>(args.ToString());
        if (param.Action == "fetchFieldMembers")
        {
            return await GetMembers(param);
        }
        else if (param.Action == "fetchRawData")
        {
            return await GetRawData(param);
        }
        else if (param.Action == "onExcelExport" || param.Action == "onCsvExport" ||
                param.Action == "onPivotExcelExport" || param.Action == "onPivotCsvExport")
        {
            EngineProperties engine = await GetEngine(param);
            if (param.InternalProperties.EnableVirtualization && param.ExportAllPages)
            {
                engine = await PivotEngine.PerformAction(engine, param);
            }
            if (param.Action == "onExcelExport")
            {
                return excelExport.ExportToExcel("Excel", engine, null, param.ExcelExportProperties);
            }
            else
            {
                return excelExport.ExportToExcel("CSV", engine, null, param.ExcelExportProperties);
            }
        }
        else
        {
            return await GetPivotValues(param);
        }
    }
Export as Pivot
You can export a Syncfusion PivotTable to an Excel file while preserving its native pivot structure using the server-side engine. The exported Excel document contains a fully interactive PivotTable, allowing users to dynamically modify configurations such as filtering, sorting, grouping, and aggregation directly in Microsoft Excel.
To enable native Excel pivot export in the PivotTable, the user must call the exportAsPivot method to export the PivotTable to Excel by clicking an external button, specifying the export type (Excel or CSV) as a parameter.
import { PivotViewAllModule, PivotFieldListAllModule } from '@syncfusion/ej2-angular-pivotview'
import { Component, OnInit, ViewChild } from '@angular/core';
import { PivotView } from '@syncfusion/ej2-angular-pivotview';
import { Button } from '@syncfusion/ej2-buttons';
import { DataSourceSettingsModel } from '@syncfusion/ej2-pivotview/src/model/datasourcesettings-model';

@Component({
    imports: [
        PivotViewAllModule,
        PivotFieldListAllModule
    ],
    standalone: true,
    selector: 'app-container',
    template: `<div class="col-md-8">
    <ejs-pivotview #pivotview id='PivotView' height='350' [dataSourceSettings]=dataSourceSettings allowExcelExport='true' [width]=width></ejs-pivotview></div>
    <div class="col-md-2"><button ej-button id='export'>Export</button></div>`
})
export class AppComponent implements OnInit {
  public width?: string;
  public dataSourceSettings?: DataSourceSettingsModel;
  public button?: Button;

    @ViewChild('pivotview', {static: false})
    public pivotGridObj?: PivotView;

    ngOnInit(): void {

        this.dataSourceSettings = {
            url: 'https://services.syncfusion.com/angular/production/api/pivot/post',
            mode: 'Server',
            columns: [ { name: 'Year', caption: 'Production Year' }],
            values: [
                { name: 'Sold', caption: 'Units Sold' },
                { name: 'Amount', caption: 'Sold Amount' }
            ],
            rows: [{ name: 'Country' }, {name: 'Products'}],
            formatSettings: [{ name: 'Amount', format: 'C0' }, { name: 'Sold', format: 'N0' }]
        };
        this.width = '100%';

        this.button = new Button({ isPrimary: true });
        this.button.appendTo('#export');

        this.button.element.onclick = (): void => {
            this.pivotGridObj?.exportAsPivot();
        };
    }
}
To enable native Excel pivot export functionality in a server-side controller, initialize the PivotExportEngine class to handle export file generation.
private PivotExportEngine<PivotData> pivotExport = new PivotExportEngine<PivotData>();Then, based on the Action parameter (onPivotExcelExport or onPivotCsvExport), invoke the ExportAsPivot method in the Post method of the PivotController.cs file.
    public async Task<object> Post([FromBody]object args)
    {
        FetchData param = JsonConvert.DeserializeObject<FetchData>(args.ToString());
        if (param.Action == "fetchFieldMembers")
        {
            return await GetMembers(param);
        }
        else if (param.Action == "fetchRawData")
        {
            return await GetRawData(param);
        }
          else if (param.Action == "onExcelExport" || param.Action == "onCsvExport" ||
                  param.Action == "onPivotExcelExport" || param.Action == "onPivotCsvExport")
        {
            EngineProperties engine = await GetEngine(param);
            if (param.InternalProperties.EnableVirtualization && param.ExportAllPages)
            {
                engine = await PivotEngine.PerformAction(engine, param);
            }
            if (param.Action == "onExcelExport")
            {
                return excelExport.ExportToExcel("Excel", engine, null, param.ExcelExportProperties);
            }
            else if (param.Action == "onPivotExcelExport" || param.Action == "onPivotCsvExport")
            {
                return pivotExport.ExportAsPivot(param.Action == "onPivotExcelExport" ? ExportType.Excel : ExportType.CSV, engine, param);
            }
            else
            {
                return excelExport.ExportToExcel("CSV", engine, null, param.ExcelExportProperties);
            }
        }
        else
        {
            return await GetPivotValues(param);
        }
    }
Secure server requests with beforeServiceInvoke
A Pivot Table wired to a server endpoint may work locally. When pointed at a production API, requests may return 401 errors—not due to invalid queries, but because the server requires credentials. A simple, low‑impact fix is to attach authentication headers immediately before each request leaves the browser.
The Pivot Table exposes a hook for every outgoing call through the beforeServiceInvoke event. The event fires just before a request is sent and provides an args object, allowing headers to be set via args.internalProperties.headers. Using beforeServiceInvoke avoids endpoint rewrites or custom transports and provides a single reliable hook that applies to aggregation, sorting, filtering, grouping, exporting, and more.
Use a trusted token issued by the authentication flow after sign‑in. Keep tokens out of source control by retrieving them at runtime (for example, from a secure in‑memory store, a server endpoint that reads an httpOnly cookie, or a token manager that refreshes on expiry). Merge the token into request headers so every call carries proof of identity.
import { NgModule } from '@angular/core'
import { BrowserModule } from '@angular/platform-browser'
import { PivotViewAllModule, PivotFieldListAllModule } from '@syncfusion/ej2-angular-pivotview';
import { Component, OnInit, ViewChild } from '@angular/core';
import { PivotView } from '@syncfusion/ej2-angular-pivotview';
import { GridSettings } from '@syncfusion/ej2-pivotview/src/pivotview/model/gridsettings';
import { DataSourceSettingsModel } from '@syncfusion/ej2-pivotview/src/model/datasourcesettings-model';

@Component({
imports: [
        PivotViewAllModule,
        PivotFieldListAllModule
    ],
standalone: true,
    selector: 'app-container',
    template: `<ejs-pivotview #pivotview id='PivotView' height='350' [dataSourceSettings]=dataSourceSettings [width]=width (beforeServiceInvoke)='beforeServiceInvoke($event)'></ejs-pivotview>`,
    providers: []
})
export class AppComponent implements OnInit {
    public dataSourceSettings?: DataSourceSettingsModel;
    public width?: string;
    public gridSettings?: GridSettings;

    @ViewChild('pivotview', { static: false })
    public pivotGridObj?: PivotView;

    // Attach an Authorization header before each server call
    beforeServiceInvoke(args:any) {
        const token = this.getAuthToken(); // obtain securely at runtime

        args.internalProperties = args.internalProperties || {};
        args.internalProperties.headers = {
            ...(args.internalProperties.headers || {}),
            'Authorization': `Bearer ${token}`
        };
    }

    getAuthToken() {
        // Retrieve and return a valid auth token securely
        return 'eyJhbGciOiJIUzI1NiIsInR5cCI6IkpXVCJ9';
    }

    ngOnInit(): void {
        this.width = '100%';
        this.dataSourceSettings = {
            url: 'https://services.syncfusion.com/angular/production/api/pivot/post',
            mode: 'Server',
            expandAll: true,
            enableSorting: true,
            columns: [{ name: 'Year', caption: 'Production Year' }],
            values: [
                { name: 'Sold', caption: 'Units Sold' },
                { name: 'Amount', caption: 'Sold Amount' }
            ],
            rows: [{ name: 'Country' }, { name: 'Products' }],
            formatSettings: [{ name: 'Amount', format: 'C0' }, { name: 'Sold', format: 'N0' }],
            filters: []
        };
    }
}
import { bootstrapApplication } from '@angular/platform-browser';
import { AppComponent } from './app.component';
import 'zone.js';
bootstrapApplication(AppComponent).catch((err) => console.error(err));Production tips
- Load tokens on demand and rotate them regularly; never hard-code secrets in source control.
- When a backend expects a different header (for example, X‑API‑Key), use that header instead of Authorization.
- Configure CORS to allow any custom headers added (for example, include Authorization in Access‑Control‑Allow‑Headers) so browsers do not block requests.
Troubleshooting
- 401 or 403: Token is missing, expired, or invalid for the target route.
- CORS preflight error: Server does not allow the custom headers.
- Missing headers: Ensure
beforeServiceInvokeruns on the same Pivot instance and sets headers on every call.
Pre‑shipment checks
- Inspect request headers in the browser Network panel; Authorization (or the configured custom key) must be present on every call.
- Confirm the server reads the same header and maps the value to the authentication middleware.
- Reproduce 401 vs 403 responses during testing to validate end‑to‑end header handling and permissions.
Summary
- A single event keeps requests authenticated without API redesign and reduces surprises when moving from local testing to production.