File system provider in Angular File Manager component
7 Jul 202624 minutes to read
The file system provider allows the File Manager component to manage the files and folders in a physical or cloud-based file system. It provides the methods for performing various file actions like creating a new folder, copying and moving of files or folders, deleting, uploading, and downloading the files or folders in the file system.
Overview of File System Providers
The following file providers are available in EJ2 File Manager component:
- Physical file system provider
- Azure cloud file system Provider
- Amazon S3 cloud file provider
- SharePoint file provider
- File Transfer Protocol file system provider
- SQL database file system provider
- NodeJS file system provider
- Google Drive file system provider
- Firebase Realtime Database file system provider
Physical file system provider
The Physical file system provider allows the users to access and manage the physical file system. To get started, clone the ej2-aspcore-file-provider using the following command.
git clone https://github.com/SyncfusionExamples/ej2-aspcore-file-provider  ej2-aspcore-file-provider

cd ej2-aspcore-file-provider
After cloning, just open the project in Visual Studio and restore the NuGet packages. Now, set the root directory of the physical file system in the File Manager controller.
After setting the root directory of the file system, just build and run the project. Now, the project will be hosted in http://localhost:{port} and just mapping the ajaxSettings property of the File Manager component to the appropriate controller methods allows to manage the files in the physical file system.
import { Component } from '@angular/core';

@Component({
    selector: 'app-root',
    styleUrls: ['app/app.component.css'],
    templateUrl: 'app/app.component.html'
})
export class AppComponent {
    public ajaxSettings: object;
    public hostUrl: string = 'http://localhost:{port}/';
    public ngOnInit(): void {
        // Initializing File Manager with Physical file system provider.
        this.ajaxSettings = {
            // Replace the hosted port number in the place of "{port}"
            url: this.hostUrl + "api/FileManager/FileOperations",
            downloadUrl: this.hostUrl + "api/FileManager/Download",
            uploadUrl: this.hostUrl + "api/FileManager/Upload",
            getImageUrl: this.hostUrl + "api/FileManager/GetImage"
        };
    }
}
Note: To learn more about the file actions that can be performed with Physical file system provider, refer to this link
Azure cloud file system Provider
The Azure file system provider allows the users to access and manage the blobs in the Azure blob storage. To get started, clone the azure-aspcore-file-provider using the following command.
git clone https://github.com/SyncfusionExamples/azure-aspcore-file-provider azure-aspcore-file-providerAfter cloning, just open the project in Visual Studio and restore the NuGet packages. Now, register the Azure storage by passing details like name, password, and blob name to the Register Azure method in the controller.
void RegisterAzure(string accountName, string accountKey, string blobName)Then, set the blob container and the root blob directory by passing the corresponding URLs as parameters in the setBlobContainer method as follows.
void setBlobContainer(string blobPath, string filePath)Note: Also, assign the same blobPath URL and filePath URL in AzureFileOperations and AzureUpload methods in the File Manager controller to determine the original path of the Azure blob.
After setting the blob container references, build and run the project. Now, the project will be hosted in http://localhost:{port} and just mapping the ajaxSettings property of the File Manager component to the appropriate controller methods allows to manage the Azure blob storage.
import { Component } from '@angular/core';

@Component({
    selector: 'app-root',
    styleUrls: ['app/app.component.css'],
    templateUrl: 'app/app.component.html'
})
export class AppComponent {
    public ajaxSettings: object;
    public hostUrl: string = 'http://localhost:{port}/';
    public ngOnInit(): void {
        // File Manager sample with Azure service.
        this.ajaxSettings = {
            // Replace the hosted port number in the place of "{port}"
            url: this.hostUrl + "api/AzureProvider/AzureFileOperations",
            downloadUrl: this.hostUrl + "api/AzureProvider/AzureDownload",
            uploadUrl: this.hostUrl + "api/AzureProvider/AzureUpload",
            getImageUrl: this.hostUrl + "api/AzureProvider/AzureGetImage"
        };
    }
}
NuGet: Additionally, we have created a NuGet package of ASP.NET Core Azure file system provider.
Please, use the following command to install the NuGet package in an application.
dotnet add package Syncfusion.EJ2.FileManager.AzureFileProvider.AspNet.CoreNote: To learn more about the file actions that can be performed with Azure Cloud File System Provider, refer to this link
Amazon S3 cloud file provider
The Amazon S3 (Simple Storage Service) cloud file provider allows the users to access and manage a server hosted file system as collection of objects stored in the Amazon S3 Bucket. To get started, clone the amazon-s3-aspcore-file-provider using the following command
git clone https://github.com/SyncfusionExamples/amazon-s3-aspcore-file-provider.git amazon-s3-aspcore-file-provider.gitNote: To learn more about creating and configuring an Amazon S3 bucket, refer to this link.
After cloning, open the project in Visual Studio and restore the NuGet packages. Now, register Amazon S3 client account details like awsAccessKeyId, awsSecretKeyId and awsRegion details in RegisterAmazonS3 method in the File Manager controller to perform the file operations.
void RegisterAmazonS3(string bucketName, string awsAccessKeyId, string awsSecretAccessKey, string bucketRegion)After registering the Amazon client account details, just build and run the project. Now, the project will be hosted in http://localhost:{port} and just mapping the ajaxSettings property of the File Manager component to the appropriate controller methods allows to manage the Amazon S3 (Simple Storage Service) bucket’s objects storage.
import { Component } from '@angular/core';

@Component({
    selector: 'app-root',
    styleUrls: ['app/app.component.css'],
    templateUrl: 'app/app.component.html'
})
export class AppComponent {
    public ajaxSettings: object;
    public hostUrl: string = 'http://localhost:{port}/';
    public ngOnInit(): void {
        // File Manager sample with amazon service.
        this.ajaxSettings = {
            // Replace the hosted port number in the place of "{port}"
            url: this.hostUrl + "api/AmazonS3Provider/AmazonS3FileOperations",
            downloadUrl: this.hostUrl + "api/AmazonS3Provider/AmazonS3Download",
            uploadUrl: this.hostUrl + "api/AmazonS3Provider/AmazonS3Upload",
            getImageUrl: this.hostUrl + "api/AmazonS3Provider/AmazonS3GetImage"
        };
    }
}
Note: To learn more about the file actions that can be performed with Amazon S3 Cloud File provider, refer to this link
SharePoint file provider
The SharePoint file provider allows users to access and manage files within Microsoft SharePoint. To get started, clone the SharePoint-aspcore-file-provider using the following command.
git clone https://github.com/SyncfusionExamples/sharepoint-aspcore-file-provider  sharepoint-aspcore-file-provider

cd sharepoint-aspcore-file-provider
Prerequisites
To set up the SharePoint service provider, follow these steps:
-
Create an App Registration in Azure Active Directory (AAD):
- Navigate to the Azure portal and create a new app registration under Azure Active Directory.
- Note down the Tenant ID, Client ID, and Client Secret from the app registration.
-
Use Microsoft Graph Instance:
- With the obtained Tenant ID, Client ID, and Client Secret, you can create a Microsoft Graph instance.
- This instance will be used to interact with the SharePoint document library.
-
Use Details from
appsettings.json:- The
SharePointControlleris already configured to use the credentials provided in theappsettings.jsonfile. - You only need to provide your
Tenant ID,Client ID,Client Secret,User Site Name, andUser Drive IDin theappsettings.jsonfile, and the application will automatically initialize the SharePoint service.
- The
Example appsettings.json Configuration
{
  "Logging": {
    "LogLevel": {
      "Default": "Warning"
    }
  },
  "SharePointSettings": {
    "TenantId": "<--Tenant Id-->",
    "ClientId": "<--Client Id-->",
    "ClientSecret": "<--Client Secret-->",
    "UserSiteName": "<--User Site Name-->",
    "UserDriveId": "<--User Drive ID-->"
  },
  "AllowedHosts": "*"
}
Replace “<–User Site Name–>”, “<–User Drive ID–>”, “tenantId”, “clientId”, and “clientSecret” with your actual values.
After configuring the SharePoint file provider, build and run the project. Now, the project will be hosted in http://localhost:{port} and just mapping the ajaxSettings property of the File Manager component to the appropriate controller methods allows to manage the files in the Microsoft SharePoint.
import { Component } from '@angular/core';

@Component({
    selector: 'app-root',
    styleUrls: ['app/app.component.css'],
    templateUrl: 'app/app.component.html'
})
export class AppComponent {
    public ajaxSettings: object;
    public hostUrl: string = 'http://localhost:{port}/';
    public ngOnInit(): void {
        this.ajaxSettings = {
            // Replace the hosted port number in the place of "{port}"
            url: this.hostUrl + 'api/SharePointProvider/SharePointFileOperations',
            downloadUrl: this.hostUrl + 'api/SharePointProvider/SharePointDownload',
            uploadUrl: this.hostUrl + 'api/SharePointProvider/SharePointUpload',
            getImageUrl: this.hostUrl + 'api/SharePointProvider/SharePointGetImage'
        };
    }
}
Note: To learn more about the file actions that can be performed with SharePoint file provider, refer to this link
File Transfer Protocol file system provider
In ASP.NET Core, File Transfer Protocol file system provider allows the users to access to the hosted file system as collection of objects stored in the file storage using File Transfer Protocol. To get started, clone the ftp-aspcore-file-provider using the following command
git clone https://github.com/SyncfusionExamples/ftp-aspcore-file-provider.git ftp-aspcore-file-provider.gitAfter cloning, open the project in Visual Studio and restore the NuGet packages. Now, register File Transfer Protocol details like hostName, userName and password in SetFTPConnection method in the File Manager controller to perform the file operations.
void SetFTPConnection(string hostName, string userName, string password)After registering the File Transfer Protocol details, just build and run the project. Now, the project will be hosted in http://localhost:{port} and just mapping the ajaxSettings property of the File Manager component to the appropriate controller methods allows you to manage the FTP’s objects storage.
import { Component } from '@angular/core';

@Component({
    selector: 'app-root',
    styleUrls: ['app/app.component.css'],
    templateUrl: 'app/app.component.html'
})
export class AppComponent {
    public ajaxSettings: object;
    public hostUrl: string = 'http://localhost:{port}/';
    public ngOnInit(): void {
        // File Manager sample with file transfer protocol service.
        this.ajaxSettings = {
            // Replace the hosted port number in the place of "{port}"
            url: this.hostUrl + "api/FTPProvider/FTPFileOperations",
            downloadUrl: this.hostUrl + "api/FTPProvider/FTPDownload",
            uploadUrl: this.hostUrl + "api/FTPProvider/FTPUpload",
            getImageUrl: this.hostUrl + "api/FTPProvider/FTPGetImage"
        };
    }
}
Note: To learn more about the file actions that can be performed with File Transfer Protocol file system provider, refer to this link
SQL database file system provider
In ASP.NET Core, SQL database file system provider allows the users to manage the file system being maintained in a SQL database table. Unlike the other file system providers, the SQL database file system provider works on ID basis. Here, each file and folder has a unique ID on which all file operations will be performed. To get started, clone the sql-server-database-aspcore-file-provider using the following command.
<add name="FileExplorerConnection" connectionString="Data Source=(LocalDB)\v11.0;AttachDbFilename=|DataDirectory|\FileManager.mdf;Integrated Security=True;Trusted_Connection=true" />After cloning, just open the project in Visual Studio and restore the NuGet packages. To establish the SQL server connection with the database file (for eg: FileManager.mdf), specify the connection string in the web config file as follows.
<add name="FileExplorerConnection" connectionString="Data Source=(LocalDB)\v11.0;AttachDbFilename=|DataDirectory|\FileManager.mdf;Integrated Security=True;Trusted_Connection=true" />Then, make an entry for the connection string in appsettings.json file as follows.
"ConnectionStrings": {
    "FileManagerConnection": "Data Source=(LocalDB)\\MSSQLLocalDB;AttachDbFilename=|DataDirectory|\\App_Data\\FileManager.mdf;Integrated Security=True;Connect Timeout=30"
}
Now, to configure the database connection, set the connection name, table name and root folder ID value by passing these values to the SetSQLConnection method.
void SetSQLConnection(string name, string tableName, string tableID)Refer to this FileManager.mdf, to learn about the pre-defined file system SQL database for the EJ2 File Manager.
After configuring the connection, just build and run the project. Now, the project will be hosted in http://localhost:{port} and just mapping the ajaxSettings property of the File Manager component to the appropriate controller methods allows to manage the files in the SQL database table.
import { Component } from '@angular/core';

@Component({
    selector: 'app-root',
    styleUrls: ['app/app.component.css'],
    templateUrl: 'app/app.component.html'
})
export class AppComponent {
    public ajaxSettings: object;
    public hostUrl: string = 'http://localhost:{port}/';
    public ngOnInit(): void {
        // Initializing the File Manager with SQL database service.
        this.ajaxSettings = {
            // Replace the hosted port number in the place of "{port}"
            url: this.hostUrl + "api/SQLProvider/SQLFileOperations",
            downloadUrl: this.hostUrl + "api/SQLProvider/SQLDownload",
            uploadUrl: this.hostUrl + "api/SQLProvider/SQLUpload",
            getImageUrl: this.hostUrl + "api/SQLProvider/SQLGetImage"
        };
    }
}
Note: To learn more about the file actions that can be performed with SQL database file system provider, refer to this link
Node JS file system provider
The Node JS file system provider allows the users to manage the files and folders in a physical file system. It provides methods for performing all basic file operations like creating a folder, copy, move, delete, and download files and folders in the file system. We can use the Node JS file system provider either by installing the ej2-filemanager-node-filesystem package or by cloning the file system provider from GitHub.
Using ej2-filemanager-node-filesystem package
- Install the ej2-filemanager-node-filesystem package by running the below command.
npm install @syncfusion/ej2-filemanager-node-filesystem-
After installing the package, navigate to the ej2-filemanager-node-filesystem package folder within the node-modules.
-
Run the command npm install command.
Cloning the ej2-filemanager-node-filesystem from GitHub
- Clone the ej2-filemanager-node-filesystem using the following command.
git clone https://github.com/SyncfusionExamples/ej2-filemanager-node-filesystem.git node-filesystem-provider- After cloning, open the root folder and run the command npm install command.
After installing the packages, set the root folder directory of the physical file system in the package JSON under scripts sections as follows.
"start": "node filesystem-server.js -d D:/Projects"Note: By default, the root directory will be configured to set
C:/Usersas the root directory.
To set the port in which the project to be hosted and the root directory of the file system. Run the following command.
set PORT=3000 && node filesystem-server.js -d D:/ProjectsNote: By default, the service will run
8090port.
Now, just mapping the ajaxSettings property of the File Manager component to the appropriate file operation methods in the filesystem-server.js file will allow to manage the physical file system with Node JS file system provider.
import { Component } from '@angular/core';

@Component({
    selector: 'app-root',
    styleUrls: ['app/app.component.css'],
    templateUrl: 'app/app.component.html'
})
export class AppComponent {
    public ajaxSettings: object;
    public hostUrl: string = 'http://localhost:8090/';
    public ngOnInit(): void {
        // Initializing the File Manager with NodeJS service.
        this.ajaxSettings = {
            // Replace the hosted port number in the place of "{port}"
            url: this.hostUrl,
            downloadUrl: this.hostUrl+ "Download",
            uploadUrl: this.hostUrl+ "Upload",
            getImageUrl: this.hostUrl+ "GetImage"
        };
    }
}
Note: To learn more about the file actions that can be performed with Node JS file system provider, refer to this link
Google Drive file system provider
In ASP.NET Core, Google Drive file system provider allows the users to manage the files and folders in a Google Drive account. The Google Drive file system provider works on ID basis where each file and folder have a unique ID. To get started, clone the google-drive-aspcore-file-provider using the following command.
git clone https://github.com/SyncfusionExamples/google-drive-aspcore-file-provider  google-drive-aspcore-file-provider

cd google-drive-aspcore-file-provider
Google Drive file system provider use the Google Drive APIs to read the file in the file system and uses the OAuth 2.0 protocol for authentication and authorization. To authenticate from the client end, obtain the OAuth 2.0 client credentials from the Google API Console. To learn more about generating the client credentials from the from Google API Console, refer to this link.
After generating the client secret data, copy the JSON data to the following specified JSON files in the cloned location.
-
EJ2GoogleDriveFileProvider > credentials > client_secret.json
-
GoogleOAuth2.0Base > credentials > client_secret.json
After updating the credentials, just build and run the project. Now, the project will be hosted in http://localhost:{port}, and it will ask to log on to the Gmail account created the client secret credentials. Then, provide permission to access the Google Drive files by clicking the allow access button in the page. Now, just mapping the ajaxSettings property of the File Manager component to the appropriate controller methods will allows to manage the files from the Google Drive.
import { Component } from '@angular/core';

@Component({
    selector: 'app-root',
    styleUrls: ['app/app.component.css'],
    templateUrl: 'app/app.component.html'
})
export class AppComponent {
    public ajaxSettings: object;
    public hostUrl: string = 'http://localhost:{port}/';
    public ngOnInit(): void {
        // Initializing the File Manager with Google Drive service.
        this.ajaxSettings = {
            // Replace the hosted port number in the place of "{port}"
            url: this.hostUrl + "api/GoogleDriveProvider/GoogleDriveFileOperations",
            downloadUrl: this.hostUrl + "api/GoogleDriveProvider/GoogleDriveDownload",
            uploadUrl: this.hostUrl + "api/GoogleDriveProvider/GoogleDriveUpload",
            getImageUrl: this.hostUrl + "api/GoogleDriveProvider/GoogleDriveGetImage"
        };
    }
}
Note: To learn more about the file actions that can be performed with Google Drive file system provider, refer to this link
Firebase Realtime Database file system provider
The Firebase Realtime Database file system provider in ASP.NET Core provides the efficient way to store the File Manager file system in a cloud database as JSON representation.
Generate Secret access key from service account
Follow the given steps to generate the secret access key:
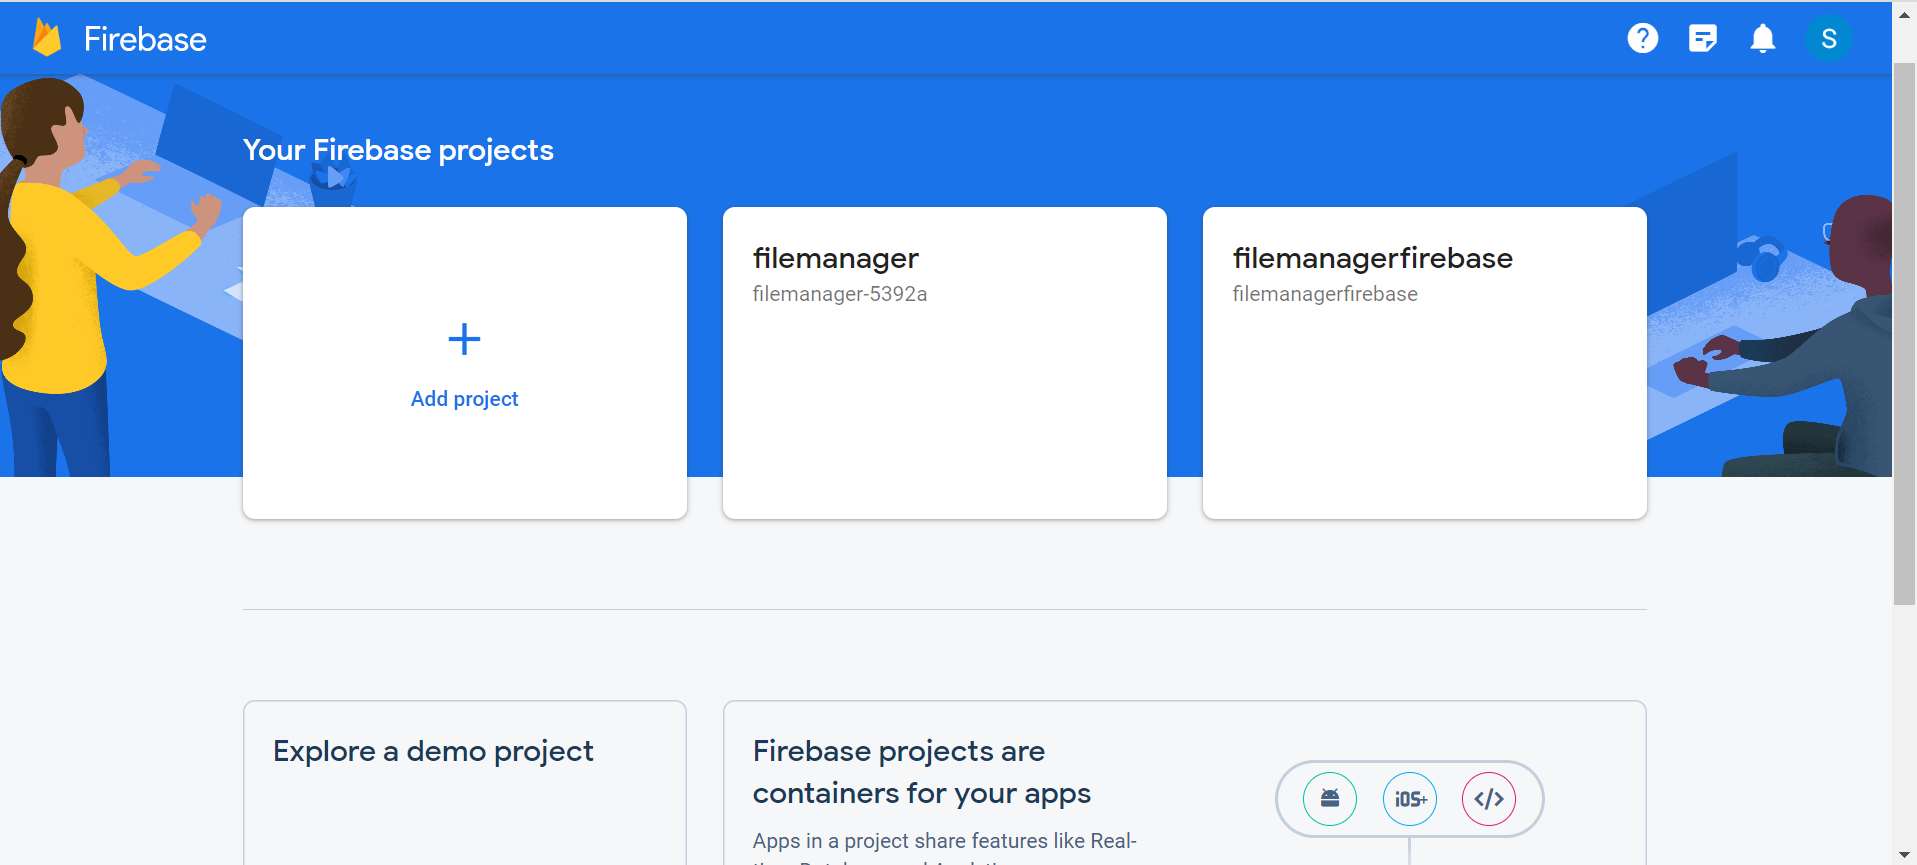
- To access the Firebase console, please click on this link. Once you have accessed the console, you can create a new project by filling in the necessary fields and clicking on the relevant buttons.
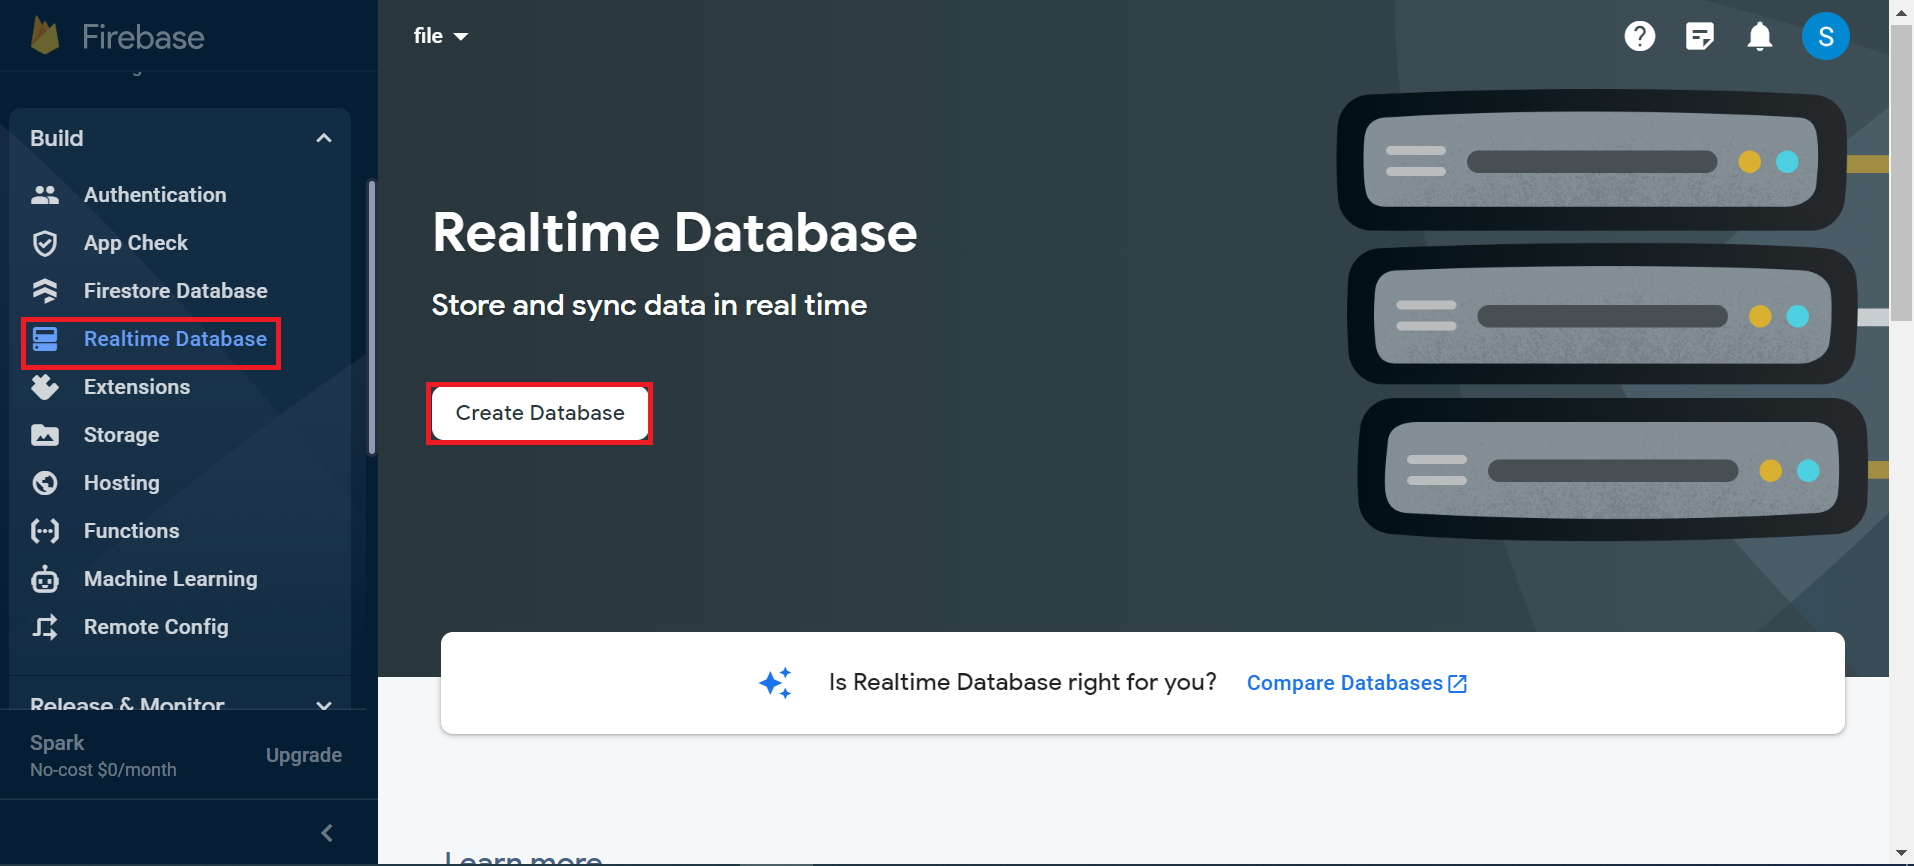
- Within the Firebase console, navigate to the Build tab. Under this tab, select the option for Realtime Database. From there, you can create a new database by clicking on the Create Database button.
- To get started, create a root node and add any desired children to it. Please refer to the following code snippet for guidance on the structure of the JSON:
{
  "Files" : [ {
    "caseSensitive" : false,
    "dateCreated" : "8/22/2019 5:17:55 PM",
    "dateModified" : "8/22/2019 5:17:55 PM",
    "filterId" : "0/",
    "filterPath" : "/",
    "hasChild" : false,
    "id" : "5",
    "isFile" : false,
    "isRoot" : true,
    "name" : "Music",
    "parentId" : "0",
    "selected" : false,
    "showHiddenItems" : false,
    "size" : 0,
    "type" : "folder"
  },
   {
    "caseSensitive" : false,
    "dateCreated" : "8/22/2019 5:18:03 PM",
    "dateModified" : "8/22/2019 5:18:03 PM",
    "filterId" : "0/",
    "filterPath" : "/",
    "hasChild" : false,
    "id" : "6",
    "isFile" : false,
    "isRoot" : true,
    "name" : "videos",
    "parentId" : "0",
    "selected" : false,
    "showHiddenItems" : false,
    "size" : 0,
    "type" : ""
  }]
 }
Here, the Files denotes the rootNode and the subsequent object refers to the children of the root node. rootNode will be taken as the root folder of the file system loaded which will be loaded in File Manager component.
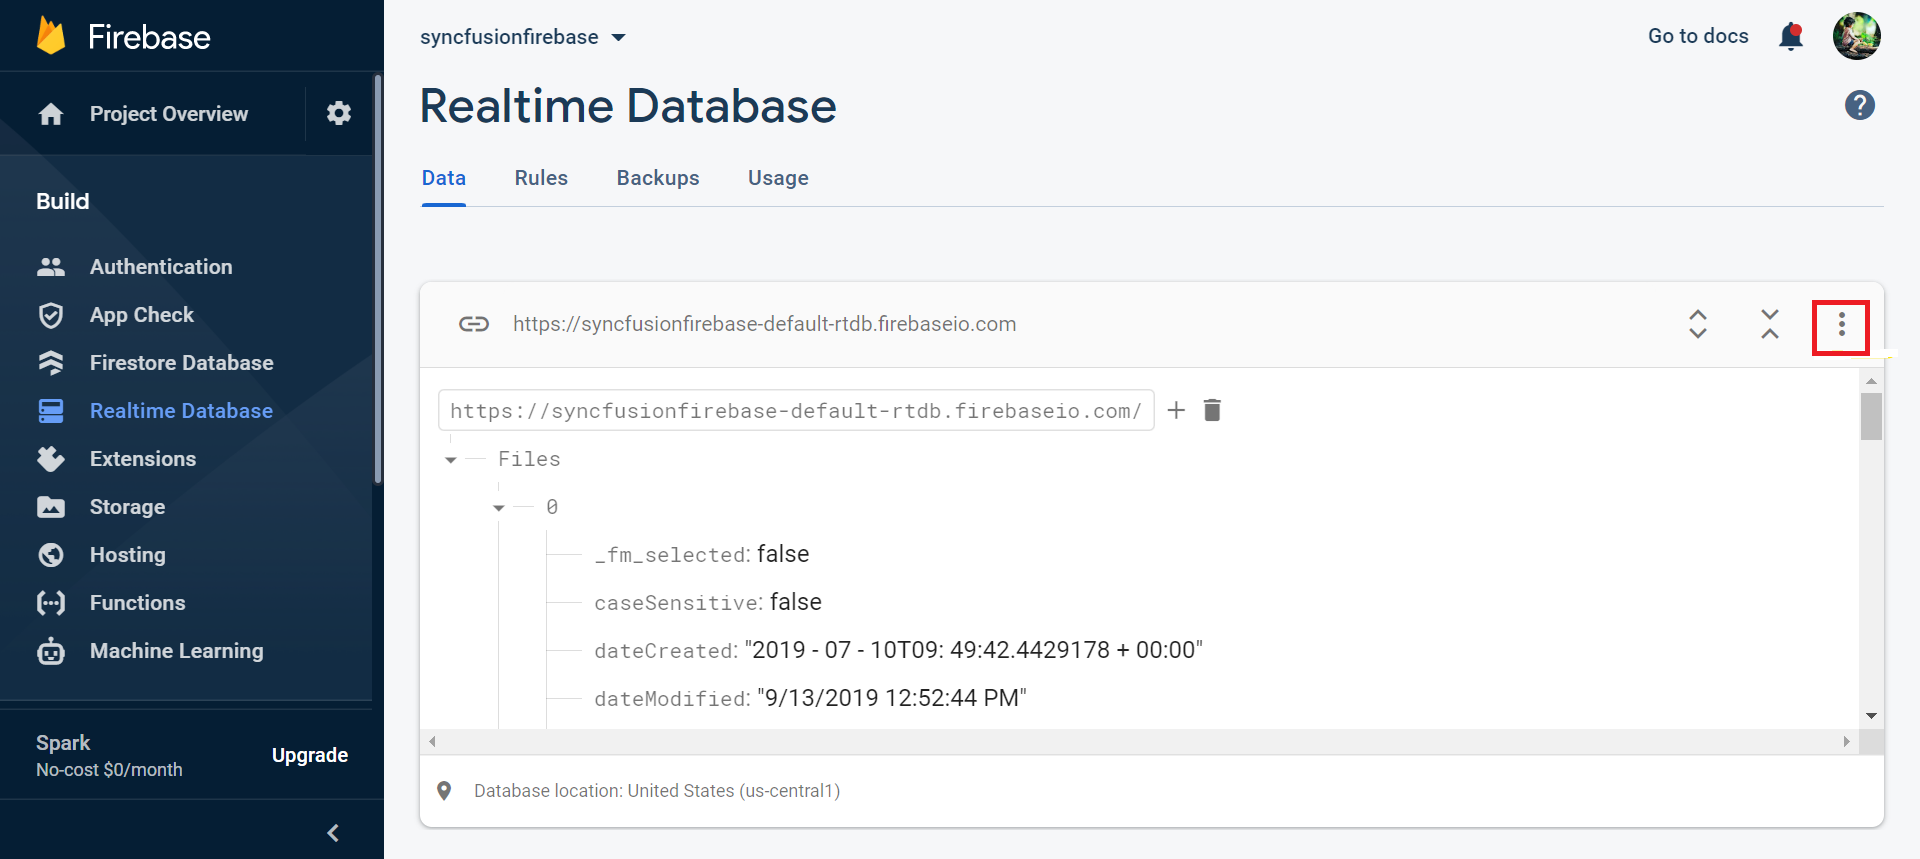
- To import a JSON file into the Firebase Realtime Database, navigate to the Data tab and click on the action icon shown in the accompanying image. From there, select the Import JSON option and upload the JSON file that was created using the code provided above.
- To interact with the Firebase Realtime Database through your application, it is necessary to grant read and write permissions by defining appropriate rules in the Firebase project’s Rules tab, as shown in the following code snippet. Once you have specified the rules, you can publish them by clicking the Publish button to enable the necessary authentication.
{
  /* Visit https://firebase.google.com/docs/database/security to learn more about security rules. */
  "rules": {
    ".read": "auth!=null",
    ".write": "auth!=null"
  }
}
Note: By default, rules of a Firebase project will be false. To read and write the data, configure the Rules as given in the following code snippet in the Rules tab in the Firebase Realtime Database project.
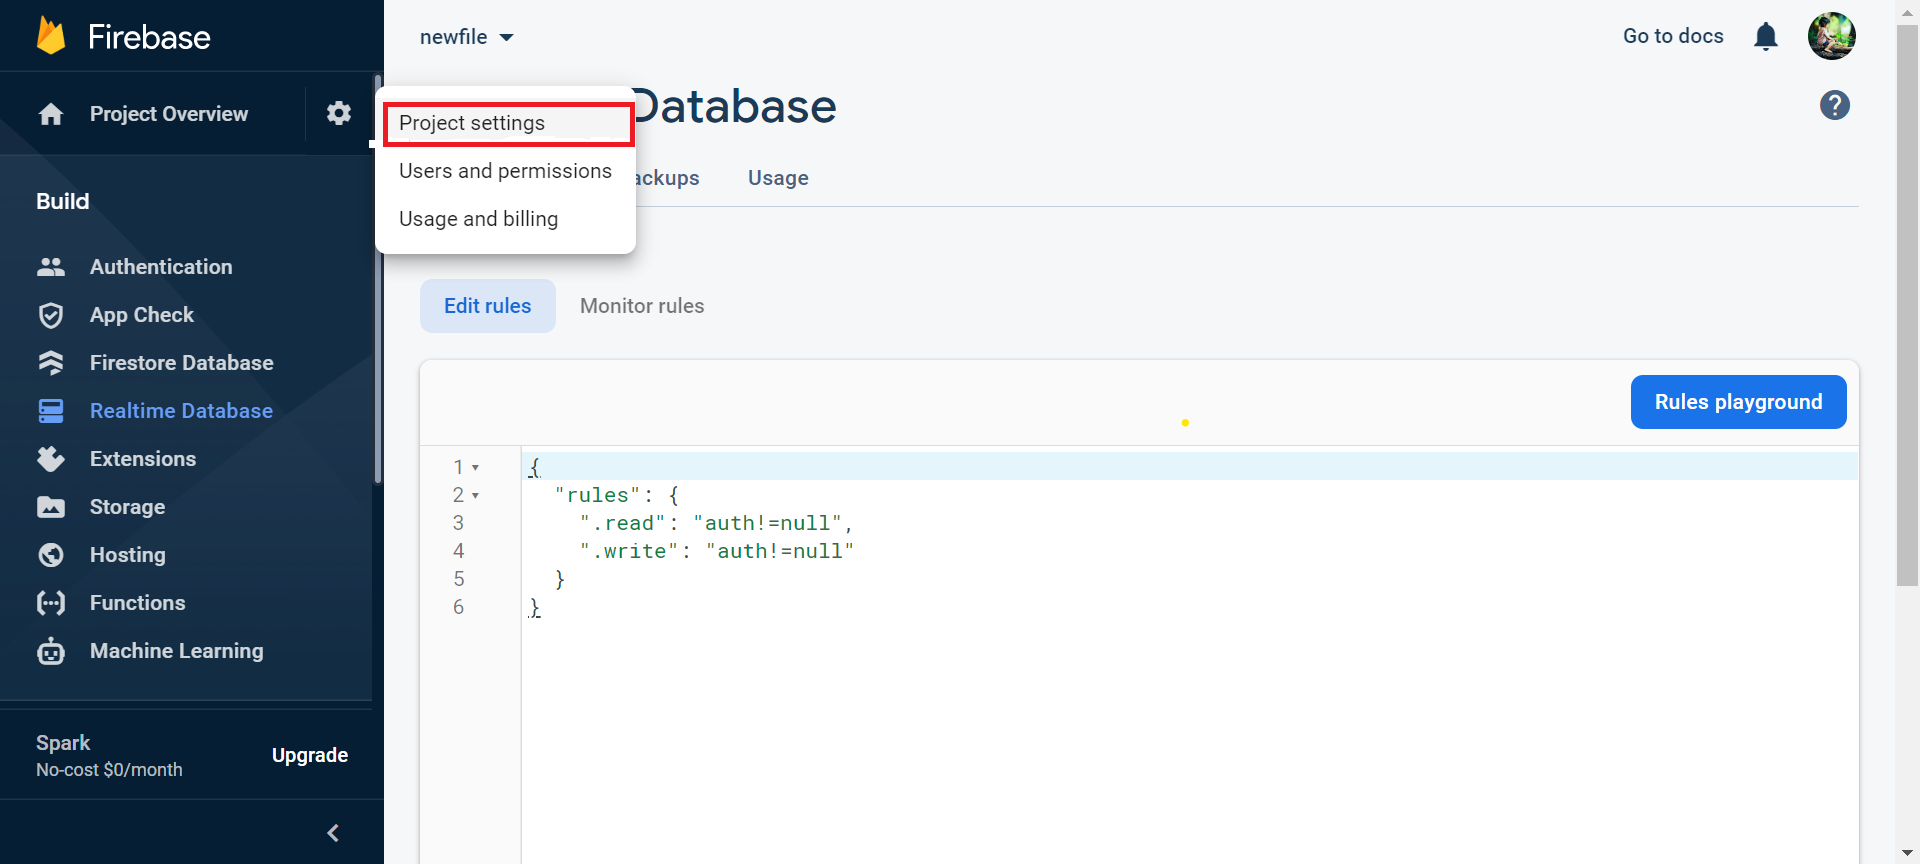
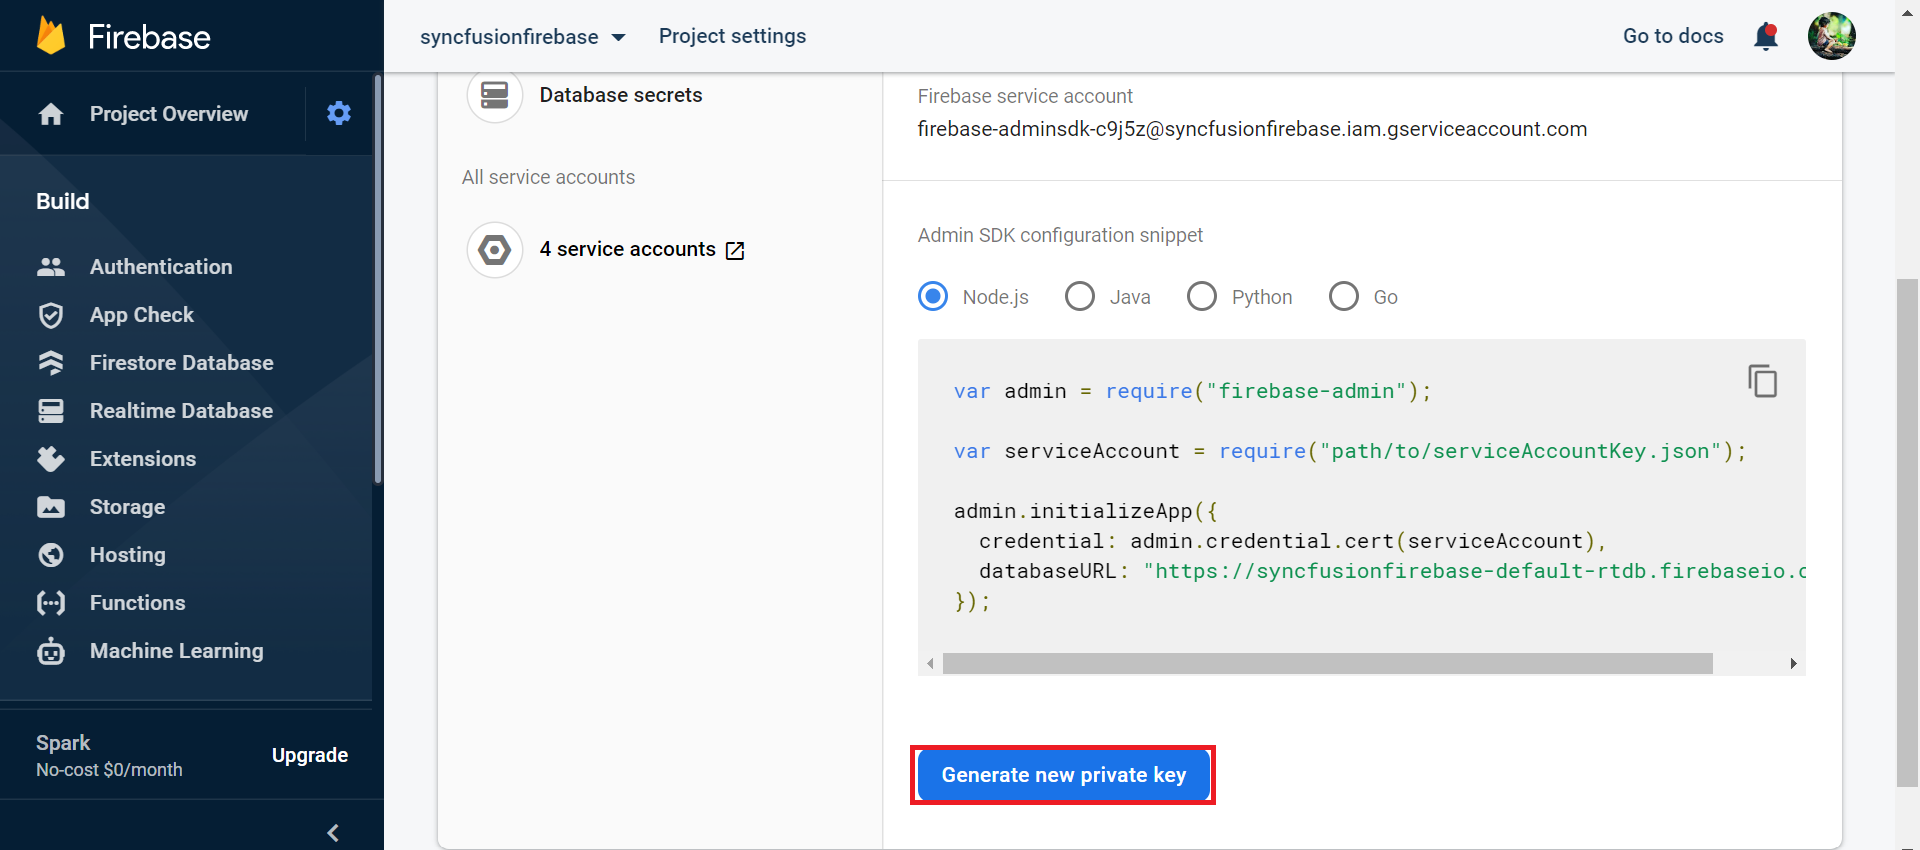
- Navigate to the project settings as instructed and then click on the Service Account tab.
- To obtain the access key JSON file, simply click on the
Generate new private keybutton and then confirm by clicking theGenerate keybutton in the pop-up window that appears.
-
Next, you will need to clone the
firebase-realtime-database-aspcore-file-providerrepository. Once cloned, simply open the project in Visual Studio and restore the NuGet package. -
Once you have generated the secret key, you will need to replace the JSON in the
access_key.jsonfile in the Firebase Realtime Database provider project with the newly generated key. This will enable authentication and allow you to perform read and write operations. -
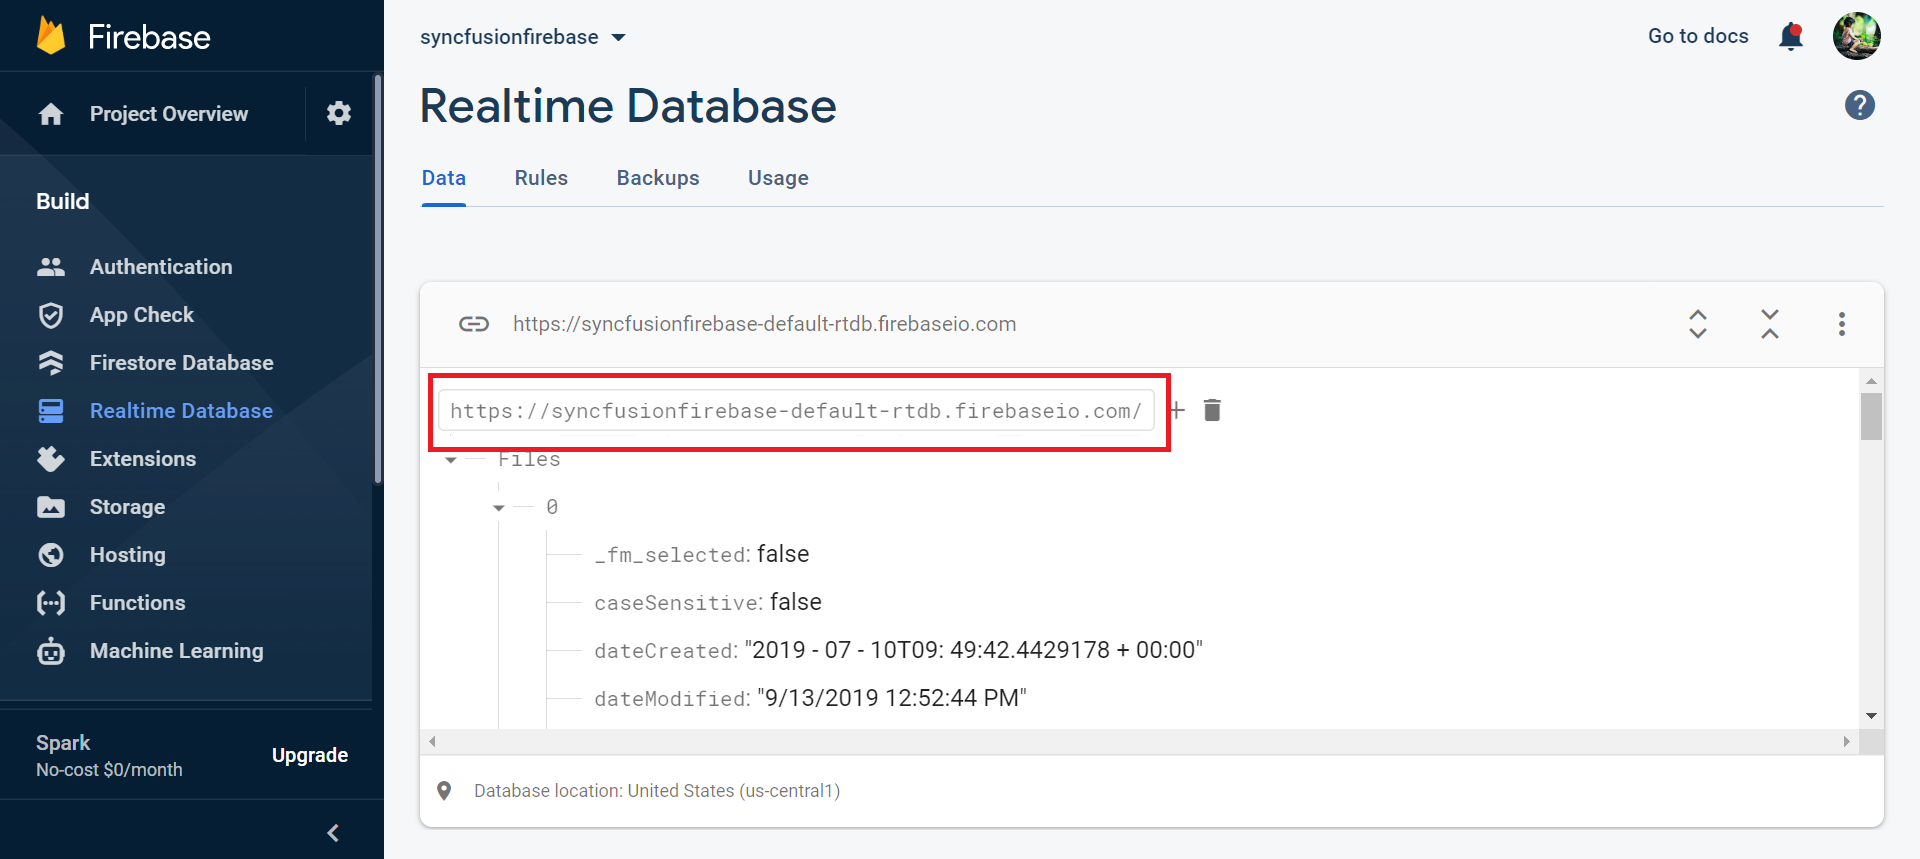
In the Data tab, locate the project API URL and then paste it into the below mentioned section.
Register the Firebase Realtime Database by assigning Firebase Realtime Database REST API link, rootNode, and serviceAccountKeyPath parameters in the RegisterFirebaseRealtimeDB method of class FirebaseRealtimeDBFileProvider in the controller part of the ASP.NET Core application.
this.operation.RegisterFirebaseRealtimeDB(string apiUrl, string rootNode, string serviceAccountKeyPath)Example:
this.operation.RegisterFirebaseRealtimeDB("{copy your API URL here}", "Files", hostingEnvironment.ContentRootPath + \\FirebaseRealtimeDBHelper\\access_key.json);In the above code:
-
{copy your API URL here}denotes Firebase Realtime Database REST API link. -
Filesdenotes newly created root node in Firebase Realtime Database. -
hostingEnvironment.ContentRootPath + \\FirebaseRealtimeDBHelper\\access_key.jsondenotes service account key path which has authentication key for the Firebase Realtime Database data.
After configuring the Firebase Realtime Database service link, build and run the project. Now, the project will be hosted in http://localhost:{port} and just mapping the ajaxSettings property of the File Manager component to the appropriate controller methods allows to manage the files in the Firebase Realtime Database.
import { Component } from '@angular/core';

@Component({
    selector: 'app-root',
    styleUrls: ['app/app.component.css'],
    templateUrl: 'app/app.component.html'
})
export class AppComponent {
    public ajaxSettings: object;
    public hostUrl: string = 'http://localhost:{port}/';
    public ngOnInit(): void {
        // Initializing File Manager with Firebase Realtime Database service.
        this.ajaxSettings = {
            // Replace the hosted port number in the place of "{port}"
            url: this.hostUrl + "api/FirebaseProvider/FirebaseRealtimeFileOperations",
            downloadUrl: this.hostUrl + "api/FirebaseProvider/FirebaseRealtimeDownload",
            uploadUrl: this.hostUrl + "api/FirebaseProvider/FirebaseRealtimeUpload",
            getImageUrl: this.hostUrl + "api/FirebaseProvider/FirebaseRealtimeGetImage"
        };
    }
}
Note: To learn more about the file actions that can be performed with Firebase Realtime Database file system provider, refer to this link