How can I help you?
Integrate Google Dialogflow with Angular Chat UI Component
29 Oct 20258 minutes to read
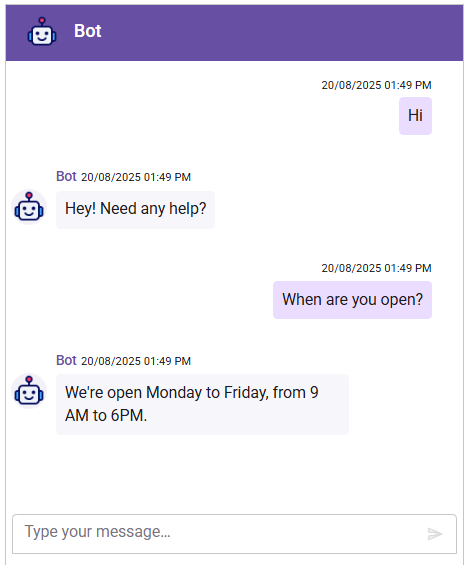
The Chat UI component integrates with Google Dialogflow to enable advanced conversational AI features in your Angular applications. The component acts as a user interface for a support bot, where user prompts are sent to the Dialogflow service via API calls, providing natural language understanding and context-aware responses.
Prerequisites
Before starting, ensure you have the following:
-
Node.js: Version 16 or higher with npm.
-
Google Account: To access Google Dialogflow and Google Cloud Console.
-
Syncfusion Chat UI: Package @syncfusion/ej2-angular-interactive-chat installed.
-
Dialogflow Service Account with the
Dialogflow API Clientrole and its JSON key file.
Set Up the Angular Environment
Follow the Getting Started guide to configure and render the Chat UI component in your Angular application using Angular CLI.
Install Dependency
Backend dependencies for Dialogflow and server setup:
npm install express body-parser dialogflow corsSet Up the Dialogflow Agent
-
In the dialogflow console, create an agent, set a name (e.g.,
MyChatBot), and configure the default language (e.g., English -en). -
Add intents with training phrases and responses (e.g., greetings, FAQs). Test using the dialogflow simulator.
-
In the Google Cloud Console, go to
APIs & Services>Credentials, create a service account with the dialogflow API client role, and download the JSON key file.
Security Note: Never commit the JSON key file to version control. Use environment variables or a secret manager (e.g., Google Cloud Secret Manager) for production.
Configure Node.js Backend
Create backend/service-acct.json with your Dialogflow service account credentials:
{
  "type": "service_account",
  "project_id": "your-dialogflow-project-id",
  "private_key_id": "abc123xyz...",
  "private_key": "-----BEGIN PRIVATE KEY-----\nMIIEv...",
  "client_email": "dialogflow-agent@your-dialogflow-project-id.iam.gserviceaccount.com",
  ...
}
Set up an Express server in backend/index.js to handle Dialogflow requests:
const express = require('express');
const { SessionsClient } = require('dialogflow');
const bodyParser = require('body-parser');
const cors = require('cors');
const serviceAccount = require('./service-acct.json');

const app = express();
app.use(cors());
app.use(bodyParser.json());

const projectId = serviceAccount.project_id;
const sessionClient = new SessionsClient({ credentials: serviceAccount });

app.post('/api/message', async (req, res) => {
  const message = req.body.text;
  const sessionId = req.body.sessionId || 'default-session';

  const sessionPath = `projects/${projectId}/agent/sessions/${sessionId}`;

  const request = {
    session: sessionPath,
    queryInput: {
      text: {
        text: message,
        languageCode: 'en-US',
      },
    },
  };

  try {
    const responses = await sessionClient.detectIntent(request);
    const result = responses[0].queryResult;
    res.json({ reply: result.fulfillmentText });
  } catch (err) {
    console.error('Dialogflow error:', err);
    res.status(500).json({ reply: "Error connecting to Dialogflow." });
  }
});

app.listen(5000, () => console.log('Backend running on http://localhost:5000'));
Use a unique
sessionId(e.g., UUID) for each user to maintain conversation context.
Configure message send
Use the Chat UI messageSend event to exchanges message. Each time a user sends a message, this event will be invoked with details of the sent message.
Forward Message to backend:
Upon message submission, a POST request is sent to your backend API endpoint (/api/message). This backend service forwards the user’s message to dialogflow and waits for a response.
Displaying Bot response:
Modify the a standalone app.component.ts file to integrate the Chat UI with the dialogflow backend:
import { Component } from '@angular/core';
import { ChatUIModule, MessageModel, UserModel } from '@syncfusion/ej2-angular-interactive-chat';

@Component({
    imports: [ ChatUIModule ],
    standalone: true,
    selector: 'app-root',
    // specifies the template string for the Chat UI component
    template: `
        <div id='chat-container'
          ejs-chatui id="chat" [user]="currentUserModel" [messages]="messages" (messageSend)="messageSend($event)" headerText="Bot" headerIconCss="chat-bot">
        </div>
        `,
    styles: `
        .chat-bot {
            background-image: url('//ej2.syncfusion.com/demos/src/chat-ui/images/bot.png');
            background-color: unset;
        }`
})
export class AppComponent {
  public messages: MessageModel[] = [];
  public currentUserModel: UserModel = { id: 'user1', user: 'Albert' };
  public botUserModel: UserModel = { id: 'user2', user: 'Bot', avatarUrl:'https://ej2.syncfusion.com/demos/src/chat-ui/images/bot.png' };

  // Handle sending of message
  public async messageSend(args:any): Promise<void> {
    args.cancel=true;
    // 1. Add user's message to the UI
    const newUserMessage: MessageModel = { text: args.message.text, author: this.currentUserModel };
    this.messages = [...this.messages, newUserMessage];

    // 2. Call backend API to get Dialogflow response
    try {
      const response = await fetch('http://localhost:5000/api/message', {
        method: 'POST',
        headers: { 'Content-Type': 'application/json' },
        body: JSON.stringify({ text: args.message.text, sessionId: this.currentUserModel.id })
      });
      const data = await response.json();
      // 3. Add bot's reply to the UI
      const botReply: MessageModel = { text: data.reply, author: this.botUserModel };
      this.messages = [...this.messages, botReply];
    } catch {
      const errorMsg: MessageModel = { text: "Sorry, I couldn't contact the server.", author: this.botUserModel };
      this.messages = [...this.messages, errorMsg];
    }
  }
}
Run and Test
Start the Backend server:
Navigate to your backend project folder and run the following command to start the Node.js server:
node index.jsStart the Angular frontend:
In a separate terminal window, navigate to your project folder and start the development server:
ng serveOpen your app and chat with your dialogflow-powered bot.
Troubleshooting:
-
Permission Denied: Ensure the service account has theDialogflow API Clientrole in the Google Cloud Console. -
CORS Error: Verify that the CORS origin in backend/index.js matches your frontend Host URL. -
No Response: Test intents in the Dialogflow Console simulator to ensure they are configured correctly. -
Quota Exceeded: Check dialogflow API quotas in the Google Cloud Console. -
Network Issues: Confirm the backend server is running and the frontend is pointing to the correct Host URL. -
Invalid Credentials: Verify the service account JSON or environment variables are correctly configured.