How can I help you?
Getting Started with the TreeGrid Component in the Quasar Framework
21 May 20267 minutes to read
This article provides a step-by-step guide for setting up a Quasar project and integrating the Syncfusion® Vue TreeGrid component using the Composition API.
The Quasar Framework is a Vue.js-based open-source framework that empowers developers to create high-performance and responsive applications across various platforms, such as web, mobile, and desktop.
Prerequisites
System requirements for Syncfusion® Vue UI components
Set up the Quasar project
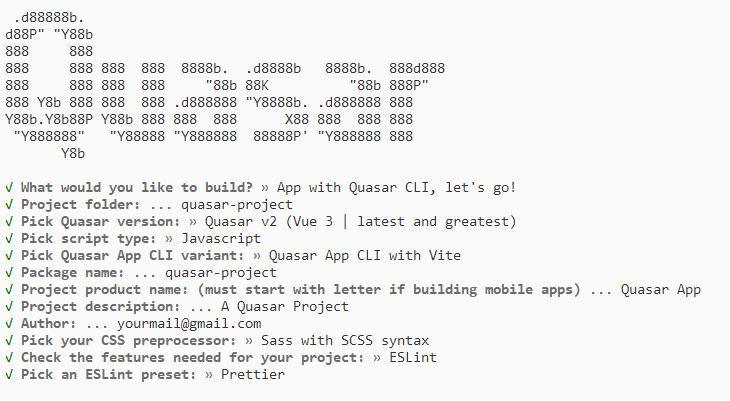
To initiate the creation of a new Quasar project, use the following commands:
npm init quasarThis command prompts additional configurations. Follow the steps outlined in the images below:
This generates the necessary files and prompts for project dependency installation. Respond with ‘yes’ to proceed with npm install, as shown in the image below:

Navigate to your project directory:
cd quasar-projectNow that quasar-project is ready to run with default settings, let’s add Syncfusion® components to the project.
Add the Syncfusion® Vue TreeGrid packages
To install the TreeGrid component, use the following command:
npm install @syncfusion/ej2-vue-treegrid --saveAdding CSS reference
The following CSS files are available in the ../node_modules/@syncfusion package folder. Add these as references in src/App.vue.
<style>
@import "../node_modules/@syncfusion/ej2-base/styles/material3.css";
@import "../node_modules/@syncfusion/ej2-buttons/styles/material3.css";
@import "../node_modules/@syncfusion/ej2-calendars/styles/material3.css";
@import "../node_modules/@syncfusion/ej2-dropdowns/styles/material3.css";
@import "../node_modules/@syncfusion/ej2-inputs/styles/material3.css";
@import "../node_modules/@syncfusion/ej2-navigations/styles/material3.css";
@import "../node_modules/@syncfusion/ej2-popups/styles/material3.css";
@import "../node_modules/@syncfusion/ej2-splitbuttons/styles/material3.css";
@import "../node_modules/@syncfusion/ej2-grids/styles/material3.css";
@import "../node_modules/@syncfusion/ej2-vue-treegrid/styles/material3.css";
</style>
Adding TreeGrid component
The treegrid code should be added in the src/App.vue file.
<template>
<ejs-treegrid :dataSource='data' :treeColumnIndex='1' childMapping='subtasks'>
<e-columns>
<e-column field='taskID' headerText='Task ID' textAlign='Right' width=70></e-column>
<e-column field='taskName' headerText='Task Name' textAlign='Left' width=200></e-column>
<e-column field='startDate' headerText='Start Date' textAlign='Right' format='yMd' width=90></e-column>
<e-column field='duration' headerText='Duration' textAlign='Right' width=80></e-column>
</e-columns>
</ejs-treegrid>
</template>
<script setup>
import { TreeGridComponent as EjsTreegrid, ColumnsDirective as EColumns, ColumnDirective as EColumn } from '@syncfusion/ej2-vue-treegrid';
const data = [
{
taskID: 1,
taskName: 'Planning', startDate: new Date('02/03/2017'), endDate: new Date('02/07/2017'), progress: 100, duration: 5, priority: 'Normal', approved: false,
subtasks: [
{ taskID: 2, taskName: 'Plan timeline', startDate: new Date('02/03/2017'), endDate: new Date('02/07/2017'), duration: 5, progress: 100, priority: 'Normal', approved: false },
{ taskID: 3, taskName: 'Plan budget', startDate: new Date('02/03/2017'), endDate: new Date('02/07/2017'), duration: 5, progress: 100, approved: true },
{ taskID: 4, taskName: 'Allocate resources', startDate: new Date('02/03/2017'), endDate: new Date('02/07/2017'), duration: 5, progress: 100, priority: 'Critical', approved: false },
{ taskID: 5, taskName: 'Planning complete', startDate: new Date('02/07/2017'), endDate: new Date('02/07/2017'), duration: 0, progress: 0, priority: 'Low', approved: true }
]
},
{
taskID: 6, taskName: 'Design', startDate: new Date('02/10/2017'), endDate: new Date('02/14/2017'), duration: 3, progress: 86, priority: 'High', approved: false,
subtasks: [
{ taskID: 7, taskName: 'Software Specification', startDate: new Date('02/10/2017'), endDate: new Date('02/12/2017'), duration: 3, progress: 60, priority: 'Normal', approved: false },
{ taskID: 8, taskName: 'Develop prototype', startDate: new Date('02/10/2017'), endDate: new Date('02/12/2017'), duration: 3, progress: 100, priority: 'Critical', approved: false },
{ taskID: 9, taskName: 'Get approval from customer', startDate: new Date('02/13/2017'), endDate: new Date('02/14/2017'), duration: 2, progress: 100, approved: true },
{ taskID: 10, taskName: 'Design Documentation', startDate: new Date('02/13/2017'), endDate: new Date('02/14/2017'), duration: 2, progress: 100, approved: true },
{ taskID: 11, taskName: 'Design complete', startDate: new Date('02/14/2017'), endDate: new Date('02/14/2017'), duration: 0, progress: 0, priority: 'Normal', approved: true }
]
},
];
</script>
<style>
@import "../node_modules/@syncfusion/ej2-base/styles/material3.css";
@import "../node_modules/@syncfusion/ej2-buttons/styles/material3.css";
@import "../node_modules/@syncfusion/ej2-calendars/styles/material3.css";
@import "../node_modules/@syncfusion/ej2-dropdowns/styles/material3.css";
@import "../node_modules/@syncfusion/ej2-inputs/styles/material3.css";
@import "../node_modules/@syncfusion/ej2-navigations/styles/material3.css";
@import "../node_modules/@syncfusion/ej2-popups/styles/material3.css";
@import "../node_modules/@syncfusion/ej2-splitbuttons/styles/material3.css";
@import "../node_modules/@syncfusion/ej2-grids/styles/material3.css";
@import "../node_modules/@syncfusion/ej2-vue-treegrid/styles/material3.css";
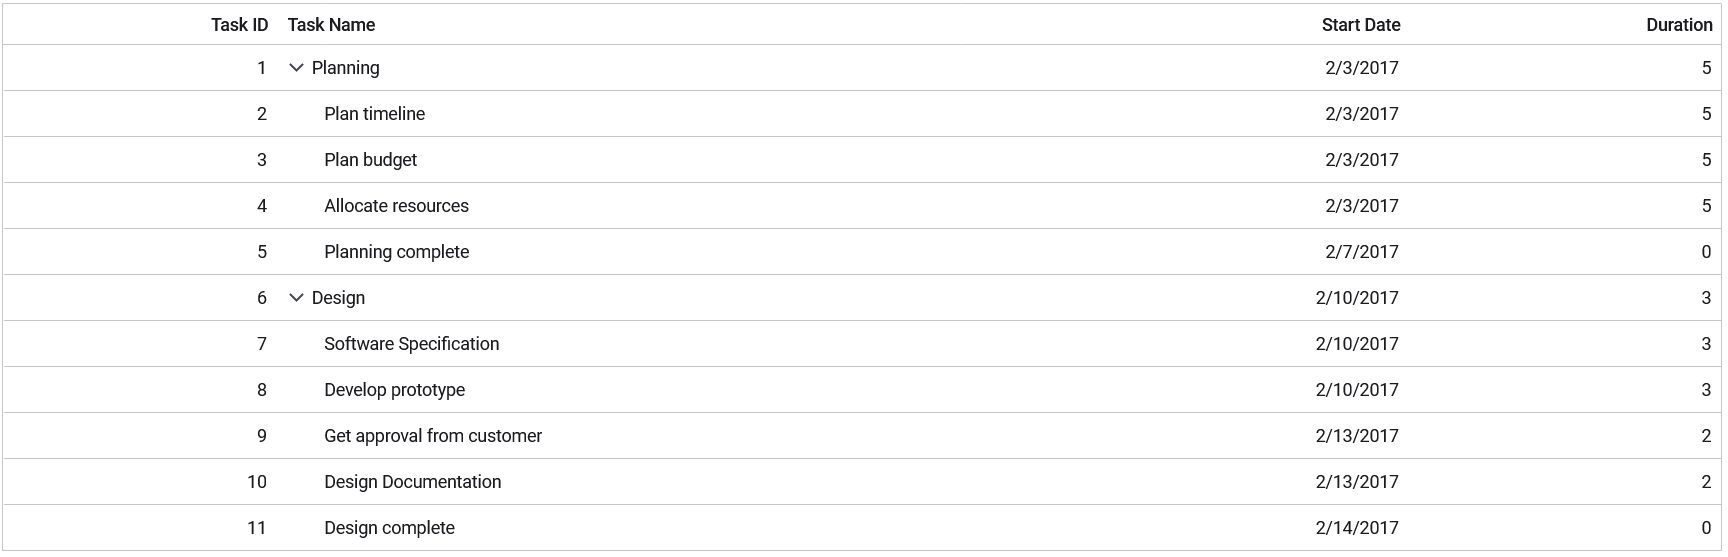
</style>Run the application
npm run devThe output will appear as follows: