Getting Started with Vue Markdown Editor
30 Jul 20265 minutes to read
The Syncfusion Vue Markdown Editor is a web-based editor that enables users to create, edit, and format Markdown content with features such as table support and structured content formatting. This article provides a step-by-step guide for setting up a Vite project with a TypeScript environment and integrating the Syncfusion Vue Markdown Editor component using the Composition API.
To get started quickly with the Vue Markdown Editor, refer to this video tutorial:
Prerequisites
This guide uses Vite as the bundler and development environment. Install Node.js 24.13.0 or higher before proceeding. For detailed information about Vite’s capabilities and configuration options, refer to the Vite documentation.
NOTE
For information about supported Vue versions and Syncfusion package compatibility, refer to the Version Compatibility documentation.
Create a Vue Application
Run the following commands to set up a Vue application:
npm create vite@latest my-app -- --template vue-tsThis command will prompt you to install the required packages and start the application. Select the options as shown below.
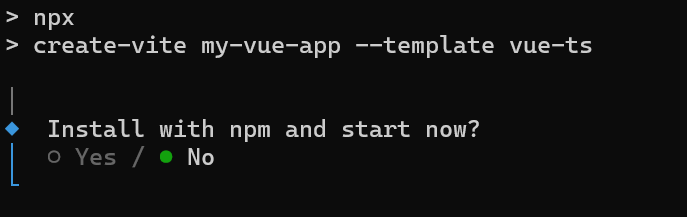
Since the Syncfusion packages are not installed at this stage, choose the No option when prompted. Then, navigate to the project directory and install the dependencies using the following commands:
cd my-app
npm install
Add Syncfusion Markdown Editor package
Syncfusion packages are available at npmjs.com. To use Vue components, install the required npm package.
npm install @syncfusion/ej2-vue-richtexteditorAdding CSS reference
Syncfusion provides multiple themes for the Rich Text Editor component. For a complete list of available themes, refer to the themes packages.
To apply the Tailwind 3 theme, install the corresponding theme package by using the following command:
npm install @syncfusion/ej2-tailwind3-themeThe installed theme package includes an index.css file that automatically imports all the required dependency styles. Import the following stylesheet into <style> section of src/App.vue.
@import '../node_modules/@syncfusion/ej2-tailwind3-theme/styles/rich-text-editor/index.css';IMPORTANT
To apply the application-specific styles correctly remove all the default styles from src/style.css.
Module injection
The following modules provide the basic features of the Markdown Editor.
-
Toolbar- Inject this module to use the Toolbar feature. -
Link- Inject this module to use the link feature in Markdown Editor. -
Image- Inject this module to use the image feature in Markdown Editor. -
MarkdownEditor- Inject this module to use the Rich Text Editor as Markdown Editor.
These modules can be injected as services using Vue’s provide function as demonstrated in the following example.
<template>
        <ejs-richtexteditor editorMode="Markdown"></ejs-richtexteditor>
</template>

<script setup>
import { provide } from "vue";
import { RichTextEditorComponent as EjsRichtexteditor, Toolbar, Link, Table, Image, MarkdownEditor } from '@syncfusion/ej2-vue-richtexteditor';

provide('richtexteditor', [Toolbar, Link, Image, Table, MarkdownEditor]);
</script>

<style>
@import '../node_modules/@syncfusion/ej2-tailwind3-theme/styles/rich-text-editor/index.css';
</style><template>
<ejs-richtexteditor editorMode="Markdown"></ejs-richtexteditor>
</template>
<script>
import { RichTextEditorComponent, Toolbar, Link, Image, Table, MarkdownEditor } from '@syncfusion/ej2-vue-richtexteditor';
export default {
name: "App",
components: {
'ejs-richtexteditor': RichTextEditorComponent
},
data: function () {
return {
};
},
provide: {
richtexteditor: [Toolbar, Link, Image, Table, MarkdownEditor],
},
}
</script>
<style>
@import '../node_modules/@syncfusion/ej2-tailwind3-theme/styles/rich-text-editor/index.css';
</style>TIPS
Additional feature modules are available here.
Adding Markdown Editor component
Now, you can start adding the Vue Markdown Editor component in the application. For getting started, add the Markdown Editor component in src/App.vue file using the following sample.
<template>
        <ejs-richtexteditor editorMode="Markdown"></ejs-richtexteditor>
</template>

<script setup>
import { provide } from "vue";
import { RichTextEditorComponent as EjsRichtexteditor, Toolbar, Link, Table, Image, MarkdownEditor } from '@syncfusion/ej2-vue-richtexteditor';

provide('richtexteditor', [Toolbar, Link, Image, Table, MarkdownEditor]);
</script>

<style>
@import '../node_modules/@syncfusion/ej2-tailwind3-theme/styles/rich-text-editor/index.css';
</style><template>
<ejs-richtexteditor editorMode="Markdown"></ejs-richtexteditor>
</template>
<script>
import { RichTextEditorComponent, Toolbar, Link, Image, Table, MarkdownEditor } from '@syncfusion/ej2-vue-richtexteditor';
export default {
name: "App",
components: {
'ejs-richtexteditor': RichTextEditorComponent
},
data: function () {
return {
};
},
provide: {
richtexteditor: [Toolbar, Link, Image, Table, MarkdownEditor],
},
}
</script>
<style>
@import '../node_modules/@syncfusion/ej2-tailwind3-theme/styles/rich-text-editor/index.css';
</style>Run the Application
To run the project, use the following command:
npm run devThe Syncfusion® Vue Markdown Editor is displayed in the browser as shown below.
