Register Syncfusion® License key in Vue application
1 Jul 20267 minutes to read
A Syncfusion® license key must be registered if your project references Syncfusion® Vue packages. The generated license key is a string that needs to be registered after any Syncfusion® Vue reference.
Note: Syncfusion® license validation is performed offline during application execution and does not require internet access. Apps registered with a Syncfusion® license key can be deployed on any system without an internet connection.
Generate the Syncfusion® license key and register it using one of the following methods:
- Register the license key in the project
- Register the license key in the Nuxt project
- Register the license key using the npx command
Register Syncfusion® license key in the project
Register the license key in the main.js file of the Vue project.
import { createApp } from 'vue'
import App from './App.vue'
import { registerLicense } from '@syncfusion/ej2-base';

// Registering Syncfusion license key
registerLicense('Replace your generated license key here');
createApp(App).mount('#app')
License key registration is required from 2022 Vol 1 v20.1.0.47 onwards for Essential® JavaScript 2 products.
Register Syncfusion® license key in the Nuxt project
Register the license key in the app.vue file of the Nuxt project.
<script>
import { registerLicense } from '@syncfusion/ej2-base';

// Registering Syncfusion license key.
registerLicense('Replace your generated license key here');
</script>
Register Syncfusion® license key using the npx command
Register the Syncfusion® license key through npx command in one of the following ways,
- Register the license key with the license file
- Register the license key with the environment variable
If both the license text file and the environment variable are used for license registration, priority is given to the
syncfusion-license.txtfile. To use the environment variable for license registration, remove the license text file from the application.
Register the license key with the license file
The following steps show how to register the Syncfusion® license key with the license text file.
-
Create the
syncfusion-license.txtfile in the application root directory and paste the license key. -
Open the command prompt in the application root directory and activate the license key using the following command:
npx syncfusion-license activate -
Once the Syncfusion® license key is activated, the following console message will appear.
License message:
(INFO) Syncfusion® License imported successfully. -
Remove the
.cachefolder fromnode_modulesin the application. -
Run the application. If you encounter a license validation error, refer to this link to resolve it. For frequently asked license registration questions, refer to this link.
If you don’t want to use the license text file in the application, refer to this link to use an environment variable and register the Syncfusion® license key. Also, check out some common licensing FAQs while registering the license key using the npx command from this link
Register the license key with the environment variable
Set the environment variable SYNCFUSION_LICENSE in the system with the license key as the value. This can be used across all applications on your machine.
The following steps show how to set environment variable in different operating systems and register the Syncfusion® license key.
- Set the environment variable in different operating systems like below,
Windows
Open the command prompt and use the setx command to add the new environment variable:
setx SYNCFUSION_LICENSE "license key"Restart the terminal or IDE after setting the environment variable for changes to take effect.
Mac
-
Open the terminal and use the
envcommand to view the variables list. - You can set the environment variable by using below command,
echo 'export SYNCFUSION_LICENSE="license key"' >> ~/.bash_profile - If you want to modify the environment variable in the bash profile. Use the below command,
nano .bash_profile-
Once modified the variable. Press
ctrl+xto exit thenYandEnterbutton to save the changes. -
Close the terminal and open it again to see the environment variables changes using
envcommand.
Linux
-
Open the terminal and use the
envcommand to view the variables list. -
You can set or modify the environment variable by using below command,
export SYNCFUSION_LICENSE='license key'-
Once set the
SYNCFUSION_LICENSEenvironment variable, restart the IDE or application terminal before using the license activation command. -
Open the command prompt in the application root directory and activate the license key by using the below command,
npx syncfusion-license activate-
Once the Syncfusion® license key is activated, the following console message will appear.
License message:
(INFO) Syncfusion® License imported successfully. -
Remove the
.cachefolder from node modules in the application. -
Now run the application. If you are facing a license validation error, refer to this link to resolve it. Also, find the most frequent license registration questions from this
link.
Register Syncfusion® license key in CI services
The following sections show how to use an environment variable in CI services.
GitHub actions
-
Create a new Repository Secret or an Organization Secret. Set the name of the secret to
SYNCFUSION_LICENSEand use the license key as a value. -
Add the Syncfusion® license activation command after running npm install or yarn like below,
steps:
- name: Install node modules
  run: npm install

- name: Activate Syncfusion License
  run: npx syncfusion-license activate
  env:
    SYNCFUSION_LICENSE: $
Azure Pipelines (YAML)
-
Create a new User-defined Variable named
SYNCFUSION_LICENSE. Use the license key as a value. -
Add the Syncfusion® license activation command after running npm install or yarn like below,
The following example shows the syntax for Windows build agents.
pool:
  vmImage: 'windows-latest'

steps:
- script: call npm install
  displayName: 'Install node modules'

- script: call npx syncfusion-license activate
  displayName: 'Activate Syncfusion License'
  env:
    SYNCFUSION_LICENSE: $(SYNCFUSION_LICENSE)
The following example shows the syntax for Linux build agents.
pool:
  vmImage: 'ubuntu-latest'

steps:
- script: npm install
  displayName: 'Install node modules'

- script: npx syncfusion-license activate
  displayName: 'Activate Syncfusion License'
  env:
    SYNCFUSION_LICENSE: $(SYNCFUSION_LICENSE)
Azure Pipelines (Classic)
-
Create a new User-defined Variable named
SYNCFUSION_LICENSE. Use the license key as a value. -
Add the Syncfusion® license activation command after running npm install or yarn using bash task like below,
# Activate the license
npx syncfusion-license activate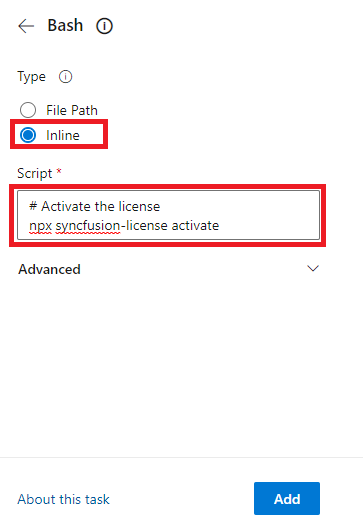
Register Multiple License Keys
If you need to register multiple Syncfusion® license keys in your application, you can do so by separating each key with a semicolon. This is useful when your application uses multiple Syncfusion® products or editions.
Format: key1;key2;key3
Example:
registerLicense('license-key-1-here;license-key-2-here');When registering multiple keys, ensure there are no spaces before or after the semicolon separator.