Getting Started with Vue Chart
12 Aug 20269 minutes to read
This section provides a step-by-step guide to creating a Vue 2 application using Vue CLI and integrating the Syncfusion® Vue Chart component. It helps users quickly configure a project and render an interactive chart.
Ready to streamline your Syncfusion Vue development?
Discover the full potential of Syncfusion Vue components with the Syncfusion AI Coding Assistant. It simplifies integration, configuration, and feature discovery through intelligent, context-aware code suggestions and is available in popular AI-powered IDEs such as VS Code, Cursor, and Syncfusion CodeStudio.
Explore Syncfusion AI Coding Assistant
To get started quickly with Vue Charts, refer to the following introductory video:
Prerequisites
Ensure your development environment meets the following requirements as listed in System requirements for Syncfusion Vue UI components.
Dependencies
The Vue Chart component is available in the @syncfusion/ej2-vue-charts package. The following dependencies are used by the package:
|-- @syncfusion/ej2-vue-charts
  |-- @syncfusion/ej2-base
  |-- @syncfusion/ej2-data
  |-- @syncfusion/ej2-pdf-export
  |-- @syncfusion/ej2-file-utils
  |-- @syncfusion/ej2-compression
  |-- @syncfusion/ej2-charts
  |-- @syncfusion/ej2-vue-base
  |-- @syncfusion/ej2-svg-base
Setting Up the Vue 2 Project
To generate a Vue 2 project using Vue CLI, install Vue CLI globally using either npm or Yarn, and then create a new project with the vue create command:
npm
npm install -g @vue/cli
vue create quickstart
yarn
yarn global add @vue/cli
vue create quickstart
When creating a new project, choose the option Default ([Vue 2] babel, eslint) from the menu.
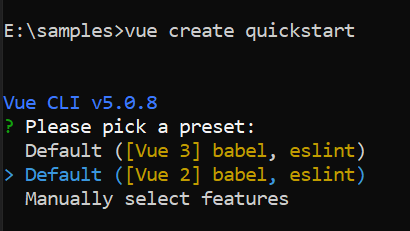
Once the quickstart project is set up with default settings, navigate to the project directory:
cd quickstartNow, proceed to add Syncfusion® packages to the project.
Add Syncfusion Vue Packages
Syncfusion packages are available at npmjs.com. To use Vue components, install the required npm package.
This article uses the Vue Chart component as an example. To use it in the project, install the @syncfusion/ej2-vue-charts package using either npm or Yarn:
npm
npm install @syncfusion/ej2-vue-chartsyarn
yarn add @syncfusion/ej2-vue-chartsNote: npm v5+ saves packages to
dependenciesby default;--saveis not required.
Add Syncfusion Vue Component
Follow the steps below to add the Vue Chart component:
Step 1: Import and register the Chart component in the script section of the src/App.vue file.
<script>
import { ChartComponent } from '@syncfusion/ej2-vue-charts';

export default {
  components: {
    'ejs-chart': ChartComponent
  }
}
</script>
Step 2: In the template section, define the Chart component.
<template>
  <div id="app">
      <ejs-chart id="container"> </ejs-chart>
  </div>
</template>
Here is the complete code for the above steps in the src/App.vue file:
<template>
  <div id="app">
      <ejs-chart id="container"> </ejs-chart>
  </div>
</template>
<script>
import { ChartComponent } from '@syncfusion/ej2-vue-charts';

export default {
name: "App",
components: {
    'ejs-chart': ChartComponent
  },
  data () {
    return {
    }
  }
}
</script>
<style>
 #container{
   height: 350px;
 }
</style>
Run the Project
To run the project, use either npm or Yarn:
npm
npm run serveyarn
yarn run serveOpen the generated local URL (for example, http://localhost:8080) from terminal in the browser. The application renders an empty Syncfusion Chart container (350px height) with default axes with no series, displaying a blank chart.
Module Injection
In Vue, register the chart’s feature modules using the component’s provide option.
The Chart component is split into feature-specific modules. To enable a specific feature in a Vue 2
application, register the corresponding module(s) in the component’s provide option. The following example shows the modules used in this guide and their purpose.
-
LineSeries- Register to enable the line series type. -
Legend- Register to enable the legend feature. -
Tooltip- Register to enable tooltip support. -
DataLabel- Register to enable data labels on points. -
Category- Register to enable category axis support.
Register these modules in the component provide option as shown below (Vue 2):
<script>
import {
  ChartComponent,
  LineSeries,
  Category,
  Legend,
  Tooltip,
  DataLabel
} from "@syncfusion/ej2-vue-charts";

export default {
  components: {
    'ejs-chart': ChartComponent
  },
  provide: {
    chart: [LineSeries, Category, Legend, Tooltip, DataLabel]
  }
};
</script>
Note: If a required module is not registered, you will encounter an error such as
"Series type is not registered"or"Module is not found". Always register all modules used in your chart.
You can also refer to the Feature Modules page for the complete list of available modules and their supported features.
Note: Inject only the modules you actually use to keep the bundle size smaller.
Populate Chart with Data
This section explains how to bind JSON data to the chart.
-
Add a series object to the chart using the
seriesproperty. Map the fieldsmonthandsalesin the JSON data to thexNameandyNameproperties of the series, and set the JSON data to thedataSourceproperty. -
Since the JSON contains category data, set the
valueTypefor the horizontal axis toCategory. By default, the axisvalueTypeisDouble.
<template>
  <div id="app">
    <ejs-chart id="container" :primaryXAxis="primaryXAxis">
      <e-series-collection>
        <e-series :dataSource='seriesData' type='Line' xName='month' yName='sales' name='Sales'></e-series>
      </e-series-collection>
    </ejs-chart>
  </div>
</template>

<script>
import { ChartComponent, SeriesCollectionDirective, SeriesDirective, LineSeries, Category } from "@syncfusion/ej2-vue-charts";

export default {
  components: {
    'ejs-chart': ChartComponent,
    'e-series-collection': SeriesCollectionDirective,
    'e-series': SeriesDirective
  },
  provide: {
    chart: [LineSeries, Category]
  },
  data() {
    return {
      seriesData: [
            { month: 'Jan', sales: 35 }, { month: 'Feb', sales: 28 },
            { month: 'Mar', sales: 34 }, { month: 'Apr', sales: 32 },
            { month: 'May', sales: 40 }, { month: 'Jun', sales: 32 },
            { month: 'Jul', sales: 35 }, { month: 'Aug', sales: 55 },
            { month: 'Sep', sales: 38 }, { month: 'Oct', sales: 30 },
            { month: 'Nov', sales: 25 }, { month: 'Dec', sales: 32 }
          ],
      primaryXAxis: {
        valueType: "Category"
      }
    };
  }
};
</script>Troubleshooting
Troubleshooting
-
Chart is not rendering — Ensure all required modules are registered in the
provideoption, verify that thedataSourceis assigned correctly, and check the browser console for errors. -
Module not found error — Confirm that the module is imported from
@syncfusion/ej2-vue-chartsand that the module name is spelled correctly in both the import statement and theprovideoption. -
No data is displayed — Check that
xNameandyNamematch the field names in your data, verify thatprimaryXAxis.valueTypeis set toCategoryfor category data, and ensure that thedataSourcearray contains records.
For more assistance, refer to the Vue Charts API Documentation and the Feature Modules page.
You can refer to our
Vue Chartsfeature tour page for its groundbreaking feature representations. You can also explore ourVue Charts examplethat shows various chart types and how to represent time-dependent data, showing trends in data at equal intervals.