Download and Installation Guide
2 Feb 20261 minute to read
Syncfusion® publishes its Visual Studio Code extension in the Visual Studio Code Marketplace. Install the extension directly within Visual Studio Code or download it from the marketplace and then install it.
Prerequisites
Before installing the Syncfusion® Web extension, ensure the following software is installed:
-
Visual Studio Code
Minimum Visual Studio Code version required: 1.38.0
- Node.js
Install through Visual Studio Code extensions
Follow these steps to install the Syncfusion® Web extension from within Visual Studio Code:
- Open Visual Studio Code.
- Go to View > Extensions to open the Extensions view.
-
Type Syncfusion Web in the search box to locate the extension.
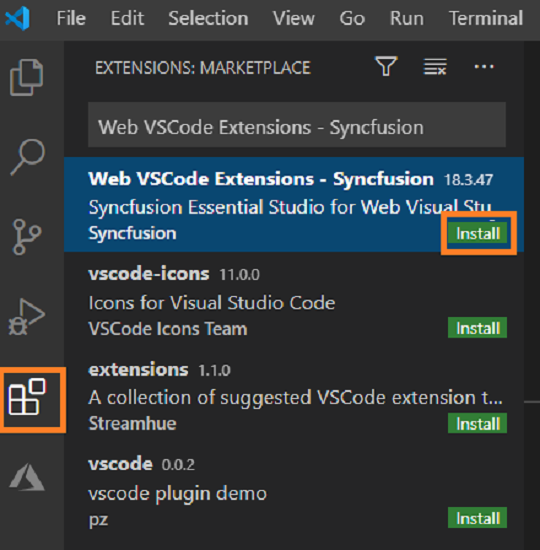
- Click the Install button on the “Web VSCode Extensions - Syncfusion®” extension.
- After installation, reload Visual Studio Code when prompted (use Reload Required).
-
Access Syncfusion Web extension commands from the Visual Studio Code command palette.

Install from the Visual Studio Code Marketplace
To install the extension from the Marketplace web page:
- Open the Syncfusion Web Extension page on the Visual Studio Code Marketplace: https://marketplace.visualstudio.com/items?itemName=SyncfusionInc.Web-VSCode-Extensions
- Click Install (or Install from Visual Studio Code Marketplace). A browser prompt appears with Open Visual Studio Code — click Open Visual Studio Code. The extension page opens inside Visual Studio Code.
- Click the Install button for “Web VSCode Extensions - Syncfusion®”.
- After installation, reload Visual Studio Code when prompted.
-
Use the Syncfusion Web extension commands from the command palette to create projects and access templates.