Oracle data binding in React Pivot Table
This guide explains how to retrieve data from an Oracle database using the Oracle Managed Data Access library and bind it to the Pivot Table through a Web API controller.
Creating a Web API Service to Fetch Oracle Data
Follow these steps to create a Web API service that retrieves data from an Oracle database and prepares it for the Pivot Table.
Step 1: Create an ASP.NET Core Web Application
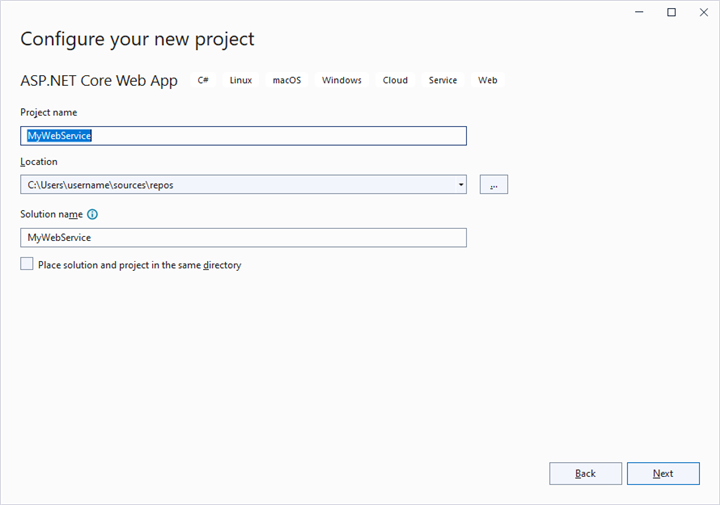
- Open Visual Studio and create a new ASP.NET Core Web App project named MyWebService.
- Follow the official Microsoft documentation for detailed instructions on creating an ASP.NET Core Web application.
Step 2: Install the Oracle NuGet Package
To enable Oracle database connectivity:
- Open the NuGet Package Manager in your project solution and search for Oracle.ManagedDataAccess.Core.
- Install the Oracle.ManagedDataAccess.Core package to add Oracle support.

Step 3: Create a Web API Controller
- Under the Controllers folder, create a new Web API controller named PivotController.cs.
- This controller facilitates data communication between the Oracle database and the Pivot Table.
Step 4: Connect to Oracle, Retrieve Data, and Serialize to JSON
In the PivotController.cs file, use the Oracle Managed Data Access library to connect to an Oracle database, retrieve data, and return it as JSON for the Pivot Table.
-
Establish Connection: Use OracleConnection with a valid connection string (e.g.,
Data Source=localhost:1521/ORCLPDB1;User Id=hr;Password=hr_password;) to connect to the Oracle database. TheData Sourceshould use the EZ Connect formathost:port/service_nameor an alias defined intnsnames.ora. -
Query and Fetch Data: Execute a SQL query (e.g.,
SELECT * FROM EMPLOYEES) using OracleCommand to retrieve data for the Pivot Table. - Structure the Data: Use OracleDataAdapter’s Fill method to populate query results into a DataTable.
- Serialize to JSON: Use JsonConvert.SerializeObject to convert the DataTable into a JSON string for the Pivot Table.
Schema dependency: The pivot report below references the fields
DEPARTMENT_ID,EMPLOYEE_NAME,JOB,SALARY,EMPLOYEE_ID,CC_EMPLOYEES, andCC_TAX_PERCENTAGE. These names do not all come from the standardHR.EMPLOYEEStable queried above (EMPLOYEE_NAME,CC_EMPLOYEES, andCC_TAX_PERCENTAGEare not standard columns). Update the SQL query in the controller so itsSELECTlist matches the fields in the pivot report, for example:
SELECT EMPLOYEE_ID, FIRST_NAME || ' ' || LAST_NAME AS EMPLOYEE_NAME,
       JOB_ID AS JOB, SALARY, DEPARTMENT_ID,
       1 AS CC_EMPLOYEES, 0 AS CC_TAX_PERCENTAGE
FROM EMPLOYEES;
Oracle client note:
Oracle.ManagedDataAccessis a fully managed driver and does not require an Oracle Instant Client orTNS_ADMINto be installed. For Oracle Cloud Autonomous Database, appendWallet Location=...and configureOracleConfiguration.WalletLocationin code or viaapp.config.
using Microsoft.AspNetCore.Mvc;
using Newtonsoft.Json;
using Oracle.ManagedDataAccess.Client;
using System.Data;

namespace MyWebService.Controllers
{
    [ApiController]
    [Route("[controller]")]
    public class PivotController : ControllerBase
    {
        [HttpGet(Name = "GetOracleResult")]
        public object Get()
        {
            return JsonConvert.SerializeObject(FetchOracleResult());
        }

        private static DataTable FetchOracleResult()
        {
            // Replace with your own connection string.
            string connectionString = "<Enter your valid connection string here>";
            OracleConnection oracleConnection = new OracleConnection(connectionString);
            oracleConnection.Open();
            OracleCommand command = new OracleCommand("SELECT * FROM EMPLOYEES", oracleConnection);
            OracleDataAdapter dataAdapter = new OracleDataAdapter(command);
            DataTable dataTable = new DataTable();
            dataAdapter.Fill(dataTable);
            oracleConnection.Close();
            return dataTable;
        }
    }
}
Step 5: Enable CORS in the Web API
React (typically http://localhost:3000 or http://localhost:5173) running on a different origin than the Web API will be blocked by CORS unless the API explicitly allows it. In Program.cs, register and apply a CORS policy:
var builder = WebApplication.CreateBuilder(args);

builder.Services.AddControllers();
builder.Services.AddCors(options =>
{
    options.AddPolicy("AllowReactApp", policy =>
        policy.WithOrigins("http://localhost:3000", "http://localhost:5173")
              .AllowAnyHeader()
              .AllowAnyMethod());
});

var app = builder.Build();

app.UseCors("AllowReactApp"); // Must be called before MapControllers.
app.MapControllers();

app.Run();
Step 6: Run the Web API Service
- Build and run the application.
- The application will be hosted at
https://localhost:7149/by default (the port number is defined in Properties/launchSettings.json and may vary based on your configuration).
Step 7: Access the JSON Data
- Access the Web API endpoint at
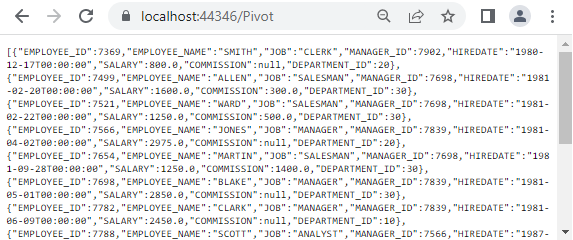
https://localhost:7149/Pivotto view the JSON data retrieved from the Oracle database. - The browser will display the JSON data, as shown below.
Connecting the Pivot Table to an Oracle Database Using the Web API Service
This section explains how to connect the Pivot Table component to an Oracle database by retrieving data from the Web API service created in the previous section.
Step 1: Create a Pivot Table in React
- Set up a basic React Pivot Table by following the Getting Started documentation.
- Ensure your React project is configured with the necessary EJ2 Pivot Table dependencies.
Step 2: Configure the Web API URL in the Pivot Table
- In the App.tsx (or App.jsx) file, map the Web API URL (
https://localhost:7149/Pivot) to the Pivot Table using the url property within the dataSourceSettings. - Below is the sample code to configure the Pivot Table to fetch data from the Web API:
import { PivotViewComponent, FieldList, Inject } from '@syncfusion/ej2-react-pivotview';
import * as React from 'react';
import './App.css';

function App() {
    let dataSourceSettings = {
        url: 'https://localhost:7149/Pivot'
        // Additional configuration will be added in the next step
    };

    return (<PivotViewComponent id='PivotView' height={350} dataSourceSettings={dataSourceSettings} showFieldList={true}>
        <Inject services={[FieldList]}/>
    </PivotViewComponent>);
};
export default App;
Step 3: Define the Pivot Table Report
- Configure the Pivot Table report in the App.tsx (or App.jsx) file to structure the data retrieved from the Oracle database.
- Add fields to the rows, columns, values, and filters properties of dataSourceSettings to define the report structure, specifying how data fields are organized and aggregated in the Pivot Table.
- Enable the field list by setting the showFieldList property to true and including the
FieldListmodule in the services section. This allows users to dynamically add or rearrange fields across the columns, rows, and values axes using an interactive user interface.
Here’s the updated sample code for App.jsx with the report configuration and field list support:
import { PivotViewComponent, FieldList, Inject } from '@syncfusion/ej2-react-pivotview';
import * as React from 'react';
import './App.css';

function App() {
    let dataSourceSettings = {
        url: 'https://localhost:7149/Pivot',
        enableSorting: true,
        expandAll: false,
        columns: [
            { name: 'DEPARTMENT_ID', caption: 'Department ID' },
            { name: 'EMPLOYEE_NAME', caption: 'Employee Name' }
        ],
        rows: [
            { name: 'JOB', caption: 'Job' },
            { name: 'SALARY', caption: 'Salary' }
        ],
        values: [
            { name: 'EMPLOYEE_ID', caption: 'Employee ID' },
            { name: 'CC_EMPLOYEES', caption: 'Employees' },
            { name: 'CC_TAX_PERCENTAGE', caption: 'Percentage' }
        ],
        filters: []
    };

    return (<PivotViewComponent id='PivotView' height={350} dataSourceSettings={dataSourceSettings} showFieldList={true}>
        <Inject services={[FieldList]}/>
    </PivotViewComponent>);
};
export default App;
Step 4: Run and Verify the Pivot Table
- Run the React application.
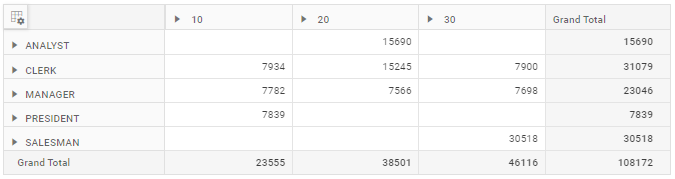
- The Pivot Table will display the data fetched from the Oracle database via the Web API, structured according to the defined report.
- The resulting Pivot Table will look like this:
Additional Resources
Explore a complete example of the React Pivot Table integrated with an ASP.NET Core Web Application to fetch data from an Oracle database in this GitHub repository.