OData Remote Data Binding in Syncfusion React Components
11 Jun 202624 minutes to read
The ODataV4Adaptor in the Syncfusion® React DataManager enables seamless integration between the React Grid and OData V4 services by handling OData‑formatted request and response processing. It automatically converts Grid actions such as filtering, sorting, paging, grouping, and CRUD into OData V4 compliant query options (like $filter, $orderby, $top, $skip) and sends them to the server. The adaptor also parses the structured OData V4 JSON response, extracting the result set and count values, ensuring smooth remote data binding without custom query or response logic.
For complete server‑side configuration and additional implementation details, refer to the DataManager ODataV4Adaptor documentation, which covers endpoint setup, query processing, and best practices for integrating OData V4 services.
Once the project creation and backend setup are complete, the next step is to render the React Data Grid Component on the client side.
Project structure:
ODataV4Adaptor/
├── OdataV4Adaptor.client/       # React frontend (Vite/React project).
│   ├── src/
│   │   ├── App.css
│   │   └── App.jsx                  # Add odatav4 adaptor here.
│   └── package.json
└── ODataV4Adaptor.Server/      # ASP.NET Core backend (API).
    ├── Controllers/                 # API controllers (will be created here).
    ├── Models/                      # Data models (will be created here).
    └── Program.cs                   # Server configuration.
React Grid frontend setup using Syncfusion OdataV4Adaptor
After finishing the backend setup for the OdataV4Adaptor ASP.NET Core project, next step is to integrate the React Data Grid on the client side by following these instructions.
Step 1: Install Syncfusion packages
Right‑click the OdataV4Adaptor.client folder in Solution Explorer and select Open in Terminal (available in newer Visual Studio versions), or open a Developer Command prompt/PowerShell from the Start menu and navigate manually to the OdataV4Adaptor.client directory. Once inside the folder, confirm that package.json is present, then run the following commands to install the required Syncfusion® packages:
npm install @syncfusion/ej2-react-grids --save
npm install @syncfusion/ej2-data --save
Step 2: Add CSS styles
Navigate to the src folder and open (or create) the stylesheet such as styles.css or App.css, then add the required CSS import statements to apply the Grid’s styling.
/* Base styles - Required for all Syncfusion components */
@import '../node_modules/@syncfusion/ej2-base/styles/material3.css';

/* Component-specific styles */
@import '../node_modules/@syncfusion/ej2-buttons/styles/material3.css';
@import '../node_modules/@syncfusion/ej2-calendars/styles/material3.css';
@import '../node_modules/@syncfusion/ej2-dropdowns/styles/material3.css';
@import '../node_modules/@syncfusion/ej2-inputs/styles/material3.css';
@import '../node_modules/@syncfusion/ej2-navigations/styles/material3.css';
@import '../node_modules/@syncfusion/ej2-popups/styles/material3.css';
@import '../node_modules/@syncfusion/ej2-splitbuttons/styles/material3.css';

/* Grid component styles - Required */
@import '../node_modules/@syncfusion/ej2-react-grids/styles/material3.css';
Import the App.css in the application entry point(App.jsx).
import "./App.css";
...
...
Step 3: Create React Grid component with OdatV4Adaptor
Grid integration with OData‑based backend services is enabled through the ODataV4Adaptor, which connects the Syncfusion DataManager to OData V4 REST endpoints. It automatically converts Grid actions such as paging, sorting, filtering, searching, and grouping into OData‑compliant query parameters that the server can process. This makes it ideal for applications built on OData V4, offering seamless server‑side data operations without the need for custom request or response handling.
By delegating these operations to the server rather than executing them in the browser, the Grid ensures that only the required data is retrieved for each request.
import { DataManager, ODataV4Adaptor } from '@syncfusion/ej2-data';
import { ColumnDirective, ColumnsDirective, GridComponent } from '@syncfusion/ej2-react-grids';

function App() {
    // Create DataManager with ODataV4Adaptor
    const data = new DataManager({
      url: 'https://localhost:xxxx/odata/Orders', // Replace xxxx with actual port number
      adaptor: new ODataV4Adaptor(), // Handles all OData communication
      crossDomain: true // Enables cross-domain requests
    });

    return (
      <div style=>
        <h2>Orders Grid</h2>
        <GridComponent dataSource={data}>
          <ColumnsDirective>
            <ColumnDirective field='OrderID' headerText='Order ID' isPrimaryKey={true} width='150' textAlign='Right' />
            <ColumnDirective field='CustomerID' headerText='Customer ID' width='150' />
            <ColumnDirective field='EmployeeID' headerText='Employee ID' width='150' />
            <ColumnDirective field='ShipCountry' headerText='Ship Country' width='150' />
          </ColumnsDirective>
        </GridComponent>
      </div>
    );
}

export default App;
The Grid sends GET requests with OData V4 query options such as
$filter,$orderby,$top, and$skip, and the server is expected to return an OData‑compliant JSON response containing the total record count (@odata.count) and the data collection (value) for proper data binding and paging.
Server-side data operations
React Grid optimizes large datasets by relying on server‑side data operations such as filtering, sorting, and paging rather than processing everything in the browser. The Syncfusion.EJ2.AspNet.Core package supports this approach by providing built‑in methods that efficiently handle these operations on the server, ensuring smooth performance even with heavy data loads.
Paging
The paging feature is enabled by setting the allowPaging property to true and injecting the Page module from @syncfusion/ej2-react-grids into the grid.
  <GridComponent dataSource={data} allowPaging={true}>
    . . .
    . . .
    . . .
    <Inject services={[Page]}/>
  </GridComponent>
After enabling paging on the client side, the ODataV4Adaptor generates OData‑compliant paging parameters in the outgoing request. It applies paging by adding $skip and $top values based on the Grid’s current page and page size. When the server receives these parameters, it returns only the required page data, and the Grid renders the requested page.
Utilize SetMaxTop() method in Program.cs to establish maximum records per request limit.
// Paging is already configured in Program.cs with:
builder.Services.AddControllers().AddOData(
    options => options
        .Select()
        .Filter()
        .OrderBy()
        .Expand()
        .Count()           // Required for paging to show total count
        .SetMaxTop(100)    // Maximum 100 records per page
        .AddRouteComponents("odata", modelBuilder.GetEdmModel()));
import { DataManager, ODataV4Adaptor } from '@syncfusion/ej2-data';
import { ColumnDirective, ColumnsDirective, GridComponent, Page, Inject } from '@syncfusion/ej2-react-grids';
function App() {
const data = new DataManager({
url: 'https://localhost:xxxx/odata/Orders', // Replace with the actual API endpoint URL.
adaptor: new ODataV4Adaptor(),
crossDomain: true
});
const pageSettings = { pageSize: 10, pageSizes: true };
return <GridComponent dataSource={data} allowPaging={true} pageSettings={pageSettings}>
<ColumnsDirective>
<ColumnDirective field='OrderID' headerText='Order ID' isPrimaryKey={true} width='150' textAlign='Right' />
<ColumnDirective field='CustomerID' headerText='Customer ID' width='150' />
<ColumnDirective field='EmployeeID' headerText='Employee ID' width='150' textAlign='Right'/>
<ColumnDirective field='ShipCountry' headerText='Ship Country' width='150'/>
</ColumnsDirective>
<Inject services={[Page]} />
</GridComponent>
};
export default App;The following screenshot illustrates the ODataV4Adaptor with paging query.
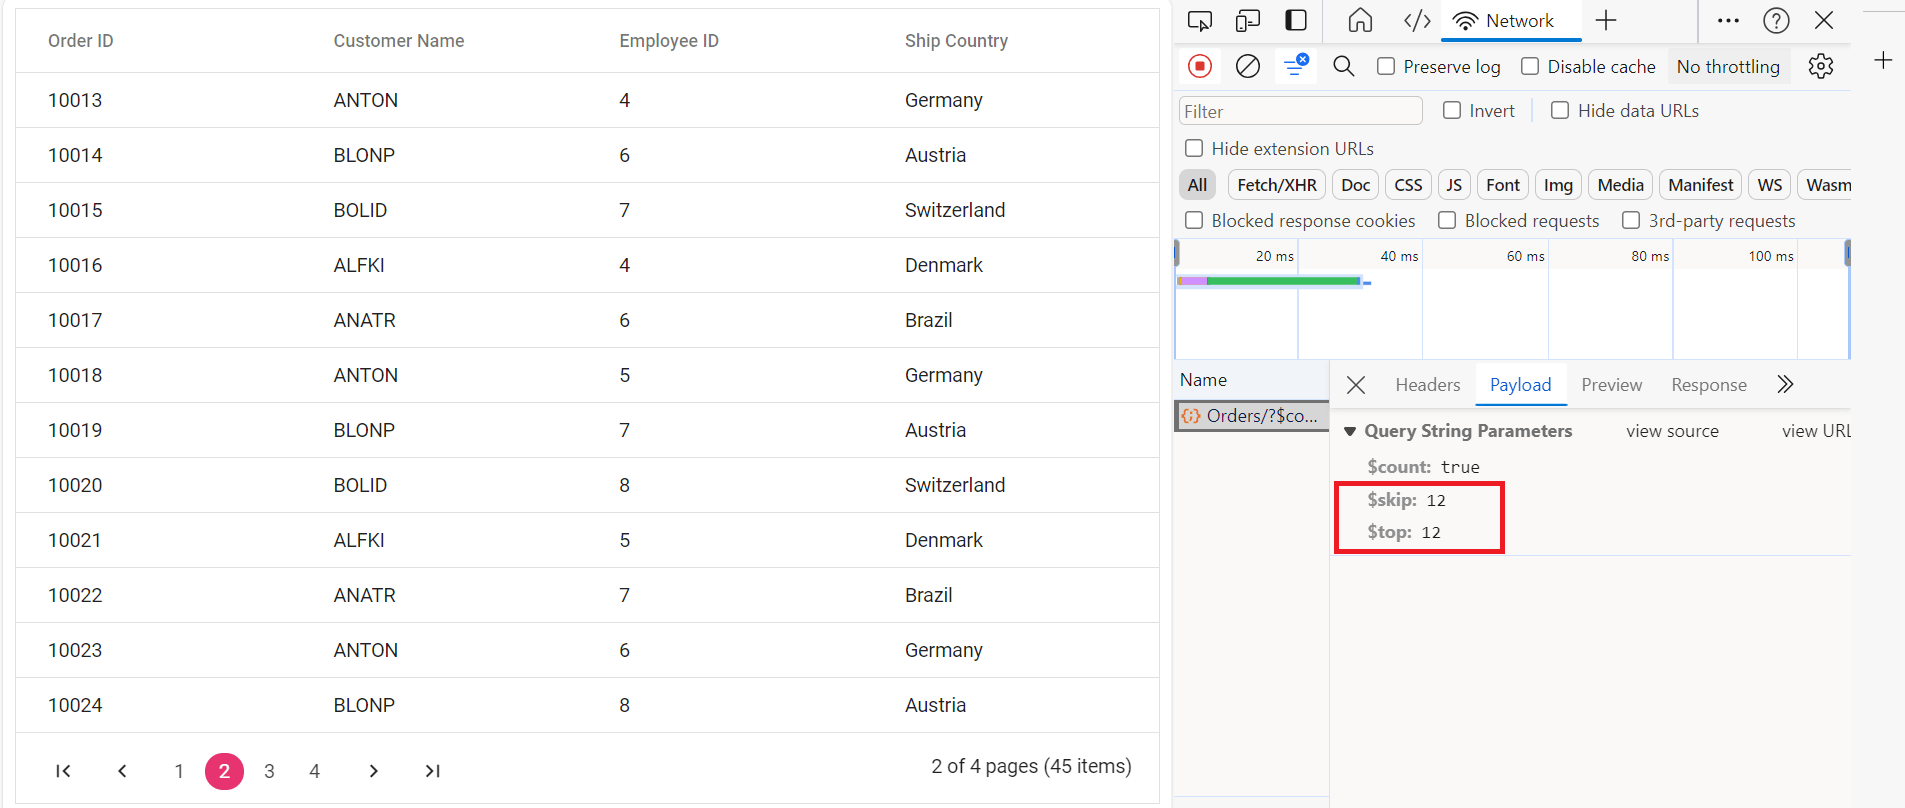
For more information about paging, refer to the Paging documentation.
Filtering
The filtering feature is enabled by setting the allowFiltering property to true and injecting the Filter module from @syncfusion/ej2-react-grids into the grid.
<GridComponent dataSource={data} allowFiltering={true}>
. . .
. . .
. . .
<Inject services={[Filter]}/>
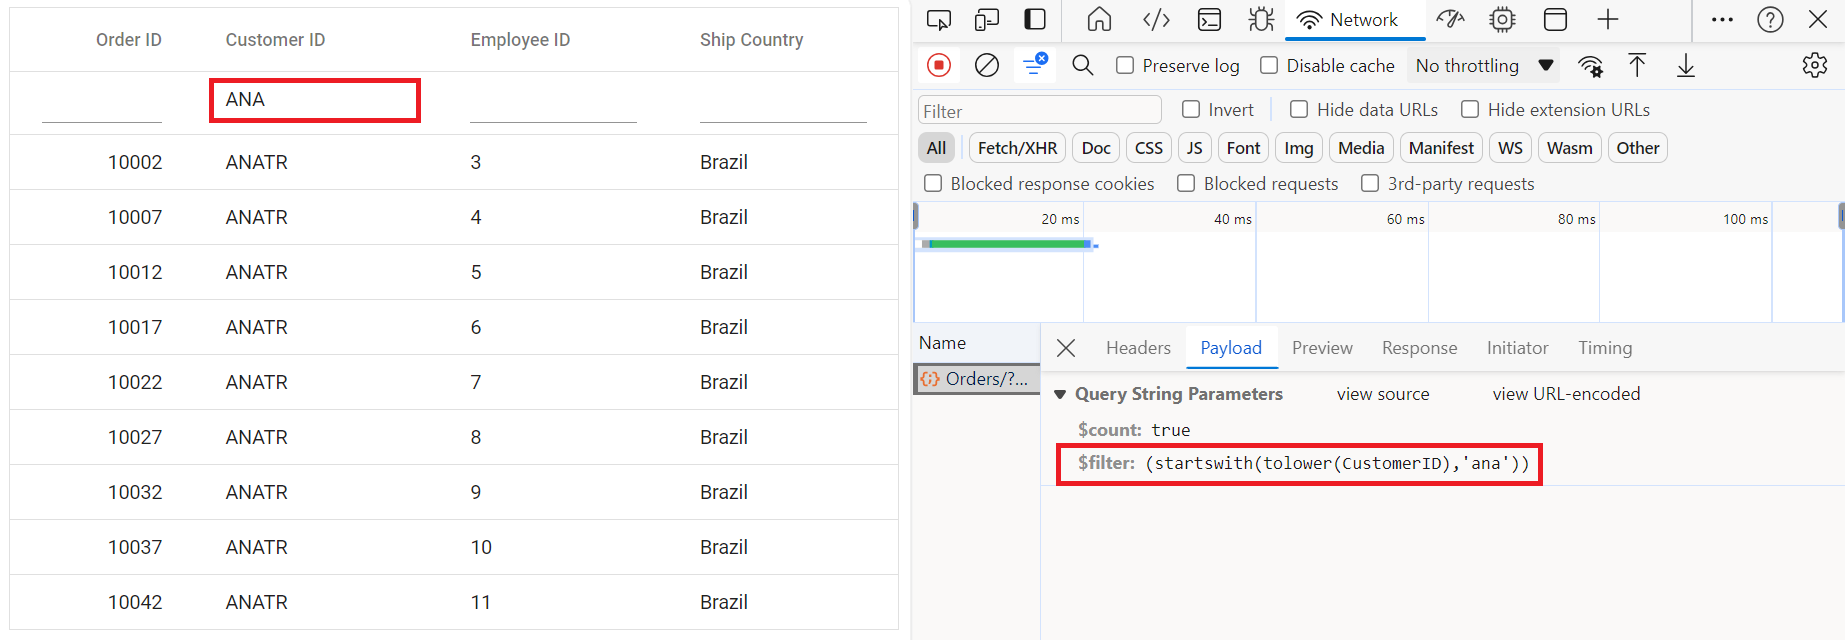
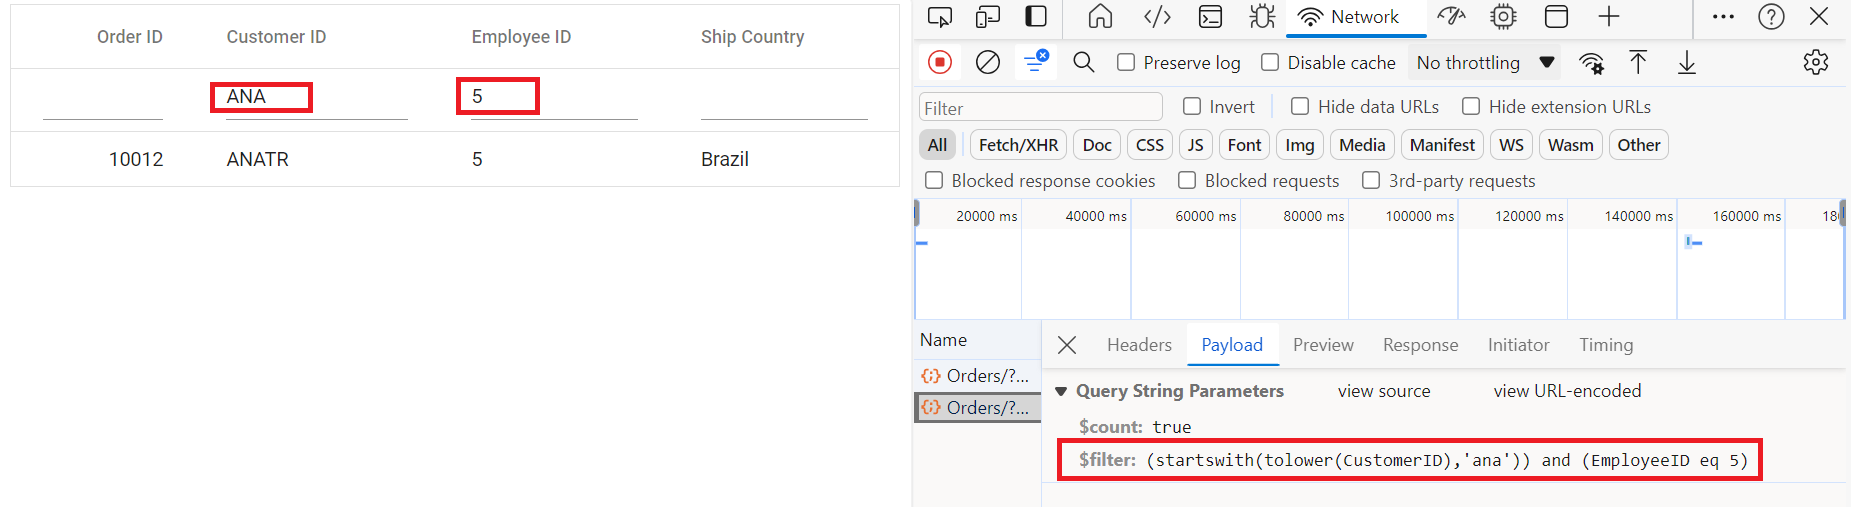
</GridComponent>After enabling filtering on the client side, the ODataV4Adaptor converts the applied filter conditions into OData‑compliant query parameters. It generates a $filter expression based on the field, operator, and value selected in the Grid. The server receives this OData filter query, executes the filtering operation, and returns only the matching records, which the Grid then renders.
Verify Program.cs includes .Filter() method in OData configuration.
// Create a new instance of the web application builder.
var builder = WebApplication.CreateBuilder(args);

// Create an ODataConventionModelBuilder to build the OData model.
var modelBuilder = new ODataConventionModelBuilder();

// Register the "Orders" entity set with the OData model builder.
modelBuilder.EntitySet<OrdersDetails>("Orders");

// Add services to the container.

// Add controllers with OData support to the service collection.
builder.Services.AddControllers().AddOData(
    options => options
        .Count()
        .Filter() // Enable filtering support.
        .AddRouteComponents("odata", modelBuilder.GetEdmModel()));
import { DataManager, ODataV4Adaptor } from '@syncfusion/ej2-data';
import { ColumnDirective, ColumnsDirective, GridComponent, Filter, Inject } from '@syncfusion/ej2-react-grids';
function App() {
const data = new DataManager({
url:'https://localhost:xxxx/odata/Orders', // Replace with the actual API endpoint URL.
adaptor: new ODataV4Adaptor(),
crossDomain: true
});
return <GridComponent dataSource={data} allowFiltering={true}>
<ColumnsDirective>
<ColumnDirective field='OrderID' headerText='Order ID' isPrimaryKey={true} width='150' textAlign='Right' />
<ColumnDirective field='CustomerID' headerText='Customer ID' width='150' />
<ColumnDirective field='EmployeeID' headerText='Employee ID' width='150' textAlign='Right' />
<ColumnDirective field='ShipCountry' headerText='Ship Country' width='150'/>
</ColumnsDirective>
<Inject services={[Filter]} />
</GridComponent>
};
export default App;Single column filtering:
Multi-column filtering:
Multiple columns can be filtered simultaneously.
Searching
The searching feature is enabled by configuring the toolbar property with Search item and injecting the Toolbar and Search modules from @syncfusion/ej2-react-grids into the grid.
  <GridComponent dataSource={data} toolbar={['Search']}>
    . . .
    . . .
    . . .
    <Inject services={[Search,Toolbar]}/>
  </GridComponent>
After enabling the search feature on the client side, the ODataV4Adaptor generates an OData‑compliant $filter expression that performs a composite search across all searchable columns. The adaptor builds a combined OR‑based filter condition using the search term, and the server returns all records that match the term in any column. The Grid then displays the resulting search output.
Search functionality requires Filter() method support (previously configured in Program.cs during OData setup).
// Create a new instance of the web application builder.
var builder = WebApplication.CreateBuilder(args);

// Create an ODataConventionModelBuilder to build the OData model.
var modelBuilder = new ODataConventionModelBuilder();

// Register the "Orders" entity set with the OData model builder.
modelBuilder.EntitySet<OrdersDetails>("Orders");

// Add services to the container.

// Add controllers with OData support to the service collection.
builder.Services.AddControllers().AddOData(
    options => options
        .Count()
        .Filter() // Enable filter for search functionality.
        .AddRouteComponents("odata", modelBuilder.GetEdmModel()));
import { DataManager, ODataV4Adaptor } from '@syncfusion/ej2-data';
import { ColumnDirective, ColumnsDirective, GridComponent, Toolbar, Inject } from '@syncfusion/ej2-react-grids';
function App() {
const data = new DataManager({
url:'https://localhost:xxxx/odata/Orders', // Replace with the actual API endpoint URL.
adaptor: new ODataV4Adaptor(),
crossDomain: true
});
const toolbar = ['Search'];
return <GridComponent dataSource={data} toolbar={toolbar}>
<ColumnsDirective>
<ColumnDirective field='OrderID' headerText='Order ID' isPrimaryKey={true} width='150' textAlign='Right' />
<ColumnDirective field='CustomerID' headerText='Customer ID' width='150' />
<ColumnDirective field='EmployeeID' headerText='Employee ID' width='150' textAlign='Right'/>
<ColumnDirective field='ShipCountry' headerText='Ship Country' width='150'/>
</ColumnsDirective>
<Inject services={[Toolbar]} />
</GridComponent>
};
export default App;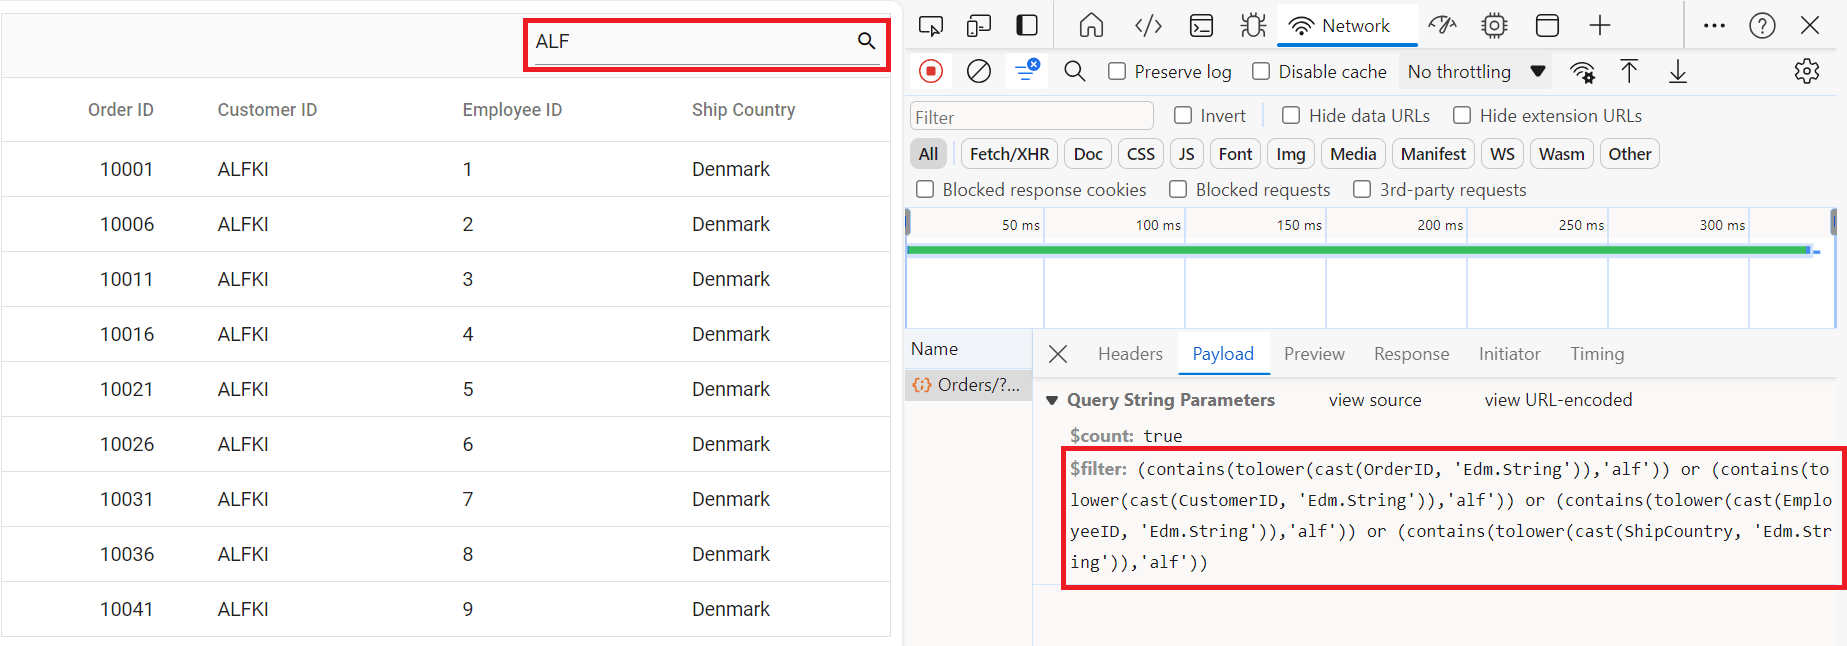
Sorting
The sorting feature is enabled by setting the allowSorting property to true and injecting the Sort module from @syncfusion/ej2-react-grids into the grid.
  <GridComponent dataSource={data} allowSorting={true}>
    . . .
    . . .
    . . .
    <Inject services={[Sort]}/>
  </GridComponent>
After enabling sorting on the client side, the ODataV4Adaptor generates an OData‑compliant $orderby expression based on the column and sort direction selected by the user. The adaptor builds the appropriate ascending or descending order clause, and the server returns data sorted according to these parameters. The Grid then displays the sorted result set.
Verify Program.cs includes .OrderBy() method in OData configuration (configured in previous steps).
// Create a new instance of the web application builder .
var builder = WebApplication.CreateBuilder(args);

// Create an ODataConventionModelBuilder to build the OData model.
var modelBuilder = new ODataConventionModelBuilder();

// Register the "Orders" entity set with the OData model builder.
modelBuilder.EntitySet<OrdersDetails>("Orders");

// Add controllers with OData support to the service collection.
builder.Services.AddControllers().AddOData(
    options => options
        .Count()
        .OrderBy() // Enable sorting support.
        .AddRouteComponents("odata", modelBuilder.GetEdmModel()));
import { DataManager, ODataV4Adaptor } from '@syncfusion/ej2-data';
import { ColumnDirective, ColumnsDirective, GridComponent, Sort, Inject } from '@syncfusion/ej2-react-grids';
function App() {
const data = new DataManager({
url:'https://localhost:xxxx/odata/Orders', // Replace with the actual API endpoint URL.
adaptor: new ODataV4Adaptor(),
crossDomain: true
});
return <GridComponent dataSource={data} allowSorting={true}>
<ColumnsDirective>
<ColumnDirective field='OrderID' headerText='Order ID' isPrimaryKey={true} width='150' textAlign='Right' />
<ColumnDirective field='CustomerID' headerText='Customer ID' width='150' />
<ColumnDirective field='EmployeeID' headerText='Employee ID' width='150' textAlign='Right'/>
<ColumnDirective field='ShipCountry' headerText='Ship Country' width='150'/>
</ColumnsDirective>
<Inject services={[Sort]} />
</GridComponent>
};
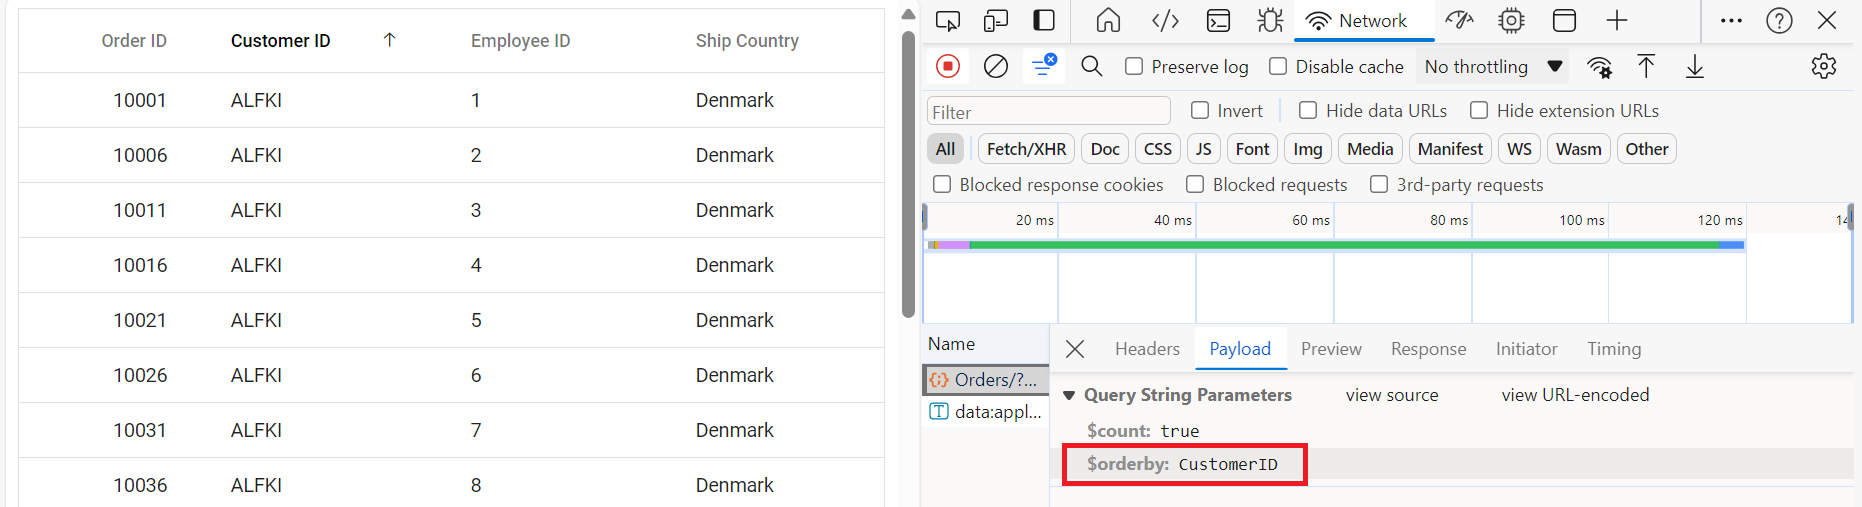
export default App;Single column sorting:
Click “Customer ID” column header to sort by “CustomerID” field.
Multi-column sorting:
Hold the Ctrl key and click “Employee ID” followed by “Customer ID” to establish hierarchical sort (primary sort by “Customer ID”, secondary sort by “Employee ID” within each “Customer ID” group).
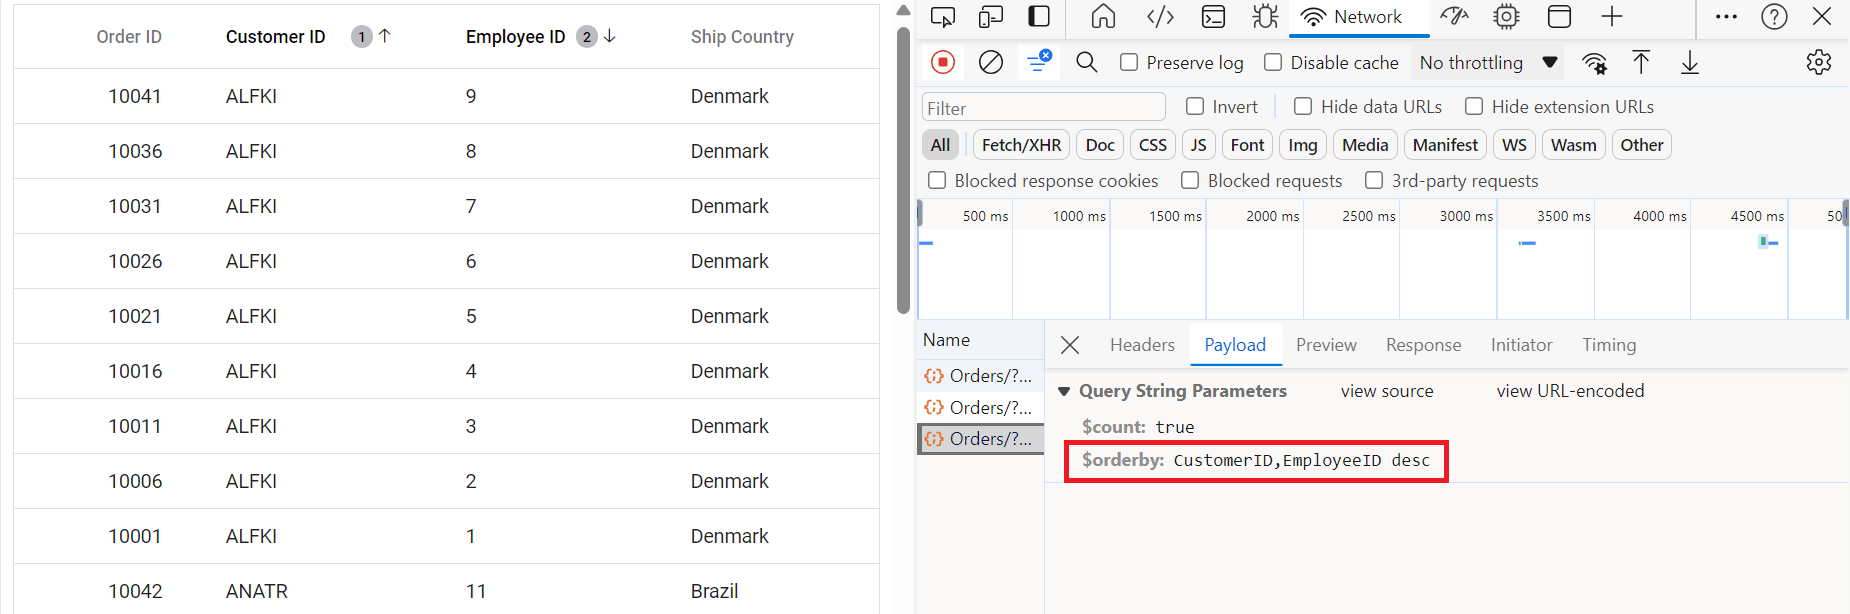
Sort indicator legend:
- ↑ (Up arrow): Indicates ascending sort direction
- ↓ (Down arrow): Indicates descending sort direction
- Numeric indicator (1, 2, 3): Displays sort priority in multi-column sorting scenarios
The Grid has now been successfully created with including paging, sorting, filtering. the next step is to enabling CRUD operations.
CRUD operations
CRUD refers to the four essential data operations: Create (add records), Read (view records), Update (modify records), and Delete (remove records).
CRUD works with OData:
| Operation | HTTP Method | URL Example | Description |
|---|---|---|---|
| Read | GET | /odata/Orders |
Get all records. |
| Create | POST | /odata/Orders |
Add a new record. |
| Update | PATCH | /odata/Orders(10001) |
Update record with key “10001”. |
| Delete | DELETE | /odata/Orders(10001) |
Delete record with key “10001”. |
Step 1: Complete server-side controller
Add all CRUD methods to the OrdersController.cs. Replace the entire controller with this complete version:
using Microsoft.AspNetCore.Mvc;
using Microsoft.AspNetCore.OData.Query;
using Microsoft.AspNetCore.OData.Routing.Controllers;
using ODataV4Adaptor.Server.Models;

namespace ODataV4Adaptor.Server.Controllers
{
    [Route("[controller]")]
    [ApiController]
    public class OrdersController : ODataController
    {
        // READ: Get all orders
        [HttpGet]
        [EnableQuery]
        public IActionResult Get()
        {
            var data = OrdersDetails.GetAllRecords().AsQueryable();
            return Ok(data);
        }

        // READ: Get single order by key
        [HttpGet("{key}")]
        [EnableQuery]
        public IActionResult Get(int key)
        {
            var order = OrdersDetails.GetAllRecords().FirstOrDefault(o => o.OrderID == key);
            if (order == null)
            {
                return NotFound();
            }
            return Ok(order);
        }

        // CREATE: Insert new order
        [HttpPost]
        [EnableQuery]
        public IActionResult Post([FromBody] OrdersDetails addRecord)
        {
            if (addRecord == null)
            {
                return BadRequest("Order cannot be null");
            }

            // Add to the beginning of the list
            OrdersDetails.GetAllRecords().Insert(0, addRecord);
            return Created(addRecord);
        }

        // UPDATE: Modify existing order
        [HttpPatch("{key}")]
        public IActionResult Patch(int key, [FromBody] OrdersDetails updatedOrder)
        {
            if (updatedOrder == null)
            {
                return BadRequest("Order data cannot be null");
            }

            var existingOrder = OrdersDetails.GetAllRecords().FirstOrDefault(o => o.OrderID == key);
            if (existingOrder == null)
            {
                return NotFound();
            }

            // Update properties (null-coalescing handles partial updates)
            existingOrder.CustomerID = updatedOrder.CustomerID ?? existingOrder.CustomerID;
            existingOrder.EmployeeID = updatedOrder.EmployeeID ?? existingOrder.EmployeeID;
            existingOrder.ShipCountry = updatedOrder.ShipCountry ?? existingOrder.ShipCountry;

            return Ok(existingOrder);
        }

        // DELETE: Remove order
        [HttpDelete("{key}")]
        public IActionResult Delete(int key)
        {
            var order = OrdersDetails.GetAllRecords().FirstOrDefault(o => o.OrderID == key);
            if (order == null)
            {
                return NotFound();
            }

            OrdersDetails.GetAllRecords().Remove(order);
            return NoContent(); // 204 No Content is standard for successful DELETE
        }
    }
}
Controller method breakdown:
-
Get(): Returns all orders;
[EnableQuery]allows OData filtering/sorting. - Get(int key): Returns specific order by ID.
-
Post(): Creates new order;
Created()returns 201 status with new record. - Patch(): Updates existing order; only changes specified fields.
-
Delete(): Removes order;
NoContent()returns 204 status.
Step 2: Client-side grid configuration
React Grid enables full CRUD functionality by configuring the required toolbar buttons (Add, Edit, Update, Delete, and Cancel) and enabling adding, editing, updating, and deleting through the editSettings property. This setup allows the Grid to handle all basic data operations directly from the UI.
import { ColumnDirective, ColumnsDirective, GridComponent, Toolbar, Edit, Inject } from '@syncfusion/ej2-react-grids';
import { DataManager, ODataV4Adaptor } from '@syncfusion/ej2-data';

function App() {
    const data = new DataManager({
      url: 'https://localhost:xxxx/odata/Orders', // Here xxxx represents the port number.
      adaptor: new ODataV4Adaptor(),
      crossDomain: true
    });

    // Configure editing options
    const editSettings = {
      allowEditing: true,   // Enable edit button
      allowAdding: true,    // Enable add button
      allowDeleting: true,  // Enable delete button
      mode: 'Normal',       // Inline editing mode
      showDeleteConfirmDialog: true  // Enable confirmation dialog
    };

    // Configure toolbar buttons
    const toolbar = ['Add', 'Edit', 'Delete', 'Update', 'Cancel', 'Search'];

    // Validation rules
    const orderIDRules = { required: true };
    const customerIDRules = { required: true, minLength: 3 };

    return <GridComponent
      dataSource={data}
      editSettings={editSettings}
      toolbar={toolbar}
      height={320}>
        <ColumnsDirective>
            <ColumnDirective field='OrderID' headerText='Order ID' isPrimaryKey={true} width='150' textAlign='Right' validationRules={orderIDRules} />
            <ColumnDirective field='CustomerID' headerText='Customer ID' width='150' validationRules={customerIDRules} />
            <ColumnDirective field='EmployeeID' headerText='Employee ID' width='150' textAlign='Right' />
            <ColumnDirective field='ShipCountry' headerText='Ship Country' width='150' />
        <Inject services={[Toolbar, Edit]} />
    </GridComponent>
};
export default App;
- The OrderID field must have
isPrimaryKey={true}for CRUD operations to function correctly.- For detailed editing setup, refer to the editing documentation. The following example demonstrates inline edit mode with a toolbar for action buttons.
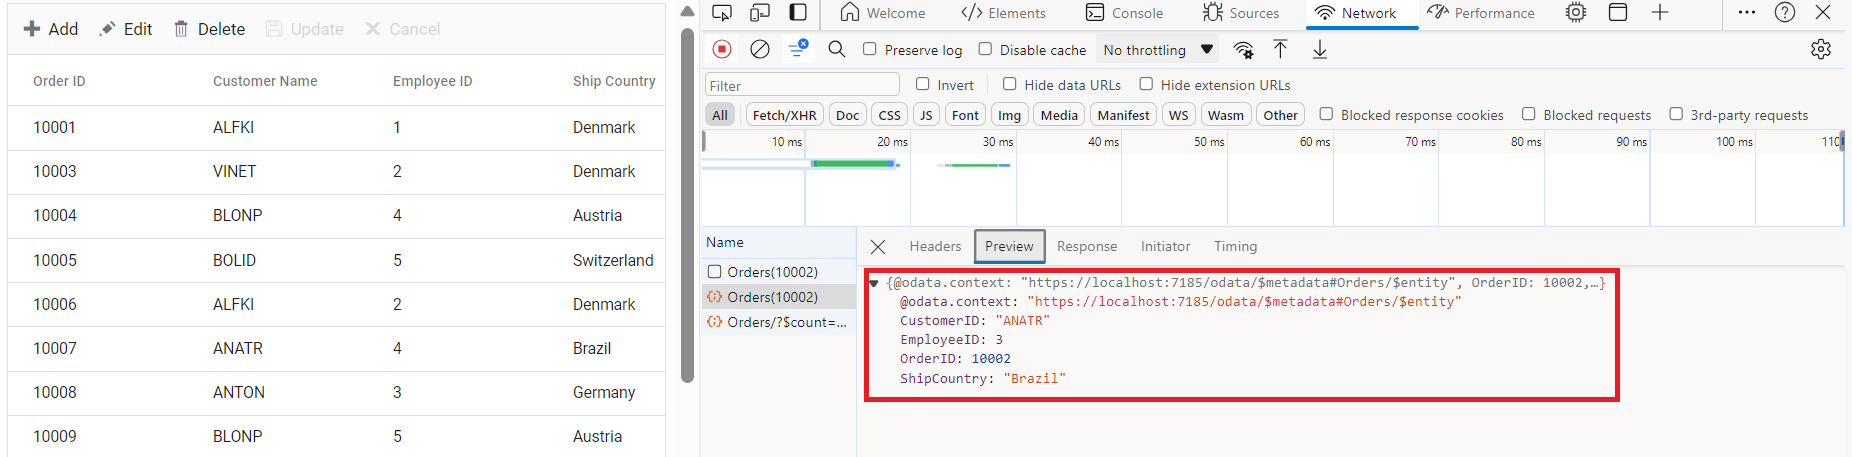
Step 3: Using CRUD features
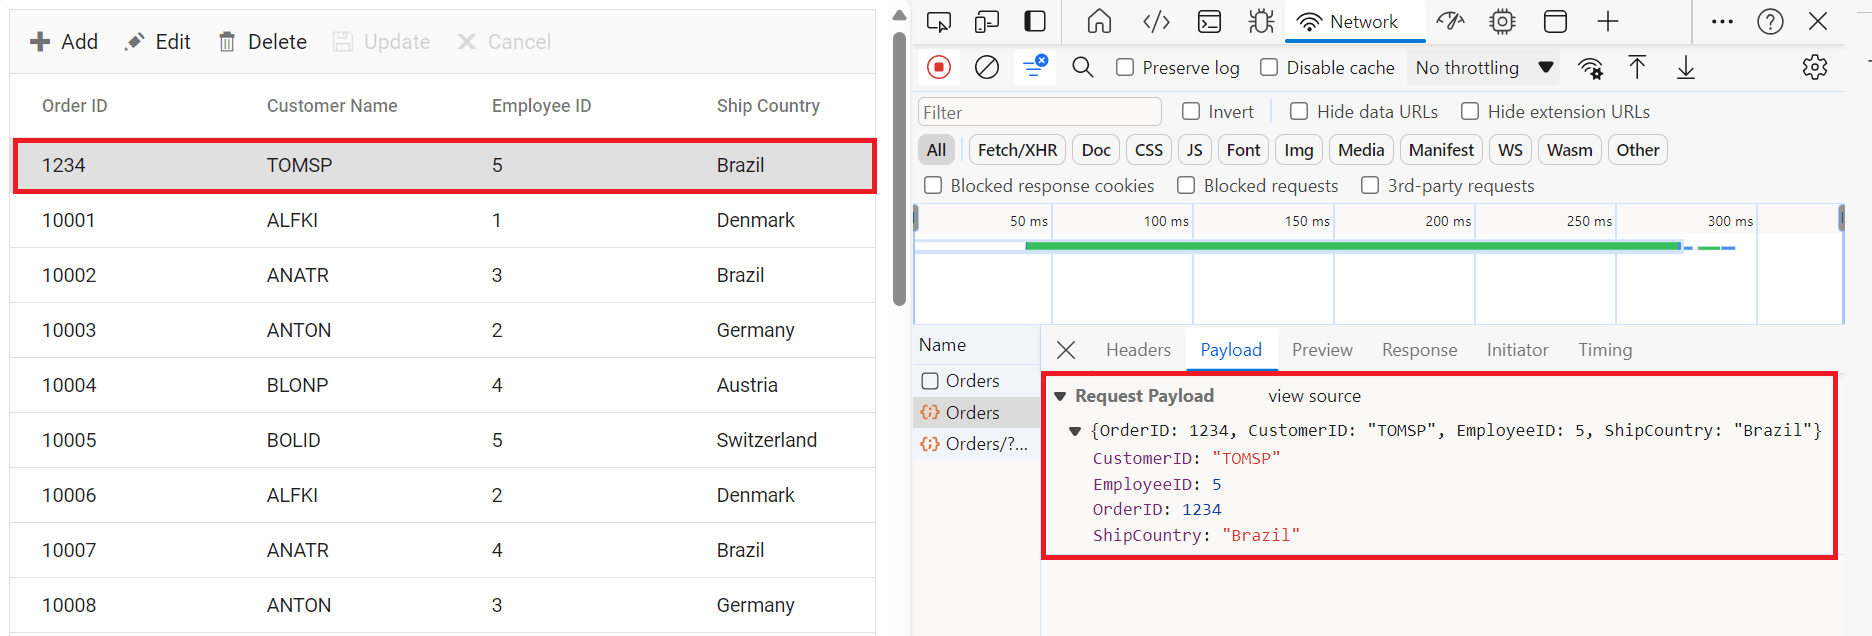
Adding a new record:
Click Add to create a new row, fill in the details, save with Update (or cancel), and the grid then sends a POST request to the server.
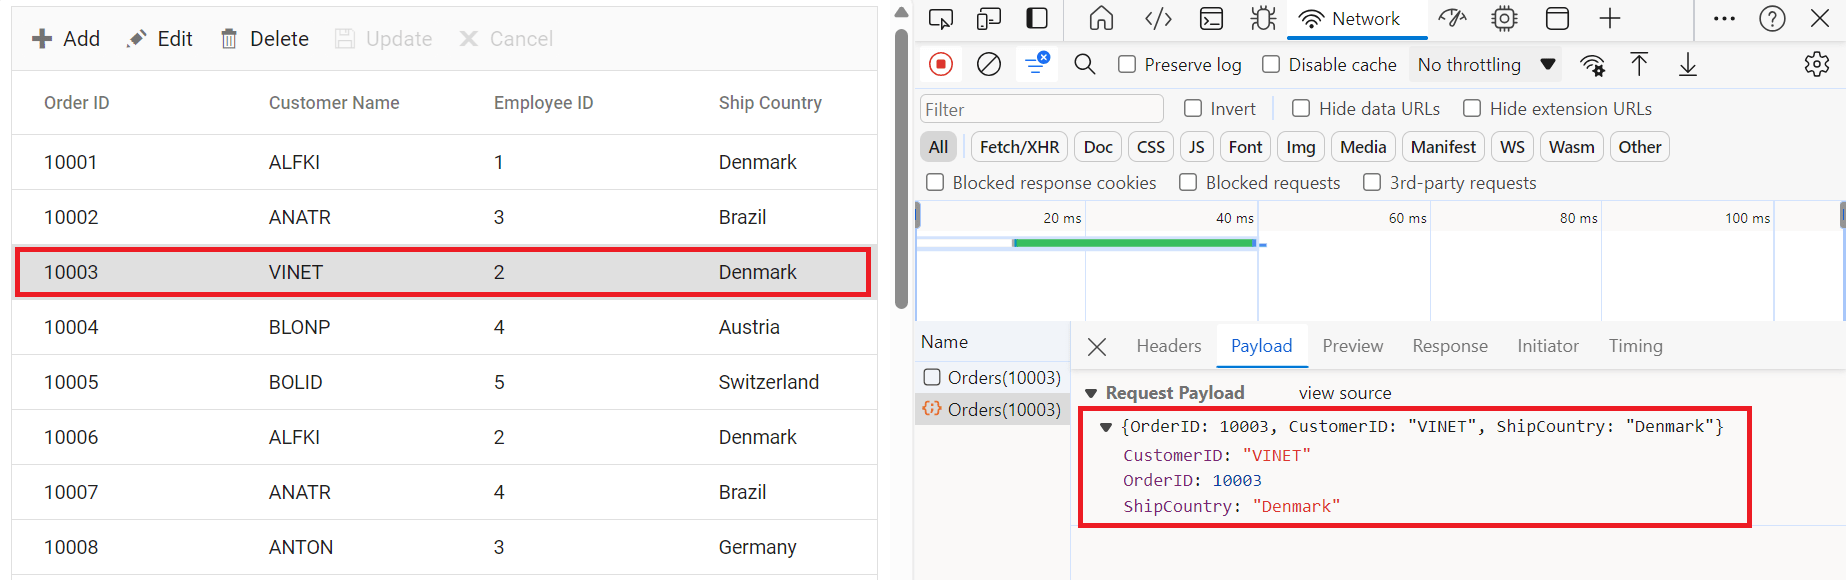
Editing an existing record:
Select the record, click Edit, modify the fields, save with Update (or cancel), and the grid sends a PATCH request to the server.
Deleting a record:
Select the record, click Delete, confirm in the dialog, and the grid sends a DELETE request to the server.
Custom URLs for CRUD operations
By default, ODataV4Adaptor uses standard OData conventions:
- Create:
POST /odata/Orders. - Update:
PATCH /odata/Orders(10001). - Delete:
DELETE /odata/Orders(10001).
Custom URLs become necessary in these scenarios:
- Existing non-OData endpoints cannot be modified.
- CRUD operations must route to different controllers.
- Custom business logic requires special routing.
- Third-party API integration is required.
Custom URL implementation:
Explicitly specify which URL DataManager uses for each operation instead of relying on OData routing conventions.
Configuring custom URLs:
DataManager supports these custom URL properties:
| Property | Purpose | Default Behavior |
|---|---|---|
url |
Read (GET) operations. | /odata/Orders |
insertUrl |
Create (POST) operations. | Uses url. |
updateUrl |
Update (PATCH/PUT) operations. | Uses url/{key}. |
removeUrl |
Delete (DELETE) operations. | Uses url/{key}. |
batchUrl |
Batch operations. | Uses url/$batch. |
Separate URLs for each operation
Use this approach when different API endpoints are assigned to handle specific CRUD or data operations.
import { ColumnDirective, ColumnsDirective, GridComponent, Toolbar, Edit, Inject } from '@syncfusion/ej2-react-grids';
import { DataManager, ODataV4Adaptor } from '@syncfusion/ej2-data';

function App() {
    const data = new DataManager({
      url: 'https://localhost:xxxx/odata/Orders',              // GET: Read operations
      insertUrl: 'https://localhost:xxxx/odata/Orders/Insert', // POST: Create operations
      updateUrl: 'https://localhost:xxxx/odata/Orders/Update', // PATCH: Update operations
      removeUrl: 'https://localhost:xxxx/odata/Orders/Delete', // DELETE: Delete operations
      adaptor: new ODataV4Adaptor(),
      crossDomain: true
    });

    const editSettings = {
      allowEditing: true,
      allowAdding: true,
      allowDeleting: true,
      mode: 'Normal'
    };
    const toolbar = ['Add', 'Edit', 'Delete', 'Update', 'Cancel', 'Search'];
    const orderIDRules = { required: true };
    const customerIDRules = { required: true, minLength: 3 };

    return <GridComponent dataSource={data} editSettings={editSettings} toolbar={toolbar} height={320}>
        <ColumnsDirective>
            <ColumnDirective field='OrderID' headerText='Order ID' isPrimaryKey={true} width='150' textAlign='Right' validationRules={orderIDRules} />
            <ColumnDirective field='CustomerID' headerText='Customer ID' width='150' validationRules={customerIDRules} />
            <ColumnDirective field='EmployeeID' headerText='Employee ID' width='150'/>
            <ColumnDirective field='ShipCountry' headerText='Ship Country' width='150'/>
        </ColumnsDirective>
        <Inject services={[Toolbar, Edit]} />
    </GridComponent>
};
export default App;
Ensure the backend defines routes that correspond to these custom URLs.
Run the application
Run the application in Visual Studio, accessible on a URL like https://localhost:xxxx. Verify the API returns order data at https://localhost:xxxx/odata/Orders, where xxxx is the port. Grid displays order data fetched from the backend API.
Troubleshooting
| Issue | Resolution |
|---|---|
| Empty Grid | Ensure the API returns data, verify “GetAllRecords()” provides results, and check the browser console. |
| CRUD Not Working | Confirm the primary key is configured and the controller supports POST, PATCH, and DELETE methods. |
| Styles Missing | Verify that Syncfusion CSS files are correctly referenced and fix any missing file errors in console. |
Complete sample repository
For the complete working implementation of this example, refer to the GitHub repository.