Custom Remote Data Binding in React Grid
21 Jul 202624 minutes to read
The CustomAdaptor in the React Data Grid is a powerful extension mechanism that customizes any existing adaptor (UrlAdaptor, WebApiAdaptor, ODataV4Adaptor, GraphQLAdaptor) to meet specific application requirements. Instead of creating an entirely new adaptor from scratch, CustomAdaptor extends and modifies the behavior of existing adaptors by intercepting and customizing HTTP requests and responses.
For detailed guidance, refer to the DataManager CustomAdaptor documentation, which explains the usage of custom adaptors in depth. For complete server-side setup and advanced implementation details, see the DataManager ODataV4Adaptor documentation, covering endpoint configuration, query handling, and recommended practices for integrating OData V4 services.
Once the project creation and backend setup are complete, the next step is to render the React Data Grid component on the client side.
React Grid setup and client-side configuration
After finishing the backend setup for the ODataV4Adaptor ASP.NET Core project, next step is to integrate the React Data Grid on the client side by following these instructions.
Step 1: Installing Syncfusion packages
Right‑click the ODataV4Adaptor.client folder in Solution Explorer and select Open in Terminal (available in newer Visual Studio versions), or open a Developer Command Prompt/PowerShell from the Start menu and navigate manually to the ODataV4Adaptor.client directory. Once inside the folder, confirm that package.json is present, then run the following commands to install the required Syncfusion® packages:
npm install @syncfusion/ej2-react-grids --save
npm install @syncfusion/ej2-data --save
Step 2: Add CSS styles
Navigate to the src folder and open the index.css stylesheet file. Add the required CSS import statements to include the Syncfusion® Grid styles.
@import '../node_modules/@syncfusion/ej2-base/styles/material3.css';
@import '../node_modules/@syncfusion/ej2-buttons/styles/material3.css';
@import '../node_modules/@syncfusion/ej2-calendars/styles/material3.css';
@import '../node_modules/@syncfusion/ej2-dropdowns/styles/material3.css';
@import '../node_modules/@syncfusion/ej2-inputs/styles/material3.css';
@import '../node_modules/@syncfusion/ej2-navigations/styles/material3.css';
@import '../node_modules/@syncfusion/ej2-popups/styles/material3.css';
@import '../node_modules/@syncfusion/ej2-splitbuttons/styles/material3.css';
@import '../node_modules/@syncfusion/ej2-react-grids/styles/material3.css';
Import the stylesheet in the main.jsx application entry point:
import { StrictMode } from 'react'
import { createRoot } from 'react-dom/client'
import './index.css'
import App from './App.jsx'

createRoot(document.getElementById('root')).render(
  <StrictMode>
    <App />
  </StrictMode>,
)
Step 3: Create React Grid component with CustomAdaptor
Integrating a CustomAdaptor with the React Data Grid requires configuring the DataManager as the communication bridge between the Grid component and the backend data source. The CustomAdaptor serves as a powerful customization layer that provides complete control over how data operations—such as filtering, sorting, paging, and querying—are processed and transmitted to the server.
Step 3.1: Creating an Extended ODataV4Adaptor:
The first step involves creating a custom adaptor by extending the existing ODataV4Adaptor class. This extension allows modification of the default behavior to meet specific application requirements.
Begin by creating a new TypeScript file named CustomAdaptor.ts in the project’s source directory. This file will house the custom adaptor class definition.
Understanding the SerialNoAdaptor implementation:
The example below demonstrates a SerialNoAdaptor class that extends ODataV4Adaptor to dynamically add serial numbers to each record after receiving the response from the server. This is particularly useful when the server data does not include sequential numbering but the Grid needs to display row numbers.
The implementation requires importing specific modules from Syncfusion packages:
-
setValuefrom@syncfusion/ej2-base– A utility function for safely setting property values on objects -
DataManager,ODataV4Adaptor, andQueryfrom@syncfusion/ej2-data– Core data management classes
The Syncfusion® DataManager provides built‑in extensibility points that allow custom logic to be applied both before a request is sent to the server and after a response is received. This is achieved by overriding adaptor methods, ensuring that request customization and response transformation are handled in a consistent and centralized manner. The following table explains the overridden methods in a CustomAdaptor and their execution phases:
| Method | Execution Phase | Purpose & Key Actions |
|---|---|---|
processResponse |
After receiving server response, before Grid rendering | Adds sequential “SNo” (serial number) to each record by iterating through response.result → displays row numbers when the server does not provide them |
processQuery |
Before sending request to server | Sets custom OData endpoint URL and adds extra query parameters → enables dynamic URLs and request tracking/identification |
beforeSend |
Immediately before HTTP request is sent | Adds Authorization: Bearer header using token from window → automatically authenticates every API request |
import { setValue } from '@syncfusion/ej2-base';
import { DataManager, ODataV4Adaptor, Query, } from '@syncfusion/ej2-data';
export class SerialNoAdaptor extends ODataV4Adaptor {
    public processResponse() {
        let i = 0;
        const original: any = super.processResponse.apply(this, arguments as any);
        /* Adding serial number */
        if (original.result) {
            original.result.forEach((item: any) => setValue('SNo', ++i, item));
        }
        return original;
    }

    public processQuery(dm: DataManager, query: Query): Object {
        dm.dataSource.url = 'https://localhost:xxxx/odata/orders';
        query.addParams('Syncfusion in React Grid', 'true');
        const result = super.processQuery.apply(this, arguments as any);
        return result;
    }

    public beforeSend(dm: any, request: any, settings: any) {
        request.headers.set('Authorization', `Bearer ${(window as any).token}`);
        super.beforeSend(dm, request, settings);
    }
}
Step 3.2: Integrating CustomAdaptor into React Grid:
After creating the custom adaptor class, integrate it with the React Grid in the main application file (typically App.tsx or App.jsx). This requires importing the necessary modules and configuring the Grid to use the custom adaptor:
- Import
DataManagerfrom@syncfusion/ej2-datato act as the link between the Grid and the OData service. - Import
CustomAdaptorfrom the local ./CustomAdaptor file to apply custom request and response logic. - Create DataManager instance by setting the service endpoint URL (e.g., https://localhost:xxxx/odata/Orders) in the
urlproperty. - Assign
CustomAdaptorto theadaptorproperty so that all operations (filtering, sorting, paging, querying) use the customized pipeline. - Bind DataManager to the Grid’s
dataSourceproperty, enabling the Grid to automatically apply the custom logic during data communication.
import { DataManager } from '@syncfusion/ej2-data';
import {CustomAdaptor} from './CustomAdaptor';
import { ColumnDirective, ColumnsDirective, GridComponent } from '@syncfusion/ej2-react-grids';

function App() {
    const data = new DataManager({
      url:'https://localhost:xxxx/odata/Orders', // Here xxxx represents the port number
      adaptor: new CustomAdaptor()
    });
    return <GridComponent dataSource={data} >
        <ColumnsDirective>
            <ColumnDirective field='SNo' headerText='SNO' width='150'/>
            <ColumnDirective field='OrderID' headerText='Order ID' isPrimaryKey={true} width='150' textAlign='Right'></ColumnDirective>
            <ColumnDirective field='CustomerID' headerText='Customer ID' width='150'></ColumnDirective>
            <ColumnDirective field='EmployeeID' headerText='Employee ID' width='150'/>
            <ColumnDirective field='ShipCountry' headerText='Ship Country' width='150'/>
        </ColumnsDirective>
    </GridComponent>
};
export default App;
Replace https://localhost:xxxx/odata/Orders with the actual API endpoint that returns data in JSON format.
Performing data operations
This section covers implementation of advanced Grid features including filtering, sorting, pagination, and complete CRUD operations.
Filtering
Filtering is enabled by setting the allowFiltering property to true and injecting the Filter module from @syncfusion/ej2-react-grids into the Grid.
import { ColumnDirective, ColumnsDirective, GridComponent, Filter, Inject } from '@syncfusion/ej2-react-grids';
function App() {
return <GridComponent dataSource={data} allowFiltering={true}>
<ColumnsDirective>
<ColumnDirective field='SNo' headerText='SNO' width='150' allowSorting={false} allowFiltering={false} allowSearching={false} isIdentity={true} />
{/* Include additional columns here */}
</ColumnsDirective>
<Inject services={[Filter]} />
</GridComponent>
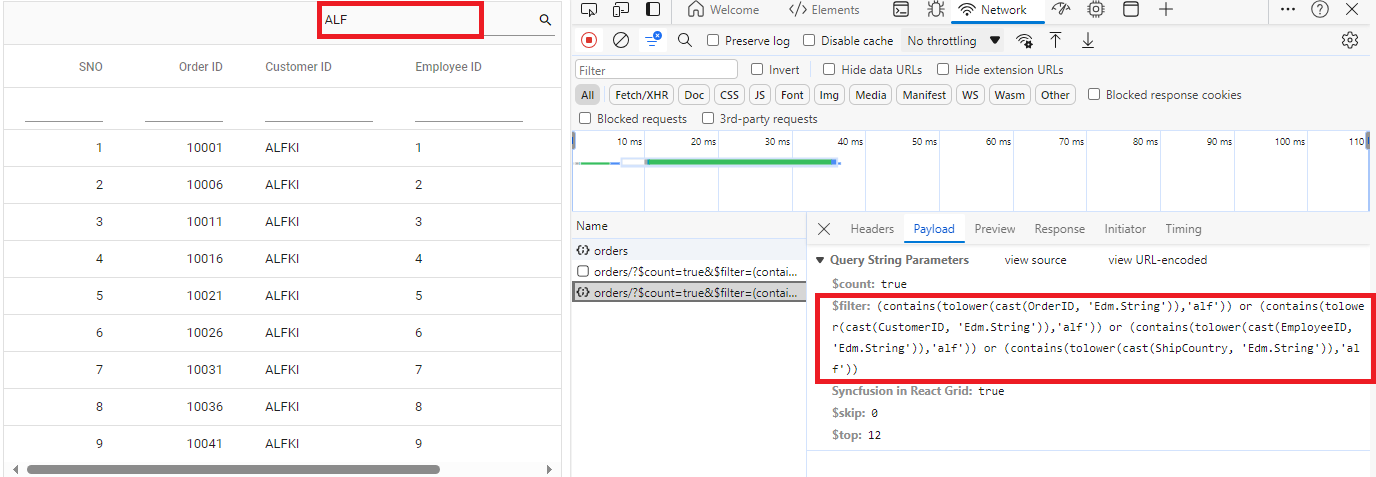
};When working with a custom adaptor, filter operations can be enabled by extending OData support within the service configuration. As part of this setup, the Filter method is included in the OData configuration, allowing the service to interpret filtering criteria. Once configured, clients can use the $filter query option in their requests to retrieve data entries that match specific conditions.
Single column filtering:

Multi-column filtering:
Multiple columns can be filtered simultaneously. Example: Apply filter criteria “ShipCountry = “Denmark” AND OrderID > 10005”.

// Create a new instance of the web application builder
var builder = WebApplication.CreateBuilder(args);

// Create an ODataConventionModelBuilder to build the OData model
var modelBuilder = new ODataConventionModelBuilder();

// Register the "Orders" entity set with the OData model builder
modelBuilder.EntitySet<OrdersDetails>("Orders");

// Add services to the container.

// Add controllers with OData support to the service collection
builder.Services.AddControllers().AddOData(
    options => options
        .Count()
        .Filter() //filtering
        .AddRouteComponents("odata", modelBuilder.GetEdmModel()));
import { DataManager } from '@syncfusion/ej2-data';
import {CustomAdaptor} from './CustomAdaptor';
import { ColumnDirective, ColumnsDirective, GridComponent, Filter } from '@syncfusion/ej2-react-grids';
function App() {
const data = new DataManager({
url:'https://localhost:xxxx/odata/Orders', // Here xxxx represents the port number.
adaptor: new CustomAdaptor()
});
return <GridComponent dataSource={data} allowFiltering={true}>
<ColumnsDirective>
<ColumnDirective field='SNo' headerText='SNO' width='150'/>
<ColumnDirective field='OrderID' headerText='Order ID' isPrimaryKey={true} width='150' textAlign='Right'></ColumnDirective>
<ColumnDirective field='CustomerID' headerText='Customer ID' width='150'></ColumnDirective>
<ColumnDirective field='EmployeeID' headerText='Employee ID' width='150'/>
<ColumnDirective field='ShipCountry' headerText='Ship Country' width='150'/>
</ColumnsDirective>
<Inject services={[Filter]} />
</GridComponent>
};
export default App;Searching
The searching feature in the Grid is enabled by adding Search to the Grid’s toolbar items and injecting the Toolbar module.
import { ColumnDirective, ColumnsDirective, GridComponent, Toolbar, Inject } from '@syncfusion/ej2-react-grids';

function App() {
    const toolbar = ['Search'];
    return <GridComponent dataSource={data} allowFiltering={true} toolbar={toolbar}>
        <ColumnsDirective>
            <ColumnDirective field='SNo' headerText='SNO' width='150' allowSorting={false} allowFiltering={false} allowSearching={false} isIdentity={true} />
            {/* Include additional columns here */}
        </ColumnsDirective>
        <Inject services={[Toolbar]} />
    </GridComponent>
};
When working with a custom adaptor, search operations can be enabled by extending OData support within the service configuration. As part of this setup, the Filter method is included in the OData configuration, allowing the service to interpret search criteria. Once configured, clients can use the $filter query option in their requests to retrieve data entries that match search conditions.
Search usage:
The search box in the Grid top‑right corner can be used to enter any keyword, and matching records from all columns will be shown instantly. Clear the search input to return to the full data set.
// Create a new instance of the web application builder
var builder = WebApplication.CreateBuilder(args);

// Create an ODataConventionModelBuilder to build the OData model
var modelBuilder = new ODataConventionModelBuilder();

// Register the "Orders" entity set with the OData model builder
modelBuilder.EntitySet<OrdersDetails>("Orders");

// Add services to the container.

// Add controllers with OData support to the service collection
builder.Services.AddControllers().AddOData(
    options => options
        .Count()
        .Filter() // searching
        .AddRouteComponents("odata", modelBuilder.GetEdmModel()));
import { DataManager } from '@syncfusion/ej2-data';
import {CustomAdaptor} from './CustomAdaptor';
import { ColumnDirective, ColumnsDirective, GridComponent, Toolbar, ToolbarItems } from '@syncfusion/ej2-react-grids';
function App() {
const data = new DataManager({
url:'https://localhost:xxxx/odata/Orders', // Here xxxx represents the port number.
adaptor: new CustomAdaptor()
});
const toolbar: ToolbarItems[] = ['Search'];
return <GridComponent dataSource={data} toolbar={toolbar}>
<ColumnsDirective>
<ColumnDirective field='OrderID' headerText='Order ID' isPrimaryKey={true} width='150' textAlign='Right'></ColumnDirective>
<ColumnDirective field='CustomerID' headerText='Customer ID' width='150'></ColumnDirective>
<ColumnDirective field='EmployeeID' headerText='Employee ID' width='150'/>
<ColumnDirective field='ShipCountry' headerText='Ship Country' width='150'/>
</ColumnsDirective>
<Inject services={[Toolbar]} />
</GridComponent>
};
export default App;Sorting
The sorting feature in the Grid allows users to organize records in ascending or descending order based on one or more columns. The sorting feature in the Grid is enabled by setting the allowSorting property to true and injecting the Sort module.
import { ColumnDirective, ColumnsDirective, GridComponent, Sort, Inject } from '@syncfusion/ej2-react-grids';
function App() {
return (
<GridComponent dataSource={data} allowSorting={true}>
<ColumnsDirective>
<ColumnDirective field='SNo' headerText='SNO' width='150' allowSorting={false} allowFiltering={false} allowSearching={false} isIdentity={true} />
{/* Include additional columns here */}
</ColumnsDirective>
<Inject services={[Sort]} />
</GridComponent>
);
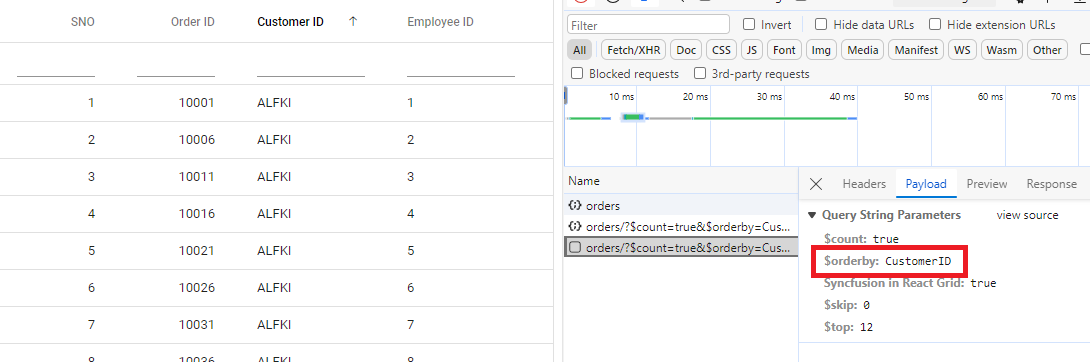
}When working with a custom adaptor, sorting functionality is supported by extending OData within the service configuration. As part of this setup, the OrderBy method is included in the OData configuration, enabling the service to interpret sorting criteria. Once configured, clients can use the $orderby query option in their requests to sort data entries based on the required attributes.
Single column sorting:
Click the “Customer ID” column header to sort by “CustomerID” field.
Multi-column sorting:
Hold the ctrl key and click “Employee ID” followed by “Customer ID” to establish hierarchical sort (primary sort by “Customer ID”, secondary sort by “Employee ID” within each “Customer ID” group).

// Create a new instance of the web application builder
var builder = WebApplication.CreateBuilder(args);

// Create an ODataConventionModelBuilder to build the OData model
var modelBuilder = new ODataConventionModelBuilder();

// Register the "Orders" entity set with the OData model builder
modelBuilder.EntitySet<OrdersDetails>("Orders");

// Add services to the container.

// Add controllers with OData support to the service collection
builder.Services.AddControllers().AddOData(
    options => options
        .Count()
        .OrderBy() // sorting
        .AddRouteComponents("odata", modelBuilder.GetEdmModel()));
import { DataManager } from '@syncfusion/ej2-data';
import {CustomAdaptor} from './CustomAdaptor';
import { ColumnDirective, ColumnsDirective, GridComponent, Sort } from '@syncfusion/ej2-react-grids';
function App() {
const data = new DataManager({
url:'https://localhost:xxxx/odata/Orders', // Here xxxx represents the port number.
adaptor: new CustomAdaptor()
});
return <GridComponent dataSource={data} allowSorting={true}>
<ColumnsDirective>
<ColumnDirective field='SNo' headerText='SNO' width='150'/>
<ColumnDirective field='OrderID' headerText='Order ID' isPrimaryKey={true} width='150' textAlign='Right'></ColumnDirective>
<ColumnDirective field='CustomerID' headerText='Customer ID' width='150'></ColumnDirective>
<ColumnDirective field='EmployeeID' headerText='Employee ID' width='150'/>
<ColumnDirective field='ShipCountry' headerText='Ship Country' width='150'/>
</ColumnsDirective>
<Inject services={[Sort]} />
</GridComponent>
};
export default App;Pagination
The paging feature allows efficient loading of large data sets through on‑demand loading. Paging in the Grid is enabled by setting the allowPaging property to true and injecting the Page module. This sends parameters to fetch only the data required for the current viewport.
import { ColumnDirective, ColumnsDirective, GridComponent, Page, Inject } from '@syncfusion/ej2-react-grids';
function App() {
return (
<GridComponent dataSource={data} allowPaging={true}>
<ColumnsDirective>
<ColumnDirective field='SNo' headerText='SNO' width='150' allowSorting={false} allowFiltering={false} allowSearching={false} isIdentity={true} />
{/* Include additional columns here */}
</ColumnsDirective>
<Inject services={[Page]} />
</GridComponent>
);
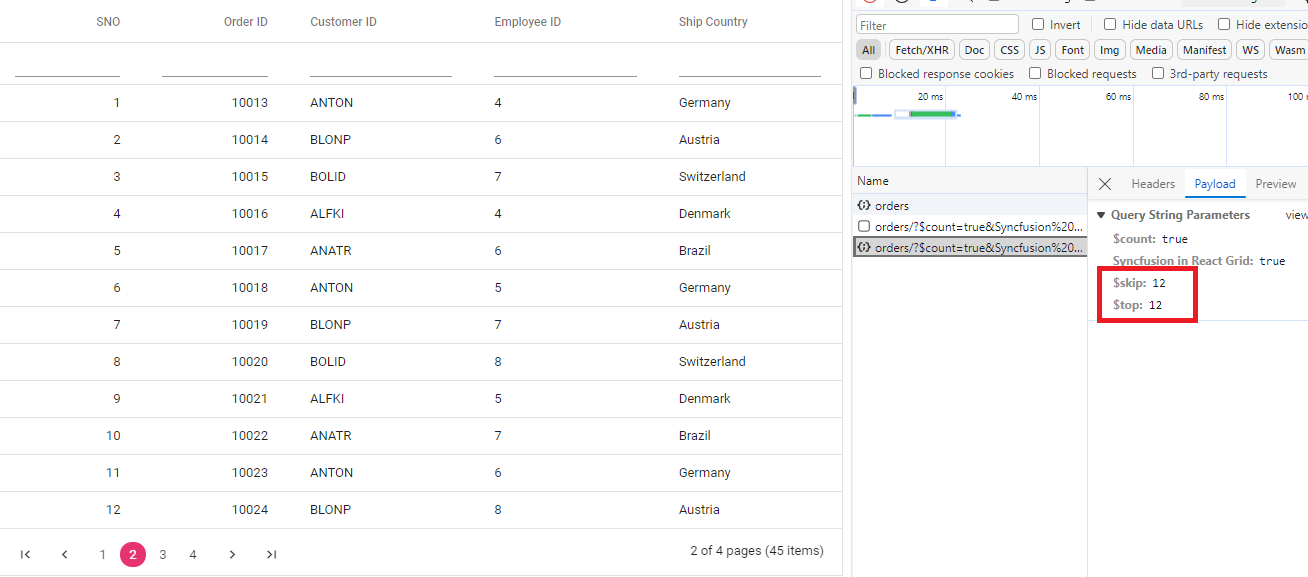
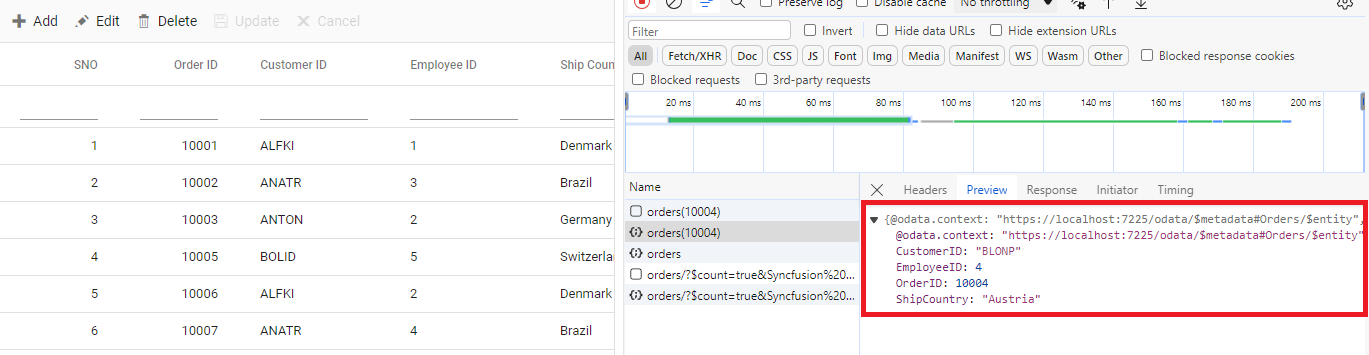
}When working with a custom adaptor, paging operations can be enabled by extending OData support within the service configuration. As part of this setup, the SetMaxTop method is included in the OData configuration, defining the maximum number of records that can be returned in a single response. Once configured, clients can use the $skip and $top query options in their requests to control the number of records to omit and the number of records to retrieve, ensuring predictable paging behavior within the application’s data handling process.
The following screenshot illustrates the custom adaptor extending OData V4 with a paging query in operation.
// Create a new instance of the web application builder
var builder = WebApplication.CreateBuilder(args);

// Create an ODataConventionModelBuilder to build the OData model
var modelBuilder = new ODataConventionModelBuilder();

// Register the "Orders" entity set with the OData model builder
modelBuilder.EntitySet<OrdersDetails>("Orders");

// Add services to the container.

// Add controllers with OData support to the service collection
builder.Services.AddControllers().AddOData(
    options => options
        .Count()
        .SetMaxTop(null)
        .AddRouteComponents("odata", modelBuilder.GetEdmModel()));
import { DataManager } from '@syncfusion/ej2-data';
import {CustomAdaptor} from './CustomAdaptor';
import { ColumnDirective, ColumnsDirective, GridComponent, Page } from '@syncfusion/ej2-react-grids';
function App() {
const data = new DataManager({
url: 'https://localhost:xxxx/odata/Orders', // Here xxxx represents the port number.
adaptor: new CustomAdaptor()
});
return <GridComponent dataSource={data} allowPaging={true}>
<ColumnsDirective>
<ColumnDirective field='SNo' headerText='SNO' width='150'/>
<ColumnDirective field='OrderID' headerText='Order ID' isPrimaryKey={true} width='150' textAlign='Right'></ColumnDirective>
<ColumnDirective field='CustomerID' headerText='Customer ID' width='150'></ColumnDirective>
<ColumnDirective field='EmployeeID' headerText='Employee ID' width='150'/>
<ColumnDirective field='ShipCountry' headerText='Ship Country' width='150'/>
</ColumnsDirective>
<Inject services={[Page]} />
</GridComponent>
};
export default App;The Grid has now been successfully created with full functionality, including paging, sorting, filtering, and CRUD features.
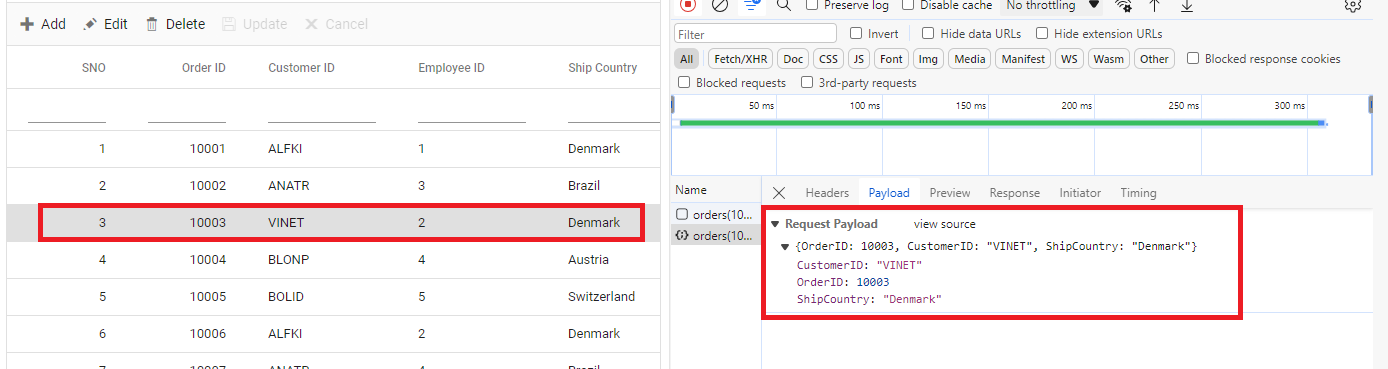
CRUD Operations
CRUD (Create, Read, Update, Delete) operations using a CustomAdaptor are handled by setting up the Grid for editing and employing the sample OrdersController in the server application. This controller manages standard HTTP requests such as GET, POST, PATCH, and DELETE to support complete data modification processes.
To enable CRUD operations in the Syncfusion® Grid component within a React application, the following steps outline the required setup:
import { ColumnDirective, ColumnsDirective, GridComponent, ToolbarItems, EditSettingsModel, Toolbar, Edit, Inject } from '@syncfusion/ej2-react-grids';
import { DataManager } from '@syncfusion/ej2-data';
import {CustomAdaptor} from './CustomAdaptor';

function App() {
    const data = new DataManager({
      url: 'https://localhost:xxxx/odata/Orders', // Here xxxx represents the port number.
      adaptor: new CustomAdaptor()
    });
    const editSettings: EditSettingsModel = { allowEditing: true, allowAdding: true, allowDeleting: true, mode: 'Normal' };
    const toolbar: ToolbarItems[] = ['Add', 'Edit', 'Delete', 'Update', 'Cancel'];
    const orderIDRules: object = {required: true};
    const customerIDRules: object = {required: true, minLength: 3};
    return <GridComponent dataSource={data} editSettings={editSettings} toolbar={toolbar} height={320}>
        <ColumnsDirective>
            <ColumnDirective field='SNo' headerText='SNO' width='150'/>
            <ColumnDirective field='OrderID' headerText='Order ID' isPrimaryKey={true} width='150' textAlign='Right' validationRules={orderIDRules}></ColumnDirective>
            <ColumnDirective field='CustomerID' headerText='Customer ID' width='150' validationRules={customerIDRules}></ColumnDirective>
            <ColumnDirective field='EmployeeID' headerText='Employee ID' width='150'/>
            <ColumnDirective field='ShipCountry' headerText='Ship Country' width='150'/>
        </ColumnsDirective>
        <Inject services={[Toolbar, Edit]} />
    </GridComponent>
};
export default App;
Normal/Inline editing is the default edit mode for the Grid component. To enable CRUD operations, ensure that the isPrimaryKey property is set to
truefor a specific Grid column, ensuring that its value is unique.
Insert Record:
Insertion of a new record in the Syncfusion® Grid is handled through the HttpPost method in the server application.

/// <summary>
/// Inserts a new order to the collection.
/// </summary>
/// <param name="addRecord">The order to be inserted.</param>
/// <returns>It returns the newly inserted record detail.</returns>
[HttpPost]
[EnableQuery]
public IActionResult Post([FromBody] OrdersDetails addRecord)
{
    if (order == null)
    {
        return BadRequest("Null order");
    }

    OrdersDetails.GetAllRecords().Insert(0, addRecord);
    return Ok(addRecord);
}
Update Record:
Updating an existing record in the Syncfusion® Grid is handled through the HttpPatch method within the controller.
/// <summary>
/// Updates an existing order.
/// </summary>
/// <param name="key">The ID of the order to update.</param>
/// <param name="updateRecord">The updated order details.</param>
/// <returns>It returns the updated order details.</returns>
[HttpPatch("{key}")]
public IActionResult Patch(int key, [FromBody] OrdersDetails updatedOrder)
{
    if (updatedOrder == null)
    {
        return BadRequest("No records");
    }
    var existingOrder = OrdersDetails.GetAllRecords().FirstOrDefault(o => o.OrderID == key);
    if (existingOrder != null)
    {
        // If the order exists, update its properties
        existingOrder.CustomerID = updatedOrder.CustomerID ?? existingOrder.CustomerID;
        existingOrder.EmployeeID = updatedOrder.EmployeeID ?? existingOrder.EmployeeID;
        existingOrder.ShipCountry = updatedOrder.ShipCountry ?? existingOrder.ShipCountry;
    }
    return Ok(existingOrder);
}
Delete Record:
Deletion of a record from the Syncfusion® Grid is handled through the HttpDelete method in the controller. The following example demonstrates the delete operation in the OrdersController:
/// <summary>
/// Deletes an order.
/// </summary>
/// <param name="key">The key of the order to be deleted.</param>
/// <returns>The deleted order.</returns>
[HttpDelete("{key}")]
public IActionResult Delete(int key)
{
    var order = OrdersDetails.GetAllRecords().FirstOrDefault(o => o.OrderID == key);
    if (order != null)
    {
        OrdersDetails.GetAllRecords().Remove(order);
    }
    return Ok(order);
}
Application execution and verification
Starting the application: Run the application by pressing F5 in Visual Studio. The browser opens and the Grid loads all orders from the service.
Connection verification: Open the browser Developer Tools (F12) and select the “Network” tab. Refresh the page to confirm a request to https://localhost:xxxx and verify that the response contains JSON data.
Troubleshooting
| Issue | Cause | Solution |
|---|---|---|
| Grid shows no data | Response format incorrect | Ensure processResponse returns {result: [], count: 0}
|
| Authentication fails | Token not added to headers | Verify beforeSend sets “Authorization” header |
| Paging does not work | Missing count in response |
Ensure response contains count property |
| Computed fields missing | Not setting values properly | Use setValue(fieldName, value, item) in processResponse
|
| CRUD operations fail | URLs not configured | Set insertUrl, updateUrl, removeUrl in DataManager
|
| API called twice | Calling super twice | Call super.methodName() only once per method |
Method override summary
| Method | When to override | Common use cases |
|---|---|---|
processQuery |
Need to modify request before it is built | • Change API endpoints • Add query parameters • Route by environment |
beforeSend |
Need to modify request just before sending | • Add auth headers • Add API keys • Log requests |
processResponse |
Need to transform incoming response | • Transform data format • Add calculated fields • Handle errors |
Complete sample repository
A complete, working sample implementation is available in the GitHub repository.