Creating a Next.js Application
21 Jul 202610 minutes to read
This section provides a step-by-step guide for setting up a Next.js application and integrating the React Diagram component.
What is Next.js?
Next.js is a React framework that makes it easy to build fast, SEO-friendly, and user-friendly web applications. It provides features such as server-side rendering, automatic code splitting, routing, and API routes, making it an excellent choice for building modern web applications.
Prerequisites
Before getting started with the Next.js application, ensure the following prerequisites are met:
-
Node.js 18.17.0 or later.
-
The application is compatible with macOS, Windows, and Linux operating systems.
-
Basic knowledge of Next.js and React
Create a Next.js application
To create a new Next.js application, use one of the commands that are specific to either NPM or Yarn.
npx create-next-app@latestyarn create next-appRunning the above command starts the project configuration process.
- Define the project name: Users can specify the name of the project directly. Let’s specify the name of the project as
ej2-nextjs-diagram.
√ What is your project named? » ej2-nextjs-diagramThis creates a new project folder with the specified name.
- Select Configuration Options.
Choose the required configuration. For a quick setup, select the recommended defaults:
? Would you like to use the recommended Next.js defaults? » - Use arrow-keys. Return to submit.
>   Yes, use recommended defaults
    TypeScript, ESLint, Tailwind CSS, App Router, AGENTS.md
    No, reuse previous settings
No, customize settings- Navigate to the project directory using the below command:
cd ej2-nextjs-diagramThe application is ready to run with default settings. Now, let’s add Syncfusion® components to the project.
Install Syncfusion® React packages
Syncfusion® React component packages are available at npmjs.com. To use Syncfusion® React components in the project, install the corresponding npm package.
Here, the React Diagram component is used in the project. To install the React Diagram component, use the following command:
npm install @syncfusion/ej2-react-diagramsyarn add @syncfusion/ej2-react-diagramsAdd the required styles
The Diagram component needs Syncfusion® theme styles to display correctly. Syncfusion® theme packages include ready-to-use styles for supported components. Install the Tailwind 3 theme package using the following command:
npm install @syncfusion/ej2-tailwind3-themeyarn add @syncfusion/ej2-tailwind3-themeAdd the following import to the global stylesheet. For an App Router project, add it to the app/globals.css file:
@import "../node_modules/@syncfusion/ej2-tailwind3-theme/styles/diagram/index.css";For a Pages Router project, add it to the global stylesheet imported in pages/_app.tsx:
import "../node_modules/@syncfusion/ej2-tailwind3-theme/styles/diagram/index.css";For the list of available themes, refer to the Themes documentation.
NOTE
Syncfusion® provides multiple built-in themes. If the application uses a different theme, replace the tailwind3.css references with the corresponding theme file, such as material3.css.
NOTE
In Next.js, global styles should be added to the global stylesheet. For App Router projects, this is commonly app/globals.css. For Pages Router projects, the global stylesheet is commonly imported in pages/_app.tsx.
Add Syncfusion® React component
Follow the below steps to add the React Diagram component to the Next.js project:
- Before adding the Diagram component to your markup, create a
datasource.tsxfile within the app folder and add the Diagram component data.
export let data: object[] = [{
    'Id': 'parent',
    'Name': 'Maria Anders',
    'Designation': 'Managing Director',
    'IsExpand': 'true',
    'RatingColor': '#C34444'
},
{
    'Id': 1,
    'Name': 'Ana Trujillo',
    'Designation': 'Project Manager',
    'IsExpand': 'false',
    'RatingColor': '#68C2DE',
    'ReportingPerson': 'parent'
},
{
    'Id': 2,
    'Name': 'Anto Moreno',
    'Designation': 'Project Lead',
    'IsExpand': 'false',
    'RatingColor': '#93B85A',
    'ReportingPerson': 'parent'
},
{
    'Id': 3,
    'Name': 'Thomas Hardy',
    'Designation': 'Senior S/w Engg',
    'IsExpand': 'false',
    'RatingColor': '#68C2DE',
    'ReportingPerson': 1
},
{
    'Id': 4,
    'Name': 'Christina Kaff',
    'Designation': 'S/w Engg',
    'IsExpand': 'false',
    'RatingColor': '#93B85A',
    'ReportingPerson': 2
},
{
    'Id': 5,
    'Name': 'Hanna Moos',
    'Designation': 'Project Trainee',
    'IsExpand': 'true',
    'RatingColor': '#D46E89',
    'ReportingPerson': 2
}];- Then, import and define the Diagram component in the app/page.tsx file, as shown below:
'use client'
import { DataManager, Query } from '@syncfusion/ej2-data';
import { StackPanel, TextElement, DataBinding, HierarchicalTree, DiagramComponent, Inject } from "@syncfusion/ej2-react-diagrams";
import { data } from './datasource';

export default function Home() {
  let items: DataManager = new DataManager(data as JSON[], new Query().take(7));

  return (
    <>
      <h2>Syncfusion React Diagram Component</h2>
      <DiagramComponent id="container" width={'100%'} height={'450px'} layout={{
        type: 'HierarchicalTree',
        margin: {
          top: 20,
        },

      }} dataSourceSettings={{
        id: 'Id',
        parentId: 'ReportingPerson',
        dataManager: items,
      }} getNodeDefaults={(node: any) => {
        node.height = 50;
        node.style.fill = '#6BA5D7';
        node.borderColor = 'white';
        node.style.strokeColor = 'white';
        return node;
      }} getConnectorDefaults={(obj: any) => {
        obj.style.strokeColor = '#6BA5D7';
        obj.style.fill = '#6BA5D7';
        obj.style.strokeWidth = 2;
        obj.targetDecorator.style.fill = '#6BA5D7';
        obj.targetDecorator.style.strokeColor = '#6BA5D7';
        obj.targetDecorator.shape = 'None';
        obj.type = 'Orthogonal';
        return obj;
      }} setNodeTemplate={(obj: any) => {
        let content = new StackPanel();
        content.id = obj.id + '_outerstack';
        content.style.strokeColor = 'darkgreen';
        content.style.fill = '#6BA5D7';
        content.orientation = 'Horizontal';
        content.padding = {
          left: 5,
          right: 10,
          top: 5,
          bottom: 5,
        };
        let innerStack = new StackPanel();
        innerStack.style.strokeColor = 'none';
        innerStack.style.fill = '#6BA5D7';
        innerStack.margin = {
          left: 5,
          right: 0,
          top: 0,
          bottom: 0,
        };
        innerStack.id = obj.id + '_innerstack';
        let text = new TextElement();
        text.content = obj.data['Name'];
        text.style.color = 'white';
        text.style.strokeColor = 'none';
        text.style.fill = 'none';
        text.id = obj.id + '_text1';
        let desigText = new TextElement();
        desigText.margin = {
          left: 0,
          right: 0,
          top: 5,
          bottom: 0,
        };
        desigText.content = obj.data['Designation'];
        desigText.style.color = 'white';
        desigText.style.strokeColor = 'none';
        desigText.style.fill = 'none';
        desigText.style.textWrapping = 'Wrap';
        desigText.id = obj.id + '_desig';
        innerStack.children = [text, desigText];
        content.children = [innerStack];
        return content;
      }} >
        <Inject services={[DataBinding, HierarchicalTree]} />
      </DiagramComponent>
    </>
  )
}
Run the application
To run the application, use the following command:
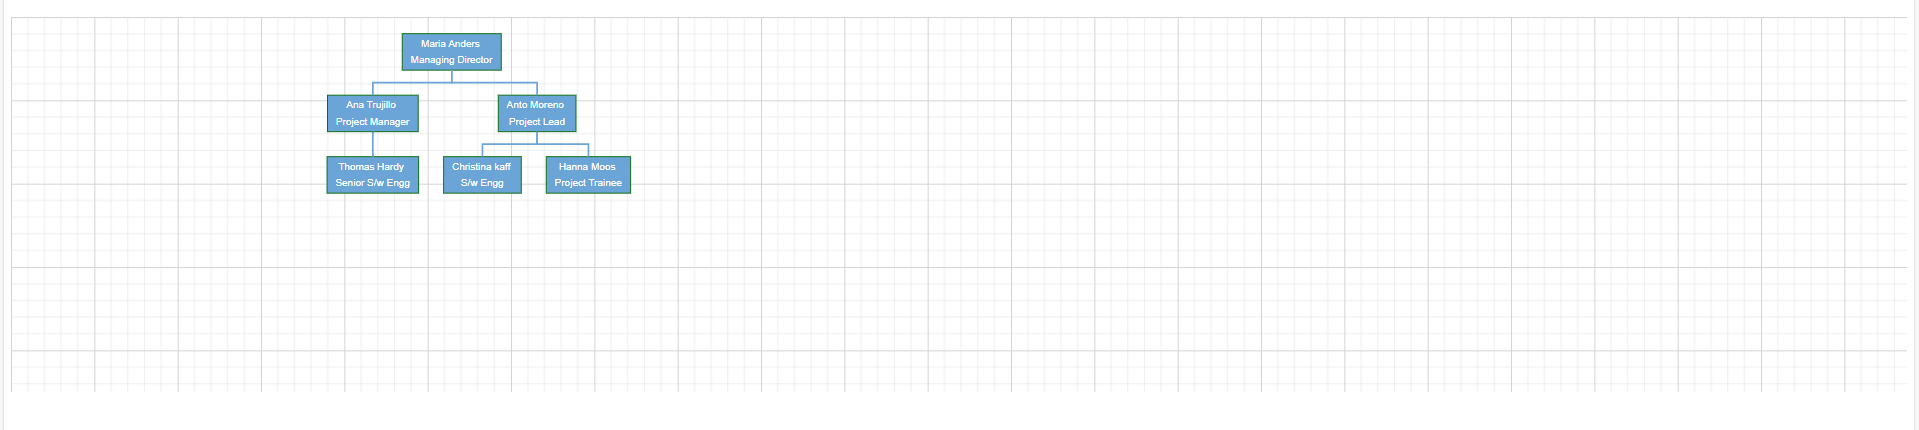
npm run devyarn run devOpen the generated local URL (for example, http://localhost:3000) from the terminal in the browser. The application displays the diagram as shown below:
To learn more about the functionality of the Diagram component, refer to the documentation.