How can I help you?
RemoteSaveAdaptor in Syncfusion® EJ2 JavaScript Grid Control
7 May 202520 minutes to read
The RemoteSaveAdaptor in Syncfusion® Angular Grid Component allows you to perform grid actions such as sorting, filtering, searching and paging primarily on the client-side while handling CRUD operations, such as updating, inserting, and removing data, on the server-side for data persistence. This approach optimizes your experience by minimizing unnecessary server interactions.
Ensure your server-side implementation in ASP.NET Core handles CRUD operations. Here is an example of how you can set up your ASP.NET Core controller to handle these operations:
Server-Side Implementation
To configure a server with Syncfusion® Angular Grid, you need to follow the below steps:
Step 1: Set Up Your Development Environment
Before you start, make sure you have the following installed:
- .NET Core SDK
- Node.js
- Visual Studio or any other preferred code editor
Step 2: Create a New ASP.NET Core Project
Open Visual Studio and create an ASP.NET Core Web API project named RemoteSaveAdaptor.
Step 3: Configure the server
In the Program.cs file of your project, configure the server to serve static files by adding the following code:
[program.cs]

var app = builder.Build();

app.UseDefaultFiles();
app.UseStaticFiles();
Comment out the below line in launchSettings.json:
    "https": {
      "commandName": "Project",
      "dotnetRunMessages": true,
      "launchBrowser": true,
     // "launchUrl": "swagger",
      "applicationUrl": "https://localhost:xxxx;http://localhost:xxxx",
      "environmentVariables": {
        "ASPNETCORE_ENVIRONMENT": "Development"
      }
    },
This configuration enables the server to locate and serve the index.html file.
Step 4: Model Class Creation
Create a model class named OrdersDetails.cs in the Models folder to represent the order data.
using System.ComponentModel.DataAnnotations;

namespace RemoteSaveAdaptor.Models
{
  public class OrdersDetails
  {
    public static List<OrdersDetails> order = new List<OrdersDetails>();
    public OrdersDetails()
    {

    }
    public OrdersDetails(int OrderID, string CustomerId, int EmployeeId, double Freight, bool Verified, DateTime OrderDate, string ShipCity, string ShipName, string ShipCountry, DateTime ShippedDate, string ShipAddress)
    {
      this.OrderID = OrderID;
      this.CustomerID = CustomerId;
      this.EmployeeID = EmployeeId;
      this.Freight = Freight;
      this.ShipCity = ShipCity;
      this.Verified = Verified;
      this.OrderDate = OrderDate;
      this.ShipName = ShipName;
      this.ShipCountry = ShipCountry;
      this.ShippedDate = ShippedDate;
      this.ShipAddress = ShipAddress;
    }

    public static List<OrdersDetails> GetAllRecords()
    {
      if (order.Count() == 0)
      {
        int code = 10000;
        for (int i = 1; i <= 2000; i++)
        {
          order.Add(new OrdersDetails(code + 1, "ALFKI", i + 0, 2.3 * i, false, new DateTime(1991, 05, 15), "Berlin", "Simons bistro", "Denmark", new DateTime(1996, 7, 16), "Kirchgasse 6"));
          order.Add(new OrdersDetails(code + 2, "ANATR", i + 2, 3.3 * i, true, new DateTime(1990, 04, 04), "Madrid", "Queen Cozinha", "Brazil", new DateTime(1996, 9, 11), "Avda. Azteca 123"));
          order.Add(new OrdersDetails(code + 3, "ANTON", i + 1, 4.3 * i, true, new DateTime(1957, 11, 30), "Cholchester", "Frankenversand", "Germany", new DateTime(1996, 10, 7), "Carrera 52 con Ave. Bolívar #65-98 Llano Largo"));
          order.Add(new OrdersDetails(code + 4, "BLONP", i + 3, 5.3 * i, false, new DateTime(1930, 10, 22), "Marseille", "Ernst Handel", "Austria", new DateTime(1996, 12, 30), "Magazinweg 7"));
          order.Add(new OrdersDetails(code + 5, "BOLID", i + 4, 6.3 * i, true, new DateTime(1953, 02, 18), "Tsawassen", "Hanari Carnes", "Switzerland", new DateTime(1997, 12, 3), "1029 - 12th Ave. S."));
          code += 5;
        }
      }
      return order;
    }
    [Key]
    public int? OrderID { get; set; }
    public string CustomerID { get; set; }
    public int? EmployeeID { get; set; }
    public double? Freight { get; set; }
    public string ShipCity { get; set; }
    public bool Verified { get; set; }
    public DateTime OrderDate { get; set; }
    public string ShipName { get; set; }
    public string ShipCountry { get; set; }
    public DateTime ShippedDate { get; set; }
    public string ShipAddress { get; set; }
  }
}
Step 5: API Controller Creation
using Microsoft.AspNetCore.Mvc;
using RemoteSaveAdaptor.Models;

namespace RemoteSaveAdaptor.Controllers
{
  [ApiController]
  public class OrdersController : Controller
  {
    [HttpPost]
    [Route("api/[controller]")]
    public object Post()
    {
      // Retrieve data from the data source (e.g., database)
      IQueryable<OrdersDetails> DataSource = GetOrderData().AsQueryable();

      // Get the total records count
      int totalRecordsCount = DataSource.Count();

      // Return data based on the request
      return new { result = DataSource, count = totalRecordsCount };
    }

    [HttpGet]
    [Route("api/[controller]")]
    public List<OrdersDetails> GetOrderData()
    {
      var data = OrdersDetails.GetAllRecords().ToList();
      return data;
    }
  }
}
The below class is used to structure data sent during CRUD operations.
public class CRUDModel<T> where T : class
{
public string? action { get; set; }
public string? keyColumn { get; set; }
public object? key { get; set; }
public T? value { get; set; }
public List<T>? added { get; set; }
public List<T>? changed { get; set; }
public List<T>? deleted { get; set; }
public IDictionary<string, object>? @params { get; set; }
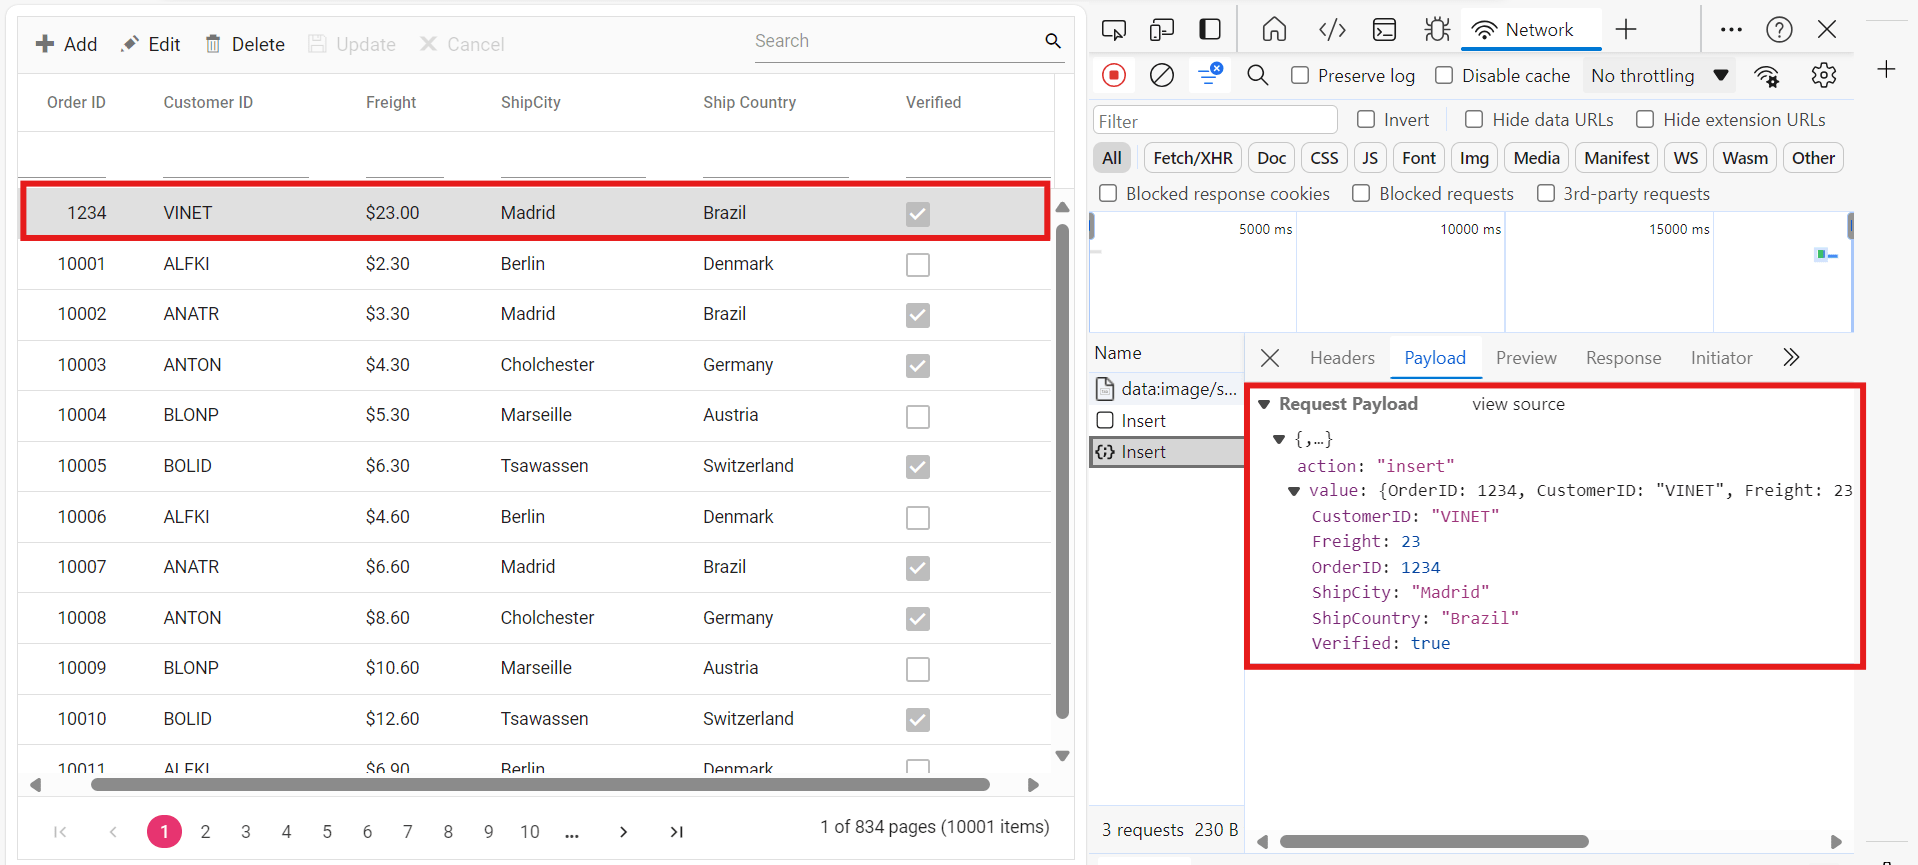
}Insert operation:
To insert a new record, utilize the insertUrl property to specify the controller action mapping URL for the insert operation. Implement the Insert method in the API controller to handle the insertion of new records.The newly added record details are bound to the newRecord parameter.
  /// <summary>
  /// Inserts a new data item into the data collection.
  /// </summary>
  /// <param name="addRecord">The order to be inserted.</param>
  /// <returns>It returns the newly inserted record detail.</returns>
  [HttpPost]
  [Route("api/Orders/Insert")]
  public ActionResult Insert([FromBody] CRUDModel<OrdersDetails> newRecord)
  {
      if (newRecord.value !=null)
      {
          OrdersDetails.GetAllRecords().Insert(0, newRecord.value);
      }

      return Json(newRecord.value);
  }
Update operation:
For updating existing records, use the updateUrl property to specify the controller action mapping URL for the update operation. Implement the Update method in the API controller to handle record updates. The updated record details are bound to the updatedRecord parameter.

/// <summary>
/// Updates an existing order.
/// </summary>
/// <param name="updateRecord">The updated order details.</param>
/// <returns>It returns the updated order details.</returns>
[HttpPost]
[Route("api/Orders/Update")]
public object Update([FromBody] CRUDModel<OrdersDetails> updatedRecord)
{
var updatedOrder = updatedRecord.value;
if (updatedOrder != null)
{
var data = OrdersDetails.GetAllRecords().FirstOrDefault(or => or.OrderID == updatedOrder.OrderID);
if (data != null)
{
// Update the existing record
data.OrderID = updatedOrder.OrderID;
data.CustomerID = updatedOrder.CustomerID;
data.Freight = updatedOrder.Freight;
data.ShipCity = updatedOrder.ShipCity;
data.ShipCountry = updatedOrder.ShipCountry;
data.Verified = updatedOrder.Verified;
// Update other properties similarly
}
}
return updatedRecord;
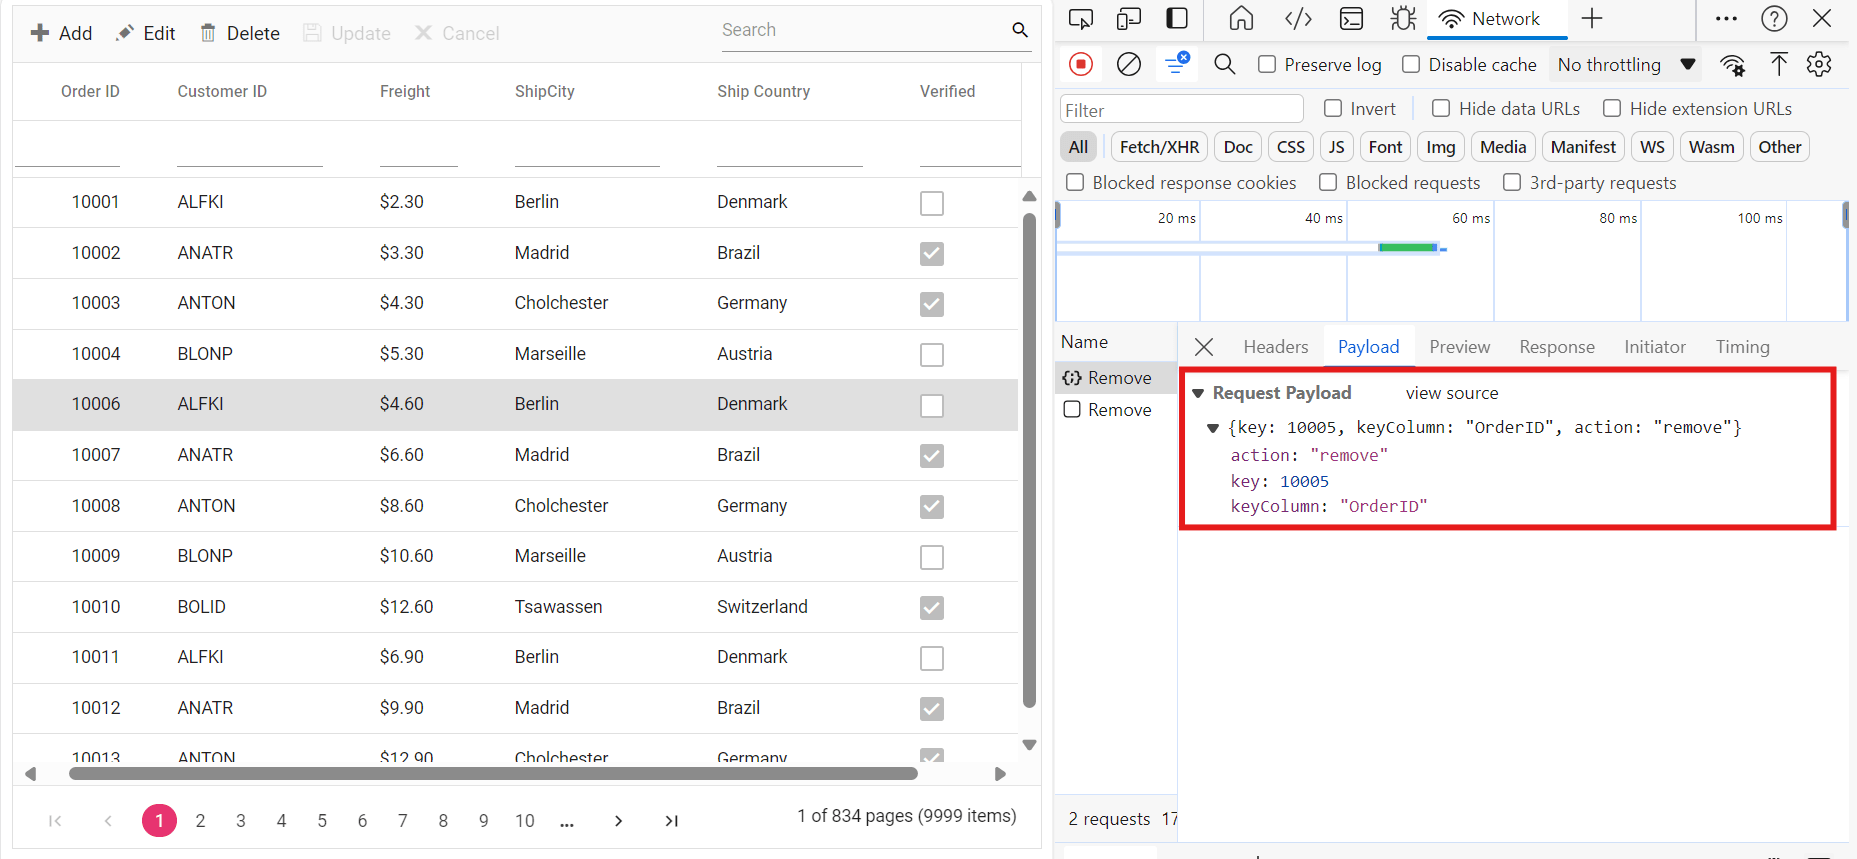
}Delete operation
To delete existing records, use the removeUrl property to specify the controller action mapping URL for the delete operation. The primary key value of the deleted record is bound to the deletedRecord parameter.
  /// <summary>
  /// Deletes an order.
  /// </summary>
  /// <param name="deletedRecord">It contains the specific record detail which is need to be removed.</param>
  /// <returns>It returns the deleted record detail</returns>
  [HttpPost]
  [Route("api/Orders/Remove")]
  public object Remove([FromBody] CRUDModel<OrdersDetails> deletedRecord)
  {
      int orderId = int.Parse(deletedRecord.key.ToString()); // get key value from the deletedRecord
      var data = OrdersDetails.GetAllRecords().FirstOrDefault(orderData => orderData.OrderID == orderId);
      if (data != null)
      {
          // Remove the record from the data collection
          OrdersDetails.GetAllRecords().Remove(data);
      }
      return deletedRecord;
  }
4. Run the Application:
Run the application in Visual Studio. It will be accessible on a URL like https://localhost:xxxx.
After running the application, you can verify that the server-side API controller is successfully returning the order data in the URL(https://localhost:xxxx/api/Orders). Here xxxx denotes the port number.
Connecting syncfusion® grid to an api service
Step 1: Create wwwroot folder
Create a folder named wwwroot in the project root directory. This folder will contain static files served by the web server.
Step 2: Create JS and CSS Folders
Inside the wwwroot folder, create js and css folders to hold script and CSS files, respectively.
Step 3: Create index.html File
Create an index.html file under the wwwroot folder and add the necessary HTML structure along with CSS and JavaScript links to include Syncfusion® Grid dependencies.
<!DOCTYPE html>
<html lang="en">
<head>
    <title>EJ2 Grid</title>
    <meta charset="utf-8">
    <meta name="viewport" content="width=device-width, initial-scale=1.0">
    <meta name="description" content="Javascript Grid Control">
    <meta name="author" content="Syncfusion">
    <link href="css/index.css" rel="stylesheet">
    <link href="https://cdn.syncfusion.com/ej2/26.1.35/ej2-base/styles/material.css" rel="stylesheet">
    <link href="https://cdn.syncfusion.com/ej2/26.1.35/ej2-grids/styles/material.css" rel="stylesheet">
    <link href="https://cdn.syncfusion.com/ej2/26.1.35/ej2-buttons/styles/material.css" rel="stylesheet">
    <link href="https://cdn.syncfusion.com/ej2/26.1.35/ej2-popups/styles/material.css" rel="stylesheet">
    <link href="https://cdn.syncfusion.com/ej2/26.1.35/ej2-richtexteditor/styles/material.css" rel="stylesheet">
    <link href="https://cdn.syncfusion.com/ej2/26.1.35/ej2-navigations/styles/material.css" rel="stylesheet">
    <link href="https://cdn.syncfusion.com/ej2/26.1.35/ej2-dropdowns/styles/material.css" rel="stylesheet">
    <link href="https://cdn.syncfusion.com/ej2/26.1.35/ej2-lists/styles/material.css" rel="stylesheet">
    <link href="https://cdn.syncfusion.com/ej2/26.1.35/ej2-inputs/styles/material.css" rel="stylesheet">
    <link href="https://cdn.syncfusion.com/ej2/26.1.35/ej2-calendars/styles/material.css" rel="stylesheet">
    <link href="https://cdn.syncfusion.com/ej2/26.1.35/ej2-notifications/styles/material.css" rel="stylesheet">
    <link href="https://cdn.syncfusion.com/ej2/26.1.35/ej2-splitbuttons/styles/material.css" rel="stylesheet">

    <script src="https://cdn.syncfusion.com/ej2/26.1.35/dist/ej2.min.js" type="text/javascript"></script>
    <script src="https://cdn.syncfusion.com/ej2/syncfusion-helper.js" type="text/javascript"></script>
</head>
<body>

    <div id="container">
        <div id="Grid"></div>
    </div>
    <script src="js/index.js" type="text/javascript"></script>
</body>
</html>
Step 4: Create JavaScript File
In this step, you will create a new JavaScript file (js/index.js) and add the necessary code to set up and configure the Syncfusion® Grid with RemoteSaveAdaptor. The Syncfusion® Grid will fetch data from a remote API and support various features such as paging, sorting, filtering, and CRUD operations.
CRUD Operations Mapping: CRUD operations within the grid can be mapped to server-side controller actions using specific properties:
- insertUrl: Specifies the URL for inserting new data.
- removeUrl: Specifies the URL for removing existing data.
- updateUrl: Specifies the URL for updating existing data.
- crudUrl: Specifies a single URL for all CRUD operations.
- batchUrl: Specifies the URL for batch editing.
ej.grids.Grid.Inject(ej.grids.Toolbar, ej.grids.Edit, ej.grids.Filter, ej.grids.Page, ej.grids.Sort);

load();
var data;

function load() {
    fetch('https://localhost:7035/api/Orders')
        .then(response => {
            if (!response.ok) {
                throw new Error(`Unable to Fetch Data. Please check URL or network connectivity.`);
            }
            return response.json();
        })
        .then(jsonValue => {
            data = new ej.data.DataManager({
                json: jsonValue,
                insertUrl: 'https://localhost:7035/api/Orders/Insert',
                updateUrl: 'https://localhost:7035/api/Orders/Update',
                removeUrl: 'https://localhost:7035/api/Orders/Remove',
                adaptor: new ej.data.RemoteSaveAdaptor()
            });
            createGrid();
        });
}

function createGrid() {
    var grid = new ej.grids.Grid({
        dataSource: data,
        allowPaging: true,
        allowSorting: true,
        allowFiltering: true,
        toolbar: ['Add', 'Edit', 'Delete', 'Update', 'Cancel', 'Search'],
        editSettings: { allowEditing: true, allowAdding: true, allowDeleting: true, mode: 'Normal' },
        columns: [
            { field: 'OrderID', headerText: 'Order ID', textAlign: 'Right', width: 120, isPrimaryKey: true, type: 'number' },
            { field: 'CustomerID', width: 140, headerText: 'Customer ID', type: 'string' },
            { field: 'ShipCity', headerText: 'ShipCity', width: 140 },
            { field: 'ShipCountry', headerText: 'ShipCountry', width: 140 }
        ]
    });
    grid.appendTo('#Grid');
}
Step 5: Run the Project
Now, run the project to see the Syncfusion® Grid connected to the API service in action.
You can find the complete sample for the RemoteSaveAdaptor in GitHub repository.