ODataV4Adaptor in Syncfusion® EJ2 JavaScript Grid Control
7 May 202524 minutes to read
The ODataV4Adaptor in the Syncfusion® Grid Control allows seamless integration of the Grid with OData v4 services, enabling efficient data fetching and manipulation. This guide provides detailed instructions on binding data and performing CRUD (Create, Read, Update, Delete) actions using the ODataV4Adaptor in your Syncfusion® Grid Control.
This section describes a step-by-step process for retrieving data using ODataV4Adaptor, then binding it to the EJ2 JavaScript Grid control to facilitate data and CRUD operations.
Creating an ODataV4 service
Step 1: Create a New ASP.NET Core Project
To create a new ASP.NET Core Web API project named ODataV4Adaptor, follow these steps:
- Open Visual Studio.
- Select “Create a new project”
- Choose ASP.NET Core Web API project template.
- Name the project ODataV4Adaptor.
- Click “Create”
Step 2: Install NuGet Packages
Using the NuGet package manager in Visual Studio (Tools → NuGet Package Manager → Manage NuGet Packages for Solution), install the Microsoft.AspNetCore.OData NuGet package.
Step 3: Configure the server
In the Program.cs file of your project, configure the server to serve static files by adding the following code:
var app = builder.Build();

app.UseDefaultFiles();
app.UseStaticFiles();
Additionally, comment out the following line in the launchSettings.json file:
    "https": {
      "commandName": "Project",
      "dotnetRunMessages": true,
      "launchBrowser": true,
     // "launchUrl": "swagger",
      "applicationUrl": "https://localhost:xxxx;http://localhost:xxxx",
      "environmentVariables": {
        "ASPNETCORE_ENVIRONMENT": "Development"
      }
    },
This configuration enables the server to locate and serve the index.html file.
Step 4: Model Class Creation
Create a model class named OrdersDetails.cs in the server-side Models folder to represent the order data.
using System.ComponentModel.DataAnnotations;

namespace ODataV4Adaptor.Models
{
    public class OrdersDetails
    {
        public static List<OrdersDetails> order = new List<OrdersDetails>();
        public OrdersDetails()
        {

        }
        public OrdersDetails(
        int OrderID, string CustomerId, int EmployeeId, string ShipCountry)
        {
            this.OrderID = OrderID;
            this.CustomerID = CustomerId;
            this.EmployeeID = EmployeeId;
            this.ShipCountry = ShipCountry;
        }

        public static List<OrdersDetails> GetAllRecords()
        {
            if (order.Count() == 0)
            {
                int code = 10000;
                for (int i = 1; i < 10; i++)
                {
                    order.Add(new OrdersDetails(code + 1, "ALFKI", i + 0, "Denmark"));
                    order.Add(new OrdersDetails(code + 2, "ANATR", i + 2, "Brazil"));
                    order.Add(new OrdersDetails(code + 3, "ANTON", i + 1, "Germany"));
                    order.Add(new OrdersDetails(code + 4, "BLONP", i + 3, "Austria"));
                    order.Add(new OrdersDetails(code + 5, "BOLID", i + 4, "Switzerland"));
                    code += 5;
                }
            }
            return order;
        }
        [Key]
        public int? OrderID { get; set; }
        public string? CustomerID { get; set; }
        public int? EmployeeID { get; set; }
        public string? ShipCountry { get; set; }
    }
}
Step 5: Build the Entity Data Model**
To construct the Entity Data Model for your ODataV4 service, utilize the ODataConventionModelBuilder to define the model’s structure. Start by creating an instance of the ODataConventionModelBuilder, then register the entity set Orders using the EntitySet<T> method, where OrdersDetails represents the CLR type containing order details.
[program.cs]
using Microsoft.OData.ModelBuilder;

// Create an ODataConventionModelBuilder to build the OData model
var modelBuilder = new ODataConventionModelBuilder();

// Register the "Orders" entity set with the OData model builder
modelBuilder.EntitySet<OrdersDetails>("Orders");
Step 6: Register the ODataV4 Services
Once the Entity Data Model is built, you need to register the ODataV4 services in your ASP.NET Core application. Here’s how:
// Add controllers with OData support to the service collection
builder.Services.AddControllers().AddOData(
    options => options
        .Count()
        .AddRouteComponents("odata", modelBuilder.GetEdmModel()));
Step 7: Add controllers
Finally, add controllers to expose the OData endpoints. Here’s an example:
using Microsoft.AspNetCore.Mvc;
using Microsoft.AspNetCore.OData.Query;
using ODataV4Adaptor.Models;

namespace ODataV4Adaptor.Controllers
{
    [Route("[controller]")]
    [ApiController]
    public class OrdersController : ControllerBase
    {
        /// <summary>
        /// Retrieves all orders.
        /// </summary>
        /// <returns>The collection of orders.</returns>
        [HttpGet]
        [EnableQuery]
        public IActionResult Get()
        {
            var data = OrdersDetails.GetAllRecords().AsQueryable();
            return Ok(data);
        }
    }
}
Step 8: Run the Application
Run the application in Visual Studio. It will be accessible on a URL like https://localhost:xxxx.
After running the application, you can verify that the server-side API controller is successfully returning the order data in the URL(https://localhost:xxxx/odata/Orders). Here xxxx denotes the port number.
Connecting syncfusion® grid to an odataV4 service
Step 1: Create wwwroot folder
Create a folder named wwwroot in the project root directory. This folder will contain static files served by the web server.
Step 2: Create JS and CSS Folders
Inside the wwwroot folder, create js and css folders to hold script and CSS files, respectively.
Step 3: Create index.html File
Create an index.html file under the wwwroot folder and add the necessary HTML structure along with CSS and JavaScript links to include Syncfusion® Grid dependencies.
<!DOCTYPE html>
<html lang="en">
<head>
    <title>EJ2 Grid</title>
    <meta charset="utf-8">
    <meta name="viewport" content="width=device-width, initial-scale=1.0">
    <meta name="description" content="Javascript Grid Control">
    <meta name="author" content="Syncfusion">
    <link href="css/index.css" rel="stylesheet">
    <link href="https://cdn.syncfusion.com/ej2/26.1.35/ej2-base/styles/material.css" rel="stylesheet">
    <link href="https://cdn.syncfusion.com/ej2/26.1.35/ej2-grids/styles/material.css" rel="stylesheet">
    <link href="https://cdn.syncfusion.com/ej2/26.1.35/ej2-buttons/styles/material.css" rel="stylesheet">
    <link href="https://cdn.syncfusion.com/ej2/26.1.35/ej2-popups/styles/material.css" rel="stylesheet">
    <link href="https://cdn.syncfusion.com/ej2/26.1.35/ej2-richtexteditor/styles/material.css" rel="stylesheet">
    <link href="https://cdn.syncfusion.com/ej2/26.1.35/ej2-navigations/styles/material.css" rel="stylesheet">
    <link href="https://cdn.syncfusion.com/ej2/26.1.35/ej2-dropdowns/styles/material.css" rel="stylesheet">
    <link href="https://cdn.syncfusion.com/ej2/26.1.35/ej2-lists/styles/material.css" rel="stylesheet">
    <link href="https://cdn.syncfusion.com/ej2/26.1.35/ej2-inputs/styles/material.css" rel="stylesheet">
    <link href="https://cdn.syncfusion.com/ej2/26.1.35/ej2-calendars/styles/material.css" rel="stylesheet">
    <link href="https://cdn.syncfusion.com/ej2/26.1.35/ej2-notifications/styles/material.css" rel="stylesheet">
    <link href="https://cdn.syncfusion.com/ej2/26.1.35/ej2-splitbuttons/styles/material.css" rel="stylesheet">

    <script src="https://cdn.syncfusion.com/ej2/26.1.35/dist/ej2.min.js" type="text/javascript"></script>
    <script src="https://cdn.syncfusion.com/ej2/syncfusion-helper.js" type="text/javascript"></script>
</head>
<body>

    <div id="container">
        <div id="Grid"></div>
    </div>
    <script src="js/index.js" type="text/javascript"></script>
</body>
</html>
Step 4: Create JavaScript File
Create a index.js file under the wwwroot/js folder and add the JavaScript code to initialize the Syncfusion® Grid with data from the API service.
var data = new ej.data.DataManager({
    url: 'https://localhost:xxxx/odata/orders', // Here xxxx represents the port number
    adaptor: new ej.data.ODataV4Adaptor()
});

var grid = new ej.grids.Grid({
    dataSource: data,
    columns: [
        { field: 'OrderID', headerText: 'Order ID', textAlign: 'Right', width: 120, isPrimaryKey: true, type: 'number' },
        { field: 'CustomerID', width: 140, headerText: 'Customer ID', type: 'string' },
        { field: 'EmployeeID', headerText: 'Employee ID', width: 140 },
        { field: 'ShipCountry', headerText: 'ShipCountry', width: 140 }
    ]
});

grid.appendTo('#Grid');
Step 5: Run the Project
Now, run the project to see the Syncfusion® Grid connected to the API service in action.
Handling searching operation
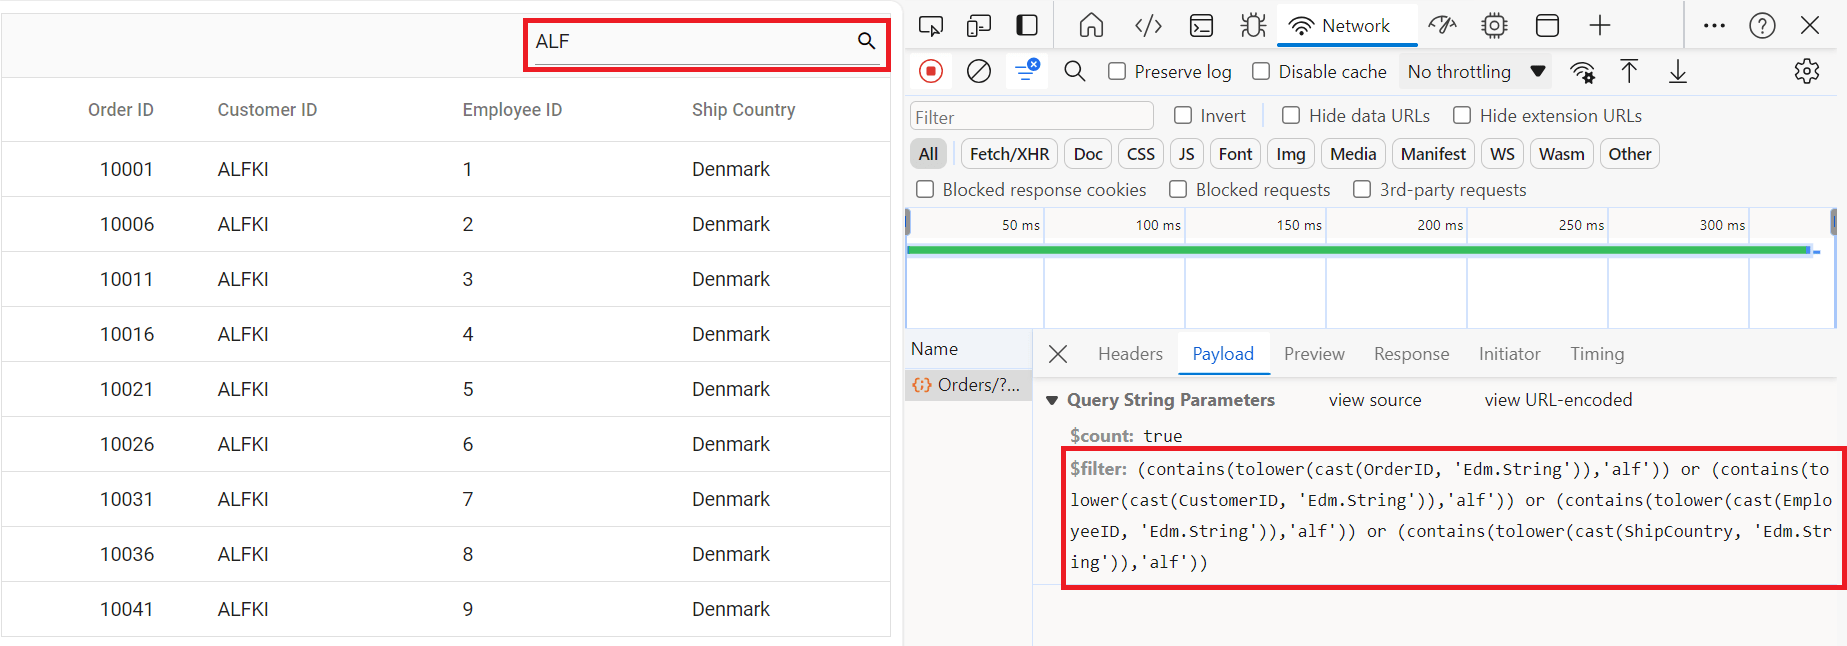
To enable search operations in your web application using OData, you first need to configure the OData support in your service collection. This involves adding the Filter method within the OData setup, allowing you to filter data based on specified criteria. Once enabled, clients can utilize the $filter query option in their requests to search for specific data entries.
// Create a new instance of the web application builder
var builder = WebApplication.CreateBuilder(args);

// Create an ODataConventionModelBuilder to build the OData model
var modelBuilder = new ODataConventionModelBuilder();

// Register the "Orders" entity set with the OData model builder
modelBuilder.EntitySet<OrdersDetails>("Orders");

// Add services to the container.

// Add controllers with OData support to the service collection
builder.Services.AddControllers().AddOData(
    options => options
        .Count()
        .Filter() //searching
        .AddRouteComponents("odata", modelBuilder.GetEdmModel()));
var data = new ej.data.DataManager({
url: 'https://localhost:xxxx/odata/orders', // Here xxxx represents the port number
adaptor: new ej.data.ODataV4Adaptor()
});
ej.grids.Grid.Inject(ej.grids.Toolbar);
var grid = new ej.grids.Grid({
dataSource: data,
toolbar:['Search'],
columns: [
{ field: 'OrderID', headerText: 'Order ID', textAlign: 'Right', width: 120, isPrimaryKey: true, type: 'number' },
{ field: 'CustomerID', width: 140, headerText: 'Customer ID', type: 'string' },
{ field: 'EmployeeID', headerText: 'Employee ID', width: 140 },
{ field: 'ShipCountry', headerText: 'ShipCountry', width: 140 }
]
});
grid.appendTo('#Grid');
Handling filtering operation
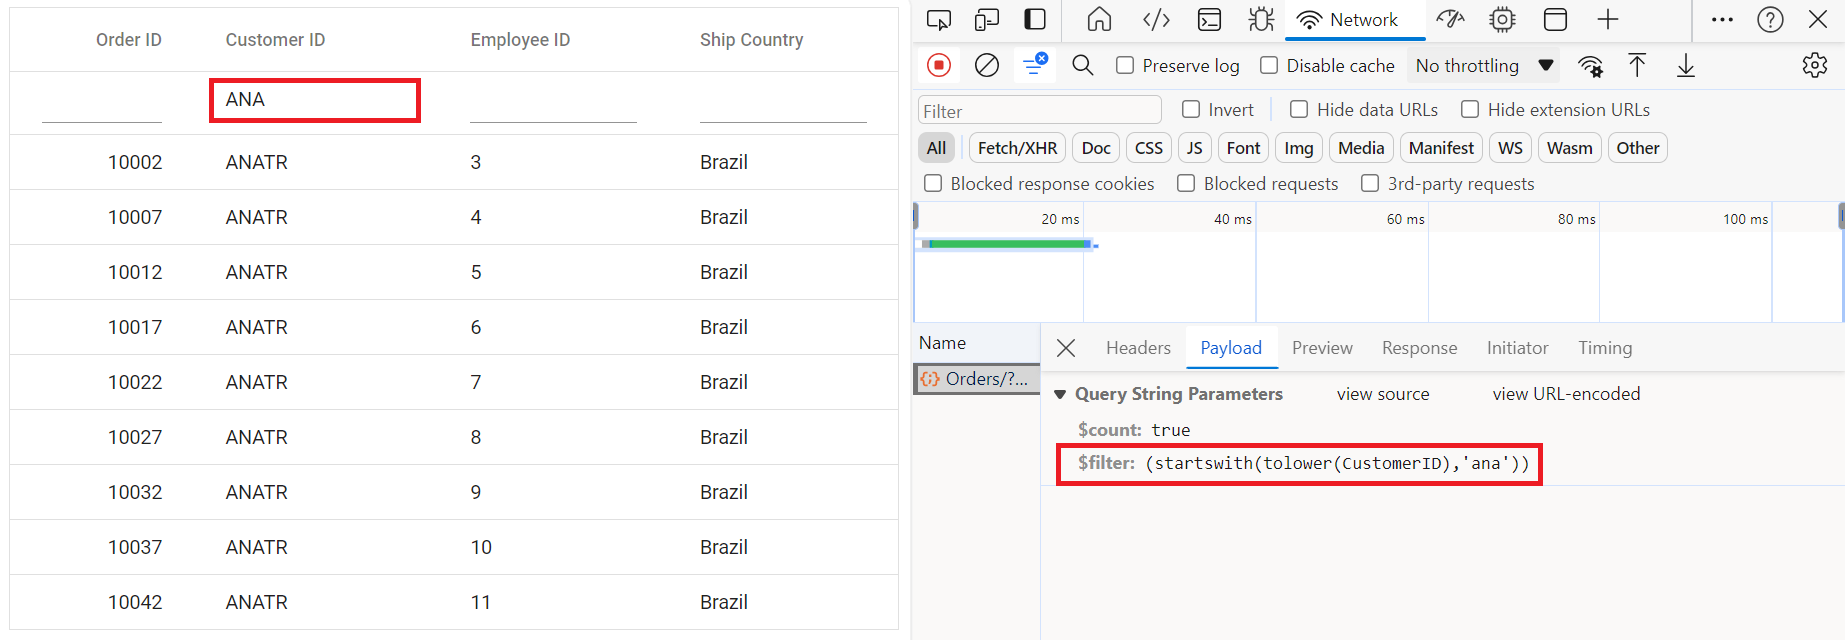
To enable filter operations in your web application using OData, you first need to configure the OData support in your service collection. This involves adding the Filter method within the OData setup, allowing you to filter data based on specified criteria. Once enabled, clients can utilize the $filter query option in your requests to filter for specific data entries.
// Create a new instance of the web application builder
var builder = WebApplication.CreateBuilder(args);

// Create an ODataConventionModelBuilder to build the OData model
var modelBuilder = new ODataConventionModelBuilder();

// Register the "Orders" entity set with the OData model builder
modelBuilder.EntitySet<OrdersDetails>("Orders");

// Add services to the container.

// Add controllers with OData support to the service collection
builder.Services.AddControllers().AddOData(
    options => options
        .Count()
        .Filter() // filtering
        .AddRouteComponents("odata", modelBuilder.GetEdmModel()));
var data = new ej.data.DataManager({
url: 'https://localhost:xxxx/odata/orders', // Here xxxx represents the port number
adaptor: new ej.data.ODataV4Adaptor()
});
ej.grids.Grid.Inject(ej.grids.Filter);
var grid = new ej.grids.Grid({
dataSource: data,
allowFiltering:true,
columns: [
{ field: 'OrderID', headerText: 'Order ID', textAlign: 'Right', width: 120, isPrimaryKey: true, type: 'number' },
{ field: 'CustomerID', width: 140, headerText: 'Customer ID', type: 'string' },
{ field: 'EmployeeID', headerText: 'Employee ID', width: 140 },
{ field: 'ShipCountry', headerText: 'ShipCountry', width: 140 }
]
});
grid.appendTo('#Grid');Single column filtering

Multi column filtering

Handling sorting operation
To enable sorting operations in your web application using OData, you first need to configure the OData support in your service collection. This involves adding the OrderBy method within the OData setup, allowing you to sort data based on specified criteria. Once enabled, clients can utilize the $orderby query option in their requests to sort data entries according to desired attributes.
// Create a new instance of the web application builder
var builder = WebApplication.CreateBuilder(args);

// Create an ODataConventionModelBuilder to build the OData model
var modelBuilder = new ODataConventionModelBuilder();

// Register the "Orders" entity set with the OData model builder
modelBuilder.EntitySet<OrdersDetails>("Orders");

// Add services to the container.

// Add controllers with OData support to the service collection
builder.Services.AddControllers().AddOData(
    options => options
        .Count()
        .OrderBy() // sorting
        .AddRouteComponents("odata", modelBuilder.GetEdmModel()));
var data = new ej.data.DataManager({
url: 'https://localhost:xxxx/odata/orders', // Here xxxx represents the port number
adaptor: new ej.data.ODataV4Adaptor()
});
ej.grids.Grid.Inject(ej.grids.Sort);
var grid = new ej.grids.Grid({
dataSource: data,
allowSorting:true,
columns: [
{ field: 'OrderID', headerText: 'Order ID', textAlign: 'Right', width: 120, isPrimaryKey: true, type: 'number' },
{ field: 'CustomerID', width: 140, headerText: 'Customer ID', type: 'string' },
{ field: 'EmployeeID', headerText: 'Employee ID', width: 140 },
{ field: 'ShipCountry', headerText: 'ShipCountry', width: 140 }
]
});
grid.appendTo('#Grid');Single column sorting

Multi column sorting

Handling paging operation
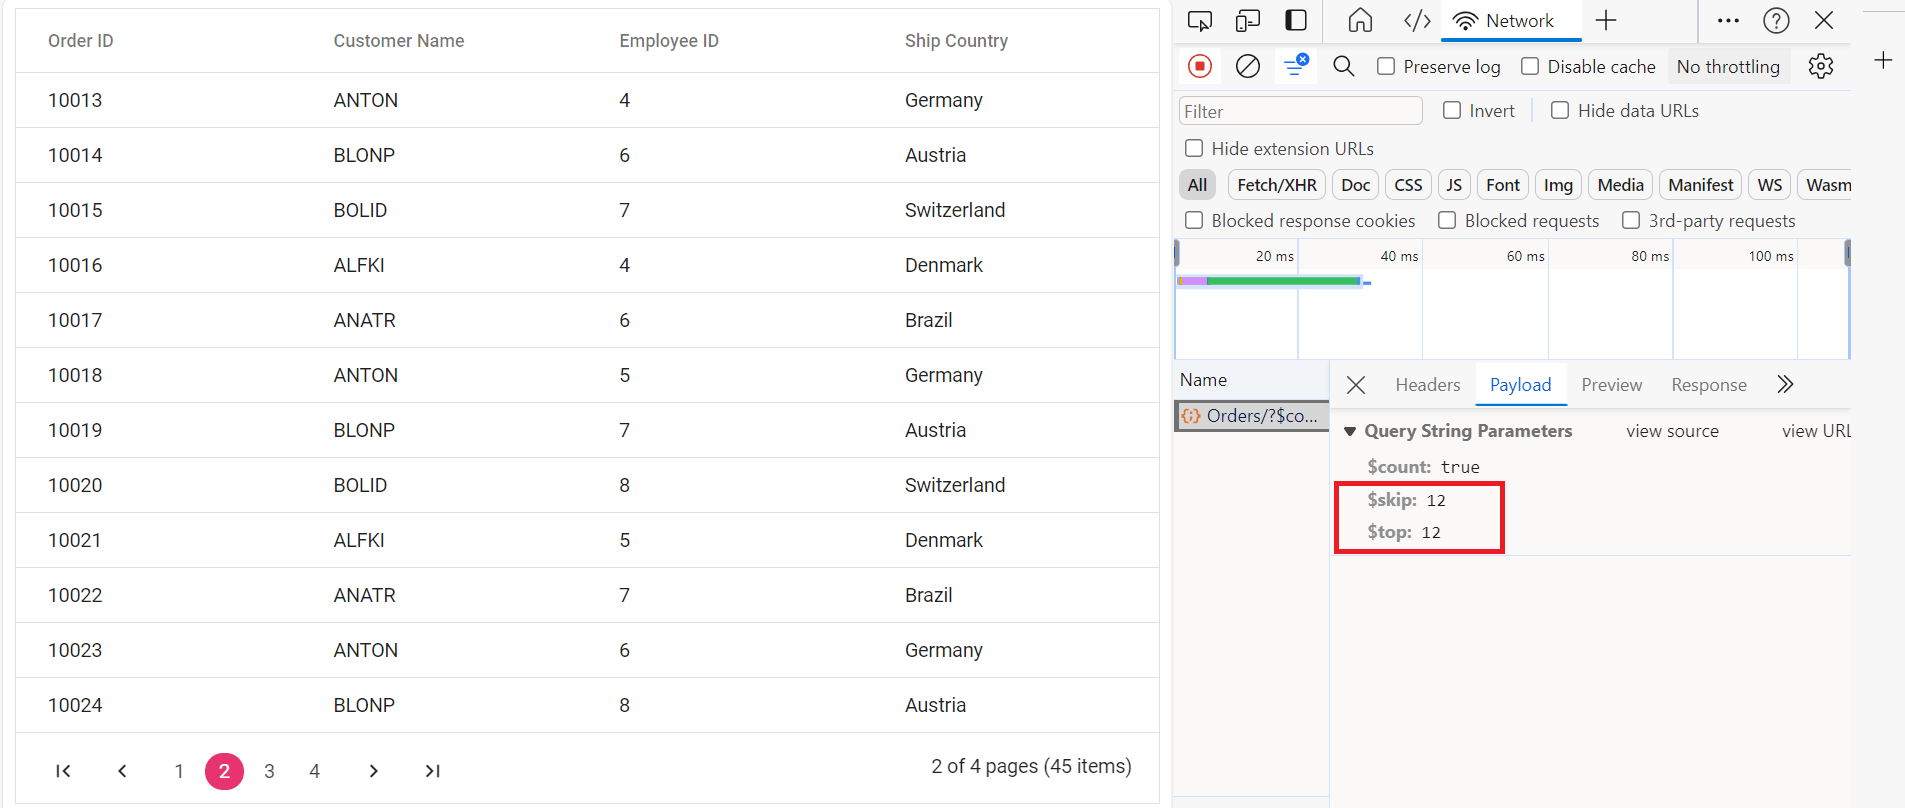
To implement paging operations in your web application using OData, you can utilize the SetMaxTop method within your OData setup to limit the maximum number of records that can be returned per request. While you configure the maximum limit, clients can utilize the $skip and $top query options in their requests to specify the number of records to skip and the number of records to take, respectively.
// Create a new instance of the web application builder
var builder = WebApplication.CreateBuilder(args);

// Create an ODataConventionModelBuilder to build the OData model
var modelBuilder = new ODataConventionModelBuilder();

// Register the "Orders" entity set with the OData model builder
modelBuilder.EntitySet<OrdersDetails>("Orders");

// Add services to the container.

// Add controllers with OData support to the service collection

var recordCount= OrdersDetails.GetAllRecords().Count;

builder.Services.AddControllers().AddOData(
    options => options
    .Count()
    .SetMaxTop(recordCount)
    .AddRouteComponents(
        "odata",
        modelBuilder.GetEdmModel()));
var data = new ej.data.DataManager({
url: 'https://localhost:xxxx/odata/orders', // Here xxxx represents the port number
adaptor: new ej.data.ODataV4Adaptor()
});
ej.grids.Grid.Inject(ej.grids.Page);
var grid = new ej.grids.Grid({
dataSource: data,
allowPaging: true,
columns: [
{ field: 'OrderID', headerText: 'Order ID', textAlign: 'Right', width: 120, isPrimaryKey: true, type: 'number' },
{ field: 'CustomerID', width: 140, headerText: 'Customer ID', type: 'string' },
{ field: 'EmployeeID', headerText: 'Employee ID', width: 140 },
{ field: 'ShipCountry', headerText: 'ShipCountry', width: 140 }
]
});
grid.appendTo('#Grid');
Handling CRUD operations
To manage CRUD (Create, Read, Update, Delete) operations using the ODataV4Adaptor, follow the provided guide for configuring the Syncfusion® Grid for editing and utilize the sample implementation of the OrdersController in your server application. This controller handles HTTP requests for CRUD operations such as GET, POST, PATCH, and DELETE.
To enable CRUD operations in the Syncfusion® Grid control, follow the below steps:
var data = new ej.data.DataManager({
    url: 'https://localhost:xxxx/odata/orders', // Here xxxx represents the port number
    adaptor: new ej.data.ODataV4Adaptor()
});
ej.grids.Grid.Inject(ej.grids.Toolbar, ej.grids.Filter, ej.grids.Sort, ej.grids.Page, ej.grids.Edit);
var grid = new ej.grids.Grid({
    dataSource: data,
    allowFiltering: true,
    allowSorting:true,
    toolbar: ['Add', 'Edit', 'Update', 'Delete', 'Cancel', 'Search'],
    editSettings: { allowAdding: true, allowDeleting: true, allowEditing: true },
    columns: [
        { field: 'OrderID', headerText: 'Order ID', textAlign: 'Right', width: 120, isPrimaryKey: true, type: 'number' },
        { field: 'CustomerID', width: 140, headerText: 'Customer ID', type: 'string' },
        { field: 'EmployeeID', headerText: 'Employee ID', width: 140 },
        { field: 'ShipCountry', headerText: 'ShipCountry', width: 140 }
    ]
});

grid.appendTo('#Grid');
Normal/Inline editing is the default edit mode for the Grid control. To enable CRUD operations, ensure that the isPrimaryKey property is set to true for a specific Grid column, ensuring that its value is unique.
Insert Record
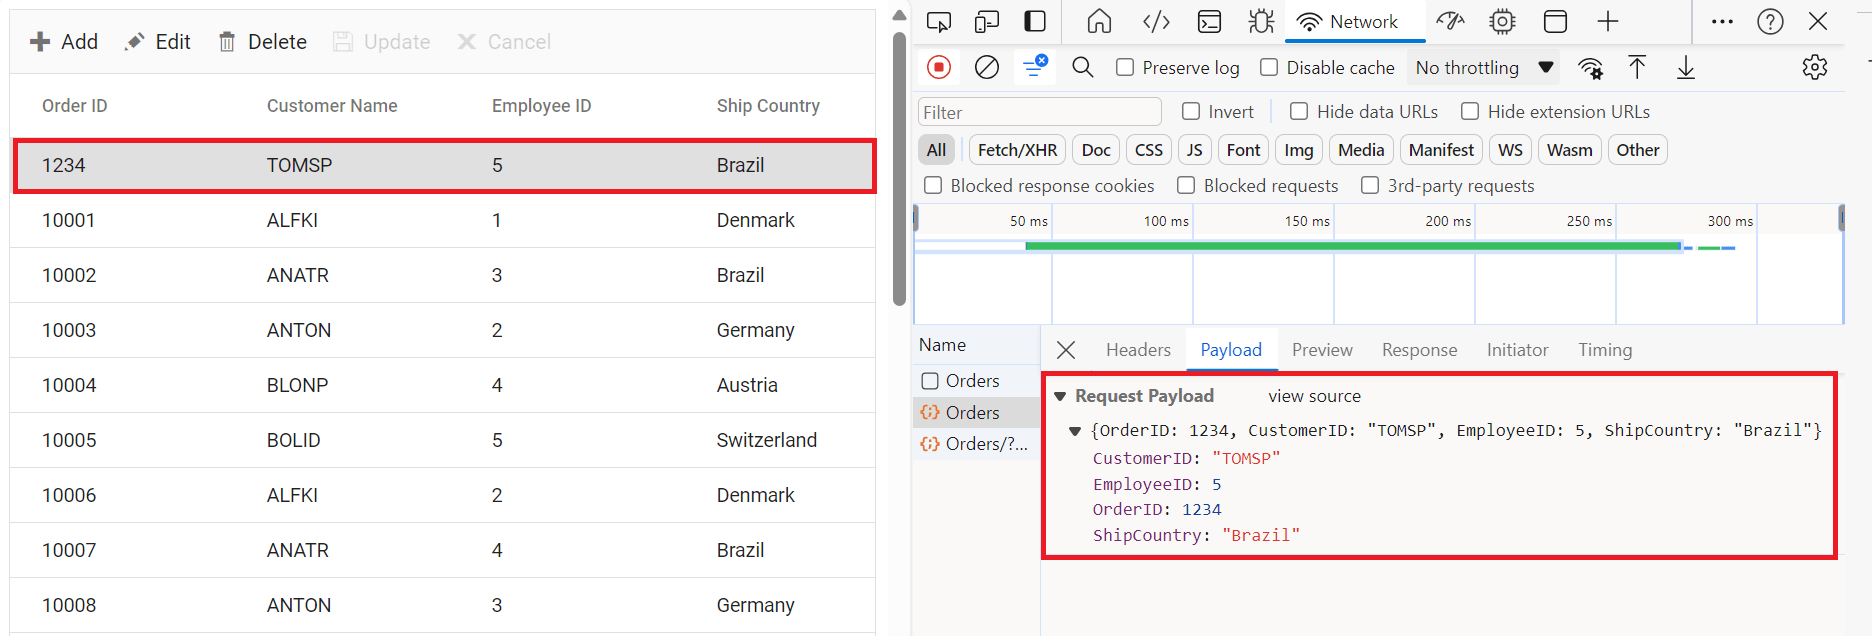
To insert a new record into your Syncfusion® Grid, you can utilize the HttpPost method in your server application. Below is a sample implementation of inserting a record using the OrdersController:
/// <summary>
/// Inserts a new order to the collection.
/// </summary>
/// <param name="addRecord">The order to be inserted.</param>
/// <returns>It returns the newly inserted record detail.</returns>
[HttpPost]
[EnableQuery]
public IActionResult Post([FromBody] OrdersDetails addRecord)
{
    if (addRecord == null)
    {
      return BadRequest("Null order");
    }
    OrdersDetails.GetAllRecords().Insert(0, addRecord);
    return Json(addRecord);
}
Update Record
Updating a record in the Syncfusion® Grid can be achieved by utilizing the HttpPatch method in your controller. Here’s a sample implementation of updating a record:
/// <summary>
/// Updates an existing order.
/// </summary>
/// <param name="key">The ID of the order to update.</param>
/// <param name="updateRecord">The updated order details.</param>
/// <returns>It returns the updated order details.</returns>
[HttpPatch("{key}")]
public IActionResult Patch(int key, [FromBody] OrdersDetails updateRecord)
{
    if (updateRecord == null)
    {
        return BadRequest("No records");
    }
    var existingOrder = OrdersDetails.GetAllRecords().FirstOrDefault(order => order.OrderID == key);
    if (existingOrder != null)
    {
        // If the order exists, update its properties
        existingOrder.CustomerID = updateRecord.CustomerID ?? existingOrder.CustomerID;
        existingOrder.EmployeeID = updateRecord.EmployeeID ?? existingOrder.EmployeeID;
        existingOrder.ShipCountry = updateRecord.ShipCountry ?? existingOrder.ShipCountry;
    }
    return Json(updateRecord);
}
Delete Record
To delete a record from your Syncfusion® Grid, you can utilize the HttpDelete method in your controller. Below is a sample implementation:
/// <summary>
/// Deletes an order.
/// </summary>
/// <param name="key">The ID of the order to delete.</param>
/// <returns>It returns the deleted record detail</returns>
[HttpDelete("{key}")]
public IActionResult Delete(int key)
{
    var deleteRecord = OrdersDetails.GetAllRecords().FirstOrDefault(order => order.OrderID == key);
    if (deleteRecord != null)
    {
        OrdersDetails.GetAllRecords().Remove(deleteRecord);
    }
    return Json(deleteRecord);
}
You can find the complete sample for the ODataV4Adaptor in GitHub link.
Odata with custom url
The Syncfusion® ODataV4 adaptor extends support for calling customized URLs to accommodate data retrieval and CRUD actions as per your application’s requirements. However, when utilizing a custom URL with the ODataV4 adaptor, it’s Essential® to modify the routing configurations in your application’s route configuration file to align with your custom URL. You can invoke the custom URL by the following methods in the Datamanager
Configuring Custom URLs
To work with custom URLs for CRUD operations in the Syncfusion® Grid, you can use the following properties:
- insertUrl: Specifies the custom URL for inserting new records.
- removeUrl: Specifies the custom URL for deleting records.
- updateUrl: Specifies the custom URL for updating records.
- batchUrl: Specifies the custom URL for batch editing operations.
Ensure that the routing configurations on the server-side are properly updated to handle these custom URLs.
The following code example describes the above behavior.
var data = new ej.data.DataManager({
    url: 'https://localhost:xxxx/odata/orders', // xxxx denotes port number
    updateUrl: 'https://localhost:xxxx/odata/orders/Update', // custom URL to update the record
    insertUrl: 'https://localhost:xxxx/odata/orders/Insert', // custom URL to insert new record
    removeUrl: 'https://localhost:xxxx/odata/orders/Delete', // custom URL to delete the record
    adaptor: new ej.data.ODataV4Adaptor()
});
ej.grids.Grid.Inject(ej.grids.Toolbar, ej.grids.Edit);
var grid = new ej.grids.Grid({
    dataSource: data,
    toolbar: ['Add', 'Edit', 'Update', 'Delete', 'Cancel'],
    editSettings: { allowAdding: true, allowDeleting: true, allowEditing: true },
    columns: [
        { field: 'OrderID', headerText: 'Order ID', textAlign: 'Right', width: 120, isPrimaryKey: true, type: 'number' },
        { field: 'CustomerID', width: 140, headerText: 'Customer ID', type: 'string' },
        { field: 'EmployeeID', headerText: 'Employee ID', width: 140 },
        { field: 'ShipCountry', headerText: 'ShipCountry', width: 140 }
    ]
});

grid.appendTo('#Grid');
For batch editing, you can specify a custom batch URL as follows:
var data = new ej.data.DataManager({
    url: 'https://localhost:xxxx/odata/orders', // xxxx denotes port number
    batchUrl: 'https://localhost:xxxx/odata/orders/BatchUpdate', // custom URL for batch update
    adaptor: new ej.data.ODataV4Adaptor()
});
ej.grids.Grid.Inject(ej.grids.Toolbar, ej.grids.Edit);
var grid = new ej.grids.Grid({
    dataSource: data,
    toolbar: ['Add', 'Edit', 'Update', 'Delete', 'Cancel'],
    editSettings: { allowAdding: true, allowDeleting: true, allowEditing: true, mode: 'Batch' },
    columns: [
        { field: 'OrderID', headerText: 'Order ID', textAlign: 'Right', width: 120, isPrimaryKey: true, type: 'number' },
        { field: 'CustomerID', width: 140, headerText: 'Customer ID', type: 'string' },
        { field: 'EmployeeID', headerText: 'Employee ID', width: 140 },
        { field: 'ShipCountry', headerText: 'ShipCountry', width: 140 }
    ]
});

grid.appendTo('#Grid');